Mentions
Conversations linking to GitHub, newest first. Times are UTC.
Mentions by source
X
Bluesky
Hacker News
Lobsters
V2EX
Qiita
DEV
Mastodon
Latest posts
github.com/Mira-Cult/math/blob/29ac53dcb36f1f259e… Look at all these separate arguments for different ranges. I might formalize and simplify it later, but Sude's First Theorem is at the "Astra says it's right" stage. Still working on prime cubes and hypercubes for all dimensions.
AV2 decode speed: 5 decoders (dav2d, splot, avmdec, rav2d, rusty_av2d) benchmarked on x86 (AVX2) and Arm64 (NEON) I benchmarked five AV2 decoders, all at their 2 Nov HEAD, on 88 sample streams from 270p to 2048x1080. The machines were an i5-4590 (AVX2) and a Raspberry Pi 4B. Every decode was checked against the reference decoder, avmdec. Only dav2d and splot matched avmdec on all 88 streams; rav2d and rusty_av2d mostly failed or gave wrong output. On x86, dav2d is fast on 8-bit (2.4x avmdec on one thread) but slower than avmdec on 10-bit (0.63x), because its asm covers 10-bit much less. On the Pi, splot is fastest on one thread, while dav2d's NEON code gives it only about 1.3x over its own C build (about 4.5x for asm on x86). avmdec gets nothing from extra threads on single-tile streams. dav2d and splot get about 2-3.4x on 4 threads. At 1080p, only dav2d on the PC is clearly real-time. The full write-up, raw data and scripts are at the link. | 1 thread, vs avmdec | 8-bit | 10-bit | |---|---|---| | dav2d, PC | 2.44x | 0.63x | | splot, PC | 1.11x | 0.95x | | dav2d, Pi | 1.96x | 1.69x | | splot, Pi | 2.79x | 3.00x | | 1080p fps, 4 threads | | | | dav2d, PC | 85 | 27 | | splot, PC | 42 | 34 | | avmdec, PC | 14 | 12 | | splot, Pi | 9 | 9 | **Full report: github.com/EwoutH/AV2/tree/main/perf/2026-11-02-a… Decoders: - avmdec: AVM av2-enc d953d2e. - dav2d 9b5d2f6e. - rav2d 0.4.2 cf41e91. - rusty_av2d 9c8f6e6. - splot b682f58.
@takuto_yamana やはり念のため使用しないことにしました。 boobyreversi.flop.jp github.com/okuhara/edax-reversi-AVX/releases
CER 6.1% の日本語音声認識 Haas-ja-v1.0 で、認識0.3〜0.4秒・メモリ約710MBの Mac ローカル音声入力を作る 2026年10月、日本語音声認識モデル Haas-ja-v1.0 が公開されました。NVIDIA の Parakeet-TDT をベースに、予測ネットワークに Kimi Delta Attention(KDA)を採用したモデルです。開発元の asr-ja-bench v1.1 では、CER strict が6.12%で、開発元が評価したオープンモデルの中で最も低い値です。 公式実装は Linux と NVIDIA GPU を前提としていますが、10月31日に公開された C++ の推論ランタイム speech.cpp v0.9.3 が Haas に対応し、Apple Silicon の Mac でも動かせるようになりました。続いて、認識の高速化やカスタム語彙への対応も加わっています。 この記事では、speech.cpp と音声入力クライアントの OpenWhispr を組み合わせ、Haas を使ったローカル音声入力環境を Mac に作ります。手元の Apple M2 では、3〜8秒の発話を8回試したときの認識サーバーの処理時間は0.29〜0.41秒でした。技術用語を指定した表記で出すための辞書設定と、実際の使い心地も紹介します。 全体の構成は次の3段です。 検証環境は macOS 26、Apple M2(メモリ 16GB)、speech.cpp 0.10.0、OpenWhispr 1.11.0(2026年11月2日時点)です。メモリは footprint コマンドで測った speech serve の phys_footprint で、待機時に712MB、測定時点までの最大は750MBでした(中継スクリプトは約20MB)。 手元の録音2本で4モデルを試した結果 Haas-ja-v1.0 の公式 Python 実装は NVIDIA GPU(CUDA)専用ですが、speech.cpp が Apple Silicon の Metal バックエンドと Q8_0 量子化モデル(0.66GB)に対応しています。自分の普段の話し方でどのくらい認識できるかを見るため、手元の録音2本(12.9秒の1文と、48.0秒の6文)を speech.cpp で動く日本語対応の4モデルに入力して比べました(各1回の実測値です)。処理時間には CLI と常駐サーバーでの測定が混在するため、モデル間の厳密な速度比較ではありません。 モデル(すべて Q8_0) 48秒音声の処理時間(実時間比) 句読点 48秒、6文の認識結果 固有名詞の補正手段 Haas-ja-v1.0(指定なし) 0.68秒(約70倍速) 自然に入る 6文すべて出力。ただし「Haas→ハーズ」「OpenWhispr→オープンインスパー」「keywords.txt→キーワードテキスト」 なし Haas-ja-v1.0(keywords[] 指定) 0.68秒(約70倍速) 自然に入る 6文すべて出力。Haas、OpenWhispr、keywords.txt は指定した表記で出力。「精度→制度」「カタカナ→カカナ」などの誤りは残る keywords[](表記=読み) parakeet-tdt_ctc-0.6b-ja 1.01秒(約48倍速) 末尾の句点1つのみ 6文すべて認識するが、48秒間が読点なしの1文につながる なし reazonspeech-v2 1.22秒(約39倍速) なし 前半5文が消失し、最後の1文だけ出力された(VAD による無音分割が必須) なし qwen3-asr-0.6b(--prompt 指定) 3.92秒(約12倍速) 入る(文の途中で句点が入る箇所あり) 6文認識するが、プロンプトで渡した OpenWhispr が OpenWhisker に化け、「経由」が「議員」になる --prompt テスト用に読み上げた次の1文(12.9秒)に対する各モデルの出力は次のとおりです。 テスト発話:「OpenWhispr を一度終了し、t3 のプロセスにならないよう、Finder、LaunchServices 経由で独立したアプリとして起動し直しました」 Haas-ja-v1.0(キーワード登録前、0.40秒):オーブンミスパーを一度終了し、t3のプロセスにならないよう、ファインダー、各ランチサービス、経由で独立したアプリとして起動し直しました。 Haas-ja-v1.0(キーワード登録後、0.19秒):OpenWhisprを一度終了し、t3のプロセスにならないよう、ファインダー、LaunchServices、経由で独立したアプリとして起動し直しました。 parakeet-tdt_ctc-0.6b-ja(0.27秒):オープンウィスパーを一度終了しt3のプロセスにならないようファインダー各クランチサービス経由で独立したアプリとして起動し直しました。 reazonspeech-v2(0.56秒):国民スパを一度収容しt3のプロセスになる内容ファインダー各コランチサービス経由で独立したアプリとして激動し直しました。 qwen3-asr-0.6b(プロンプト指定あり、0.81秒):OpenWhispr を一度終了し、T3 のプロセスにならないよう Finder、各 LaunchServices 議員で独立したアプリとして起動し直しました。 素の状態ではどのモデルも OpenWhispr や Haas のような新しい固有名詞を外しました。違いが出たのは語彙を補正する方法です。4モデルのうち Haas-ja-v1.0 だけが、表記=読み1,読み2(例:OpenWhispr=オープンウィスパー,オープンインスパー,オーブンミスパー)の形で、デコード時に語彙を優先させられます。今回の2本では、語彙を指定しても処理時間は増えず、句読点も残りました。ただし語彙の指定は似た音の別の語を指定した表記に置き換えることもあり得ます。表記を直せることと句読点が入ることから、音声入力用のエンジンとして Haas-ja-v1.0 を選びました。 カーソル位置に文字を入力するクライアントは、自前の OpenAI 互換サーバーに接続できる OSS の中から OpenWhispr(MIT ライセンス、無料)を選びました。VoiceInk でも同じ構成で動作を確認できましたが、配布バイナリは7日間の試用後に25ドルの買い切りライセンスが必要です(Xcode でソースから自前ビルドすれば無料で全機能を使えます)。Handy は外部の文字起こしサーバーへの接続機能を持っていません。 中継スクリプトで吸収した仕様差 speech serve は OpenAI 互換の /v1/audio/transcriptions を提供しており、OpenWhispr も OpenAI 互換のセルフホストサーバーに対応しています。ただし直接つなぐと、次の2点が問題になりました。あわせて、長い音声の扱いも中継スクリプトで決めています。 1. 辞書パラメータ prompt が 400 で拒否される OpenWhispr はカスタム辞書を prompt フィールドに入れて送信します。一方 speech.cpp は、モデルが受け付けないフィールドを受け取ると、無視せずに 400 Bad Request を返します。speech serve --help にも、モデルが受け付けないオプションは拒否すると書かれており、意図された動作です。 {"error":{"message":"Haas-ja-v1.0 does not take the option prompt; leave it out","type":"invalid_request_error","param":"prompt","code":"unsupported_parameter"}} VoiceInk からつないだ場合も、毎回送る temperature=0 が同じ理由で 400 になります。またモデル名は、大文字で始まる Haas-ja-v1.0 以外は 404 になります。中継スクリプトでは file、language、response_format 以外のフィールドを除いてから転送しています。 2. テキスト補正が既定でオンのため /v1/chat/completions も呼ばれる OpenWhispr には、文字起こしのあとに LLM で文を整える「テキスト補正」があり、v1.11.0 では既定でオンです(src/stores/settingsStore.ts で useCleanupModel の既定値が true)。私の環境では、補正の送り先も文字起こしと同じセルフホストのサーバーになっていて、文字起こしのたびに /v1/chat/completions へリクエストが届きました。 speech serve は音声専用のサーバーで /v1/chat/completions を持たないため 404 を返し、発話のたびに「クリーンアップに失敗しました」という通知が表示されます。 対策は「言語モデル → ディクテーションのクリーンアップ」で「テキスト補正を有効にする」をオフにすることです。 設定がオンに戻っても通知が出ないよう、中継スクリプトでも /v1/chat/completions を受けるようにしました。OpenWhispr が送ってくる user メッセージは次のような形なので、<transcript> と </transcript> の内側にある認識テキストだけを抜き出してそのまま返しています。 <system-reminder>...(アカウント等のメタ情報)...</system-reminder> <transcript> こんにちは、こちら晴天です。 </transcript> Output only the cleaned transcript. 3. 長い音声だけ VAD で分割する(しきい値90秒) 長い音声を1回で渡すと文が抜けるモデルがあります(上の表の reazonspeech-v2 では前半5文が消えました)。そのため当初は30秒を超える音声に chunking_strategy=auto(silero-vad で無音区間ごとに分けて認識する指定)を付けていました。 しかし Haas-ja-v1.0 に48秒で6文の録音を渡して比べると、分割したほうが遅く、句読点の一部も消えました。 chunking_strategy=auto あり(0.85秒):認識の精度について、今回の音声は、プロキシのログがプロキシになっていましたカタカナの技術用語はHaasが苦手な場合がありますよく使う後はkeywords.txtに... 分割なし(丸ごと認識、0.68秒):認識の制度について、今回の音声はプロキシのログがプロキシになっていました。カカナの技術用語は、Haasが苦手な場合があります。よく使う語はkeywords.txtに... 手元の48秒の録音では分割せずに6文すべて出力されたため、しきい値は90秒に設定しました(環境変数 HAAS_CHUNK_SECONDS で調整できます)。 セットアップ手順 中継スクリプト(proxy.py)、カスタム語彙ファイルのテンプレート(keywords.txt)、launchd 登録スクリプト(setup.sh)は akitana-airtanker/haas-mac-dictation にまとめてあります。setup.sh は以下の手順1〜4と同じことをまとめて行います。setup.sh を使う場合は手順1〜4を飛ばして手順5へ、手作業で入れる場合は手順1から進めてください。どちらも Homebrew と Xcode Command Line Tools(git と /usr/bin/python3 に必要。xcode-select --install で入ります)が前提です。 brew install ffmpeg brew install --cask openwhispr git clone akitana-airtanker/haas-mac-dictation cd haas-mac-dictation ./setup.sh setup.sh は、~/.local/share/haas-dictation/proxy.py と ~/Library/LaunchAgents/ の2つの plist を上書きし、2つのサービスを登録し直します。keywords.txt は既にあれば上書きしません。 1. speech.cpp とモデルの取得 公式のインストールスクリプトで ~/.local/bin/speech にバイナリが入り、モデルも名前指定で取得できます。ここでは検証したバージョンの 0.10.0 を指定しています。このスクリプトは ~/.local/share/speech.cpp/ にある他のバージョンを削除し、~/.local/bin を PATH に加える行を ~/.zshrc などに書き足します。 curl -fsSL raw.githubusercontent.com | sh -s -- --version 0.10.0 export PATH="$HOME/.local/bin:$PATH" speech pull haas-ja-v1.0 speech pull silero-vad 確認:両方のモデルで checked its SHA-256 が表示されれば完了です。 2. speech serve 単体での動作確認 ポート 8080 でサーバーを起動し、Web UI または curl で認識できるか確かめます。 speech serve haas-ja-v1.0 silero-vad --host 127.0.0.1 --port 8080 ブラウザで 127.0.0.1 を開くか、別ターミナルから WAV ファイルを POST すると認識結果が返ります。確認したら Ctrl + C で止めます(手順4で常駐させます)。 3. 中継スクリプト(proxy.py)と語彙ファイルの配置 ~/.local/share/haas-dictation/ を作り、proxy.py と keywords.txt を置きます。OpenWhispr の再試行機能などは WebM/Opus 形式で音声を送るため、WAV 以外の音声が来たときは ffmpeg(brew install ffmpeg)で 16kHz モノラル WAV に変換してから speech serve に渡しています。 mkdir -p ~/.local/share/haas-dictation ~/.local/share/haas-dictation/keywords.txt には固有名詞の表記と読みを書きます。 1行に1語。「書き方=読み1,読み2」 Claude Code=クロードコード OpenWhispr=オープンウィスパー,オープンインスパー,オーブンミスパー Haas=ハース,ハウズ GitHub=ギットハブ,リットハグ LaunchServices=ランチサービス,各ランチサービス keywords.txt=キーワードテキスト ~/.local/share/haas-dictation/proxy.py は Python 標準ライブラリだけで動作します(GitHub リポジトリの proxy.py と同じ内容です)。認識結果は既定ではログに残しません。確認のために残したいときだけ、環境変数 HAAS_LOG_TEXT=1 を指定します。 proxy.py の全文#!/usr/bin/env python3 """OpenAI 互換の文字起こしクライアント (VoiceInk など) と speech.cpp の間の中継。 - speech.cpp が拒否する項目 (temperature, model, stream など) を落とす - keywords.txt の語彙を keywords[] として足す (Haas のカスタム語彙) - 長い音声 (CHUNK_SECONDS 超) だけ chunking_strategy=auto を足し、silero-vad の区間ごとに認識させる (短い音声は丸ごとの方が句読点が正確。長い一括は文が抜けることがある) 標準ライブラリだけで動く。 """ import json import os import subprocess import sys import tempfile import time import uuid import urllib.error import urllib.request from email.parser import BytesParser from email.policy import HTTP from http.server import BaseHTTPRequestHandler, ThreadingHTTPServer HERE = os.path.dirname(os.path.abspath(file)) UPSTREAM = os.environ.get("HAAS_UPSTREAM", "127.0.0.1") PORT = int(os.environ.get("HAAS_PROXY_PORT", "8081")) KEYWORDS_FILE = os.environ.get("HAAS_KEYWORDS", os.path.join(HERE, "keywords.txt")) FFMPEG = "/opt/homebrew/bin/ffmpeg" if os.path.exists("/opt/homebrew/bin/ffmpeg") else "ffmpeg" PASS = {"file", "language", "response_format"} CHUNK_SECONDS = float(os.environ.get("HAAS_CHUNK_SECONDS", "90")) 認識結果は機密を含み得るため、既定ではログに残さない。HAAS_LOG_TEXT=1 のときだけ記録する。 LOG_TEXT = os.environ.get("HAAS_LOG_TEXT") == "1" def ensure_wav(data, filename): """RIFF WAVE 以外で、中身が空でなければ ffmpeg で 16kHz mono PCM WAV に変換する。""" if data[:4] == b"RIFF" and data[8:12] == b"WAVE": return data, filename or "audio.wav", "audio/wav", False if not data or all(b == 0 for b in data[:64]): return data, filename or "audio.wav", "audio/wav", False try: with tempfile.NamedTemporaryFile(suffix=".wav") as tmp: p = subprocess.run( [FFMPEG, "-hide_banner", "-loglevel", "error", "-y", "-i", "pipe:0", "-ac", "1", "-ar", "16000", "-c:a", "pcm_s16le", tmp.name], input=data, stdout=subprocess.PIPE, stderr=subprocess.PIPE, timeout=30 ) if p.returncode == 0: wav = tmp.read() if wav[:4] == b"RIFF": return wav, "audio.wav", "audio/wav", True except Exception: pass return data, filename or "audio.wav", "audio/wav", False def wav_seconds(data): """RIFF の fmt と data チャンクから長さを求める。読めなければ None。""" if data[:4] != b"RIFF" or data[8:12] != b"WAVE": return None i, rate_bytes = 12, None while i + 8 <= len(data): cid, size = data[i:i + 4], int.from_bytes(data[i + 4:i + 8], "little") if cid == b"fmt ": rate_bytes = int.from_bytes(data[i + 16:i + 20], "little") # byte rate elif cid == b"data" and rate_bytes: return min(size, len(data) - i - 8) / rate_bytes i += 8 + size + (size & 1) return None def parse_keywords(text): lines = (l.strip() for l in text.splitlines()) return [l for l in lines if l and not l.startswith("#")] def keywords(): try: with open(KEYWORDS_FILE, encoding="utf-8") as f: return parse_keywords(f.read()) except FileNotFoundError: return [] def extract_transcript(body): text = "" try: req = json.loads(body.decode("utf-8")) for m in reversed(req.get("messages", [])): if m.get("role") == "user": c = m.get("content", "") text = c if isinstance(c, str) else "".join(p.get("text", "") for p in c if isinstance(p, dict)) break except Exception: pass s, e = text.rfind("<transcript>"), text.rfind("</transcript>") if s != -1 and e > s: text = text[s + len("<transcript>"):e] return text.strip() def parse(ctype, body): msg = BytesParser(policy=HTTP).parsebytes( b"Content-Type: " + ctype.encode() + b"\r\n\r\n" + body) for part in msg.iter_parts(): yield part.get_param("name", header="content-disposition"), part def rebuild(ctype, body, kws=None, to_wav=None): kws = keywords() if kws is None else kws to_wav = to_wav or ensure_wav boundary = "haas-" + uuid.uuid4().hex out = bytearray() def add(name, data, filename=None, ptype=None): disp = f'form-data; name="{name}"' + (f'; filename="{filename}"' if filename else "") out.extend(f"--{boundary}\r\nContent-Disposition: {disp}\r\n".encode()) if ptype: out.extend(f"Content-Type: {ptype}\r\n".encode()) out.extend(b"\r\n" + data + b"\r\n") dropped, seconds = [], None for name, part in parse(ctype, body): if name not in PASS: dropped.append(name) continue data = part.get_payload(decode=True) or b"" if name == "language" and data.strip() not in (b"ja", b"auto"): dropped.append("language") # Haas は ja だけ continue if name == "file": data, fname, ptype, transcoded = to_wav(data, part.get_filename()) if transcoded: dropped.append("(ffmpeg->wav)") seconds = wav_seconds(data) add(name, data, fname, ptype) continue add(name, data, part.get_filename(), part.get_content_type() if part.get_filename() else None) for kw in kws: add("keywords[]", kw.encode()) if seconds and seconds > CHUNK_SECONDS: add("chunking_strategy", b"auto") dropped.append(f"(chunked {seconds:.0f}s)") out.extend(f"--{boundary}--\r\n".encode()) return f"multipart/form-data; boundary={boundary}", bytes(out), dropped class Handler(BaseHTTPRequestHandler): def _forward(self, method, path, body=None, ctype=None): req = urllib.request.Request(UPSTREAM + path, data=body, method=method) if ctype: req.add_header("Content-Type", ctype) try: with urllib.request.urlopen(req, timeout=300) as r: status, headers, data = r.status, r.headers, r.read() except urllib.error.HTTPError as e: status, headers, data = e.code, e.headers, e.read() except urllib.error.URLError as e: status, headers = 502, {} data = ('{"error":{"message":"speech serve に接続できません: %s"}}' % e.reason).encode() self.send_response(status) self.send_header("Content-Type", headers.get("Content-Type", "application/json")) self.send_header("Content-Length", str(len(data))) self.end_headers() self.wfile.write(data) return status, data def do_GET(self): self._forward("GET", self.path) def do_POST(self): body = self.rfile.read(int(self.headers.get("Content-Length", 0))) ctype = self.headers.get("Content-Type", "") if self.path.rstrip("/").endswith("/audio/transcriptions") and ctype.startswith("multipart/"): ctype, body, dropped = rebuild(ctype, body) status, data = self._forward("POST", "/v1/audio/transcriptions", body, ctype) detail = data[:200].decode(errors="replace") if LOG_TEXT else f"({len(data)} bytes)" sys.stderr.write(f" dropped={dropped} -> {status} {detail}\n") elif self.path.rstrip("/").endswith("/chat/completions"): OpenWhispr のテキスト補正がこのサーバーに向いた場合は、<transcript> の中身をそのまま返す text = extract_transcript(body) resp = json.dumps({ "id": "chatcmpl-passthrough", "object": "chat.completion", "created": int(time.time()), "model": "passthrough", "choices": [{"index": 0, "message": {"role": "assistant", "content": text}, "finish_reason": "stop"}], }, ensure_ascii=False).encode("utf-8") self.send_response(200) self.send_header("Content-Type", "application/json") self.send_header("Content-Length", str(len(resp))) self.end_headers() self.wfile.write(resp) sys.stderr.write(f" chat/completions passthrough ({len(text)} chars)\n") else: self._forward("POST", self.path, body, ctype) if name == "main": print(f"haas proxy on http://127.0.0.1:{PORT} -> {UPSTREAM}", file=sys.stderr) ThreadingHTTPServer(("127.0.0.1", PORT), Handler).serve_forever() 4. launchd による常駐化 ログイン時に自動起動し、異常終了時に再起動するよう ~/Library/LaunchAgents/ に2つの plist を置きます。 D=$HOME/.local/share/haas-dictation LA=$HOME/Library/LaunchAgents mkdir -p "$LA" cat > "$LA/local.haas.speech-serve.plist" <<EOF <?xml version="1.0" encoding="UTF-8"?> <!DOCTYPE plist PUBLIC "-//Apple//DTD PLIST 1.0//EN" "apple.com"> <plist version="1.0"><dict> <key>Label</key><string>local.haas.speech-serve</string> <key>ProgramArguments</key><array> <string>$HOME/.local/bin/speech</string><string>serve</string> <string>haas-ja-v1.0</string><string>silero-vad</string> <string>--host</string><string>127.0.0.1</string><string>--port</string><string>8080</string> </array> <key>RunAtLoad</key><true/><key>KeepAlive</key><true/> <key>StandardErrorPath</key><string>$D/serve.log</string> <key>StandardOutPath</key><string>$D/serve.log</string> </dict></plist> EOF cat > "$LA/local.haas.proxy.plist" <<EOF <?xml version="1.0" encoding="UTF-8"?> <!DOCTYPE plist PUBLIC "-//Apple//DTD PLIST 1.0//EN" "apple.com"> <plist version="1.0"><dict> <key>Label</key><string>local.haas.proxy</string> <key>ProgramArguments</key><array> <string>/usr/bin/python3</string><string>$D/proxy.py</string> </array> <key>RunAtLoad</key><true/><key>KeepAlive</key><true/> <key>StandardErrorPath</key><string>$D/proxy.log</string> <key>StandardOutPath</key><string>$D/proxy.log</string> </dict></plist> EOF launchctl bootstrap gui/$(id -u) "$LA/local.haas.speech-serve.plist" launchctl bootstrap gui/$(id -u) "$LA/local.haas.proxy.plist" 確認:launchctl list | grep haas で2行表示され、curl -s 127.0.0.1 に Haas-ja-v1.0 が含まれていれば稼働しています。 5. OpenWhispr のインストールと設定 冒頭でインストールしていなければ Homebrew でインストールし、Finder または Dock から起動します。 brew install --cask openwhispr ! 私の環境では、T3 Code(ターミナルを内蔵したアプリ)から OpenWhispr のバイナリを直接起動したとき、録音しても音が入りませんでした。macOS の tccd のログには次の行が出ていました。 service: kTCCServiceMicrophone requires entitlement com.apple.security.device.audio-input but it is missing for responsible={identifier=t3, ...}, accessing={identifier=com.gizmolabs.openwhispr.helper}; access to kTCCServiceMicrophone denied macOS はマイクの許可を、OpenWhispr ではなく起動元のアプリ(ここでは t3)について判定し、起動元に com.apple.security.device.audio-input の entitlement がないため拒否していました。Finder から起動し直すと録音できました。 設定画面の「音声認識」で「セルフホスト」を選び、サーバー URL に 127.0.0.1 Haas-ja-v1.0 を入力します。 「ホットキー」でディクテーション用のキー(図では Ctrl + S)を設定します。 初回録音時に macOS のマイク権限とアクセシビリティ権限を求められたら許可します。 確認:任意の入力欄で設定したホットキー(Ctrl + S など)を押して話し、~/.local/share/haas-dictation/proxy.log に POST /v1/audio/transcriptions HTTP/1.1" 200 が記録されてテキストが入力されれば完成です。認識が崩れた固有名詞は keywords.txt に追記して保存するだけで、プロセス再起動なしに次の発話から反映されます。 実際に動かして確認したこと 日常的に使ううえで気になった点も手元で確かめました。 音声データの通信先:OpenWhispr で8回話すあいだ、プロセスの通信先を lsof で記録しました。音声データは 127.0.0.1:8081 の中継スクリプトから 127.0.0.1:8080 の speech serve へ渡されます(これとは別に、OpenWhispr 本体から Vercel のアドレスへの接続が2本あり、通信量は数KBでした)。 ログの扱い:speech serve のログ(serve.log)には認識本文は記録されず、起動情報や音声の秒数、テキストのバイト数、処理時間などが記録されます。中継スクリプト(proxy.log)も既定では認識テキストを出力しないようにしてあります(デバッグ時のみ HAAS_LOG_TEXT=1 で先頭200バイトを記録できます)。 メモリ使用量:speech serve が待機時に約710MB、中継スクリプトが約20MB、OpenWhispr 本体が約99MBです(OpenWhispr の別機能でローカル LLM を有効にしている場合は、追加で llama-server のメモリが乗ります)。 処理時間のばらつき:3〜8秒の発話8回では speech serve の処理時間は0.29〜0.41秒でした。モデル読み込み直後の初回や、しばらく間を空けたあとに数秒かかることがありますが、続けて話す場面では0.3秒前後で返ってきます。 おわりに これまでローカルの音声認識は「句読点が入らない」「新しい技術用語がカタカナに崩れる」という小さなストレスがあり、結局キーボードで打ち直すことが少なくありませんでした。 Haas-ja-v1.0 を speech.cpp で常駐させてみて一番ありがたかったのは、句読点が自然に入ることと、「あ、この単語が化けたな」と思ったその場で keywords.txt に 表記=読み を1行足せば、再起動も待たずに次の発話から狙いどおりの綴りで出てくるところです。エディタやターミナル、ブラウザを行き来しながら、思いついたことをすぐ声で流し込めるようになりました。 OpenWhispr と speech.cpp の間には少しだけパラメータの仕様差がありますが、約200行の Python スクリプト1枚で吸収できます。Apple Silicon の Mac をお持ちなら、まずは speech serve 単体の Web UI(手順2)だけでも認識の速さと句読点の自然さを体感できるので、ぜひ試してみてください。
github.com/lodestone-rock/anthropic-prospectus-an… much easier to read without the fluff now
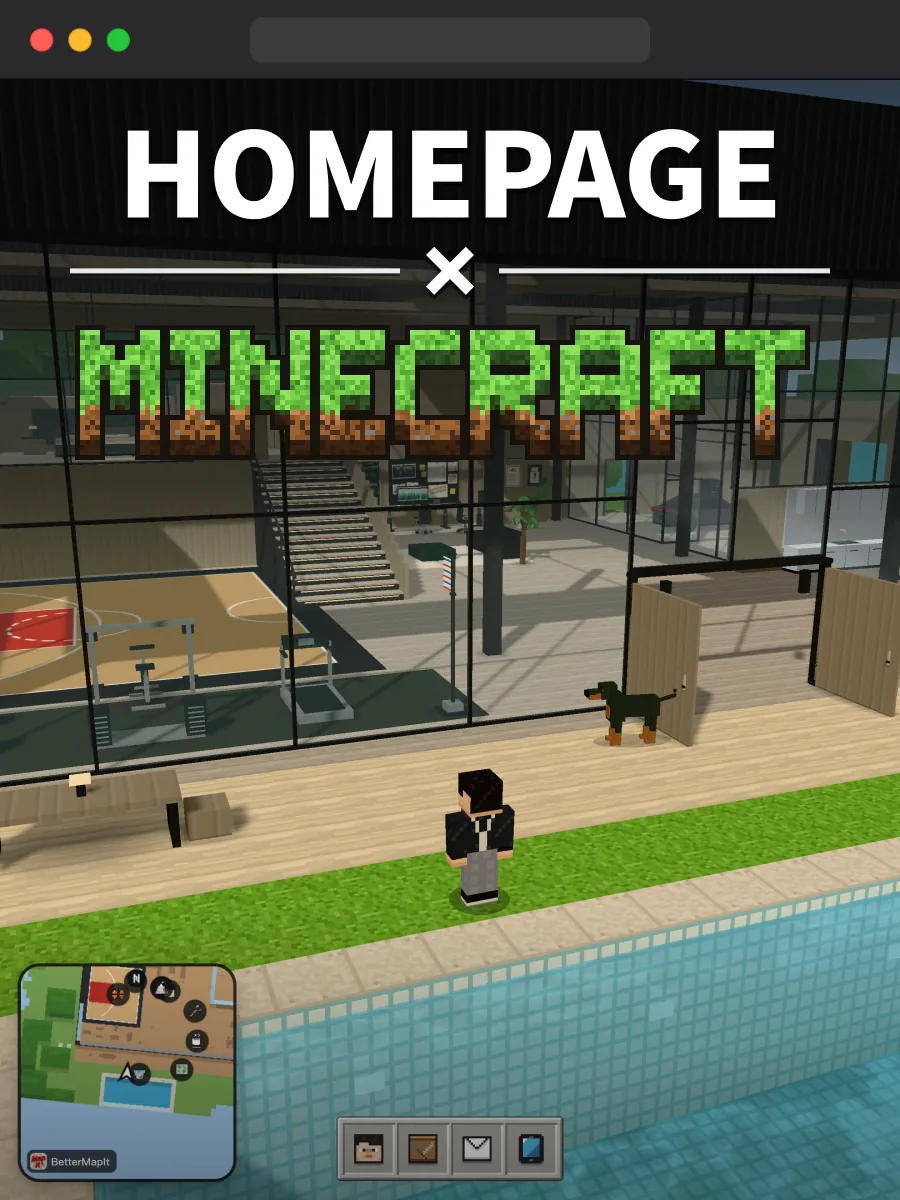
🔨 Homecraft: a Minecraft-style personal website you can walk through 🔨Homecraft: a Minecraft-style personal website you can walk through !homecraft Demo: terryhu.cn Open source: terryHu7/homecraft I've always enjoyed building and customizing websites, but even after trying one template after another, I still felt constrained. Inspired by Minecraft, The Matrix and the metaverse, I used AI to turn my personal website from a 2D page into a 3D world. You can explore it freely. I've built a basketball court, a gym and a workbench, and added a day–night cycle and a weather system. You can also embed regular web pages and open them by pressing F. The block-based graphics keep rendering demands low, so the site works on phones too. Exploring the site feels like visiting a friend's home. Compared with a traditional website, it may be a more memorable way to get to know someone. Once you get used to this kind of personal website, it's hard to go back…
日本のデモでsignal使われ始めたみたいだけど、現場でbitchatも試してほしいな。 ネパールのデモで活躍した、Bluetoothでインターネットを使わずに通信するチャットアプリ。暗号化されててテレメトリもない。 イランでネット遮断があったときにも流行ったみたい。 permissionlesstech/bitchat
Built an open-source async standup app you can self-host (Docker, AGPL-3.0) Our team's standups kept landing at a bad hour for someone, so I built a self-hosted tool to skip the live call entirely. How it works: 1. Each person records a ~2-minute video/audio update when their day starts (or types it). 2. The audio is transcribed, and an LLM extracts Yesterday / Today / Blockers. 3. It remembers your previous update, ticks off completed tasks, and tags mentioned teammates. 4. The team reads or watches the check-ins asynchronously in their own morning. Self-Hosting & Tech Stack: - Single docker-compose setup: Postgres, MinIO (video/audio storage), Node/App engine, lightweight scheduler for reminders, Caddy for HTTPS, and automated daily DB backups. - AGPL-3.0 License — All features unlocked out of the box, zero telemetry, no license keys, no limits. Current Caveats (v0.1): - Auth: Magic links currently route through Resend (or Google OAuth). Plain SMTP is not implemented yet. - AI Provider: Uses Groq (Whisper + Llama) for transcription and drafting. Without an API key, video uploads still work and team members type check-ins manually. Local Whisper is on the roadmap (the provider is interface-driven). - Privacy & Architecture: Media files upload directly from the browser into your MinIO bucket (bypassing the app server). Transcripts and summaries are encrypted at rest in Postgres. Full Disclosure: A significant chunk of the codebase was generated with Claude Code (visible in the Git history). I review, test, and run everything myself, but I prefer full transparency. - GitHub:codeaz-org/asincly - Setup Guide: docs/DEPLOYMENT.md inside the repo (includes a hosted demo link if you just want to test the UI). A question for team leads & devs: Would your team actually record quick 2-minute videos, or would everyone inevitably default to typing? That’s the core assumption I’m looking to validate.
I've started to use a custom bookmarklet for this. If I like something I read or watched, I 'pick' it with the bookmarklet, add my thoughts, and categorise it. The script then checks if it's on the Internet Archive, if not it tries to archive the site, and then save it to my public repo, which then my personal website shows under /library. Repo link, if anyone is interested: karthikeyankc/picks
GO言語製のメールクライアント、ZDNET で紹介されてるな… GitHub - hkdb/aerion: An Open Source Lightweight E-Mail Client · GitHub hkdb/aerion I have a new favorite Linux email client in 2026 - and I've tested them all - ZDNET zdnet.com
让 AI 清理一批单元测试,没想到 GPT 吭哧吭哧一共跑了 8 个多小时,算上没开源的一共删了 15 万行的测试。 Lody#2268 t.co
skills#278 (by someone else) quite ridiculous—just skim its first two comments, absurd amounts of unnecessary detail and a preposterous solution, all very obviously slop. All that needed to be said was “cloning repositories can take arbitrarily long, so putting a 60 second timeout is obviously wrong”. The rest is worse than posturing. Rather like the issue, this article is written in a tedious style which sure looks sloppy, and I disagree with parts of its conclusions. > The thing is, timeouts need to exist. Infinite waits are bad. Hanging processes are bad. I’m not arguing against timeouts. Since the author won’t, I will. The skills case shouldn’t have a timeout at all: it’s the wrong place and the wrong thing. You rather want to check if it’s still working, and Git has that handled. The problematic case is if it can get stalled waiting for authentication, and I’m not convinced that can happen in a way that needs to be catered for. If it’s interactive, the user will observe the authentication prompt and so the timeout cutting them off is wrong, and if it’s not interactive then it should fail immediately. I’m inclined to presume it’s slop-style cargo-culting (in which area Chesterton’s fence is an increasingly unreliable rubric). As for the Docker Gordon case, well, for a human tool I’d just say there shouldn’t be any timeout, it’s obviously dumb, the human will observe if things aren’t working as expected and interrupt it. For AI nonsense, well, this sounds to me like the wrong way to apply a timeout. I would rather expect it to throw an LLM at it and its logs or something to apply judgement like the human would, to see if it seems like it’s not working or stuck and interrupt it. A hard timeout is obviously idiotic, but a timeout at all feels from the wrong era of computing for such a thing.
@Rime_Nan 使用的是这个项目,有兴趣可以看下 OpenDCAI/gugu
From a cube of mirrors to common scale normalizers: an invitation to review a relational approach to gravity (G–01) I'd like to invite a mathematical and physical review of G–01, a thread of the Relational Geometry Program. The starting experiment is a cube of mirrors with a moving wall. We ask what happens to a system's references when its images are projected at different scales, and which relations can still be reconstructed when those projections acquire a common reference. The proposed sequence is reflection → difference → projection → common normalizer → referenced remainder → self-contained closure → continuation. The gravitational hypothesis is that a physical realization of this process could determine how geometry changes between systems. Acceleration would then be read from that geometry and its clocks, rather than chosen as the starting law. There is a precise mathematical part to examine: - O40: for integer scale references, L = lcm(N,m) gives a minimal common representation. For example, 1/2 = 3/6 and 1/3 = 2/6: the values remain distinguishable even after their scales become comparable. - O58: one declared closure model uses a² + b² + 1 = N². Its normalized remainder is 1/N², and a new closure can preserve the previous reference while reorganizing that remainder. - G–01 v1.3: the same identity is N² − a² − b² = 1, describing integer points on a Minkowski hyperboloid. The manuscript studies integer Lorentz transformations, a tree of continuations, and the limiting cone. We use C to name the inaccessible horizon of comparison in this model, not an additional observer. The physical question is whether a dynamically selected common normalizer and its residual relations can induce observer-independent length and clock observables. The passage from these exact mathematical structures to gravitation remains an open research step. What would be particularly valuable to review? The proof and scope of the integer continuation tree; the relation of this construction to known hyperbolic and number-theoretic results; whether finite-resolution normalization has the required mathematical properties; and, above all, a concrete criterion or counterexample distinguishing physical evolution from a change of representation. The program also explores the same language of references and closures in Navier–Stokes, Yang–Mills, and computational complexity, with distinct mathematical contracts in each field. I would welcome corrections or references to prior work, especially on the common mechanism rather than any single resemblance. Project overview: link to the Repo G–01 v1.3 manuscript: available to share; direct PDF link to be added once uploaded. Curiosity and a specific objection are equally welcome.
@CuiKh82013 使用的是这个项目,有兴趣可以看下 OpenDCAI/gugu
Geometric and algebraic inference in humans and neural networks Jacob Russin, Joonhwa Kim, Ellie Pavlick, Michael J. Frank arxiv.org [𝚚-𝚋𝚒𝚘.𝙽𝙲 𝚌𝚜.𝙰𝙸 𝚌𝚜.𝙲𝙻 𝚌𝚜.𝙻𝙶] 💬Code: jlrussin/geometric-algebraic-ti-transformers, t.co
I created go-winplugin: Runtime plugin loading for Go on Windows Hi everyone, I recently released go-winplugin, an open-source project that provides runtime plugin support for Go on Windows. One limitation I've always found frustrating is that Go's official plugin package doesn't support Windows. This makes it difficult to build extensible applications that load functionality at runtime. go-winplugin works by: - Parsing Go packages using AST - Generating CGO bridge wrappers - Building shared libraries (.dll) - Dynamically loading and executing exported Go functions Current features: - Windows runtime plugin support - Multi-file plugin support - Package-wide analysis - Struct detection - Symbol caching - Plugin sandbox validation - Automatic GCC/MSYS2 setup Latest release: v0.3.0 Repository: RamanSharma100/go-winplugin Package: pkg.go.dev I'd appreciate feedback on the architecture, API design, and potential use cases.
使用的是这个项目,有兴趣可以看下 OpenDCAI/gugu
It's called Lemo-Opuscar. Free and open-source (MIT), 10.4k stars. lemomo-ai/lemo-opuscar Heads up: one film takes the agent ~30–60 min and a fair amount of tokens. Demo films by LemoLab (CC BY 4.0).
برای زمانی که اینترنت ها رو قطع کنن یه هوش مصنوعی لوکال خیلی به کار میاد تلگرام :t.me Edge Gallery play.google.com PocketStrike github.com/AbuZar-Ansarii/PocketStrike/releases t.co
apalis-dev/rivium-challenge Most of the submissions are generic and literal copy pastas of the initial submissions. These ideas scream "I shared this repo with Claude and asked it for ideas" I did the same thing and got the same suggestions across different LLMS
Repo: vercel-labs/agent-desktop Quick correction: it's already past 9,500 stars ⭐ It grew faster than I could say it. If you try it, use a spare user account first. It acts with your real logins. YES or NO: would you let it drive your computer? 👇
Geht es euch auch auf die Nerven, dass euch KuK auf eduki und etsy Geld aus der Tasche ziehen, weil ihr Kalenderblätter für Tablet/E-Reader als PDF haben wollt? Hier ist die offene Lösung zum Generieren und Anpassen. Viel Spaß! #bluelz #schule #eduki #opensource bephial/eCalendar
@RockWitNoRoll its not too hard to setup katboi01/UmaViewer
先日、自宅テレビがAndroid TVに変わったので、Komorebi ( BeerEgg2001/Komorebi ) をインストールしてKonomiTVと連携してみたんだけど、とんでもなく高機能なアプリでビックリした。
@TheDarkEnjoyer If you're curious, the actual shader math for the blend modes is here: github.com/AyagamiDev/ayagami/blob/main/ayagami-r… It's a bit messy but that's not the issue. The issue is how to hook it up into the actual rendering efficiently, which can end up with lots of complexity in the renderer code.
what i read: the broker script github.com/Jakeschincariol/day-trader-skill/blob/… the tsla example and the "coin flip" numbers are in the readme of the repo above
几十万文件里找一个旧工程,系统搜索转半分钟,第三方工具建索引要一整晚。 FSearch 自建文件名索引,打字秒出,支持通配符/正则/按时间大小路径过滤,可定时更新。 cboxdoerfer/fsearch
If you run Caddy or any internet-facing go binary on Ubuntu or RHEL-like, i would implore you to apply these mitigations: typhoon1217/cve-2026-98432-mitigation
A first look at the updated car list for Driver San Francisco (ft. 567 cars from Forza Motorsport 4 and Forza Horizon 1). driversf-forza by xob0t: xob0t/driversf-forza #DriverSanFrancisco #DriverSF #DSF #ForzaMotorsport4 #FM4 #ForzaHorizon1 #FH1 #ForzaShare t.co
Cybersecurity resources for different domains github.com/m14r41/PentestingEverything/tree/main t.co
I've been daily driving my own browser on Omarchy, and the beta is out I've been building a browser called ilo and using it on Omarchy, tiled in Hyprland. It has a sidebar, Spaces, pinned and Today tabs, a command bar on Ctrl+T and split view. It's at 0.1.2 now, and Linux is in beta. The latest release added little ilo, a small window for a quick page, and peek, which opens a shift-clicked link as a card over the page you're on. It's a Flatpak and runs natively on Wayland: flatpak install --user github.com/MartinPTielemans/ilo/releases/latest/d… It's Chromium underneath (ungoogled-chromium), so Chrome extensions install from the Web Store, and the full uBlock Origin is built in. No analytics, crash reports only if you say yes. It's GPL-3.0. I build it with coding agents, and agents can work in it too: over a built-in MCP server, in a Space of their own, off until you turn it on. They can't read your cookies or saved logins or type into password fields. It's a first beta and there are gaps: ilo#454 MartinPTielemans/ilo If it misbehaves on your setup, an issue on GitHub would help.
Another pdf converter? Here's my version of it. Introducing Unpaper, a small project I built with @claudeai using Claude Code. Simple, privacy-first, with a clean and nostalgic desktop-inspired UI. Built with AI. Doesn't use AI. Check out the project: prithikalambore/unpaper t.co
Compared tree ensembles in Module 6 of #mlzoomcamp. 🌳 Decision tree 🌲 Random forest ⚡ XGBoost 📉 Tuned the validation RMSE My repo: github.com/ashuzzz151/machine-learning-zoomcamp-h… t.co
@tomdabassman Eine kuratoerte Liste findet sich auf dem europäischen GitHub: OpenLLM-Europe/European-OpenLLM-Projects
the skill is already live, free (all u need is a Claude subscription) Theoxmotion/moment-reel -> drop it in ur Claude Code skills folder -> say "make a moment reel of Zidane's 2002 volley" -> Claude checks the facts, writes it and draws every shot
我都没注意到 NSH 能有这么低的资源占用。 longbridge/nsh
امتحان کنید بپرسید: «دیجیکالا جای خوبیه برای کار؟» «حقوق حسابدار در تهران چقدر است؟» «الان کدوم حوزهها بیشترین استخدام رو دارن؟» بدون API key و اکانت: uvx iran-jobs-mcp ⭐ sepehr071/iran-jobs-mcp 📚 بقیهی MCPهای ایرانی: sepehr071/iran-mcp
还在花钱买带水印的教材 PDF?这份资源可能直接帮你省下一大笔钱 GitHub 上有开发者整理了「ChinaTextbook」项目,覆盖国内小学、初中、高中到大学多个阶段的教材资源 全部为高清无水印 PDF,支持免费下载,查教材、备课、复习都很方便 项目地址 TapXWorld/ChinaTextbook
I catalogued 217 game asset packs — here is what is actually inside I spent a weekend cataloguing 217 game asset packs. Here is what is actually inside them — file counts, formats, and which ones are worth your time. Why bother Asset hunting is the worst part of starting a project. You open 40 tabs, download 12 zips, and half of them are 2012-era sprite sheets with no license file. So I pulled the whole set into one place and measured what is really there. The numbers - 217 packs, ~465 MB compressed - 2D art: 146 packs - 3D models: 50 packs - UI kits: 17 packs - Audio: 10 packs - Textures: 10 packs File formats I found across the catalog: PNG, SVG, OBJ, FBX, glTF, OGG, WAV, TTF, TMX/TSX, Aseprite source. What the sizes actually mean A 0.2 MB pack can still be great — Pixel Platformer is 252 files in 250 KB, because pixel art compresses well. Meanwhile some 14 MB packs are mostly palette textures, not models. Rule of thumb I ended up with: - Under 1 MB — usually pixel art or icons. Great for jams. - 1–5 MB — the sweet spot: platformer kits, UI packs, low-poly props. - 5–15 MB — 3D kits and audio packs, or 1,000+ file art packs. Format notes worth knowing before you buy anything 2D packs almost always ship spritesheets plus individual PNGs. Check whether individual sprites are included — slicing a spritesheet yourself is a day of work you do not get back. 3D kits vary wildly. The good ones ship OBJ + glTF + FBX + a texture folder. The bad ones ship OBJ only and no materials. UI packs with SVG sources are worth 2–3× more than PNG-only ones, because you can restyle them without re-exporting. Audio packs in OGG + WAV are the practical combo: OGG for the build, WAV for editing. License check Everything I catalogued is CC0 — commercial use allowed, attribution not required. That matters more than the art quality: an unclear license will burn a week of legal review when you ship. How I organize it now Five folders, matching the categories above, with the pack name and file count in the folder name. Preview image next to each. When I start a prototype I copy the whole folder, not individual files. Open data I published the index itself if you want to browse or build on it: - awesome-game-assets — curated list of free and commercial asset sources, with license notes - game-assets-catalog — the 217-pack catalog as JSON (title, price, URL) If you want to skip the hunting, I put the catalog online with instant downloads and crypto checkout (no account, no KYC): → clr.sell.app No subscription, no DRM. Take the free samples first if you want to test the quality. What is your go-to source for game assets? Always looking for packs I missed.
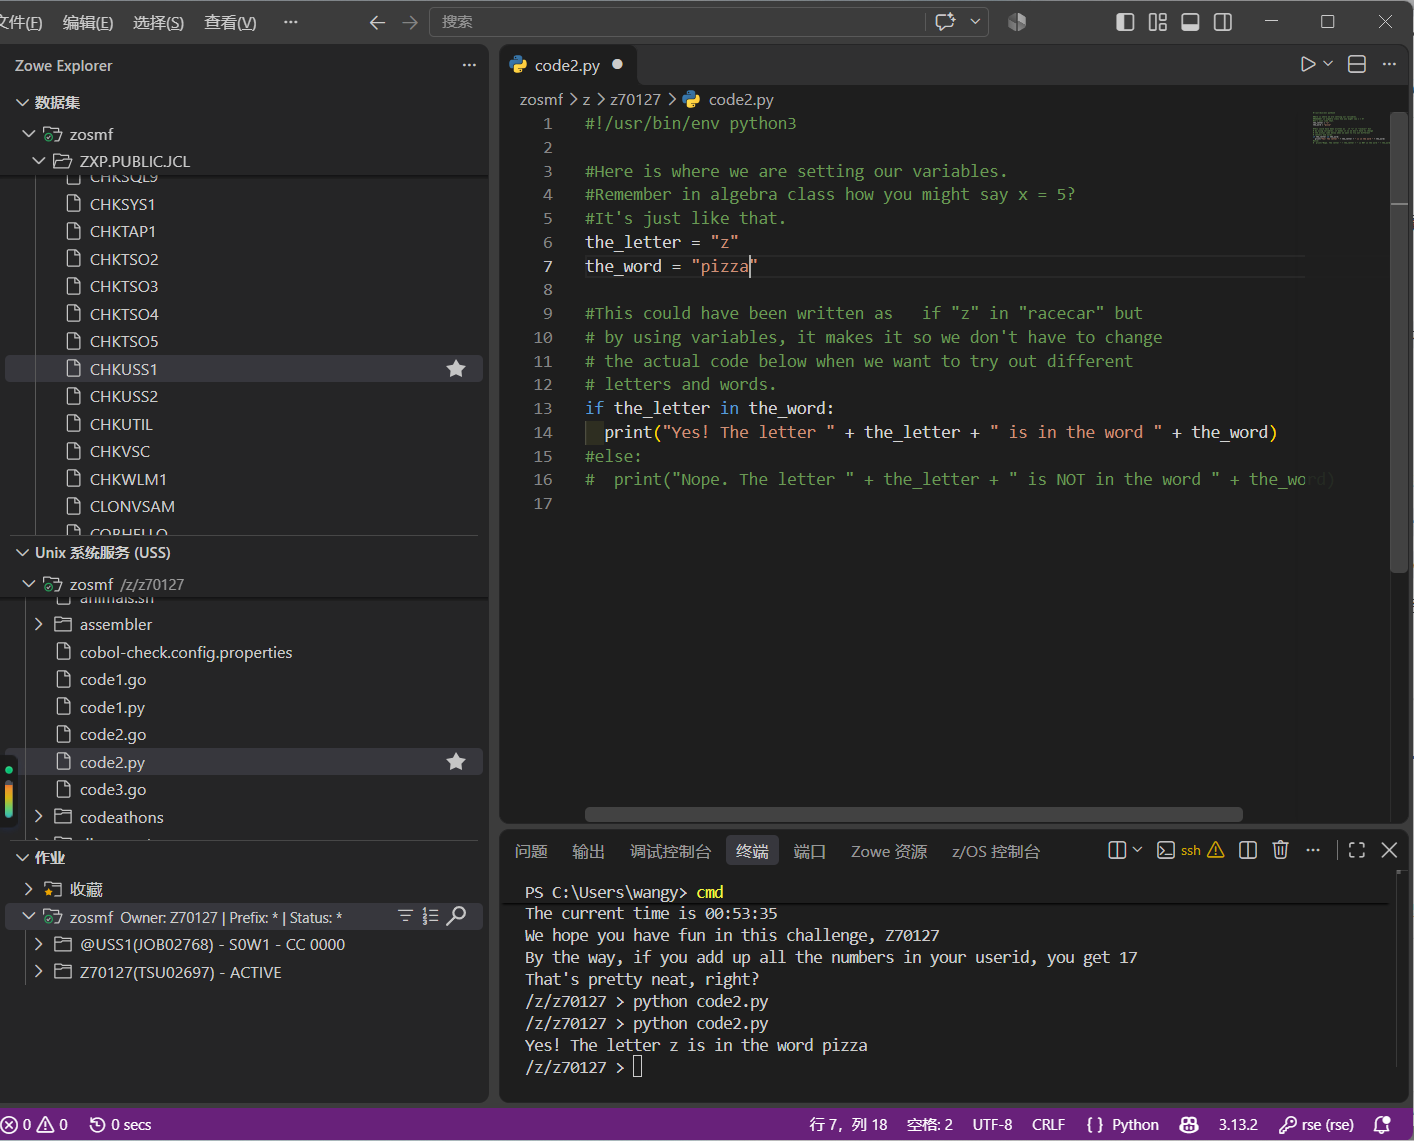
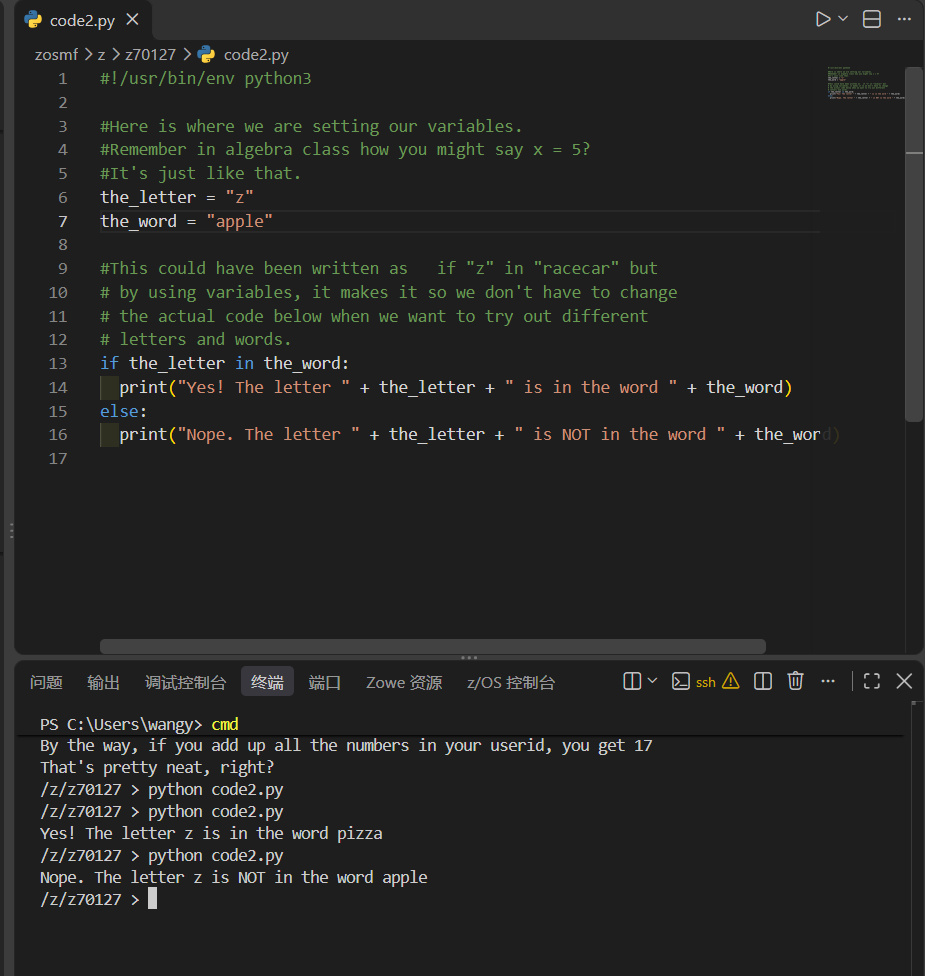
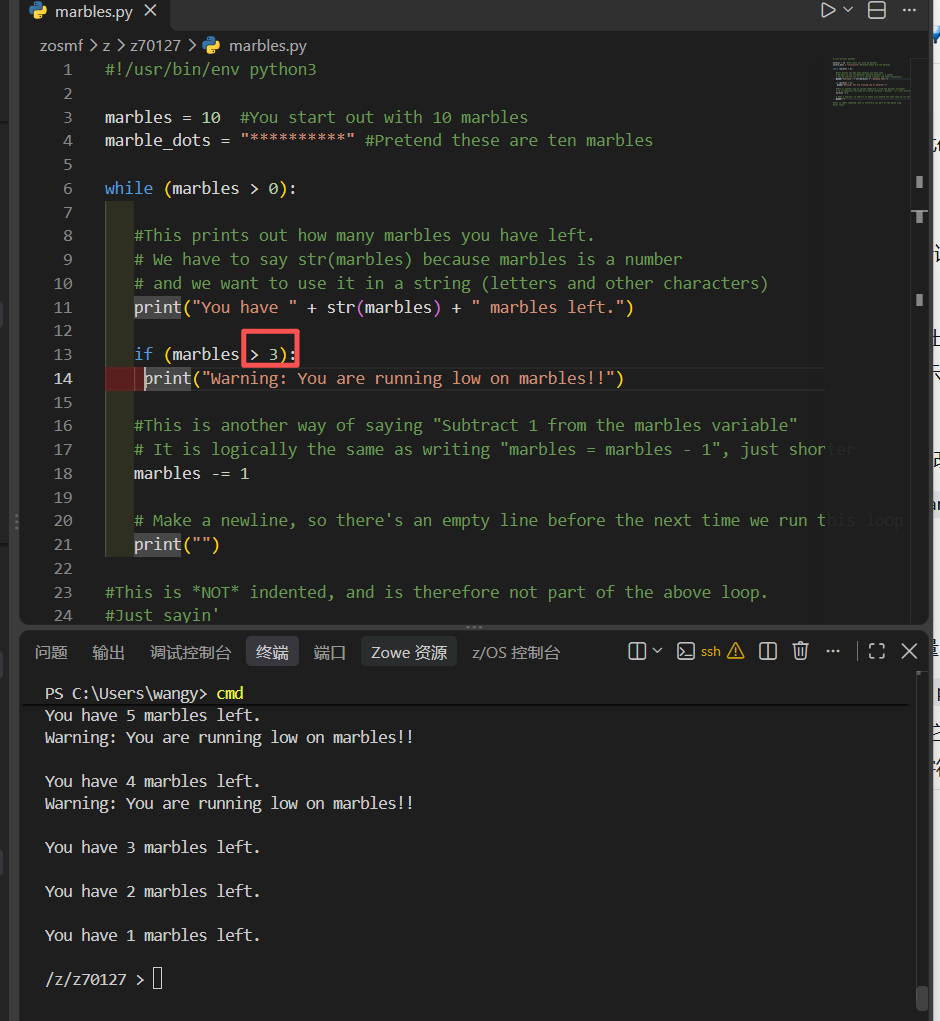
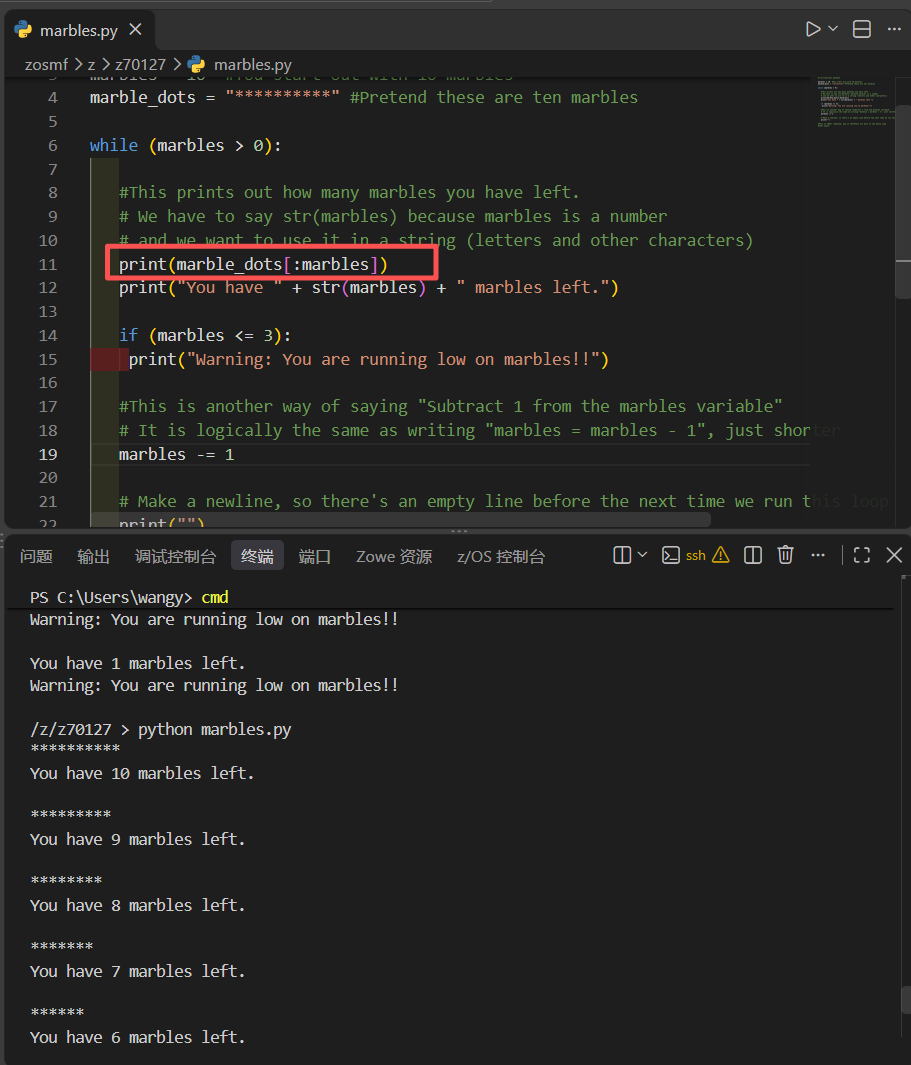
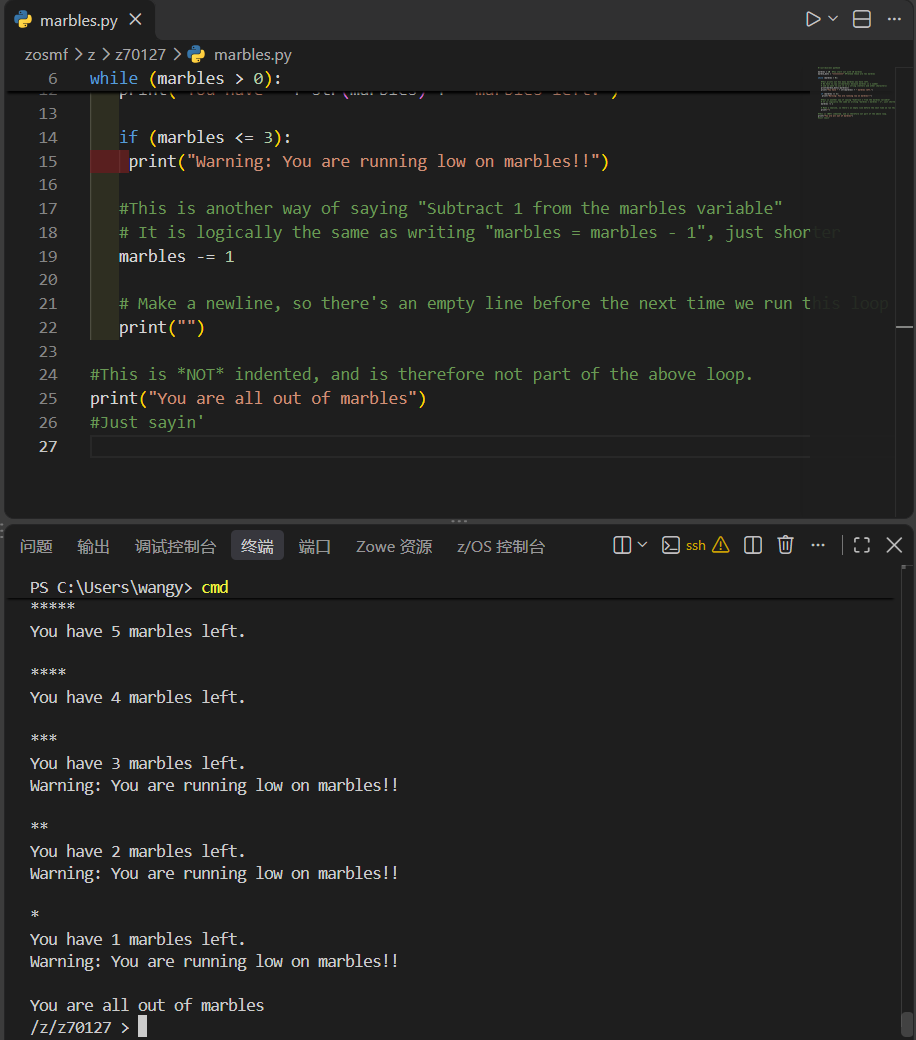
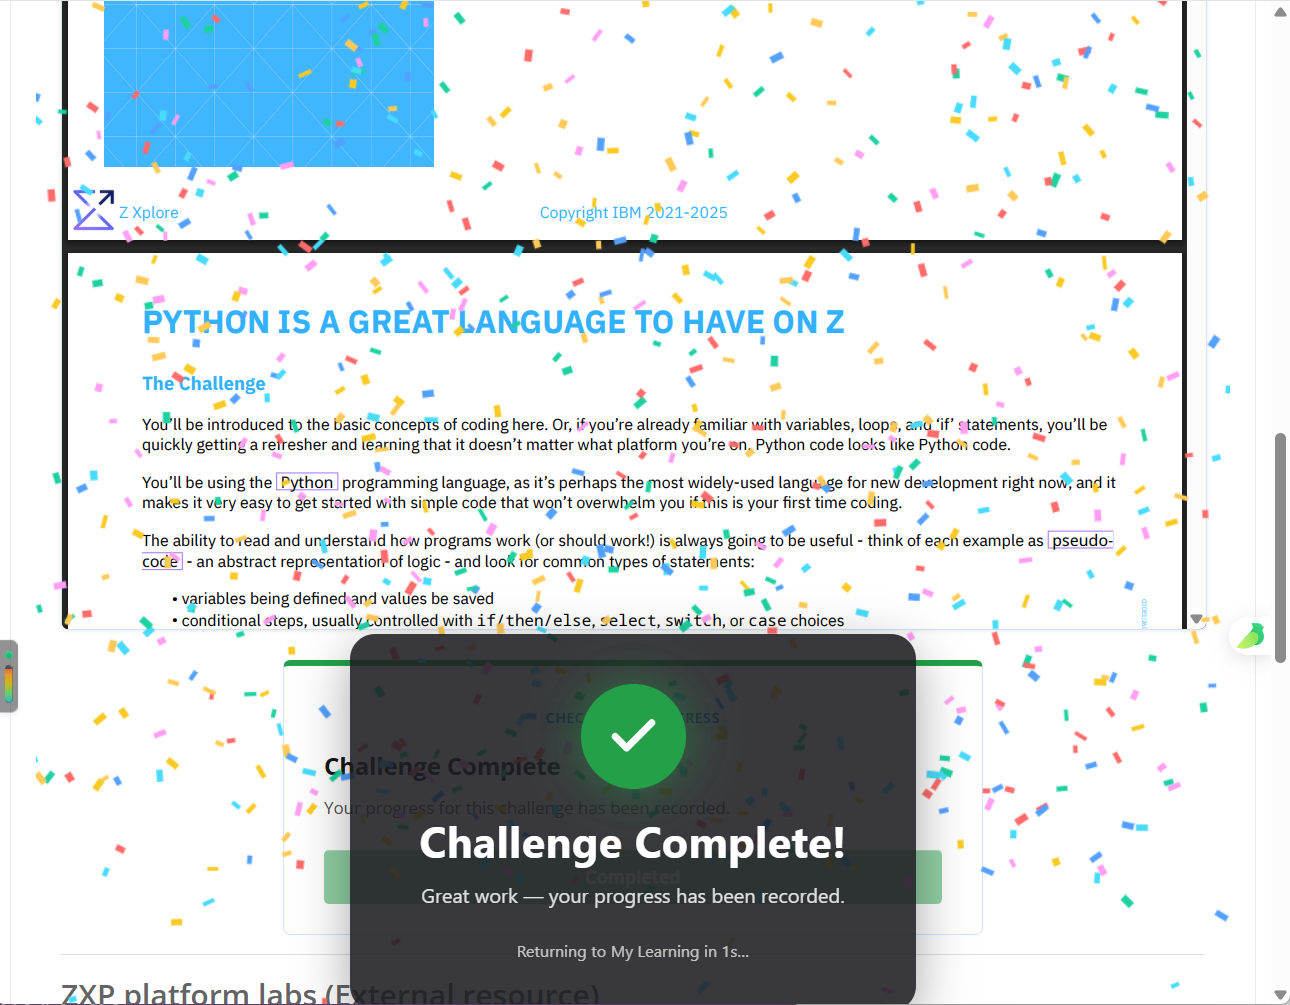
z/OS で Python を動かし、変数・条件分岐・ループを直す(IBM Z Xplore CODE1) このチャレンジとは、一言でいうと CODE1 は COBOL のチャレンジではありません。z/OS 上で Python を使ったプログラミングの入門で、要点は、プラットフォームが変わっても考え方は変わらないということです。値を保持する変数、実行する内容を決める条件、ブロックを繰り返すループ、ロジックをまとめる関数です。Python が使われるのは、汎用言語で始めやすく、基礎が分かれば、別の言語を学ぶことは主にその言語特有の構文を学ぶことになるからです。COBOL のプログラマーにとっての収穫は、プログラムを実行するだけでなく、読むことです。プログラムを見て、ロジックを追い、思った通りに動かないときに直せることです。 パート 1 — code1.py を実行し、読む USS ターミナルで python3 code1.py を実行しました。出力は "Welcome to the CODE challenge!" から始まり、現在時刻を 1 秒ごとに表示し、最後に自分のユーザーIDについての行で終わりました。その行は、ユーザーID の数字を全部足すと 17 になるという内容で、z70127 なら 7 + 0 + 1 + 2 + 7 = 17 で、まさにその通りです。チュートリアルの例は 40 でしたが、それは例のユーザーID が z99994 だったからです。この違いはエラーではなく、実行した人から計算しているプログラムの当然の結果です。 code1.py を VS Code で開くと、理由が分かりました。緑色の # の行はコメントで、コードではありません。プログラムは、時刻を知るために datetime、スリープのために time、ユーザーID を取得するために getpass をインポートし、改行を入れたい場所で \n を使って出力します。実行してから読むことで、出力の意味が分かりました。時刻の行、ユーザーID の行、1 秒の間隔は、すべてソースの中にありました。 パート 2 — 変数と、何も起こらない単語 code2.py は小さな調査です。文字 z は単語の中にあるか。第 6 行は the_letter = "z"、第 7 行は the_word = "pumpkin" です。変数は値の入れ物で、代数で x = 5 と言うようなものですが、ここでは単語と文字を保持します。ファイルのコメントにもある通り、変数を使う利点は、別の単語や文字を試したいときに、チェックするコードを書き直す必要がなく、値を変えるだけで済むことです。 pumpkin で python3 code2.py を実行すると、何も出ませんでした。else がまだない状態で、z のない単語なら、それが正しい動作です。第 7 行を the_word = "pizza" に変え、ファイルを保存し、USS ターミナルで再実行すると、今度は "Yes! The letter z is in the word pizza" と出ました。このステップの教訓は、ミニチュア版で言えばこれだけです。値を 1 つ変え、保存し、再実行し、出力を読む。保存を忘れると、新しいファイルではなく、古いファイルをテストしていることになります。 !code1-code2-pizza.png パート 3 — else を、両方向でテストする code2.py の第 15、16 行はコメントアウトされていました。#else: と # print("Nope. The letter " + the_letter + " is NOT in the word " + the_word) です。両行の先頭の # を削除し、else が第 13 行の if と揃い、その下の print 行がインデントされたままになるようにしました。Python では、インデントは飾りではありません。どの行がどの分岐に属するかを、プログラムが知る方法です。 次に、うまくいく場合だけでなく、両方の分岐をテストしました。pizza では、出力は変わらず "Yes! The letter z is in the word pizza" でした。単語を "apple" に変えて再実行すると、今度は "Nope. The letter z is NOT in the word apple" と出ました。片方向しかテストしていない分岐は、実はテストしていないのと同じです。 !code1-code2-apple-else.png パート 4 — ビー玉と、1 行を 10 回表示するループ marbles.py は marbles = 10 と marble_dots = "**"、つまり 10 個のアスタリスクを 10 個のビー玉に見立てたものから始まります。第 6 行の while (marbles > 0): ループは、ビー玉が 0 より多い間、このブロックを続けなさいという意味です。ループの中では "You have " + str(marbles) + " marbles left." と表示します。str(marbles) が必要なのは、marbles が数字で、メッセージの残りが文字列だからです。このメッセージはコードの中には 1 回しか出てきませんが、10 回表示されます。ループが繰り返し、最後の marbles -= 1 が毎回 1 ずつ減らすからです。 警告のバグは、このチャレンジで最もはっきりした問題解決の場面でした。コメントを外した第 13、14 行は if (marbles > 3): の後に print("Warning: You are running low on marbles!!") というものでした。このまま実行すると、警告は "You have 5 marbles left." と "You have 4 marbles left." の後に出て、3、2、1 の後には出ませんでした。まさに逆です。条件が、ビー玉が少ない場合ではなく、多い場合をテストしていたからです。修正は、条件を if (marbles <= 3):、つまり 3 以下に変えることでした。if を動かしたり、ループを書き直したりはしませんでした。比較演算子を 1 つ変えるだけで十分でした。if はすでに正しい場所にあり、「You have」の表示の後、引き算の前にあって、ちょうど報告された数をチェックしていたからです。 !code1-marbles-warning-bug.png パート 5 — ビー玉を描き、きれいに終わる 視覚化のステップは、ループの中、「You have」の表示の前に、1 行を追加することでした。print(marble_dots[:marbles]) です。[:marbles] というスライスは、10 個のアスタリスクの文字列から、最初の marbles 個の文字だけを取ります。10 個残っていれば 10 個、7 個残っていれば 7 個表示されます。修正後、出力は予想通りになりました。10 個残りで **、9 個で *、8 個で **、7 個で *、6 個で ****、という具合で、警告は 3 から下だけに出ました。 !code1-marbles-dots.png 最後のメッセージは、1 回だけ、最後に出なければなりませんでした。最終的なファイルでは、print("You are all out of marbles") は第 25 行にインデントなしで置かれ、ループの外、後ろにあります。だから、ループが終わり、marbles が 0 になったときにだけ実行されます。最終的な出力がそれを確認しました。3 個残りで * と警告、2 個残りで ** と警告、1 個残りで * と警告、その後、空行、そして "You are all out of marbles"、それ以降は何もありません。ループの中にインデントされたメッセージなら 10 回表示されます。インデントなしのメッセージは、最後に 1 回だけ表示されます。それが、そのメッセージのあるべき場所だからです。 !code1-marbles-final.png パート 6 — 検証 最後に、ZXP.PUBLIC.JCL から CHKCODE ジョブをサブミットしました。やり方はこれまでのチェックと同じで、データセット一覧から CHKCODE を見つけてサブミットします。検証ジョブは自分の marbles.py を実行するので、アスタリスクの数、間隔、警告が 3 から下だけに出ること、最後のメッセージがチュートリアルのスクリーンショット通りであることを、一度にチェックします。合格し、プラットフォームには "Challenge Complete!" と "Great work — your progress has been recorded." と表示されました。ここで、このチャレンジは、自分で実行したプログラムから、Fundamentals の完了したステップになりました。 !code1-challenge-complete.png COBOL にとってなぜ重要か COBOL のプログラムも、変数、条件、ループ、サブルーチンでできています。構文が違い、ホームディレクトリのファイルではなく、データセットに対して実行されるだけです。同じ z/OS システム上で、まず Python を読めるようになることは、次に COBOL のプログラムが思った通りに動かないときに、方法を持っているということです。実行し、実際の出力を読み、間違っている条件や行を 1 つ見つけ、変え、保存し、再実行する。このチャレンジの 2 つの修正は、どちらもその方法を報いるものでした。else の分岐は、z のない単語を試すまでテストされず、警告は、自分がそうなると思っていた数ではなく、実際にどの数で出たかを読むまで、正しくなりませんでした。 次回:Wrap Up — Fundamentals のまとめ。 個人学習ブログ原文:CobolNote#7
We built an MCP server for a consumer product and left the main feature out !Image description Most MCP servers are developer tools. Databases, file systems, issue trackers, CI. The pattern is familiar: you give an agent a capability it did not have, and the capability is usually "do a thing to a system." We ship a consumer product. CMeIn turns a handful of ordinary phone photos of a person into realistic photos of that person, for dating profiles and social media. Last week we published an MCP server for it at https://mcp.cmein.com/mcp. The obvious tool to expose would have been image generation. That is the product. That is what people pay for. We did not expose it, and the reasoning turned out to be the most useful part of the project. What the server actually does Six tools need no account: - photo_advice answers questions about photos of yourself from articles we have published, and returns the source link with the answer - cmein_pricing and cmein_info read the live pages, so the numbers are current rather than remembered - see_examples and find_video point at real output - contact_us sends a message to a person Four more work on a signed-in account: my_credits, my_generations, find_scene and request_credits_back. Notice what that list is. It is reading, searching and advising. The one thing the product exists to do is absent. Why generation stayed out Three reasons, in increasing order of how long they took us to articulate. It costs money per call. An agent that can spend a user's credits is an agent that can spend them wrongly, in a loop, without the user seeing the prompt that caused it. The failure mode is not a bad response, it is a bill. It needs photos the agent does not have. Generation starts from reference photos of a specific person. That upload is a consent moment. Routing it through a chat transcript makes it casual, and it should not be casual. The output needs to be looked at. The product is photographs of a person's face. The review step, where you decide this one looks like you and that one does not, is the product as much as the generation is. An agent returning twelve images into a conversation is not a shortcut, it is a worse version of the thing. So the boundary we landed on: the agent can answer questions, read live state and help you decide. The act that costs money, consumes a person's likeness and needs human judgement stays in the app. The part that was genuinely hard Account-scoped tools over a remote server. my_credits has to know whose credits. The server is a resource server and nothing more. It mints no tokens, holds no secret, and knows nothing about passwords. It verifies an RS256 JWT against the key set published at cmein.com/.well-known/jwks.json, then checks three things that matter more than the signature does. Issuer. Must be cmein.com. A valid token from somewhere else is somebody else's token. Audience. Must be this server. This is RFC 8707, and it is the check that is easy to leave out. A token obtained for one resource used to be replayable against any other resource that trusted the same issuer. Refusing a token whose audience is not you is the entire mitigation, and it is one line. Scope. Per tool. A grant of "see my credits" is not a grant of "spend them", and the person chose between those on the consent screen. Two things that cost us time and are worth stealing. createRemoteJWKSet from jose caches the key set and refetches when it sees an unknown kid, with its own cooldown. That is what lets you rotate keys without redeploying the MCP server, and what stops a stream of bad tokens turning into a stream of requests to your own auth server. The WWW-Authenticate header on the 401 is not decoration. A client does not go looking for an authorization server on its own, it does it because a 401 pointed it at the RFC 9728 metadata document. Get that header wrong and the client reports "unauthorized" forever and never offers to connect. It looks like a broken server and it is a missing header. One more detail, which loops back to the top. The server defines and enforces a photos:write scope, and no tool uses it. It is deliberately left out of the advertised scopes, because a consent screen that asks for a permission nothing exercises is asking for more than it needs. You can read the whole surface without an account: curl https://mcp.cmein.com/.well-known/oauth-protected-resource Why a consumer product wants this at all Your assistant already has opinions about profile photos. It assembled them from listicles and from the marketing of companies selling headshots, and it will state them with the same confidence either way. We generate these photos for a living and write up what works. The connector hands the assistant those passages with a link, so the claim can be checked instead of trusted. This also sits inside a wider position we hold. Our robots.txt blocks the crawlers that collect training corpora, and explicitly allows the ones that crawl to answer a question and cite a source. We publish an llms.txt. The MCP server is the same idea taken one step further: do not train on us, do use us, and link back when you do. Try it claude mcp add --transport http cmein https://mcp.cmein.com/mcp Source is MIT at BarakBurger/cmein-mcp, and the setup page for other clients is at cmein.com. I am interested in where other people drew this line. If you have shipped an MCP server for something consumer facing, what did you deliberately not expose? `
The Lossless extension for Echo Music is out Self-hosted on Vercel. It races multiple providers and streams FLAC in Echo, with automatic fallback to the best available quality. Setup takes about 5 minutes. Guide: lossless.echomusic.fun Source: EchoMusicApp/lossless-extension t.co
SSH 东拼西凑、老掉牙的面板加上一堆脚本,这些你是不是已经受够了? ServerKit 将站点、数据库、Docker、SSL、防火墙、备份以及多机 Agent 统统收进一个现代 Web 面板。 它支持自托管,内存占用约 180MB,1GB 的 VPS 也能跑得动。 🔗jhd3197/ServerKit t.co
Tokenized Pre-IPO Equity & Creator-Driven Perpetuals on Solana: Inside the KriptoK Social Trading Engine Why Pre-IPO Equity & High-Frequency Social Trading Belong on Solana Historically, pre-IPO equity exposure in frontier AI companies (like Anthropic or SpaceX) and 24/7 tokenized US equities were locked behind accredited investor gates and fragmented OTC brokers with 5–10% spreads. Meanwhile, retail social trading copied delayed screenshots rather than verifiable on-chain execution. On Solana, KriptoK (@KriptoK / @KriptoKLeague) merges three primitives into a single unified trading terminal: 1. Pre-IPO Perpetuals (e.g., Anthropic Perps) with deterministic mark-price funding and instant USDC margin settlement. 2. Tokenized Equities & Crypto Perpetuals with native Limit, Stop-Loss (SL), and Take-Profit (TP) bracket orders. 3. Creator League & Gacha Rewards Engine that aligns creator alpha distribution directly with verifiable volume. --- 1. Modeling Pre-IPO Perpetual Funding Rates & Bracket Risk Sizing Unlike spot orderbooks, pre-IPO synthetic perpetuals anchor their mark price $P_{\text{mark}}$ to an index oracle $P_{\text{index}}$ using an 8-hour funding premium $F$: def compute_perp_position_metrics( entry_price: float, stop_loss: float, take_profit: float, account_equity_usdc: float, max_risk_pct: float = 0.01, leverage: float = 5.0 ) -> dict: risk_capital = account_equity_usdc * max_risk_pct per_unit_loss = abs(entry_price - stop_loss) position_size_units = risk_capital / per_unit_loss if per_unit_loss > 0 else 0.0 notional_usdc = position_size_units * entry_price required_margin_usdc = notional_usdc / leverage rr_ratio = abs(take_profit - entry_price) / per_unit_loss if per_unit_loss > 0 else 0.0 return { "notional_usdc": round(notional_usdc, 2), "required_margin_usdc": round(required_margin_usdc, 2), "risk_reward_ratio": round(rr_ratio, 2) } --- 2. Open-Source KriptoK Creator & Quantitative Perps Toolkit We published a complete open-source reference repository covering KriptoK Pre-IPO perpetuals execution, SL/TP risk calculators, and Creator Challenge #01 workflows: - GitHub Repository & Walkthrough: duongynhi000005-oss/kriptok-creator-ecosystem-showcase - Quantitative Solana Prediction Analytics: duongynhi000005-oss/worm-premier-league-prediction-analytics
یه MCP سرور متنباز ساختم که ایرانتلنت، جابینجا و جابویژن رو همزمان به ایجنت هوش مصنوعیتون وصل میکنه 🚀 آگهی، شرکت، نظر کارمندا، گزارش مصاحبه و حقوق، همه با یه درخواست. sepehr071/iran-jobs-mcp 🧵👇 t.co
@TheAbsurdJapan 我是来自中国的独立开发者,目前也在研究游戏和教育相关内容,对您的项目很感兴趣,希望能合作,这是我的开源仓库,谢谢 github.com/silasxbt
Deploy Your Project: কীভাবে GitHub-এ কোড Push করে Vercel-এ লাইভ করবেন (End-to-End Bangla Tutorial) আজকের এই ভিডিওতে আমরা একদম Step-by-Step শিখব, কীভাবে আপনার লোকাল প্রজেক্ট GitHub-এ Upload (Push) করে Vercel-এর সঙ্গে Connect করে খুব সহজেই ওয়েবসাইট Live বা Deploy করতে হয়। আপনি যদি একজন Beginner হন এবং নিজের তৈরি করা Website বা Web Project ইন্টারনেটে সবার জন্য Live করতে চান, তাহলে এই ভিডিওটি আপনার জন্য! 🎯 📌 এই ভিডিওতে যা যা শিখবেন: ✅ লোকাল প্রজেক্টের জন্য GitHub Repository তৈরি করা ✅ Git ও GitHub ব্যবহার করে Project Push করা ✅ Vercel Account তৈরি করা ✅ GitHub Repository-এর সঙ্গে Vercel Connect করা ✅ মাত্র কয়েকটি ধাপে Website Deploy করা ✅ Live Website-এর Link সংগ্রহ ও Share করা ✅ Project Update করে পুনরায় Deploy করার নিয়ম 💻 যেসব টুল ব্যবহার করব: Git & GitHub Vercel VS Code 🔗 Useful Links: 🐙 GitHub: github.com ▲ Vercel : vercel.com 👨💻 My GitHub Profile: github.com/prantamohajan 🌐 My Portfolio: pranta-mohajan.vercel.app 🎯 এই ভিডিওটি কাদের জন্য? যারা HTML, CSS, JavaScript বা অন্যান্য Web Technologies দিয়ে প্রজেক্ট তৈরি করেন এবং নিজেদের প্রজেক্ট অনলাইনে Live করতে চান, তাদের জন্য এই Tutorial-টি খুবই উপকারী হবে। 🔥 ভিডিওটি শেষ পর্যন্ত দেখুন এবং নিজের Project GitHub থেকে Vercel-এ Deploy করে ফেলুন! ❤️ ভিডিওটি ভালো লাগলে Like দিন, Channel-টি Subscribe করুন এবং নতুন নতুন Programming ও Web Development Tutorial পেতে পাশে থাকুন। 📢 Subscribe to Code with Pranta for more coding tutorials! #GitHub #Vercel #WebDevelopment #Deployment #GitHubTutorial #VercelDeployment #BanglaTutorial #Programming #CodeWithPranta #WebDevelopmentBangla
ComfyUI H3 😃 Continuity Studio ComfyUI Timeline Studio Node Pack for MiniMax H3: multi-shot video, visual memory across scenes and angles, and local or cloud Story writing, on local/cloud 👇 KadoBOT/ComfyUI-H3-Continuity-Studio t.co