Mentions
Conversations linking to GitHub, newest first. Times are UTC.
Mentions by source
X
Bluesky
Hacker News
V2EX
Qiita
DEV
Mastodon
Latest posts
Thanks! You can find very detailed indormation about the pipeline here: github.com/electarchive/electionsarchive/blob/mai…
Machine-checked in Lean 4: 0 sorry, 14 declared axioms (4 on the prediction chain + 10 K3 interval certificates). The honest count, stated as such. #Mathematics #TheoreticalPhysics #Arithmon Arithmon/K7
@migtissera @engineering304 @Taperedfail Great, here's the guide: github.com/hashgraph-online/hol-guard/blob/main/d…. Add Drost's JSON under `contributions/mcp-servers/`; the trust-only command creates its external/opt-in binding. Then open a PR.
Vops (or Versionated-Ops): your server is a git repo. So in the last few months I made vops, because honestly? I feel that doing it my way is better. Most "production-ready" infrastructure orchestrations like Dokku or Dokploy do their "magic" behind the scenes, and there is no single source of truth for the state of your application. In contrast, setups with kubernetes, fluxcd and even docker compose's on your home folder rapidly get fat from multiple services that you has to keep. Vops is simpler: - Your infraestructure is a git repo. vops sync git pulls and pushes it via ssh. - Projects are configured in docker-compose files, git-diffable and reproductible. - Your secrets are saved on the same repo; only the ssh keys of the server can read it. - Registry, TLS, Logging and Backups built in, using linux primitives. It's all a single binary. - No telemetry, a single exposed dashboard, a single binary you can keep around. - BTRFS allows for backups, previews, rolling releases and canary deployments.
Glyph apk Lost? Does anybody have the apk for this glyph? ThomasJPrice/glyph-matrix-pong
I got Voxel's mesh stack running on an RBS20 build, and it syncs into a Voxel RBR50 mesh (open source) Voxel doesn't make firmware for the RBS20, so I built my own. It takes NETGEAR's last RBS20 firmware (2.7.6.6) and adds Voxel's mesh software, SSH, iperf3 and a live sync monitor. Repo: LachRMIT/rbs20-voxel Highlights - Synced into my Voxel RBR50v2 mesh on both bands: 5 GHz at -52 dBm / 867 Mb/s, 2.4 GHz at -36 dBm (tested on an RBR20 converted to an RBS20). - Uses the same mesh stack as Voxel's RBK50 builds, for better compatibility with Voxel routers. - SSH as root with your admin password, plus iperf3 for backhaul speed tests. - A live sync monitor on port 8080 that shows pairing progress, backhaul signal and rate, and the mesh logs, so you're not guessing from LED colours. - Works for an RBR20 converted to a satellite too. There's no download, because the images contain NETGEAR and Voxel binaries. Instead you supply the stock and Voxel images, and the build script makes the firmware for you. The repo also documents the RBS20 image format and the two fixes most people hit: "it still boots the old firmware" and "SSH permission denied". Set an admin password before flashing, and as always, custom firmware is at your own risk. Big thanks to Voxel for the firmware this builds on. If you found this useful, a star on the GitHub repo would be amazing! And if you need any help send me a message. Very excited about this.
t3code#27905 Someone please come bump this. I really want to mention Issues in t3code.
新サービス・ツール ウォッチ 2026-11-03|巨大モデルをローカルで動かすcolibriと、デスクトップ操作CLI GitHub では、AI エージェント向けのデスクトップ操作 CLI の agent-desktop(本日+2,243)と、巨大なモデルを手元で動かす colibri(+655)が目立ちました。Hacker News の1位は、LLM が重みを読み書きするという研究記事です。 ▼ チャプター 0:00 オープニング 0:23 vercel-labs/agent-desktop 1:07 JustVugg/colibri 2:04 Astra can read and write weights to improve Qwen 3:49 まとめ ▼ 注目シグナル ・vercel-labs/agent-desktop(Rust、+2,243)— AI エージェントがデスクトップのアプリを操作するための CLI。README は OS のアクセシビリティの仕組みを使い、画像の照合はしないと説明。macOS・Windows・Linux 対応、Apache-2.0 vercel-labs/agent-desktop ・JustVugg/colibri(C、+655)— 巨大な MoE モデルを手元の機材で動かす推論エンジン。共通部分をメモリに置き、必要な部分をディスクから読む。README は GLM-5.2(744B)が RTX 5090 6枚で毎秒約9トークンと説明(作った側の数字)。Apache-2.0 JustVugg/colibri ・Astra can read and write weights to improve Qwen(1,310pt / 412コメント)— LLM がニューラルネットワークの重みを直接読み書きするのが驚くほど得意、という研究記事(記事の説明)。ツールではなく研究 rikiyat.github.io ▼ GitHub Trending(daily) ・thedotmack/claude-mem(TypeScript、+1,799)— エージェントのセッションをまたぐ記憶(継続) thedotmack/claude-mem ・D4Vinci/Scrapling(Python、+858)— ウェブ収集のフレームワーク D4Vinci/Scrapling ・FlashML-org/FreeToken(Python、+654)— 大きな MoE モデルを手元の GPU・CPU で動かすサービング エンジン。Apache-2.0 FlashML-org/FreeToken ▼ Product Hunt(11/02分) ・Specsight(314票)— AI アプリの不具合を検出する(紹介文) ・SKI(298票)— 声でコードを書く(紹介文) ・telemetry.dev(242票)— AI エージェントの監視(紹介文) ・WinnerAdSpy(154票)— 競合の広告を分析する(紹介文) ・Backenly(153票)— エージェント向けのバックエンド(紹介文) ▼ Hacker News ・Show HN: Subvocal(413pt / 237コメント)— 声を出さずに口パクで入力するスマートグラス。開発中 news.ycombinator.com ・Show HN: syscall.sh(190pt / 48コメント)— Linux システムコールのサイトと API の更新 syscall.sh ・Launch HN: Momentic(97pt / 66コメント)— アプリを使って不具合を探す QA エージェント momentic.ai ▼ Hugging Face(トレンド) ・LiquidAI/LFM3-1.7B — 970いいね、文章生成 huggingface.co ・deepseek-ai/DeepSeek-V4.1-Flash-1017 — 4,685いいね、画像と文章(継続) huggingface.co ・baidu/Unlimited-OCR-2 — 560いいね、文書の読み取り、MIT huggingface.co ・speridlabs/idol — 407いいね、画像から3D huggingface.co ・mistralai/Mistral-Large-4-1T-A52B — 1,498いいね、画像と文章(継続) huggingface.co ―――――――――― GitHub Trending・Hacker News(公式API)・Hugging Face(公式API)は直接取得。Product Hunt のみ agents-radar 経由(11/02分)。 音声: VOICEVOX:ずんだもん / VOICEVOX:四国めたん / VOICEVOX:東北きりたん / VOICEVOX:あんこもん 立ち絵: 坂本アヒル #ずんだもん #新サービス #AIツール
and now we have a Lean proof (~200k lines) that the equivalence is provable in iPRA (intuitionistic primitive recursive arithmetic), which is a weaker theory than previously used PA github.com/VladimirReshetnikov/ProveIt/blob/1b394…
your notes app shouldn't need an account, a subscription, or your data char runs on your own key: anthropic, openai, openrouter, groq, or ollama locally with no key at all free + open source: jayamitkatariya/char t.co
Integration 02: PatrolCraft, patrol editing for UniFi Protect PTZ cameras Our second integration on Labs is PatrolCraft. It lets you edit the patrols you already set up in UniFi Protect, all in one place. reddit.com How it works: - Pick a PTZ camera and open one of its patrols. - For each preset, set how long the camera stays there (dwell time) and how fast it moves to it (speed). - See a snapshot of each preset, so you know which view is which. - Turn the camera's auto tracking on or off for people, vehicles, and zoom while tracking. We built it for lots, yards and docks, where one PTZ camera covers a lot of ground and some views need more time than others. Version 0.5.0 runs on a Mac today. Install it with one command in Terminal: curl -fsSL labs.yestechie.com | bash At the end, the installer shows your login password once, so save it then. The source is on GitHub. Want to look around first? The interactive demo runs in your browser. You'll need UniFi Protect and a UniFi PTZ camera. For business use, contact us. Questions, or ideas for how you'd set up your patrols? Drop them below.
VOICEVOX Engine for UE5プラグイン ver2.0 概要 VOICEVOX Engine for UE5プラグインはヒホさんが制作・公開されている、 VOICEVOXの非公式 UnrealEngine5対応版、VOICEVOX COREをUE5で使用するためのプラグインです。 対応プラットフォーム&エンジンバージョン Windows11 macOS UnrealEngine5.0~5.7 VOICEVOX CORE対応バージョン プラグインのバージョンごとに対応するVOICEVOX COREになります。 ver2.x VOICEVOX CORE 0.16.0 ! VOICEVOX NEMO COREは16がリリースされてないため、ver2.x以降は対象外となります。 ver1.x VOICEVOX CORE 0.15.7 VOICEVOX NEMO CORE 0.15.0 プラグイン使用準備 Githubに記載したReadMEを見てください。 基本的な処理フロー VOICEVOX Engine for UE5プラグインの基本的な利用フローは次のとおりです。 C++ C++ から利用する手順を説明します。 各ヘッダーファイルについて プラグインに作成した各ヘッダーファイルの説明です。 cppファイルも公開しているので、セットで見てください。 VoicevoxUECore UVoicevoxCoreSubsystem.h VOICEVOX COREのAPIへ接続するためのSubsystemです。 C++で利用する場合はUVoicevoxCoreSubsystemから各VOICEVOX CORE APIを呼ぶことを想定しています。 EngineSubystemの派生クラスです。 EditorとGame両方で使用する想定 VoicevoxEngine VoicevoxBlueprintLibrary.h VOICE VOX COREのAPIを実行するBlueprint公開用ノードをまとめています。 VoicevoxAsyncTask.h VOICE VOX COREのAPIを実行するBlueprint公開用ノードをまとめています。 負荷がかかる一部のAPIをLatentノードにしています。 全体の呼び出し順序 Build.cs に依存モジュールを追加する Build.csのPublicDependencyModuleNames、もしくはPrivateDependencyModuleNamesに以下のモジュール名を追加してください。 C++のみ VoicevoxUECore Blueprint、もしくはEditorを使用 VoicevoxUECore VoicevoxEngine PublicDependencyModuleNames.AddRange( new string[] { "Core", "InputCore", "CoreUObject", "Engine" } ); PrivateDependencyModuleNames.AddRange( new string[] { "VoicevoxUECore", "VoicevoxEngine", } C++で実装 UE側はUVoicevoxCoreSubsystemを用いて実装します。 以下、ゲーム側実装例になります。 VOICEVOX COREの初期化 最初にVOICEVOX COREの初期化APIを必ず実行してください。 ゲーム側の利用例は次のとおりです。 #include "Engine/Engine.h" #include "Subsystems/VoicevoxCoreSubsystem.h" void InitializeVoicevoxExample() { if (!GEngine) { return; } UVoicevoxCoreSubsystem* Core = GEngine->GetEngineSubsystem<UVoicevoxCoreSubsystem>(); if (!Core) { return; } // CPU モードで初期化。全モデル一括読み込みは要求しない。 const bool bInitialized = Core->Initialize(false, 0, false); if (!bInitialized) { UE_LOG(LogTemp, Error, TEXT("VOICEVOX initialization failed")); return; } // vvmファイル名を渡してモデルデータを読み込む const FString ModelPath = TEXT("0"); if (!Core->LoadVoiceModel(ModelPath)) { UE_LOG(LogTemp, Error, TEXT("VOICEVOX model load failed")); return; } } 初期化・モデル読み込みは時間がかかる可能性があるため、上記はAPIの呼び出し順序を示す最小例です。 ! ゲームのメインスレッドで実行することを推奨しません。 実際にはロード画面やワーカースレッド、非同期タスクなどでAPIを実行してください。 テキストから WAV データを生成する RunTextToSpeech() は WAV 形式のバイト配列 TArray<uint8> を返します。 スタイルIDはロードしたVVMファイルから利用可能なIDを指定してください。 #include "Engine/Engine.h" #include "Subsystems/VoicevoxCoreSubsystem.h" TArray<uint8> GenerateVoicevoxWavExample() { if (!GEngine) { return {}; } const UVoicevoxCoreSubsystem* Core = GEngine->GetEngineSubsystem<UVoicevoxCoreSubsystem>(); if (!Core || !Core->GetIsInitialize()) { return {}; } const VoicevoxStyleId StyleId = 0; // 実際に利用可能なスタイルIDを指定 return Core->RunTextToSpeech( StyleId, TEXT("こんにちは、Unreal Engine から音声を合成しています。"), false, // 通常テキスト true // 疑問文の調整を有効化 ); } 戻り値はWAV のバイト列です。 USoundWaveで再生する場合は変換処理が必要です。 ! 合成処理をゲームのメインスレッドで実行することを推奨しません。 実際にはワーカースレッド、もしくは非同期タスクなどでAPIを実行してください。 AudioQuery を編集して合成する 音声のパラメータを調整したい場合は、まず GetAudioQuery() でAudioQueryを取得し、編集後に RunSynthesis() に渡します。 #include "Engine/Engine.h" #include "Subsystems/VoicevoxCoreSubsystem.h" TArray<uint8> GenerateFromQueryExample() { if (!GEngine) { return {}; } const UVoicevoxCoreSubsystem* Core = GEngine->GetEngineSubsystem<UVoicevoxCoreSubsystem>(); if (!Core || !Core->GetIsInitialize()) { return {}; } const VoicevoxStyleId StyleId = 0; FVoicevoxAudioQuery Query = Core->GetAudioQuery( StyleId, TEXT("音声合成のテストです。"), false); // 必要に応じて Query の各パラメータを変更する。 return Core->RunSynthesis(Query, StyleId, true); } 終了処理 VOICEVOX CORE を利用しなくなったときはFinalize() を呼び出します。 if (GEngine) { if (UVoicevoxCoreSubsystem* Core = GEngine->GetEngineSubsystem<UVoicevoxCoreSubsystem>()) { Core->Finalize(); } } UVoicevoxCoreSubsystem API一覧 UVoicevoxCoreSubsystemで公開されているAPI一覧です。 ライフサイクル・初期化 API宣言 説明 bool Initialize(bool bUseGPU, int CPUNumThreads = 0, bool bLoadAllModels = false); VOICEVOX COREの初期化 bool GetIsInitialize() const; 初期化処理実行済みかを取得 void Finalize(); VOICEVOX COREの終了処理 モデル管理 API宣言 説明 bool LoadModel(VoicevoxStyleId StyleId) const; スタイルIDでモデルをロード(旧APIを残しています。実際はLoadVoiceModelを使用してください) bool LoadVoiceModel(const FString& VvmFileName) const; 指定VVMファイルをロード bool AllLoadVoiceModel() const; 全VVMファイルをロード bool UnloadVoiceModel(const FString& VvmFileName) const; 指定VVMファイルをアンロード bool IsLoadedVoiceModel(const FString& VvmFileName) const; 指定VVMファイルのロード状態を確認 テキスト解析・AudioQuery API宣言 説明 TArray<FVoicevoxAccentPhrase> OpenJTalkRcAnalyze(const FString& Text) const; 日本語テキストをアクセント句へ解析 FVoicevoxAudioQuery GetAudioQuery(VoicevoxStyleId StyleId, const FString& Message, bool bKana) const; テキストからAudioQueryを生成 FVoicevoxAudioQuery GetAudioQueryFromAccentPhrases(const TArray<FVoicevoxAccentPhrase>& AccentPhrases) const; アクセント句からAudioQueryを生成 TArray<FVoicevoxAccentPhrase> SynthesizerCreateAccentPhrases(VoicevoxStyleId StyleId, const FString& Text, bool bKana) const; スタイル指定でアクセント句を生成 TArray<FVoicevoxAccentPhrase> SynthesizerReplace(EReplaceType ReplaceType, const TArray<FVoicevoxAccentPhrase>& AccentPhrases, VoicevoxStyleId StyleId) const; アクセント句の指定パラメータを再生成 音声合成 API宣言 説明 TArray<uint8> RunTextToSpeech(VoicevoxStyleId StyleId, const FString& Message, bool bKana, bool bEnableInterrogativeUpspeak) const; テキストからWAVバイト列を生成 TArray<uint8> RunSynthesis(const char* AudioQueryJson, VoicevoxStyleId StyleId, bool bEnableInterrogativeUpspeak) const; AudioQueryまたはアセットからWAVバイト列を生成 TArray<uint8> RunSynthesis(const FVoicevoxAudioQuery& AudioQuery, VoicevoxStyleId StyleId, bool bEnableInterrogativeUpspeak) const; AudioQueryまたはアセットからWAVバイト列を生成 TArray<uint8> RunSynthesis(const UVoicevoxQuery& VoicevoxQuery, bool bEnableInterrogativeUpspeak) const; AudioQueryまたはアセットからWAVバイト列を生成 リップシンク API宣言 説明 static TArray<FVoicevoxLipSync> GetLipSyncList(FVoicevoxAudioQuery AudioQuery, bool bIsSimple = false, float PitchModulation = 1.0f); AudioQueryからリップシンクデータを生成 メタ情報・実行環境 API宣言 説明 TArray<FVoicevoxMeta> GetMetaList() const; 話者メタ情報を取得 TArray<FVoicevoxMeta> GetVoiceModelFileMetaList(const FString& VvmFileName) const; 指定VVMのメタ情報を取得 TArray<FVoicevoxMeta> GetAllVoiceModelFileMetaList() const; 全VVMのメタ情報を取得 FString GetMetaName(VoicevoxStyleId StyleId) const; スタイルIDに対応する名前を取得 TMap<int, FString> GetVvmFileNameMapToStyleId() const; スタイルIDからVVM名への対応表を取得 FString GetVoicevoxVersion(const FString& CoreName); 指定COREのバージョン取得 bool IsGpuMode(const FString& CoreName); 指定COREのGPUモードを確認 FVoicevoxSupportedDevices GetSupportedDevices(const FString& CoreName); 指定COREの対応デバイス取得 TArray<FString> GetCoreNameList(); 初期化済みCORE名一覧を取得 ユーザー辞書 API宣言 説明 VoicevoxUserDictWord UserDictWordMake(const FString& Surface, const FString& Pronunciation, uintptr_t AccentType) const; 辞書単語の構造体を生成 bool UserDictInitialize(const FString& DictPath = TEXT("")) const; ユーザー辞書を初期化 TArray<uint8_t> UserDictAddWord(const VoicevoxUserDictWord* Word) const; 辞書単語を追加しUUIDを返す bool RewriteUserDictWord(const TArray<uint8_t>& WordUuid, const VoicevoxUserDictWord *Word) const; 辞書単語を更新 bool DeleteUserDictWord(const TArray<uint8_t>& WordUuid) const; 辞書単語を削除 TMap<FString, FVoicevoxRegisteredUserDictWord> GetUserDictWord() const; 登録済み辞書単語を取得 bool UserDictSave(const FString& Path) const; 辞書をファイルに保存 void UserDictDelete() const; 辞書を破棄 Blueprint Blueprint から利用する手順を説明します。 Blueprint での利用フロー 処理フローの例です。 実際にゲームへ組み込む際は、次の順序を基本にします。 VOICEVOX CORE を初期化する。 必要な音声モデルをロードする。 TextToSpeechOutput() などで音声を生成する。 戻り値の USoundWave が有効なら再生する。 必要なら AudioQuery からリップシンク情報を生成し、対応する Audio Component に渡す。 終了時に CORE のリソースを解放する。 Blueprint API 同期APIと状態参照・辞書操作 Blueprintノード名 公開種別 C++宣言 VoicevoxFinalize BlueprintCallable static void Finalize() GetOpenJTalkRcAnalyze BlueprintCallable static UPARAM(DisplayName="OpenJTalkAnalyze") TArray<FVoicevoxAccentPhrase> OpenJTalkRcAnalyze(const FString& Text) VoicevoxUnLoadVoiceModel BlueprintCallable static bool UnloadVoiceModel(FString VvmFileName) VoicevoxIsLoadedVoiceModel BlueprintCallable static bool IsLoadedVoiceModel(FString VvmFileName) GetVoicevoxCoreNameList BlueprintPure static UPARAM(DisplayName="CoreNameList") TArray<FString> GetCoreNameList() GetVoicevoxMetas BlueprintPure static UPARAM(DisplayName="Metas") TArray<FVoicevoxMeta> GetMetasToList() GetVoicevoxModelFileMetas BlueprintPure static UPARAM(DisplayName="Metas") TArray<FVoicevoxMeta> GetVoiceModelFileMetaList(const FString& VvmFileName) GetAllVoicevoxModelFileMetas BlueprintCallable static UPARAM(DisplayName="Metas") TArray<FVoicevoxMeta> GetAllVoiceModelFileMetaList() GetVoicevoxSupportedDevices BlueprintPure static UPARAM(DisplayName="SupportedDevices") FVoicevoxSupportedDevices GetSupportedDevices(const FString& CoreName) VoicevoxVersion BlueprintPure static UPARAM(DisplayName="VoicevoxCoreVersion") FString GetVoicevoxCoreVersion(const FString& CoreName) IsVoicevoxGpuMode BlueprintPure static UPARAM(DisplayName="GPU Mode") bool IsVoicevoxGpuMode(const FString& CoreName) VoicevoxTextToSpeechOutput BlueprintCallable static UPARAM(DisplayName="Sound") USoundWave* TextToSpeechOutput(int32 StyleId, FString Message, bool bRunKana = false, bool bEnableInterrogativeUpspeak = true) VoicevoxToTextAudioQueryOutput BlueprintCallable static UPARAM(DisplayName="Sound") USoundWave* TextToAudioQueryOutput(int32 StyleId, FString Message, bool bRunKana = false, bool bEnableInterrogativeUpspeak = true) GetVoicevoxAudioQuery BlueprintCallable static UPARAM(DisplayName="AudioQuery") FVoicevoxAudioQuery GetAudioQuery(int32 StyleId, FString Message, bool bRunKana = false) GetVoicevoxAudioQueryFromAccentPhrases BlueprintCallable static UPARAM(DisplayName="AudioQuery") FVoicevoxAudioQuery GetAudioQueryFromAccentPhrases(const TArray<FVoicevoxAccentPhrase>& AccentPhrases) GetVoicevoxAccentPhrase BlueprintCallable static UPARAM(DisplayName="AccentPhraseAnalyze") TArray<FVoicevoxAccentPhrase> GetSynthesizerAccentPhrase(int32 StyleId, const FString& Text, bool bKana) VoicevoxReplace BlueprintCallable static UPARAM(DisplayName="AccentPhraseAnalyze") TArray<FVoicevoxAccentPhrase> SynthesizerReplace(EReplaceType ReplaceType, const TArray<FVoicevoxAccentPhrase>& AccentPhrases, int32 StyleId) VoicevoxAudioQueryOutput BlueprintCallable static UPARAM(DisplayName="Sound") USoundWave* AudioQueryOutput(FVoicevoxAudioQuery AudioQuery, int32 StyleId, bool bEnableInterrogativeUpspeak = true) VoicevoxQueryAssetOutput BlueprintCallable static UPARAM(DisplayName="Sound") USoundWave* VoicevoxQueryOutput(UVoicevoxQuery* VoicevoxQuery, bool bEnableInterrogativeUpspeak = true) GetVoicevoxLipSyncList BlueprintCallable static UPARAM(DisplayName="LipSyncList") TArray<FVoicevoxLipSync> GetLipSyncList(FVoicevoxAudioQuery AudioQuery) VoicevoxUserDictWordMake BlueprintCallable static UPARAM(DisplayName="UserDictWord") FVoicevoxCoreUserDictWord UserDictWordMake(const FString& Surface, const FString& Pronunciation, int64 AccentType) VoicevoxCoreUserDictInitialize BlueprintCallable static bool UserDictInitialize(const FString& DictPath = TEXT("")) VoicevoxUserDictAddWord BlueprintCallable static UPARAM(DisplayName="UUID") TArray<uint8> UserDictAddWord(const FVoicevoxCoreUserDictWord Word) VoicevoxRewriteUserDictWord BlueprintCallable static bool RewriteUserDictWord(const TArray<uint8>& WordUuid, const FVoicevoxCoreUserDictWord Word) VoicevoxDeleteUserDictWord BlueprintCallable static bool DeleteUserDictWord(const TArray<uint8>& WordUuid) GetVoicevoxUserDictWord BlueprintCallable static TMap<FString, FVoicevoxRegisteredUserDictWord> GetUserDictWord() VoicevoxCoreUserDictSave BlueprintCallable static bool UserDictSave(const FString& Path) VoicevoxCoreUserDictDelete BlueprintCallable static void UserDictDelete() 非同期アクションノード Blueprintノード名 公開種別 C++宣言 VoicevoxInitialize BlueprintCallable static UVoicevoxInitializeAsyncTask* Initialize(UObject* WorldContextObject, bool bUseGPU, int CPUNumThreads = 0) VoicevoxLoadModel BlueprintCallable static UVoicevoxLoadModelAsyncTask* LoadModel(UObject* WorldContextObject, int32 StyleId) VoicevoxLoadVoiceModel BlueprintCallable static UVoicevoxLoadVoiceModelAsyncTask* LoadVoiceModel(UObject* WorldContextObject, FString VvmFileName) VoicevoxAllLoadVoiceModel BlueprintCallable static UVoicevoxLoadVoiceModelAsyncTask* AllLoadVoiceModel(UObject* WorldContextObject) VoicevoxTextToSpeechOutputAsync BlueprintCallable static UVoicevoxTextToSpeechAsyncTask* TextToSpeech(UObject* WorldContextObject, int32 StyleId, FString Message, bool bRunKana = false, bool bEnableInterrogativeUpspeak = true) VoicevoxToTextAudioQueryOutputAsync BlueprintCallable static UVoicevoxTextToSpeechAsyncTask* TextToAudioQuery(UObject* WorldContextObject, int32 StyleId, FString Message, bool bRunKana = false, bool bEnableInterrogativeUpspeak = true) VoicevoxAudioQueryOutputAsync BlueprintCallable static UVoicevoxAudioQueryToSpeechAsyncTask* AudioQueryOutput(UObject* WorldContextObject, int32 StyleId, FVoicevoxAudioQuery AudioQuery, bool bEnableInterrogativeUpspeak = true) VoicevoxQueryAssetOutputAsync BlueprintCallable static UVoicevoxAudioQueryToSpeechAsyncTask* VoicevoxQueryOutput(UObject* WorldContextObject, UVoicevoxQuery* VoicevoxQuery, bool bEnableInterrogativeUpspeak = true) リップシンク付き音声再生コンポーネント Blueprintノード名 公開種別 C++宣言 StopAudioAndLipSync BlueprintCallable void StopAudioAndLipSync() PlayToText BlueprintCallable void PlayToText(FString Message, bool bRunKana = false, bool bEnableInterrogativeUpspeak = true, float SpeedScale = 1.0f, float PitchScale = 0.0f, float IntonationScale = 1.0f, float VolumeScale = 1.0f, float PrePhonemeLength = 0.1f, float PostPhonemeLength = 0.1f) PlayToAudioQuery BlueprintCallable void PlayToAudioQuery(const FVoicevoxAudioQuery& Query, bool bEnableInterrogativeUpspeak = true) PlayToAudioQueryAsset BlueprintCallable void PlayToAudioQueryAsset(UVoicevoxQuery* VoicevoxQuery, bool bEnableInterrogativeUpspeak = true) SetLipSyncDataToAudioQuery BlueprintCallable void SetLipSyncDataToAudioQuery(const FVoicevoxAudioQuery& Query) SetLipSyncDataToAudioQueryAsset BlueprintCallable void SetLipSyncDataToAudioQueryAsset(UVoicevoxQuery* VoicevoxQuery) VoicecoxCharacterLipSyncAudioComponent キャラクターのSkeletalMesh設定 Blueprintノード名 公開種別 C++宣言 SetSkeletalMesh BlueprintCallable void SetSkeletalMesh(USkeletalMeshComponent* SkeletalMesh) リップシンク 以下の記事を見てください。 VoicevoxEngine For UE リップシンクコンポーネント エディタ拡張 VoicevoxEngineプラグインが有効な場合、メニューバーにVOICEVOXメニューが追加されます。 Editor ! エディターはα版となります。 アクセント情報を作成、編集するエディター機能です。 保存でVoicevox AudioQueryアセットを生成、アセット書き出しでSoundWaveアセット、音声書き出しでWavファイルを作成します。 アクセント、イントネーション、長さの編集は未対応です。 もし編集したい場合は、一度Voicevox AudioQueryアセットを生成後、AccentPhaasesの項目を編集してください。 Speaker List プラグインで利用可能なVOICEVOX モデルの一覧です。 Copyボタンを押すことで、style IDをコピーします。 利用時の注意点 初期化とモデル読み込みは音声合成より先に行う。 Initialize() の成功だけでは目的のスタイルのモデルが読み込まれているとは限りません。 重い処理をゲームスレッドに直書きしない。 初期化、モデル読み込み、AudioQuery 生成、合成は負荷を考慮し、適切な非同期実行を設計してください。 スタイルIDを確認する。 読み込んだVVMファイルに格納されているスタイルIDのみ利用可能です。 AquesTalkライクな記法をする場合はルールに従う。 AquesTalkライクな記法をする場合、ルールに違反するとクラッシュします。 例:ボク'ワ/ズ'ンダモン/ナノ'ダ 全てのカナはカタカナで記述される アクセント句は/または、で区切る。、で区切った場合に限り無音区間が挿入される。 カナの手前に_を入れるとそのカナは無声化される アクセント位置を'で指定する。全てのアクセント句にはアクセント位置を 1 つ指定する必要がある。 アクセント句末に?(全角)を入れることにより疑問文の発音ができる ※VOICEVOX ENGINE ReadMeより引用 ライセンス VOICEVOX ENGINEのライセンスを継承し、LGPL v3と、ソースコードの公開が不要な別ライセンスのデュアルライセンスとなります。 利用規約 VOICEVOX Engine for UE5の利用規約はVOICEVOXのホームページに記載された利用規約を継承するため、利用前に必ず一読してください。 各スピーカーモデルのライセンスはVOICEVOX公式ホームページのキャラクター一覧を参照してください。 ! VOCEVOXの利用規約及び各キャラクターの利用規約を厳守するようにお願いいたします 問い合わせに関して VOICEVOX Engine for UE5プラグインに関して質問があれば、Twitter、Qiitaのコメント欄で聞いてもらうか、公開したGithubのissueに記載してください。 ! 間違ってもVOICEVOX CORE作者のヒホさん、VOICEVOX公式Twitterアカウント及びVOICEVOX ホームページで、VOICEVOX Engine for UE5プラグインの問い合わせをしないようにお願いいたします。
FM27 Player Export for Mac (Apple Silicon) Got the old FM26 Player Export working on FM27. On an Apple Silicon Mac, load a view, select your players, press F9, and it writes your squad or scouting data to a CSV (and HTML) in ~/Sports Interactive/Football Manager 27/. It only reads the table that’s on screen, and doesn’t touch your save or game files. You’ll need sptndc’s FM27 BepInEx (the loader) and Rosetta first, then drop the DLL into BepInEx/plugins. Steps are in the readme. oeknudsen/fm27-player-export-macos Credit:original plugin by vinteset, macOS fork by DadMych, FM27 loader by sptndc. My part was getting it to compile and run against FM27’s new UI. Heads-up: text and attribute columns export fine, but I haven’t verified the star columns (Ability/Potential) yet.
v21 released **** IMPORTANT: Run the V21.x upgrade before upgrading HA Core **** The version of HA Core released last night (4th November) moves to 'Marketplace' from HACS. This includes a new feature check that blocks the easy upgrade/domain switch process I built into v21. I'm testing a work around (more manual now) - but if holding back please do upgrade to v21 before core for an easier upgrade path. **** UPDATE 20:00 3rd Nov **** 61 installs already on v21 - the below plus one Facebook message have been the extent of issues logged, so pleased to see this complex upgrade working well for the majority! ****** *** EDIT 3rd Nov 6:45am — if you get "No manifest.json file found": restart Home Assistant and then update. HACS caches where it found the integration's folder for the session, so it looks for the old location in the new release. The cache clears on restart. Sorry, this variation didn't show up in (extensive) testing. *** Quick heads up — v21 has just been released into the wild. One thing to do first. If you're not already on 20.1.1, grab that before v21. HACS only ever offers the newest release, so you have to ask for 20.1.1 by name: three dots → Redownload → Need a different version? → pick 20.1.1 → restart. Then update to v21 and you'll get a notice in Settings → Repairs with a Fix button that does the rest in one press. Why the faff? The integration has moved to a new folder and is now called EDF Energy (UK). Your account needs handing across to it, which is what that one button does. Everything comes with it — entity ids, history, Energy dashboard statistics — so automations, scripts and dashboards carry on untouched. There's a walkthrough with screenshots for every starting point here: stevekirtley.github.io The actually interesting bits: 🔋 The usage graph wasn't quite right. Export was being stacked on top of import, so a day of 28 kWh in and 10 kWh out drew as a 38 kWh bar, and the scale ran way past your biggest day. They now sit side by side, and the cost view gets a proper Net figure — what you paid less what you earned. 📊 Rate bands. On a multi-rate tariff the import bar now splits into off peak, standard and peak, in both the kWh and cost views. Genuinely free windows get labelled Free. 🎁 Free promotion estimates. Power Perks and the like get billed at your normal rate and credited back weeks later, so there's never been any way to check what you were owed. The Usage tab now shows what you used during the free windows and roughly what should come back. It's an estimate — EDF settle from their own half-hourly readings — but it gives you a number to hold the credit up against when it lands. 🕳️ Missing usage data. A few of you noticed gaps in your consumption data with no way to fill them in, so I've closed off a few holes here. The clocks-change days were being thrown away every October and March (48 half hours expected, 50 or 46 delivered), and any gap in the middle of your history used to stay missing for good, because the backfill only ever looked at the end of it. Both now fill themselves in. There's also a button to make it ask EDF again, and where EDF genuinely don't hold the data it'll tell you exactly which days and hours are missing so you can chase them to recover those dates from the central database. Plus the usual pile of smaller fixes — full notes on the release: github.com/stevekirtley/HomeAssistant-EDFEnergy/r… Why the new folder? It's so the integration can be listed natively in HACS (or the Marketplace, as it'll soon be called). There's an existing (slightly less feature-rich) EDF plugin sitting in the old namespace — that one got listed first, because at the time mine was a fork of an existing library and I wasn't eligible to submit it. It's since diverged enough that it's no longer a fork, so now it can go in. As ever, if something looks off, stick an issue on GitHub (or post here) and I'll take a look. 🙏
A10 Mini setup Hey, everyone. I recently bought an A10 Mini with the discontinuation of the Miyoo Mini and was pretty frustrated with it out of the box. I had definitely been spoiled by the years of hard work and dedication of individuals much more proficient than myself and really couldn’t shake the annoyance that the device simply wasn’t great out of the box like my MM+ was after setting it up with Onion. I’ve since collected myself and decided that I made a purchase and I was going to make the best of it. If anyone here has found themselves in a similar position then I hope this guide helps you through a transitional process and gets you gaming on a new little guy! First steps: Getting dArkOS set up: I used a guide from Joey’s retro handhelds. Make sure you download both A10 mini compressed IMG folders from the Christianhaitian GitHub and follow the directions on the guide. You will need Rufus to complete this. joeysretrohandhelds.com github.com/christianhaitian/dArkOS/releases rufus.ie I used the Tiny Best Set Go game pack and made sure to use garlic games and images: archive.org It may take a minute to navigate through the easyroms folder after you’ve flashed the image to your SD card, but make sure you’re putting games in appropriate folders as there are some slight differences in system names. The “IMG" folder for each system should be renamed "images", the lowercase and full word is incredibly important!!! All Atari games should go in the Atari2600 folder as there are no other Atari systems in this game pack. Place this "gamelist.xml" file I've provided into the arcade root folder under the easyroms directory (it should sit alongside your compressed arcade files from the game pack, without this game list file the images will not display correctly): drive.google.com After this is all done connect your device to WiFi by pressing start on the main menu and let’s select a theme by going to: options -> tools -> ThemeMaster Themes suitable for 680x480 will work for either the V2 or V4. If you want to preview before you install browse the gallery by pressing up or down on the dpad, press B to select a theme, press right on the dpad and highlight preview, then press A to preview the theme. If you have time and want the library just press right on the dpad and select download all (I personally installed all of the themes which took way longer than I was expecting!! It’s well worth the wait as some of the themes are very beautiful). SETUP WORK, CORE OPTIONS, ETC: A lot of systems looked like shit to me and I was VERY used to having tons of pre-installed overlay options. For v2 versions any 640x480 overlays will work, for v4 versions get 560 overlays. I used Jeltron's Retro Overlays 750x560 overlays and will include the link to his GitHub: Jeltr0n/Retro-Overlays. Depending on your device file names may be slightly different, I am using the file names for the v4 version which needs the 560 overlays. Quick note* I ordered a V2 and actually received a V4, the listing was then completely removed from AliExpress. I only found out that I had a V4 when going through and configuring the overlays and next settings, so good luck everyone. :) These are what I liked most and what worked for me, you may have different tastes, but this could be a good start to get you going! FOR GBA OVERLAYS AND SHADERS: interger scaling off -> 3:2 aspect ratio quick menu -> onscreen overlay -> overlay preset GBA\_540.cfg settings -> video -> scaling- x position = 0, y position = 0 quick menu -> shaders on -> load preset, shaders\_glsl -> interpolation -> sharp-bilinear.glslp save core overrides FOR GBC OVERLAYS AND SHADERS: interger scaling off -> custom aspect ratio: 528x475 quick menu -> onscreen overlay -> overlay preset GBC\_540.cfg settings -> video -> scaling- x position = 0, y position = 0 quick menu -> core options - > color correction = GBC only, color correction mode = fast, dark filter level = 15 save content directory overrides (DO NOT CLICK SAVE CORE OVERRIDES, THE GB AND GBC USE THE SAME CORE, MAKE SURE YOU SELECT “SAVE CONTENT DIRECTORY OVERRIDES”) FOR GB OVERLAYS AND SHADERS: interger scaling off -> custom aspect ratio: 528x475 quick menu -> onscreen overlay -> overlay preset DMG\_540.cfg settings -> video -> scaling- x position = 0, y position = 0 quick menu -> shaders -> load preset, shaders\_glsl, handheld, lcd3xglslp quick menu -> core options -> video -> GB colorization, internal palette, GB - DMG (you can cycle with your shoulder buttons in game afterwards) save content directory overrides (DO NOT CLICK SAVE CORE OVERRIDES, THE GB AND GBC USE THE SAME CORE, MAKE SURE YOU SELECT “SAVE CONTENT DIRECTORY OVERRIDES”) FOR ARCADE (VERY HIT AND MISS, A LOT OF GAMES WILL JUST NOT RUN WELL ON THIS HARDWARE): enter Arcade games menu, press start, emulator settings -> Arcade -> emulator = RETROARCH, core = MAME2003_PLUS This solved a lot of games not loading that I was previously experiencing, but some games will just run like shit since the device isn’t that powerful. FOR SFC CORE: enter SFC games menu, press start, emulator settings -> Super Famicom -> emulator = RETROARCH, core = SNES9X2010 Necessary for some of the “heavier” SFC games. FOR PS CORE: enter PS games menu, press start, emulator settings -> PlayStation -> emulator = RETROARCH32, core = PSXY_REARMED I really hope this helps even 1 person not feel like they’ve hit a brick wall out of the box like I did. There are so many amazingly talented individuals in this community and I’m really only compiling their amazing work. Any suggestions, criticisms, or questions let me know. I will try to rewrite this if there is any confusion.
Does NEAR usage pay for the NEAR it mints? Using NEAR block headers + NEAR Intents revenue: over 90 days, usage covered 19% of issuance. Break-even needs ~5.3x. Demo: raindess69.github.io Code: Raindess69/near-usage-thesis Built at NEAR HACKATHON @NEARProtocol #NEARHackathon t.co
[KDE] Cloudy Debian (: Hey! It's my first rice, trying my best (: I wanted it to be comfortable for daily work first of all, and to learn new things step by step along the way. Thanks to this subreddit for the inspiration! Details: OS: Debian 13 (trixie) DE: KDE Plasma 6.3.6, Wayland Base theme: Utterly Sweet by HimDek (Kvantum + Plasma theme), fully recolored by me. HimDek/Utterly-Sweet-Plasma Colors: graphite + pink, my own palette. I replaced the navy/magenta/cream of the original with a script that rewrites Kvantum, the Plasma color scheme, Konsole and fastfetch from one palette file. Icons: YAMIS (monochrome) by dirn Window decorations: Round-Dark Wallpaper: found online, source unfortunately unknown, but I can comment a name later if needed. Terminal: Konsole, my own color scheme Font: JetBrainsMono Nerd Font Fetch: fastfetch (my 3-box layout) + brrtfetch for the animated logo. ferrebarrat/brrtfetch Font: JetBrainsMono Nerd Font Panel: rebuilt, 60px, translucent, 24h clock without date Launcher icon: drawn by hand (two toggle switches)
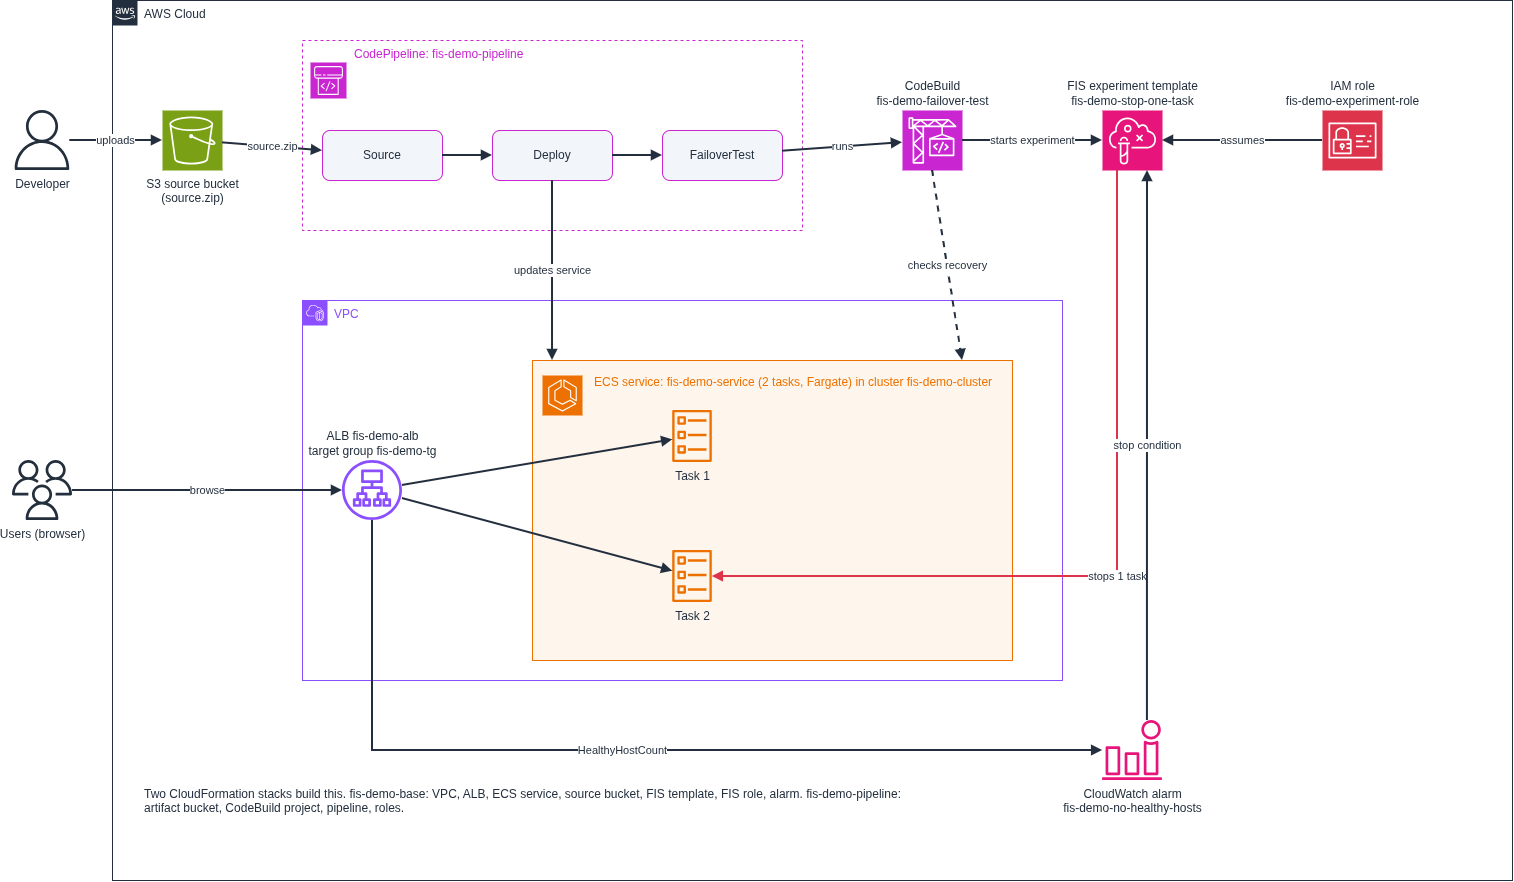
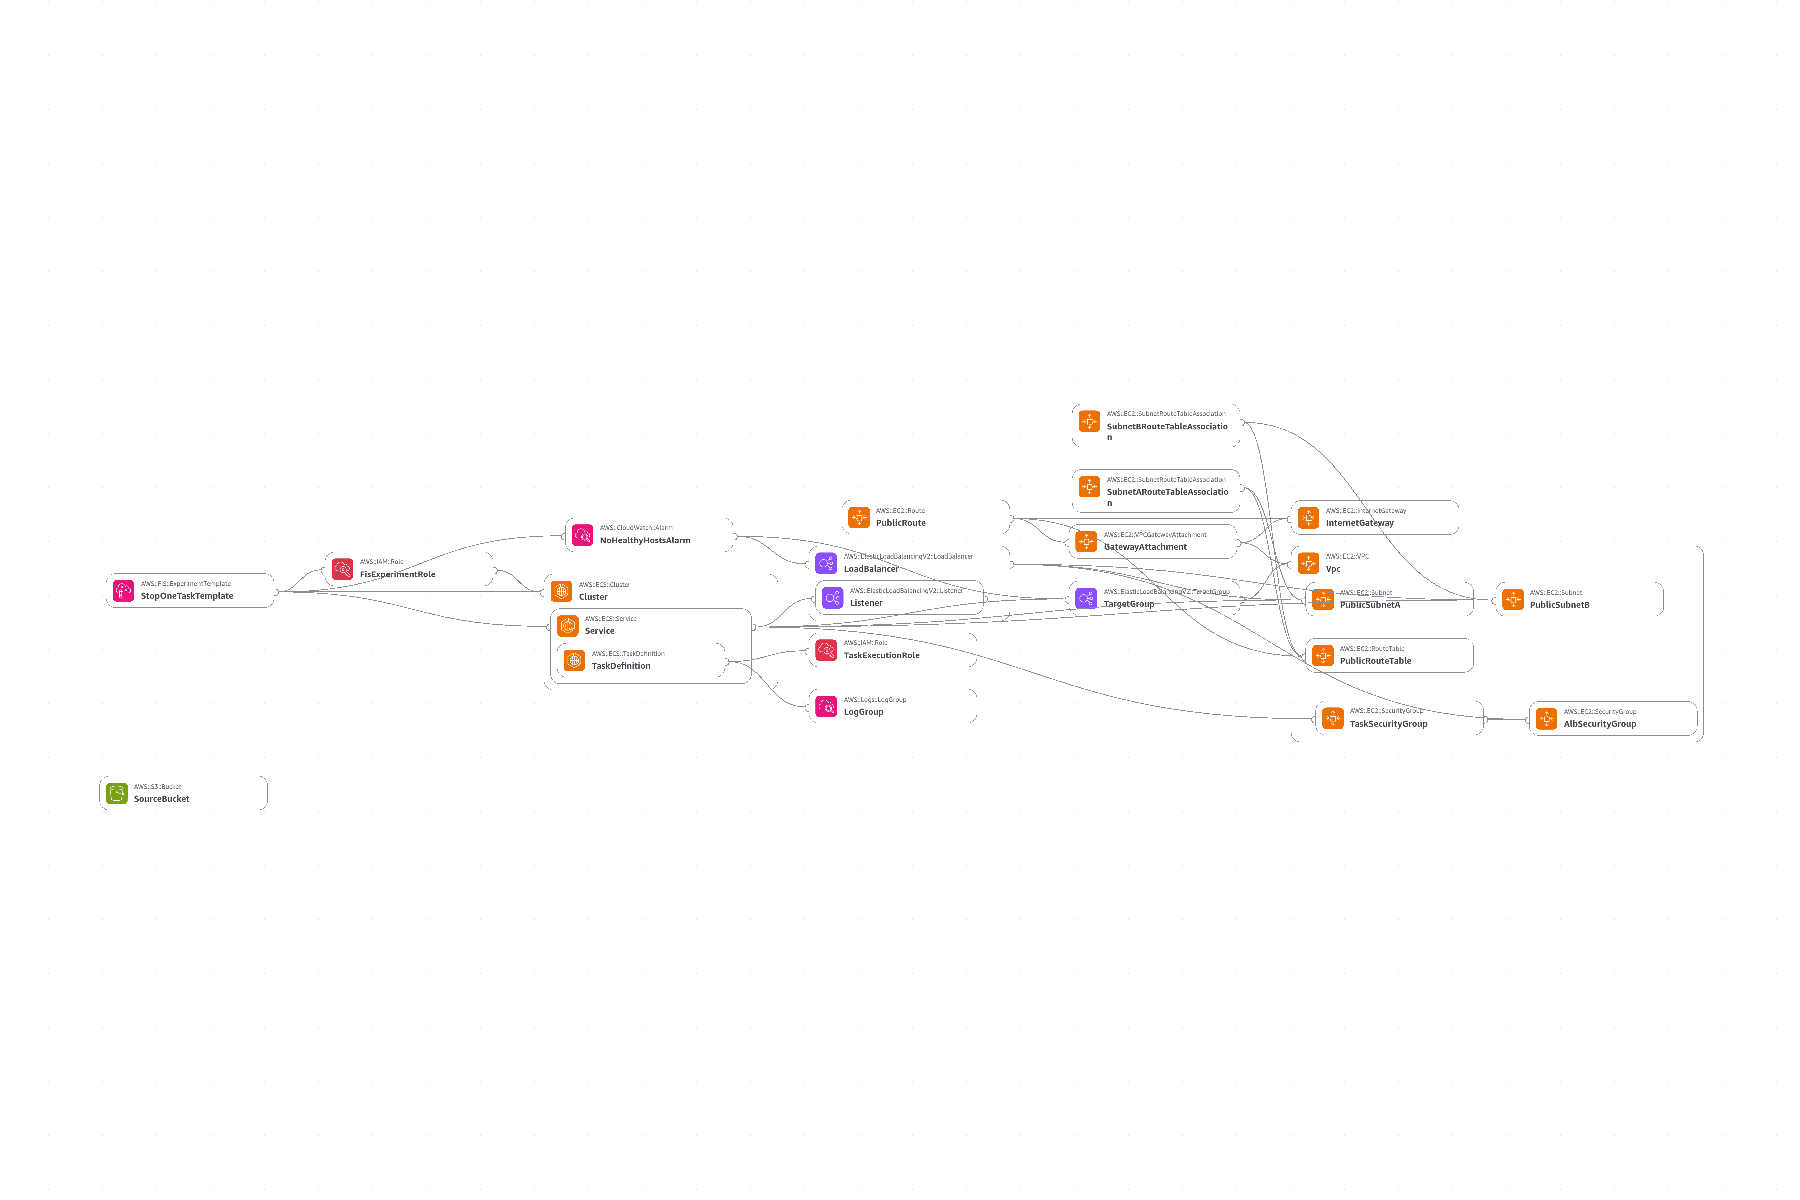
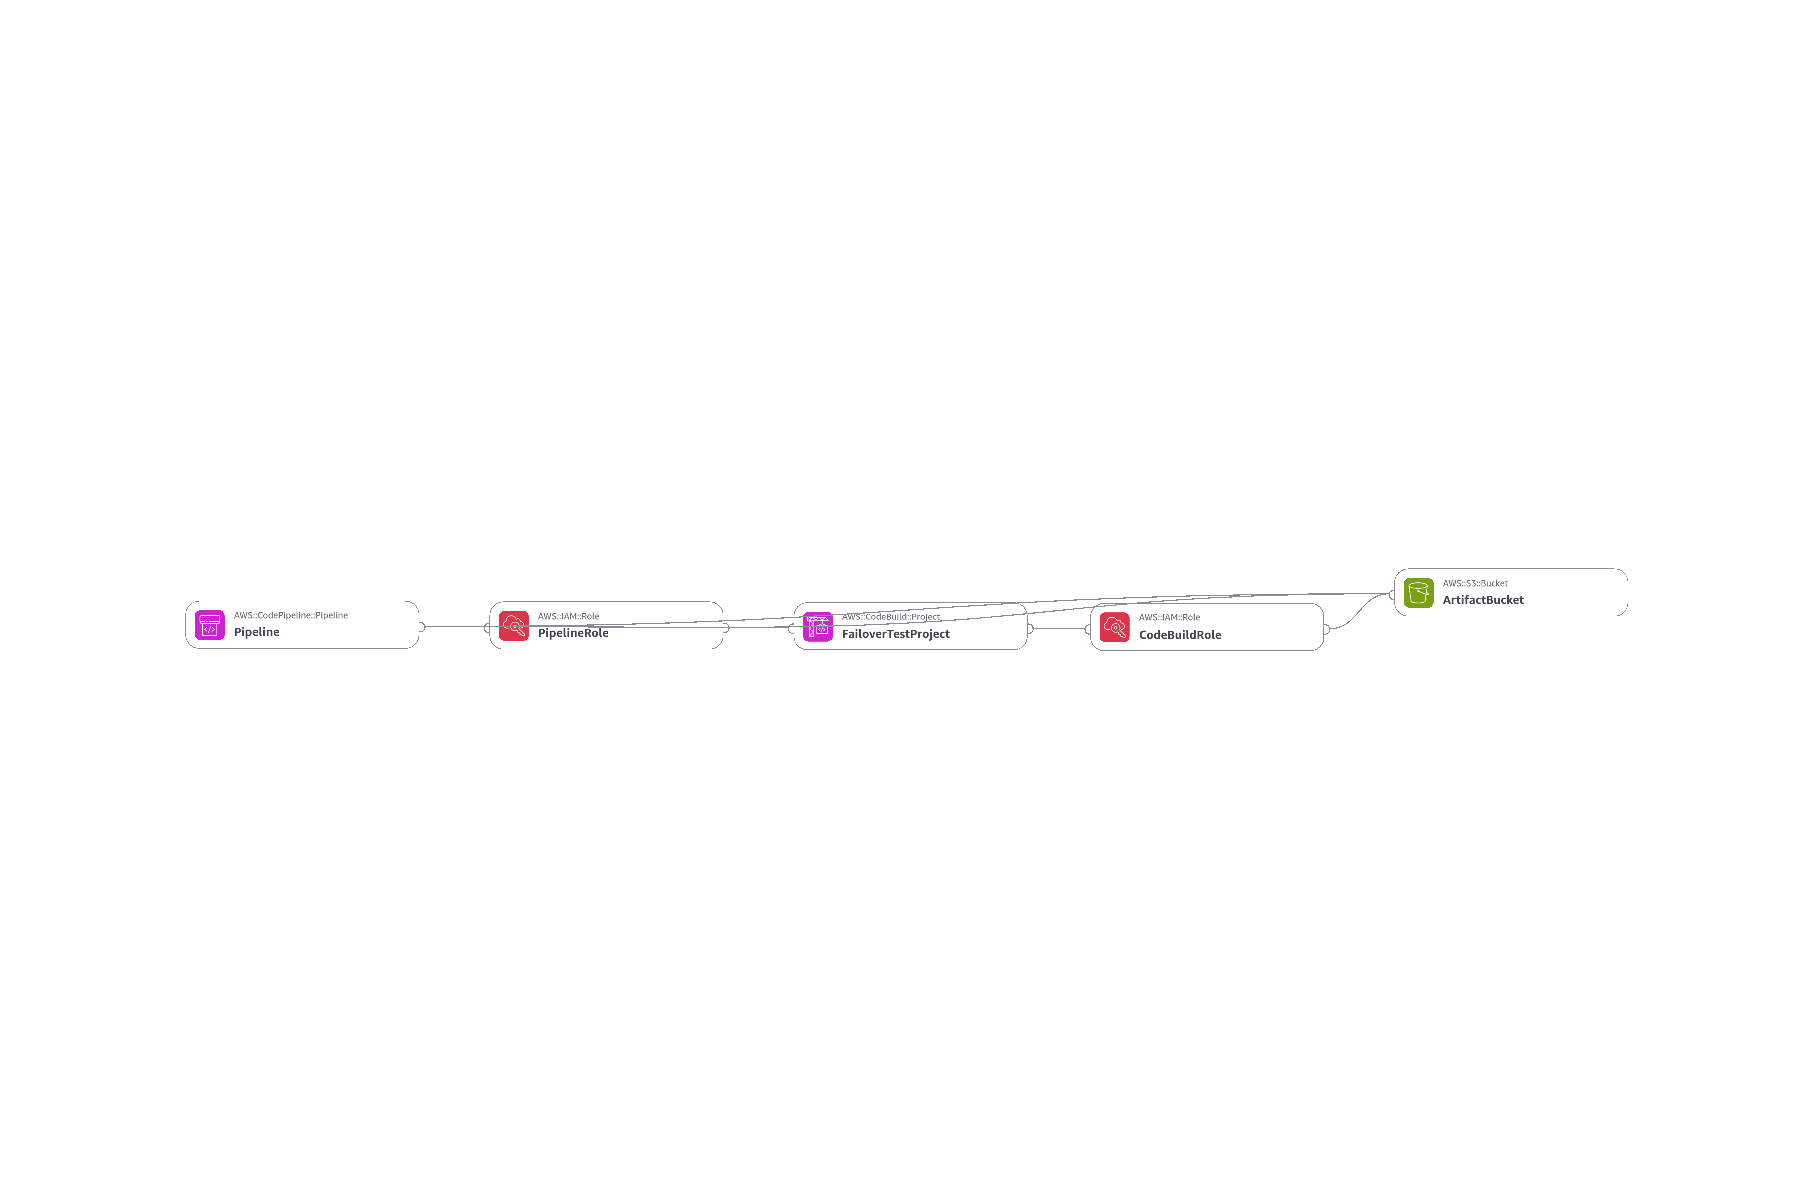
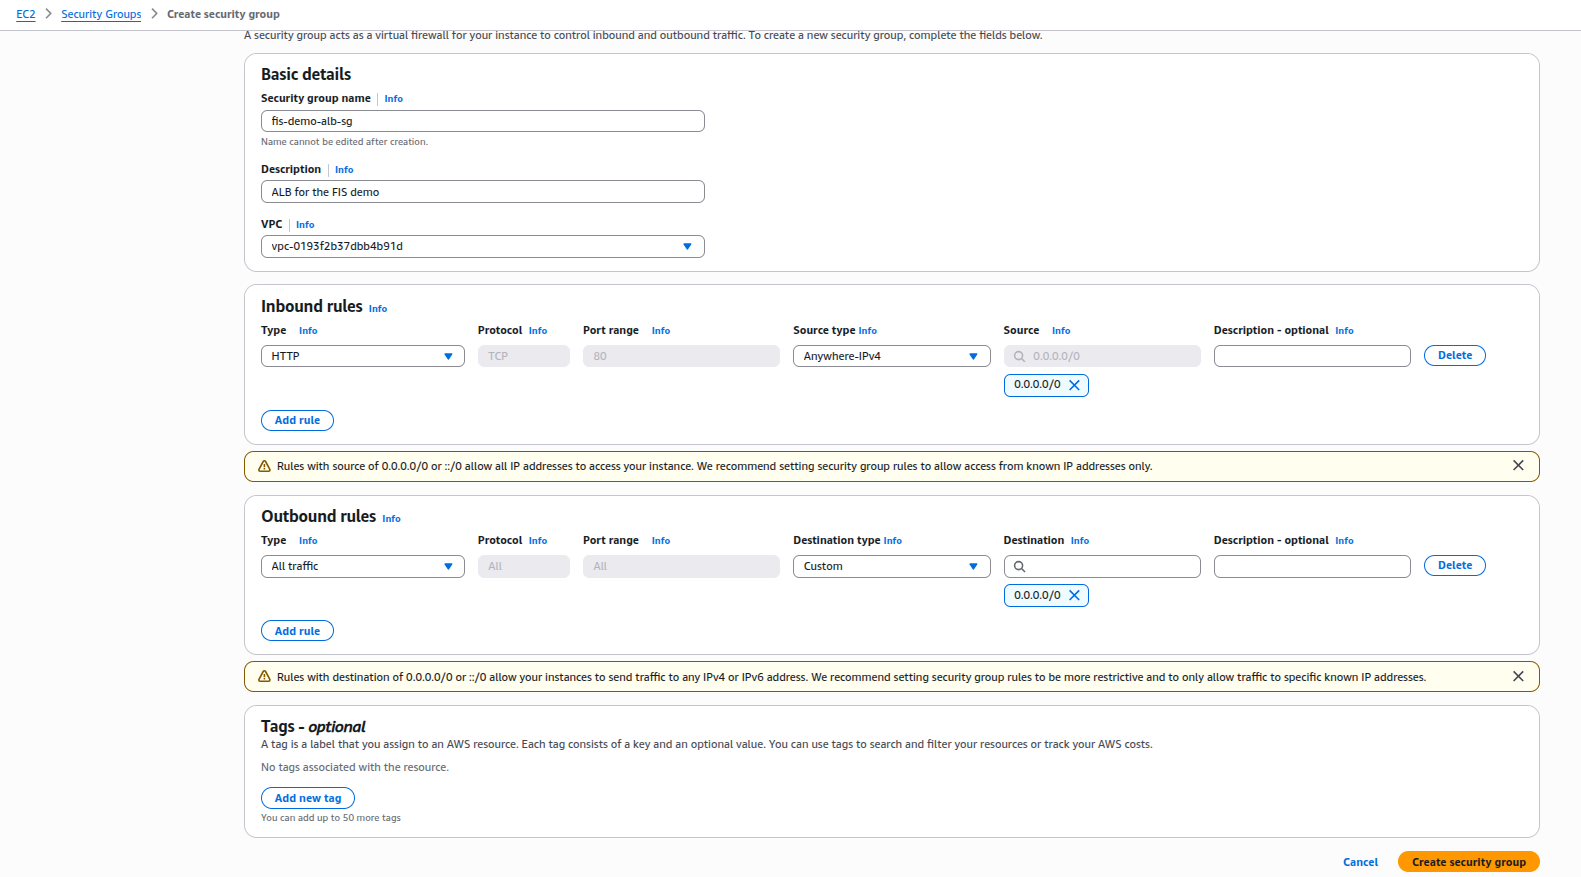
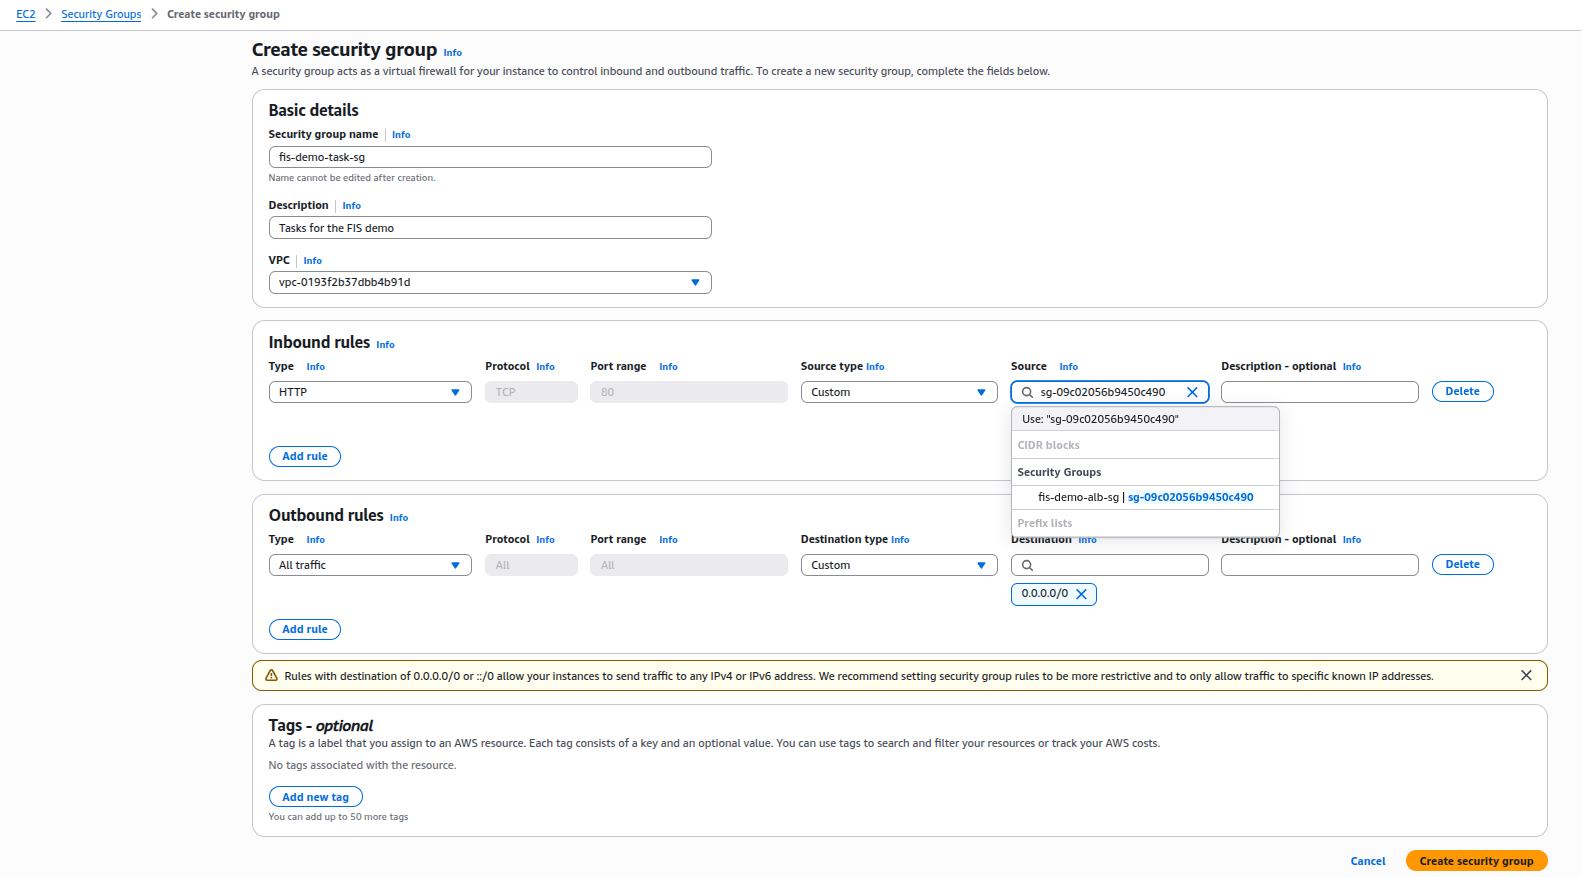
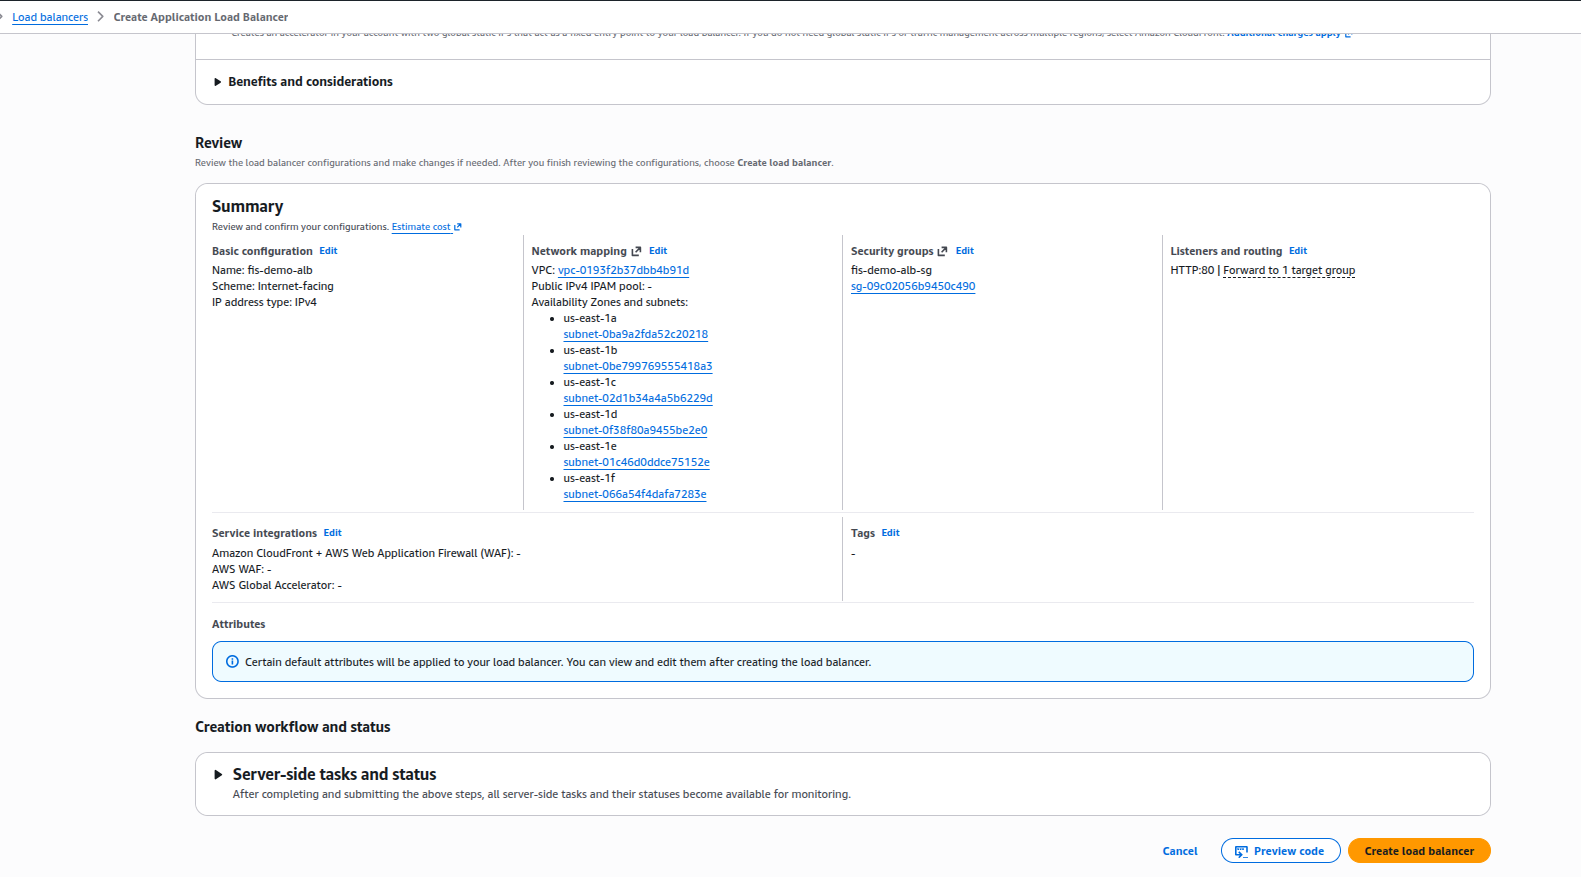
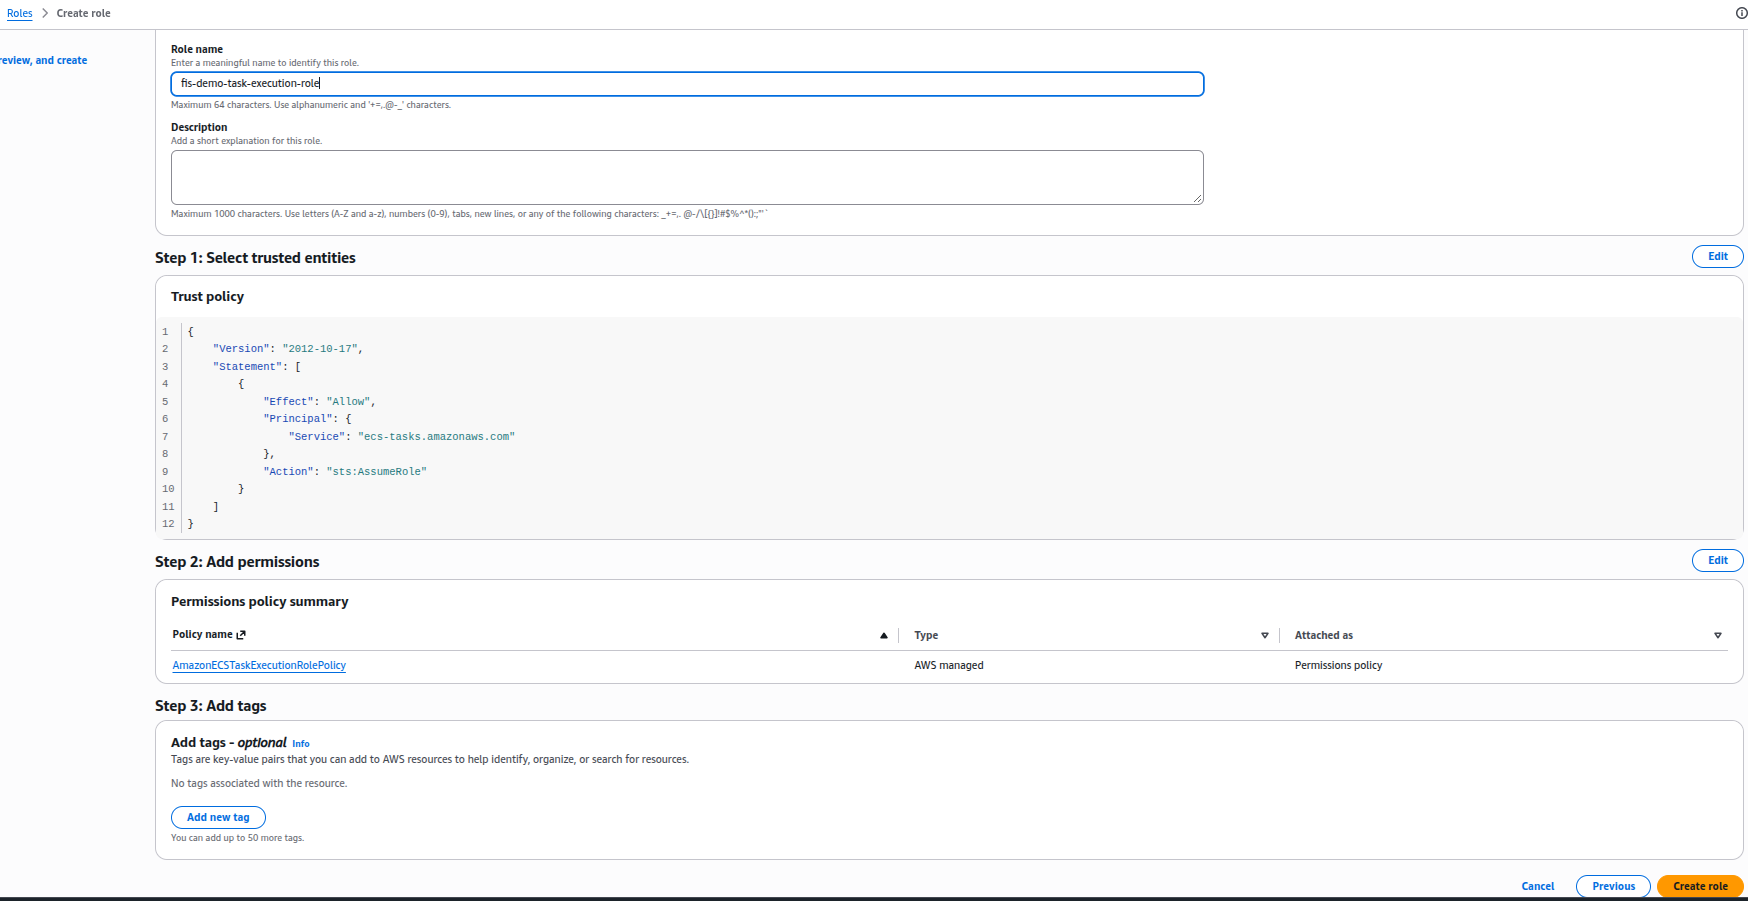
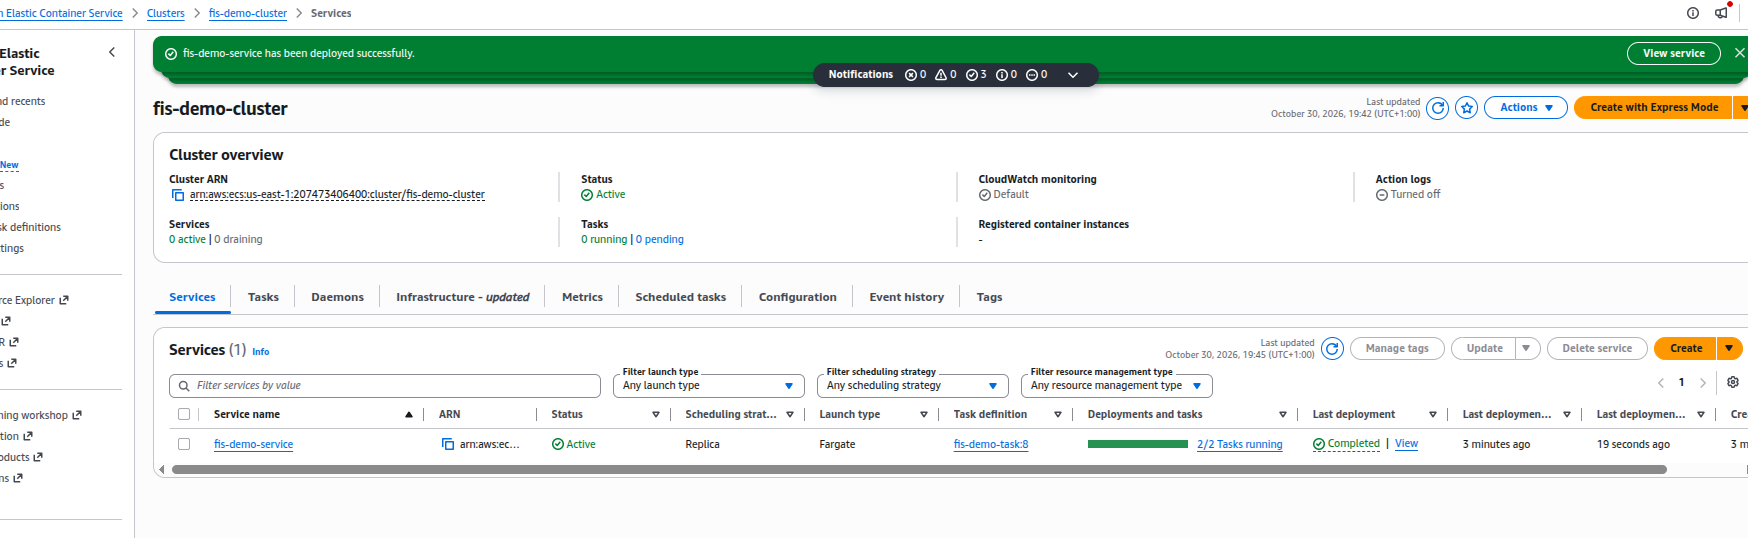
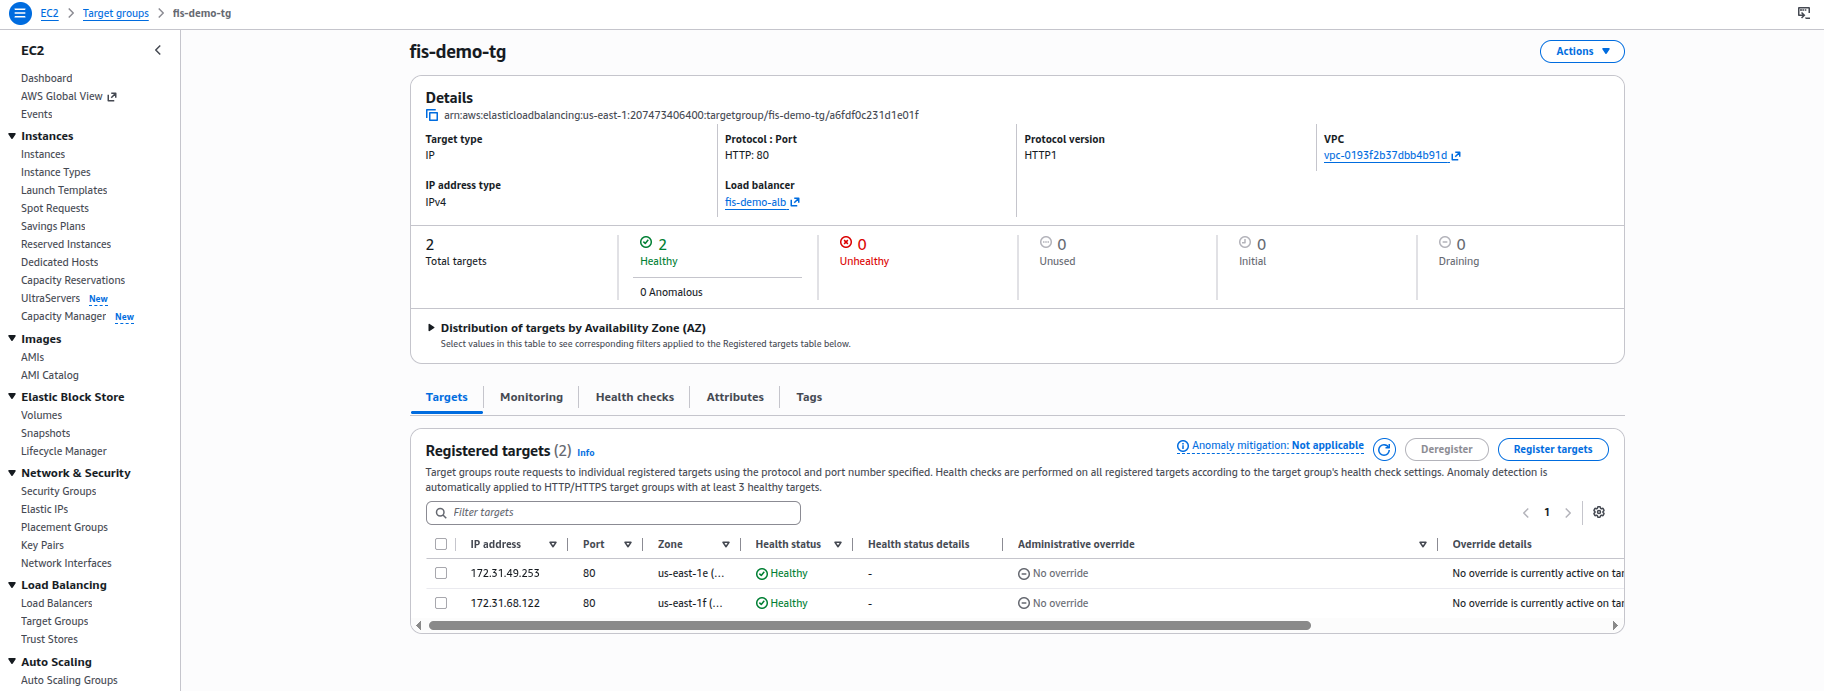
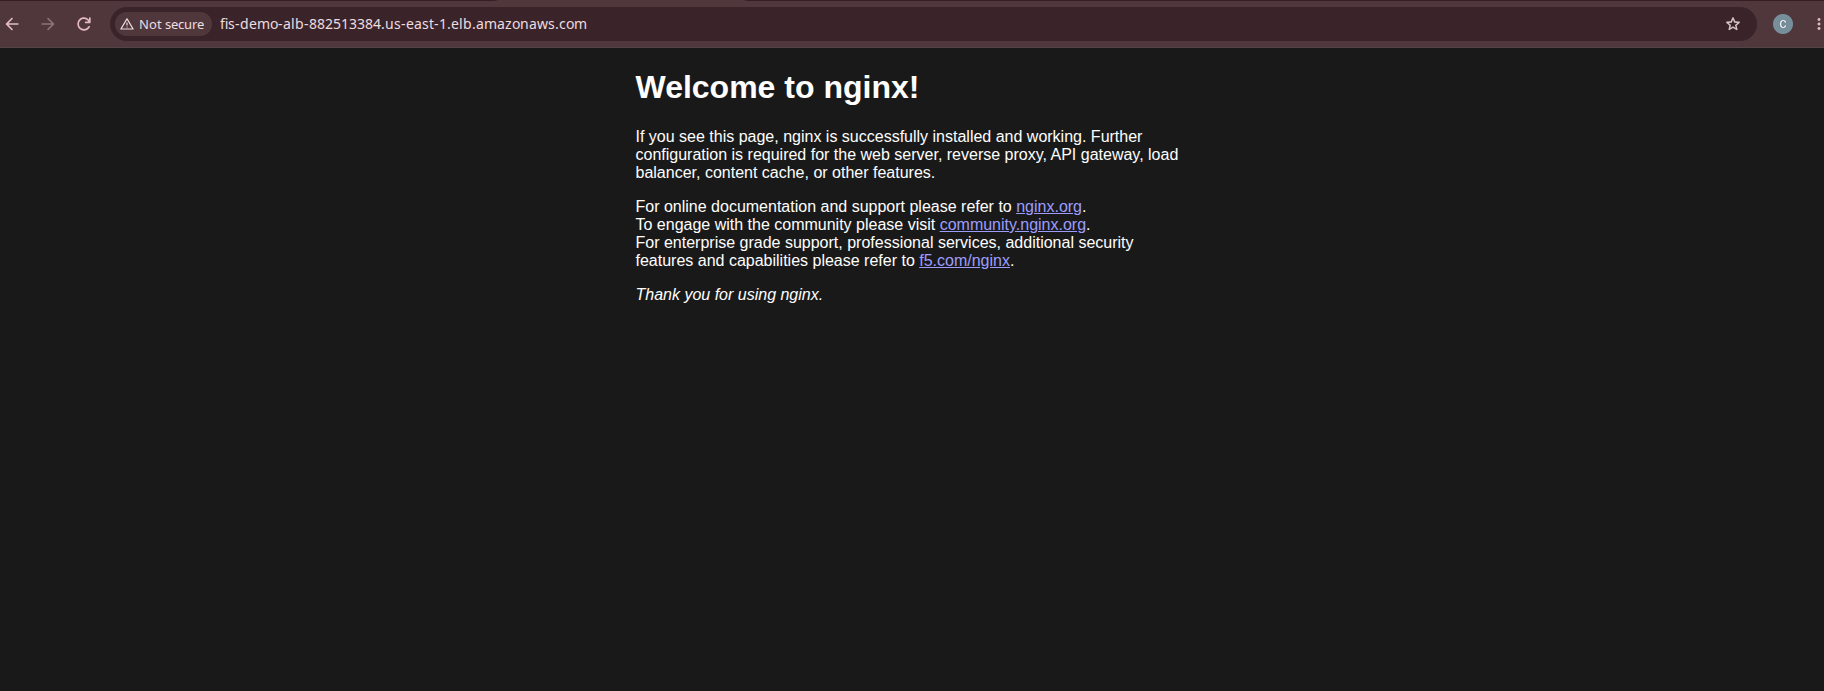
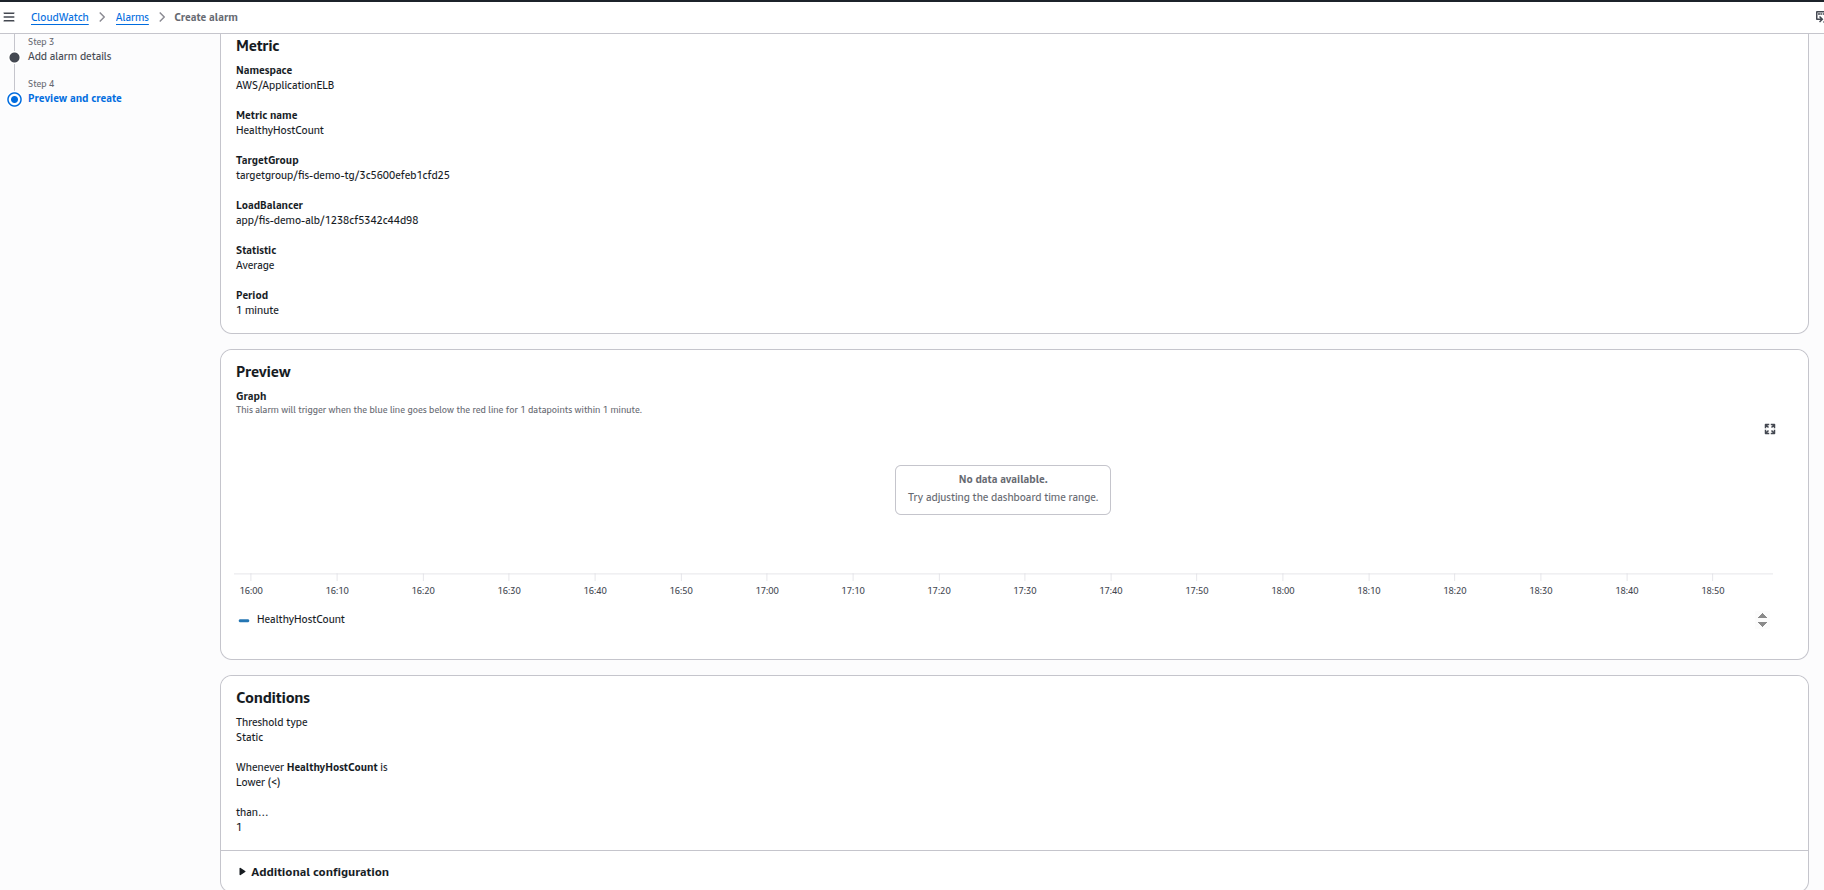
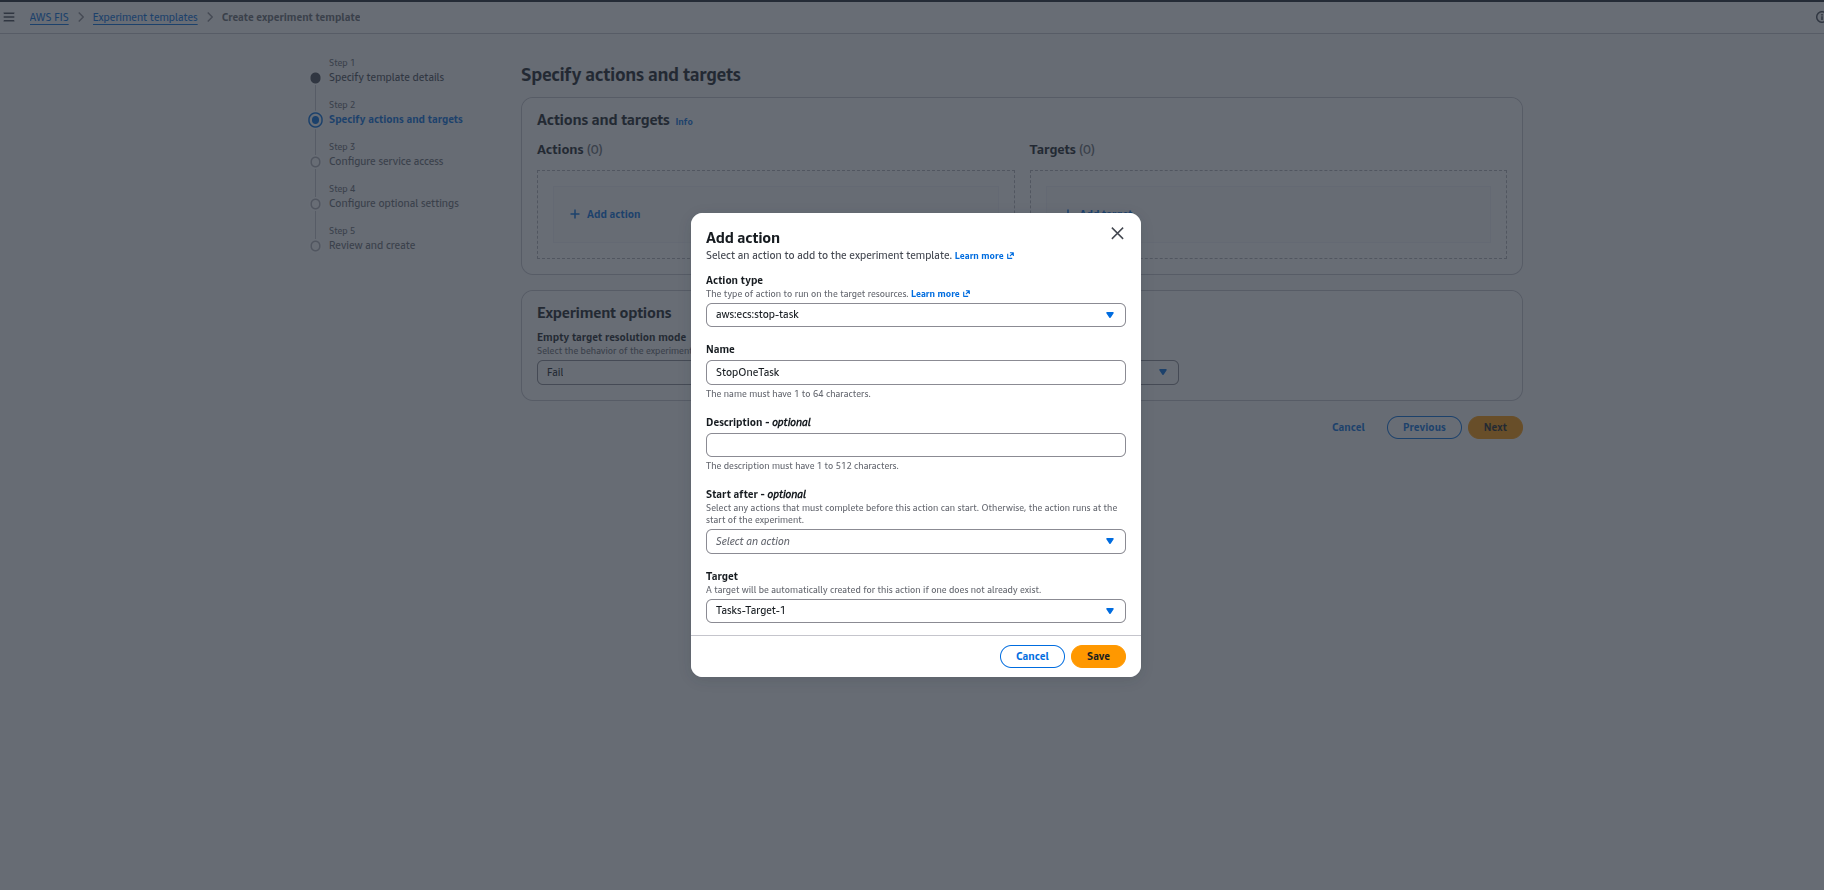
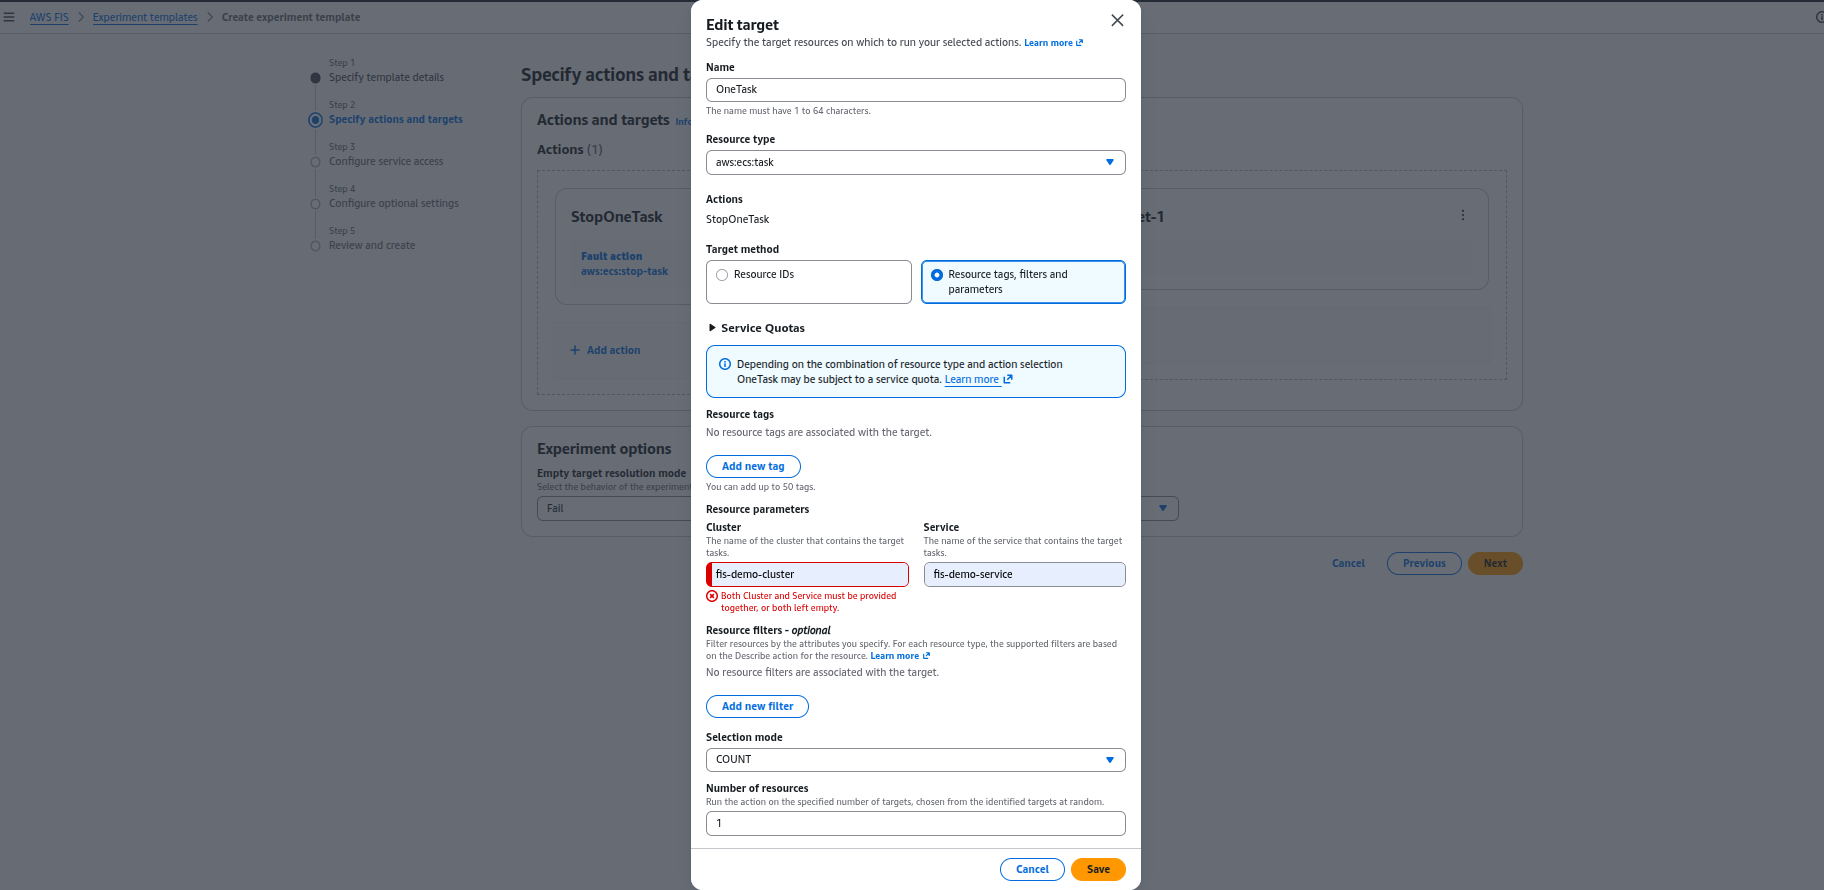
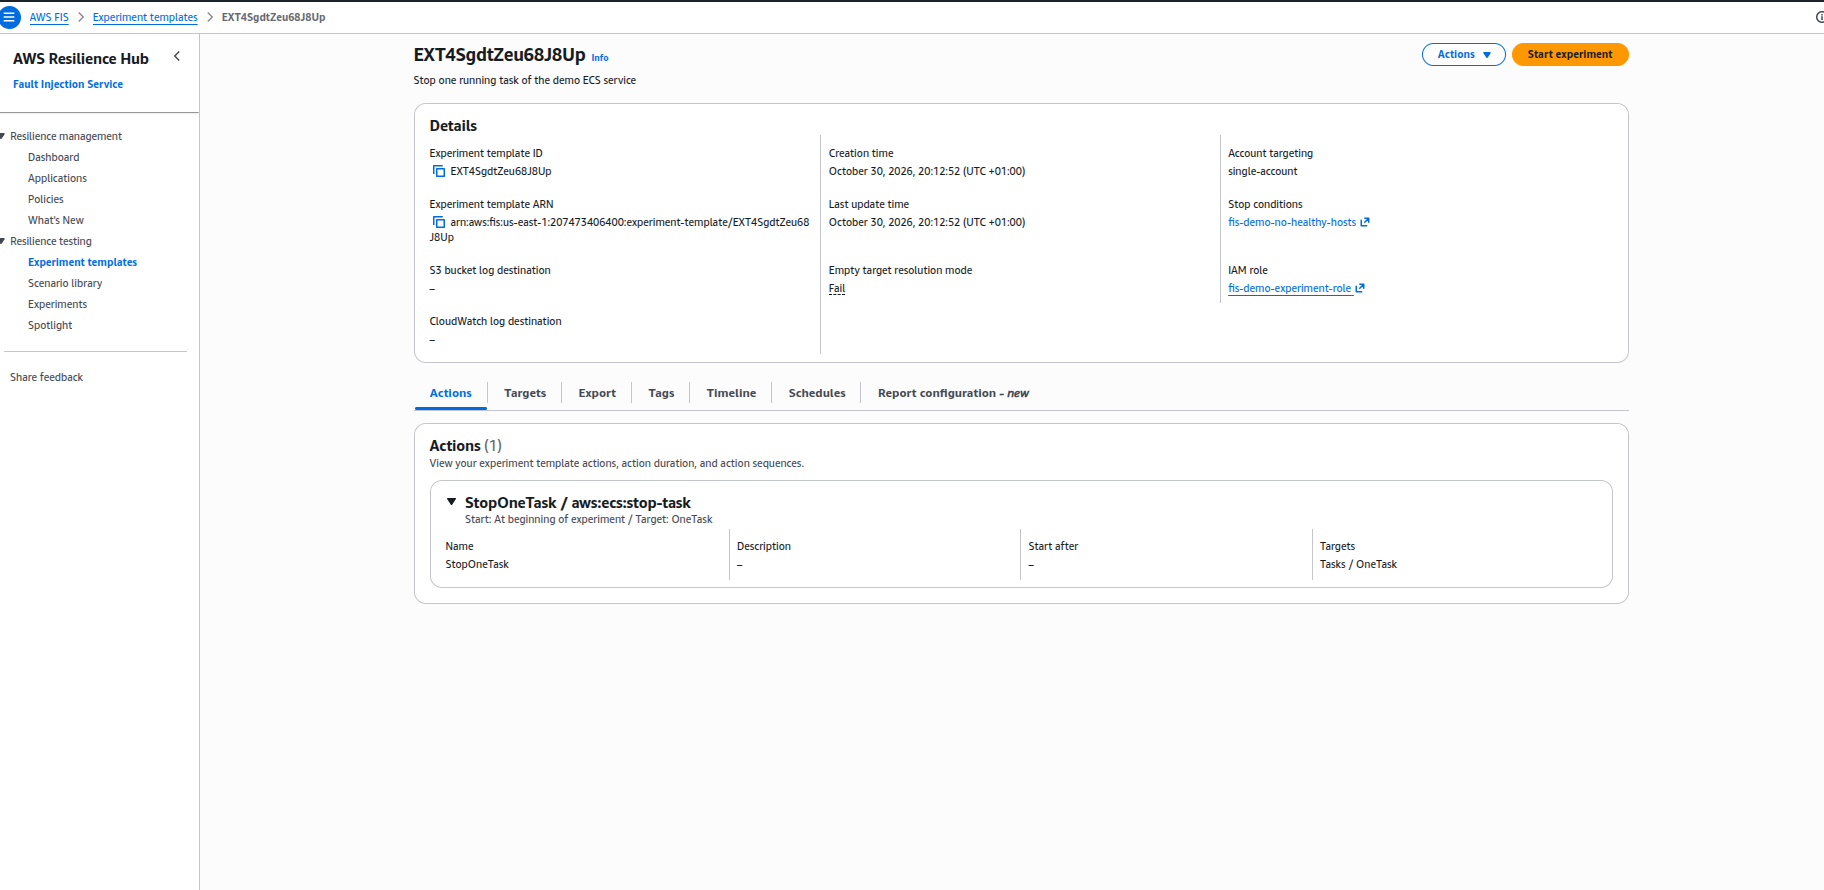
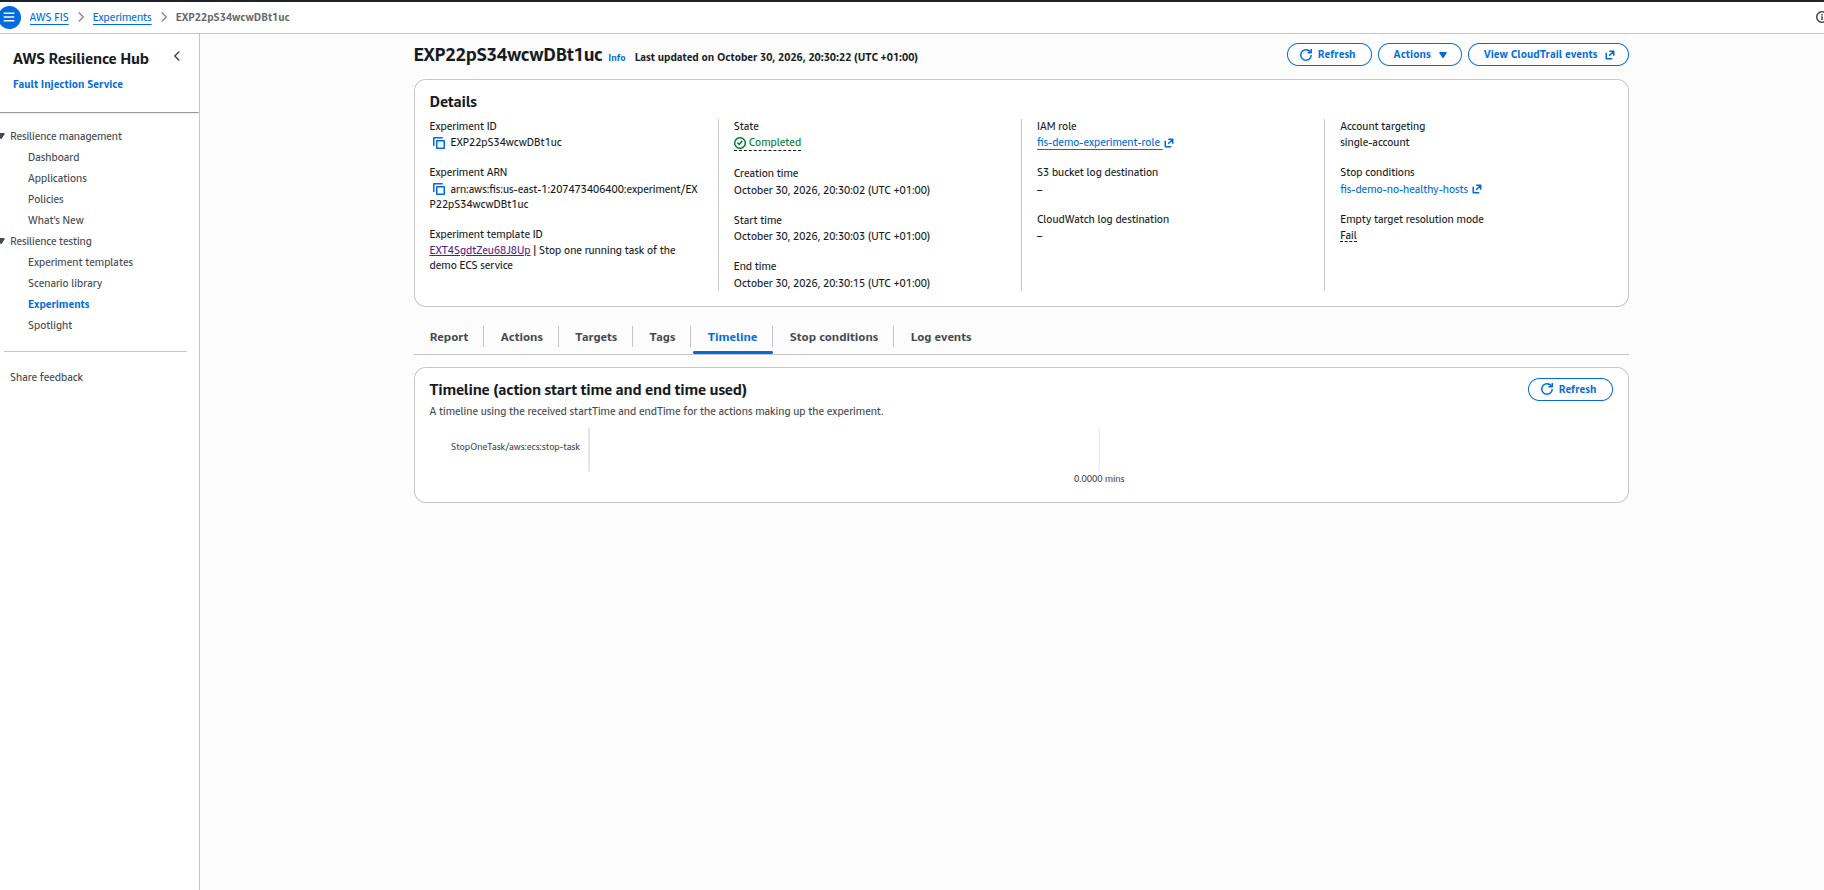
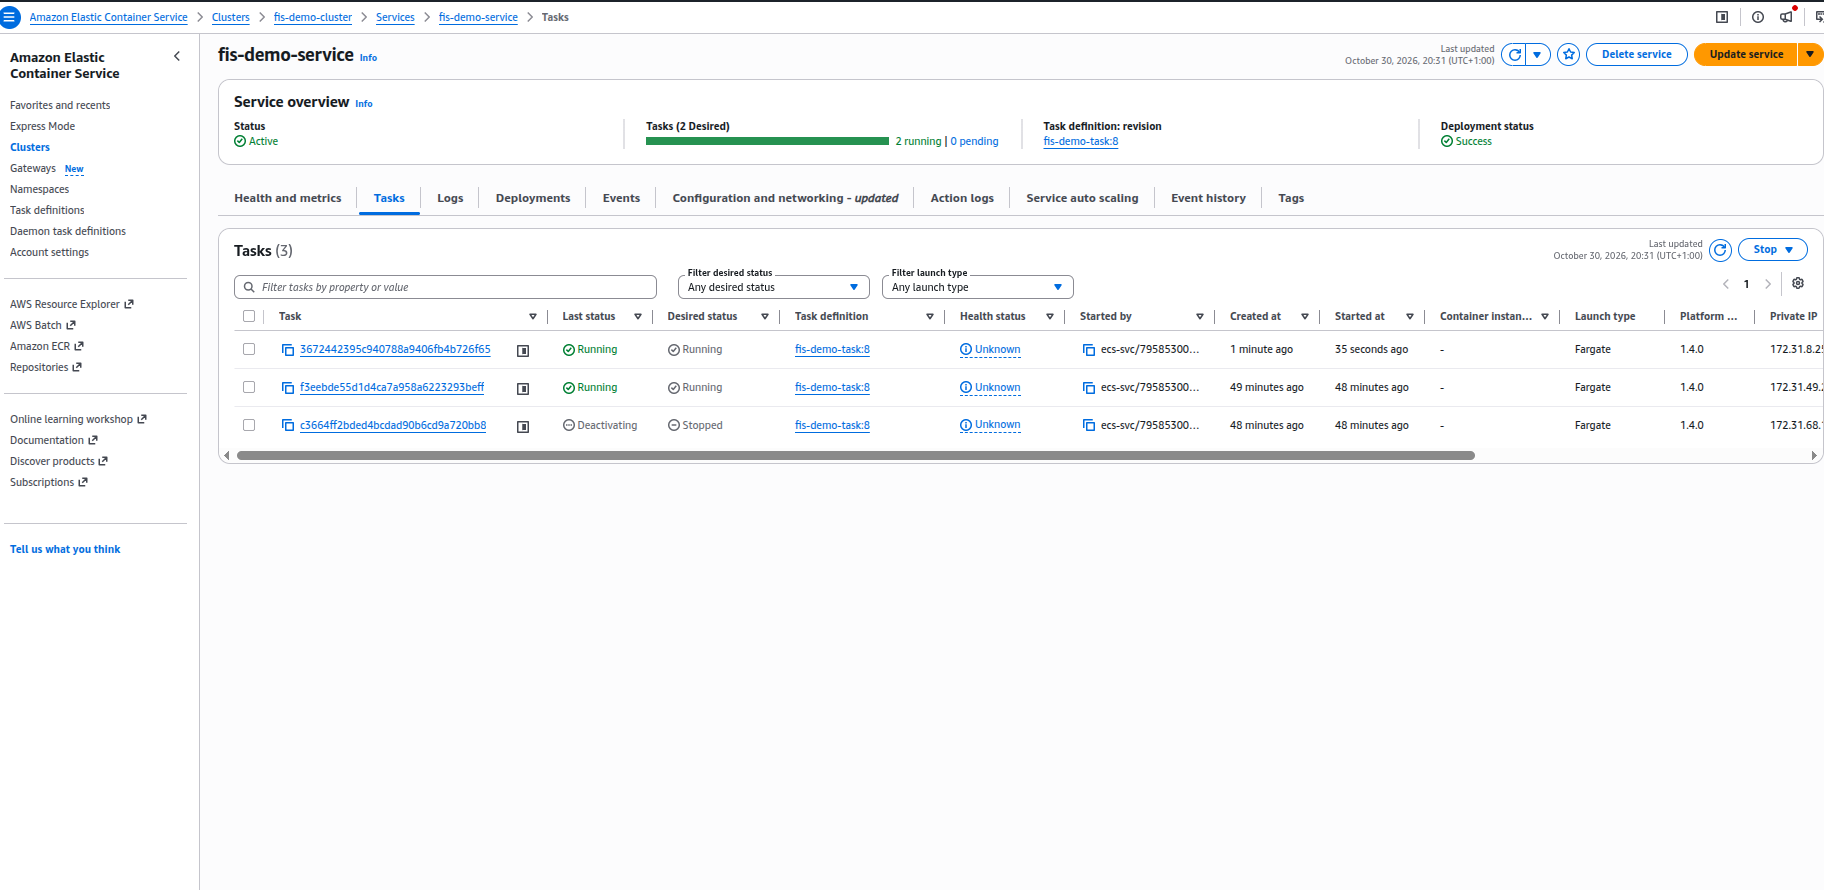
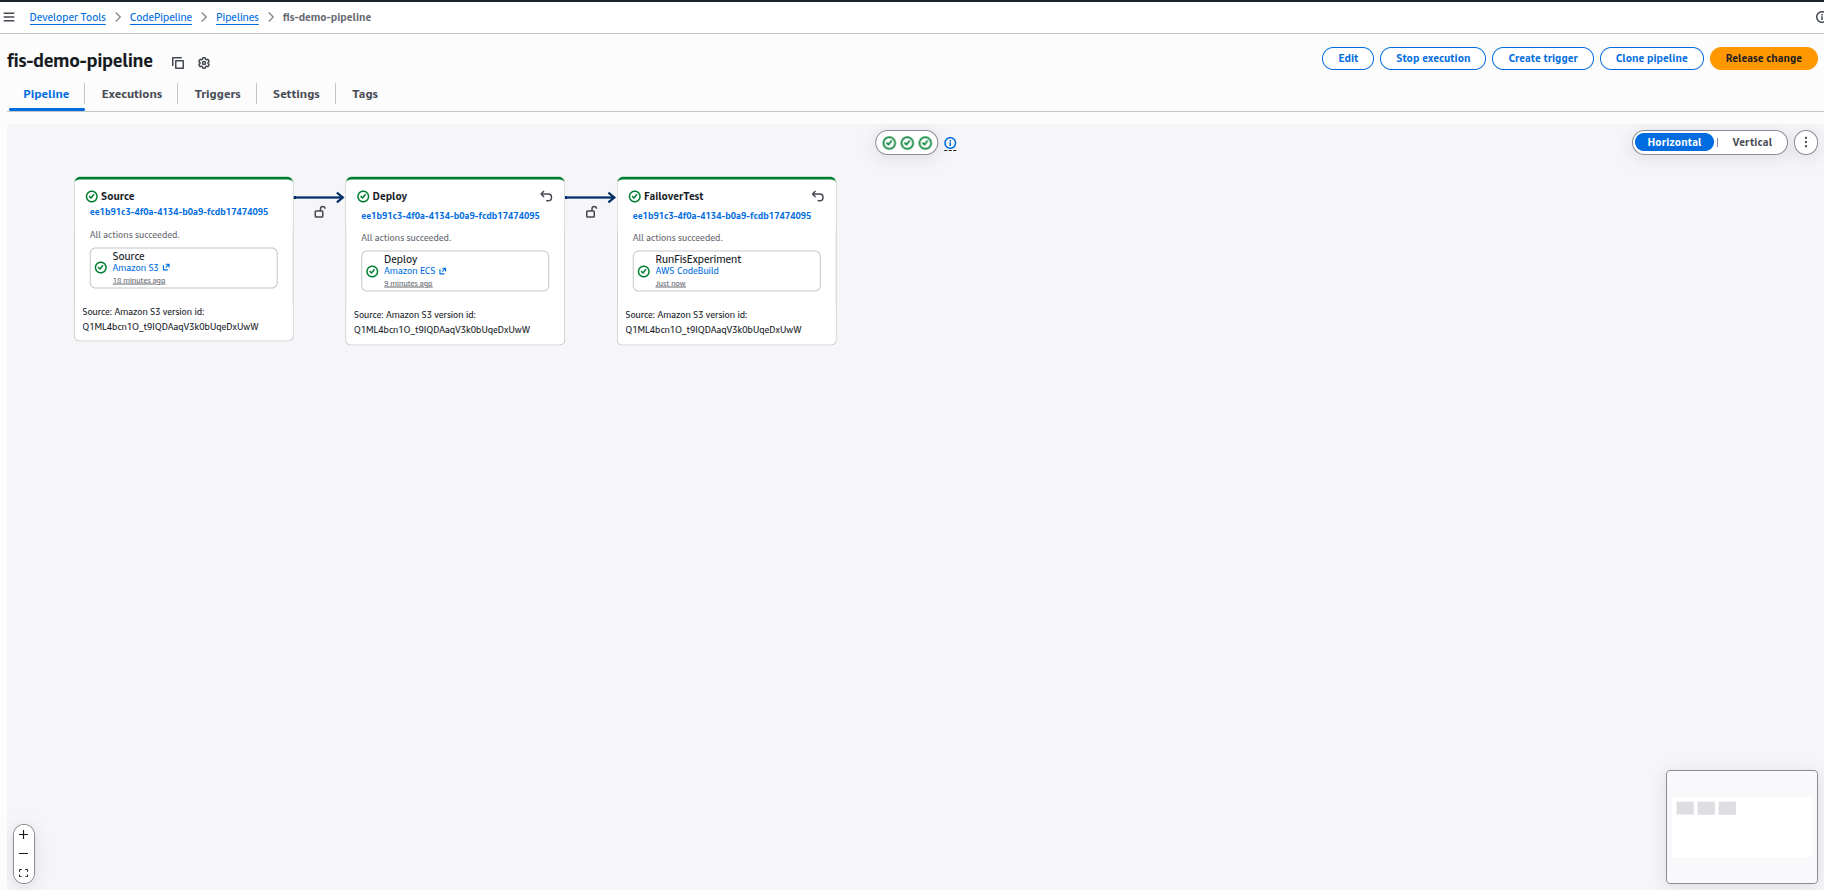
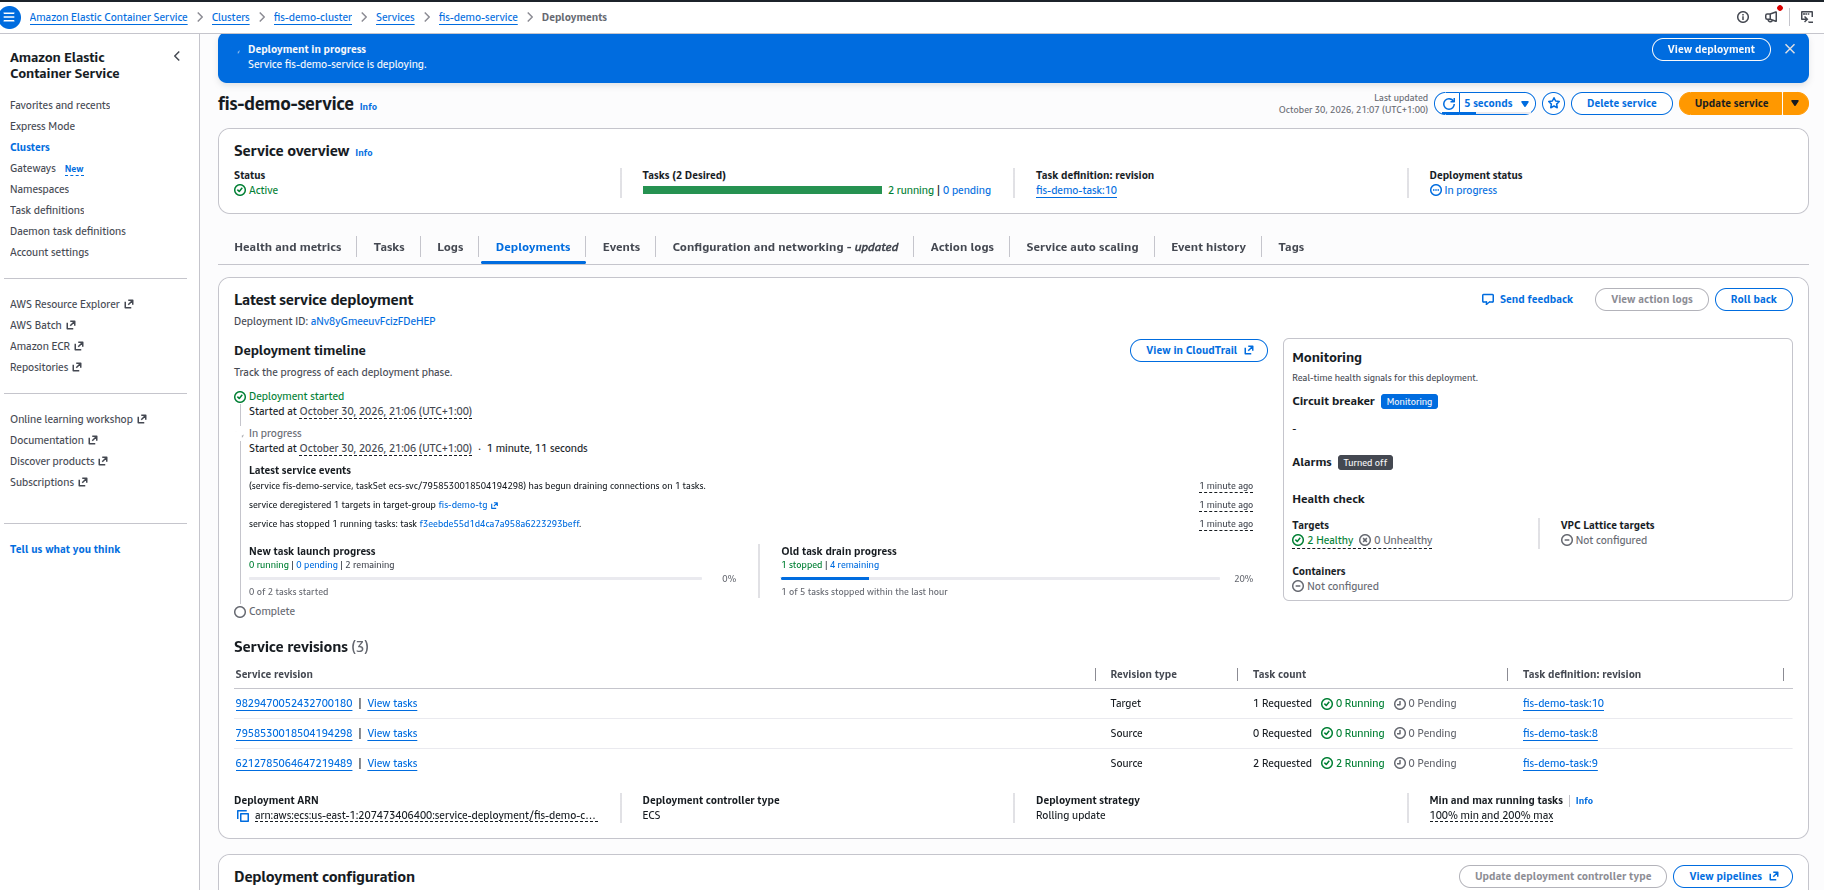
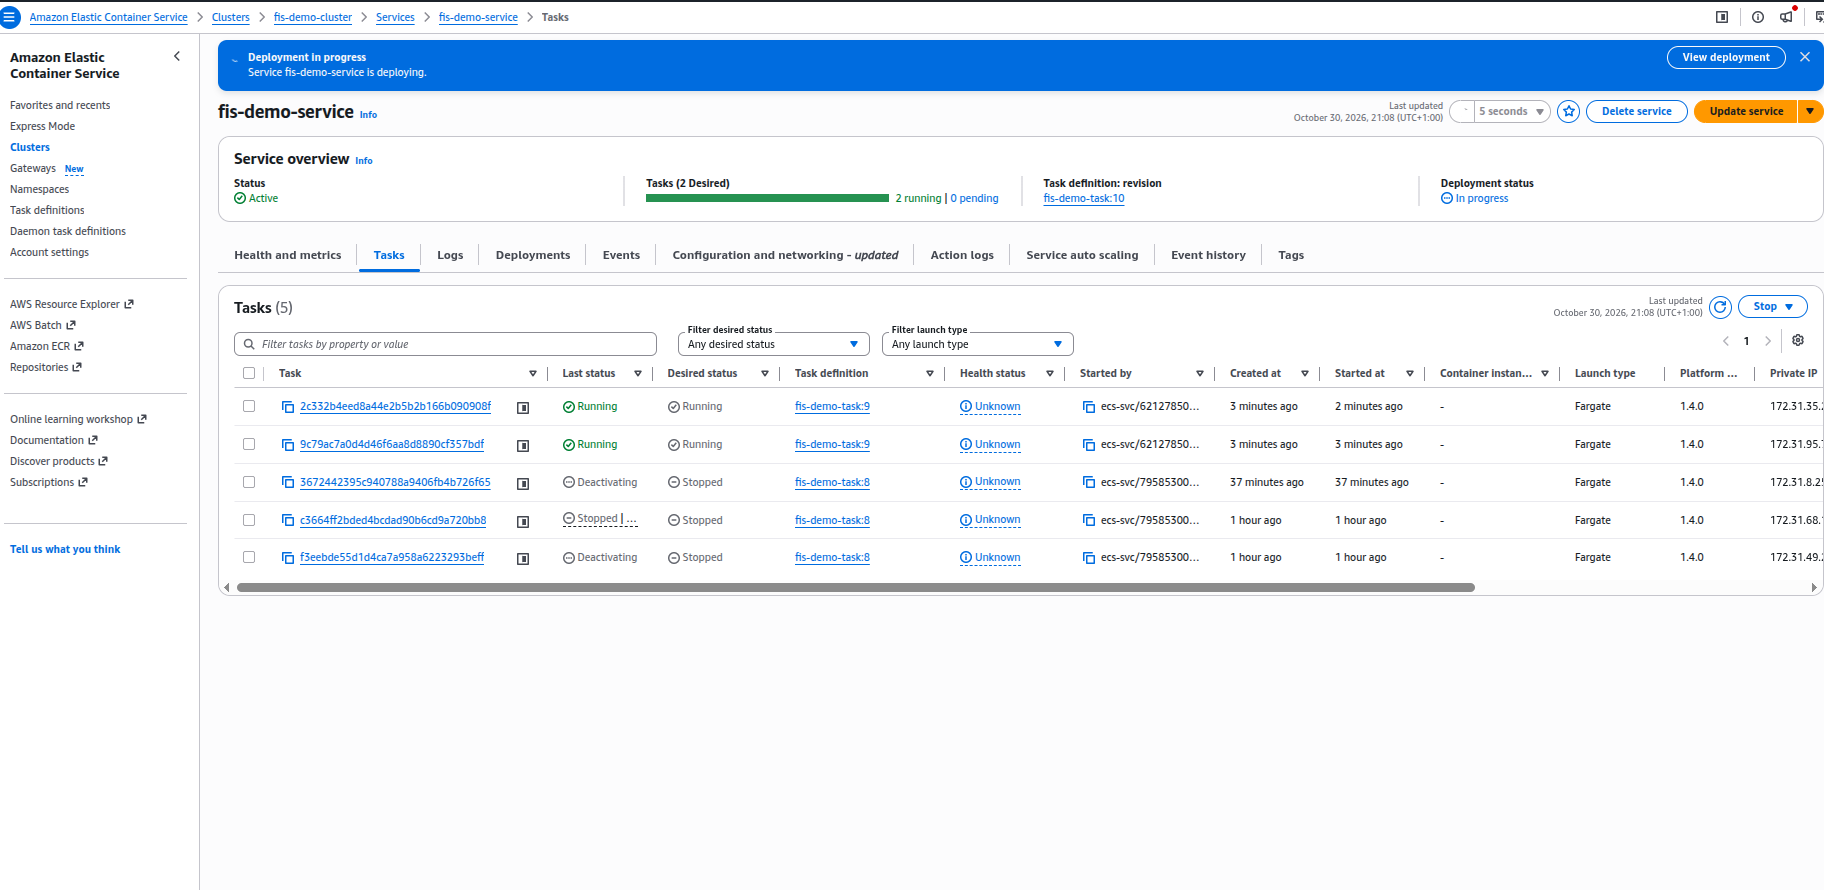
Test failover in your CI/CD pipeline with AWS Fault Injection Service Introduction When a task in an ECS service stops, ECS starts a new one by itself. You do not have to do anything. The load balancer then sends traffic to the new task when it is healthy. That is the design. But a design is a claim until you test it. These things can still go wrong: - The new task cannot start. For example, the image cannot be pulled or a setting is missing. - The new task starts but never passes the load balancer health check. - The service recovers, but it takes longer than you can accept. - The service runs only one task, so users see an outage while the replacement starts. Most teams find these problems during a real outage. In this guide, you find them on every release instead. You build a pipeline that does this: 1. It deploys the service. 2. It uses AWS Fault Injection Service (FIS) to stop one running task on purpose. 3. It waits, then checks that the service is back to its desired task count and that the load balancer shows all targets healthy. 4. If recovery takes longer than the time you set, the stage fails. You will build it twice. First by hand in the AWS console, so you see every part. Then with two CloudFormation stacks. The demo service runs plain nginx, so the test will pass. The demo shows how the pieces work. The test becomes useful when you point it at a real service. What this test proves: the service recovers from a lost task within a time limit that you choose. What it does not prove: zero failed requests during the failure. It does not send traffic while the task is down. Architecture !Architecture Diagram !Resource Diagram !Pipeline Diagram - An S3 bucket holds source.zip. A change to this file starts the pipeline. - CodePipeline has three stages: Source, Deploy, FailoverTest. - The Deploy stage updates the ECS service. - The FailoverTest stage runs a CodeBuild project. It starts the FIS experiment and checks recovery. - The FIS experiment stops one task of fis-demo-service. - A CloudWatch alarm watches the number of healthy targets. It is the experiment's stop condition. The service runs 2 tasks. The experiment stops 1 of them, so one task stays up while ECS replaces the other. How the pieces fit Deploy and FailoverTest are two different jobs. The Deploy stage is a normal release. It puts the new version on ECS. The FailoverTest stage runs after it and asks one question: does the service still recover if a task dies? It works like an integration test that runs after a deploy. What FIS does. FIS is the tool that breaks the task. It stops one task and only one, because the target is set to select a count of 1. It uses its own IAM role, which can only stop tasks in this cluster, so the pipeline does not need broad ECS permissions to break things. It also keeps a record of each experiment. You could stop a task with aws ecs stop-task and get the same failure. FIS adds the limited role, the record, and the stop condition. FIS is worth more with faults that run over time, such as CPU stress or network delay, because a stop condition can halt those. For this one action, the stop-condition alarm cannot undo a stopped task. The real safety control is the count of 1. Why CodeBuild is in the pipeline. At the time of writing, I found no built-in CodePipeline action that starts a FIS experiment. So the FailoverTest stage runs a CodeBuild project, and CodeBuild runs a script. CodeBuild does not break anything itself. It gives the script a place to run, and it turns the result into pass or fail for the pipeline. What the script does. CodeBuild reads buildspec/run-fis-experiment.yml from source.zip. That file runs scripts/run-fis-experiment.sh. The script has four steps. It exits with an error if any step fails. 1. Check before. It asks ECS how many tasks are running and asks the load balancer how many targets are healthy. Both must equal the desired count. If not, it stops. A service that was already broken should not be blamed on the test. 2. Start. It runs aws fis start-experiment with the experiment template ID. FIS stops one task. 3. Wait for the experiment. It checks the status every 10 seconds until the experiment is completed. If the status is stopped, failed or cancelled, or it takes more than 300 seconds, the script fails. 4. Wait for recovery. It keeps checking running tasks and healthy targets until both match the desired count again. If this takes longer than RECOVERY_TIMEOUT (300 seconds by default), the script fails. Otherwise it prints The service recovered. Test passed. The script gets the template ID, cluster name, service name and target group ARN from environment variables on the CodeBuild project. Why S3 is used. The project uses two S3 buckets, for two different jobs. - The source bucket holds source.zip. A pipeline needs a place to read its source from. S3 keeps the demo simple, because it needs no GitHub connection and no extra setup step. CodePipeline reads the source as one zip file, and the bucket must have versioning turned on. A new upload of source.zip creates a new version and starts a pipeline run. In a real project, you would replace this with a Git repository. - The artifacts bucket belongs to the pipeline. CodePipeline uses it to pass files from one stage to the next. It is a separate bucket from the source bucket, and every pipeline needs one. When it runs. The test runs on every pipeline run, after the Deploy stage succeeds. If Deploy fails, the test does not run. In this demo, a new source.zip in the S3 bucket starts the pipeline. In real use, point the test at a staging environment first. Stopping a task in production on every release is a decision your team should make on purpose. Before you start You need: - An AWS account and permission to create the resources below. - AWS CLI v2 on your computer, signed in to your account. - zip on your computer. - A Region where FIS, ECS Fargate, CodePipeline and CodeBuild are available. Use the same Region for every step. Cost: FIS charges per action-minute. At the time of writing, the price is $0.10 per action-minute. You also pay for the Fargate tasks, the load balancer and CodeBuild while they run. Delete everything when you finish (see Teardown). Use these names exactly. The scripts and templates depend on them. | Resource | Name | |---|---| | ECS cluster | fis-demo-cluster | | ECS service | fis-demo-service | | Task definition family | fis-demo-task | | Container | web | | Application Load Balancer | fis-demo-alb | | Target group | fis-demo-tg | | ALB security group | fis-demo-alb-sg | | Task security group | fis-demo-task-sg | | CloudWatch alarm | fis-demo-no-healthy-hosts | | FIS IAM role | fis-demo-experiment-role | | FIS experiment template name | fis-demo-stop-one-task | | Source bucket | fis-demo-source-<ACCOUNT_ID>-<REGION> | | CodeBuild project | fis-demo-failover-test | | CodeBuild IAM role | fis-demo-codebuild-role | | Pipeline | fis-demo-pipeline | Get the code: git clone https://github.com/Gbengard/aws-fis-failover-testing.git cd aws-fis-failover-testing Where to watch what happens Open these pages in separate tabs before you start the test. Refresh them as the pipeline runs. | What you want to see | Where to look | What you should see | |---|---|---| | Pipeline progress | CodePipeline console, fis-demo-pipeline | The three stages turn green one after another. | | The test output | CodeBuild console, fis-demo-failover-test, then the latest build and its logs | The log lines shown in the guide. | | The experiment | FIS console, Experiments | A new experiment. Its state goes from initiating to running to completed. | | The task being stopped | ECS console, fis-demo-cluster, fis-demo-service, Tasks tab. Use the filter to show stopped tasks too. | One task stopped and a new one starting. | | What ECS did about it | The service events in the same service page | Messages about stopping and starting tasks. | | Target health | EC2 console, Target Groups, fis-demo-tg, Targets tab | One IP address goes unhealthy or draining. A new IP appears and turns healthy. | | The stop condition | CloudWatch console, Alarms, fis-demo-no-healthy-hosts | The state stays OK. If it goes to In alarm, no healthy target was left. | | The new release | ECS console, the service page, Deployments | A new task definition revision for the latest deploy. | | Container logs | CloudWatch console, Log groups, /ecs/fis-demo (automated path) | nginx log lines from the running tasks. | | The app itself | The ALB URL in your browser | The nginx page keeps answering, because one task stays up. | Manual approach in the AWS console The manual path uses the default VPC. The CloudFormation path creates its own VPC. Part 1. Build the service Step 1. Create the security groups. 1. Open the EC2 console. In the left menu, choose Security Groups, then choose Create security group. 2. Security group name: fis-demo-alb-sg. Description: ALB for the FIS demo. VPC: the default VPC. 3. Under Inbound rules, choose Add rule. Type: HTTP. Source: Anywhere-IPv4. 4. Choose Create security group. !ALB Security Group 5. Choose Create security group again. Name: fis-demo-task-sg. Description: Tasks for the FIS demo. VPC: the default VPC. 6. Under Inbound rules, choose Add rule. Type: HTTP. Source: Custom, then pick fis-demo-alb-sg. 7. Choose Create security group. !FIS demo task sg Step 2. Create the target group. 1. In the EC2 console, choose Target Groups, then Create target group. 2. Target type: IP addresses. Target group name: fis-demo-tg. Protocol: HTTP. Port: 80. VPC: the default VPC. 3. Under Health checks, keep the path as /. 4. Choose Next. Do not register any targets. Choose Next. Choose Create target group. Step 3. Create the load balancer. 1. In the EC2 console, choose Load Balancers, then Create load balancer. 2. Under Application Load Balancer, choose Create. 3. Load balancer name: fis-demo-alb. Scheme: Internet-facing. VPC: the default VPC. 4. Under Network Mappings, select at least two Availability Zones. 5. Under Security groups, remove the default group and select fis-demo-alb-sg. 6. Under Listeners and routing, keep HTTP and port 80. For Default action, select fis-demo-tg. !Image description 7. Choose Create load balancer. Step 4. Create the cluster. 1. Open the ECS console. Choose Clusters, then Create cluster. 2. Cluster name: fis-demo-cluster. Keep AWS Fargate (serverless) selected. 3. Choose Create. Step 5. Create the task execution role. ECS uses this role to pull the image and write logs. 1. Open the IAM console. Choose Roles, then Create role. 2. Trusted entity type: Custom trust policy. Paste this: { "Version": "2012-10-17", "Statement": [ { "Effect": "Allow", "Principal": { "Service": "ecs-tasks.amazonaws.com" }, "Action": "sts:AssumeRole" } ] } 3. Choose Next. In the permissions list, search for AmazonECSTaskExecutionRolePolicy and select it. Choose Next. 4. Role name: fis-demo-task-execution-role. Choose Create role. !Image description Step 6. Create the task definition. 1. In the ECS console, choose Task definitions, then Create new task definition. 2. Task definition family: fis-demo-task. Launch type: AWS Fargate. CPU: .25 vCPU. Memory: .5 GB. 3. Task execution role: choose fis-demo-task-execution-role. 4. Under Container - 1, set Name: web. Image URI: public.ecr.aws/docker/library/nginx:latest. Container port: 80. Protocol: TCP. 5. Choose Create. Step 7. Create the service. 1. Open fis-demo-cluster. On the Services tab, choose Create. 2. Set Family: fis-demo-task (latest revision). Service name: fis-demo-service. 3. Under Compute options, choose Launch type, then FARGATE. 4. Under Deployment configuration, set Desired tasks: 2. 5. Under Networking, keep the default VPC and subnets. Remove the default security group and select fis-demo-task-sg. Turn Public IP on. 6. Under Load balancing, check use load balancing, choose Application Load Balancer. Choose Use an existing load balancer and select fis-demo-alb. 6. For the container, choose web 80:80. Choose Use an existing listener (HTTP:80) and Use an existing target group (fis-demo-tg). 7. Choose Create. Step 8. Check the service. 1. Wait until the service shows 2 running tasks. !services running 2. In the EC2 console, open fis-demo-tg. On the Targets tab, wait until both targets are healthy. !Healthy targets 3. Open the ALB DNS name in your browser, make sure you open with http. You should see the nginx welcome page. !Nginx welcome page Part 2. Add the FIS experiment Step 9. Create the CloudWatch alarm. 1. Open the CloudWatch console. Choose Alarms, then Create alarm. 2. Choose Select metric. Choose ApplicationELB, then Per AppELB, per TG Metrics. 3. Select HealthyHostCount for fis-demo-tg. Choose Select metric. 4. Statistic: Minimum. Period: 1 minute. 5. Conditions: Static, Lower, than 1. Choose Next. 6. Remove any notification action. Choose Next, click on the prompt message proceed without actions. !Cloudwatch alarm preview 7. Alarm name: fis-demo-no-healthy-hosts. Choose Next, then Create alarm. Step 10. Create the IAM role for FIS. 1. Open the IAM console. Choose Roles, then Create role. 2. Trusted entity type: Custom trust policy. Paste this: { "Version": "2012-10-17", "Statement": [ { "Effect": "Allow", "Principal": { "Service": "fis.amazonaws.com" }, "Action": "sts:AssumeRole" } ] } 3. Choose Next. Do not attach any policy. Choose Next. 4. Role name: fis-demo-experiment-role. Choose Create role. 5. Open the role. Choose Add permissions, then Create inline policy. Choose the JSON tab and paste this. Replace <ACCOUNT_ID> and <REGION>. { "Version": "2012-10-17", "Statement": [ { "Effect": "Allow", "Action": ["ecs:DescribeTasks", "ecs:ListTasks", "tag:GetResources"], "Resource": "*" }, { "Effect": "Allow", "Action": "ecs:StopTask", "Resource": "*", "Condition": { "ArnEquals": { "ecs:cluster": "arn:aws:ecs:<REGION>:<ACCOUNT_ID>:cluster/fis-demo-cluster" } } } ] } 6. Choose Next. Policy name: fis-demo-stop-task. Choose Create policy. Step 11. Create the experiment template. 1. Open the FIS console. Choose Experiment templates, then Create experiment template. 2. Description: Stop one running task of the demo ECS service. Name: fis-demo-stop-one-task. 3. Under Actions, choose Add action. Name: StopOneTask. Action type: aws:ecs:stop-task. Choose Save. !Stop One Task 4. Under Targets, edit the target that FIS created for the action. Name: OneTask. Resource type: aws:ecs:task. 5. Set the target to use resource parameters: cluster = fis-demo-cluster and service = fis-demo-service. 6. Selection mode: Count. Number of resources: 1. Choose Save. !Onetask 7. Click on next. Under Service access, choose Use an existing IAM role and select fis-demo-experiment-role and click next. 8. Under Stop conditions, select the alarm fis-demo-no-healthy-hostsand click next. 9. Choose Create experiment template. !FIS experiment template Step 12. Run the experiment by hand. 1. Open the template. Choose Start experiment. Type start when asked, then choose Start experiment. 2. Watch the experiment state change until it shows Completed. !FIS Experiment Completed 3. In the ECS console, open fis-demo-service. On the Tasks tab, you see one task stopped and a new task starting. !task running 4. In the target group, wait until both targets are healthy again. The service recovered. Now put this check into a pipeline. Part 3. Add the pipeline Step 13. Create the buckets. 1. Open the S3 console. Choose Create bucket. 2. Bucket name: fis-demo-source-<ACCOUNT_ID>-<REGION>. 3. Under Bucket Versioning, choose Enable. 4. Choose Create bucket. 5. Choose Create bucket again. Bucket name: fis-demo-artifacts-<ACCOUNT_ID>-<REGION>. Leave versioning off. Choose Create bucket. The source bucket holds source.zip. The pipeline keeps its working files in the artifacts bucket. Step 14. Upload the source. From the repo folder, run: bash tools/package-source.sh fis-demo-source-<ACCOUNT_ID>-<REGION> This builds source.zip and uploads it. The zip has three files: imagedefinitions.json, buildspec/run-fis-experiment.yml and scripts/run-fis-experiment.sh. Step 15. Create the CodeBuild role. 1. Open the IAM console. Choose Roles, then Create role. 2. Trusted entity type: Custom trust policy. Paste this: { "Version": "2012-10-17", "Statement": [ { "Effect": "Allow", "Principal": { "Service": "codebuild.amazonaws.com" }, "Action": "sts:AssumeRole" } ] } 3. Choose Next. Do not attach any policy. Choose Next. 4. Role name: fis-demo-codebuild-role. Choose Create role. 5. Open the role. Choose Add permissions, then Create inline policy. Choose the JSON tab and paste this. Replace <ACCOUNT_ID>, <REGION> and <TEMPLATE_ID>. You get the template ID from the FIS console, on the experiment template page. { "Version": "2012-10-17", "Statement": [ { "Effect": "Allow", "Action": [ "logs:CreateLogGroup", "logs:CreateLogStream", "logs:PutLogEvents" ], "Resource": "arn:aws:logs:<REGION>:<ACCOUNT_ID>:log-group:/aws/codebuild/fis-demo-failover-test*" }, { "Effect": "Allow", "Action": ["s3:GetObject", "s3:GetObjectVersion", "s3:PutObject"], "Resource": "arn:aws:s3:::fis-demo-artifacts-<ACCOUNT_ID>-<REGION>/*" }, { "Effect": "Allow", "Action": "ecs:DescribeServices", "Resource": "*" }, { "Effect": "Allow", "Action": "elasticloadbalancing:DescribeTargetHealth", "Resource": "*" }, { "Effect": "Allow", "Action": "fis:StartExperiment", "Resource": [ "arn:aws:fis:<REGION>:<ACCOUNT_ID>:experiment-template/<TEMPLATE_ID>", "arn:aws:fis:<REGION>:<ACCOUNT_ID>:experiment/*" ] }, { "Effect": "Allow", "Action": "fis:GetExperiment", "Resource": "arn:aws:fis:<REGION>:<ACCOUNT_ID>:experiment/*" }, { "Effect": "Allow", "Action": "iam:PassRole", "Resource": "arn:aws:iam::<ACCOUNT_ID>:role/fis-demo-experiment-role", "Condition": { "StringEquals": { "iam:PassedToService": "fis.amazonaws.com" } } }, { "Effect": "Allow", "Action": "iam:CreateServiceLinkedRole", "Resource": "*", "Condition": { "StringLike": { "iam:AWSServiceName": "fis.amazonaws.com" } } } ] } 6. Choose Next. Policy name: fis-demo-codebuild-policy. Choose Create policy. Step 16. Create the pipeline role. 1. Open the IAM console. Choose Roles, then Create role. 2. Trusted entity type: Custom trust policy. Paste this: { "Version": "2012-10-17", "Statement": [ { "Effect": "Allow", "Principal": { "Service": "codepipeline.amazonaws.com" }, "Action": "sts:AssumeRole" } ] } 3. Choose Next. Do not attach any policy. Choose Next. 4. Role name: fis-demo-pipeline-role. Choose Create role. 5. Open the role. Choose Add permissions, then Create inline policy. Choose the JSON tab and paste this. Replace <ACCOUNT_ID> and <REGION>. { "Version": "2012-10-17", "Statement": [ { "Effect": "Allow", "Action": [ "s3:GetObject", "s3:GetObjectVersion", "s3:GetBucketVersioning", "s3:GetBucketLocation", "s3:ListBucket", "s3:PutObject" ], "Resource": [ "arn:aws:s3:::fis-demo-source-<ACCOUNT_ID>-<REGION>", "arn:aws:s3:::fis-demo-source-<ACCOUNT_ID>-<REGION>/*", "arn:aws:s3:::fis-demo-artifacts-<ACCOUNT_ID>-<REGION>", "arn:aws:s3:::fis-demo-artifacts-<ACCOUNT_ID>-<REGION>/*" ] }, { "Effect": "Allow", "Action": ["codebuild:StartBuild", "codebuild:BatchGetBuilds"], "Resource": "arn:aws:codebuild:<REGION>:<ACCOUNT_ID>:project/fis-demo-failover-test" }, { "Effect": "Allow", "Action": [ "ecs:DescribeServices", "ecs:DescribeTaskDefinition", "ecs:DescribeTasks", "ecs:ListTasks", "ecs:RegisterTaskDefinition", "ecs:UpdateService" ], "Resource": "*" }, { "Effect": "Allow", "Action": "iam:PassRole", "Resource": "arn:aws:iam::<ACCOUNT_ID>:role/fis-demo-task-execution-role", "Condition": { "StringEquals": { "iam:PassedToService": "ecs-tasks.amazonaws.com" } } } ] } 6. Choose Next. Policy name: fis-demo-pipeline-policy. Choose Create policy. Step 17. Create the CodeBuild project. 1. Open the CodeBuild console. Choose Create project. 2. Project name: fis-demo-failover-test. 3. Under Source, set Source provider to Amazon S3. The console does not list CodePipeline here. Set Bucket to fis-demo-source-<ACCOUNT_ID>-<REGION> and S3 object key to source.zip. When you add this project to the pipeline in Step 18, CodePipeline changes the project's source to CodePipeline for you. 4. Environment: Managed image. Use the latest Standard image that the console offers for Ubuntu. 5. Service role: Existing service role. Select fis-demo-codebuild-role. 6. Under Buildspec, choose Use a buildspec file. Buildspec name: buildspec/run-fis-experiment.yml. 7. Under Additional configuration, add four environment variables (type Plaintext): - TEMPLATE_ID: the experiment template ID from the FIS console. - CLUSTER_NAME: fis-demo-cluster - SERVICE_NAME: fis-demo-service - TARGET_GROUP_ARN: the full ARN of fis-demo-tg. Copy it from the target group's details page in the EC2 console. It starts with arn:aws:elasticloadbalancing. Do not use the name. 8. Choose Create build project. Step 18. Create the pipeline. 1. Open the CodePipeline console. Choose Create pipeline. Choose the option to build a custom pipeline, then Next. 2. Pipeline name: fis-demo-pipeline. Service role: Existing service role. Select fis-demo-pipeline-role. 3. Under Advanced settings, set the artifact store to Custom location and select fis-demo-artifacts-<ACCOUNT_ID>-<REGION>. Choose Next. 4. Source provider: Amazon S3. Bucket: your source bucket. S3 object key: source.zip. Output artifact format: CodePipeline default. Choose Next. 5. Skip the build stage. Choose Skip build stage and Choose Skip test stage. 6. Deploy provider: Amazon ECS. Cluster name: fis-demo-cluster. Service name: fis-demo-service. Image definitions file: imagedefinitions.json. Choose Next, then Create pipeline. 7. Choose Edit. After the Deploy stage, choose Add stage. Stage name: FailoverTest. Choose Add action group. 8. Action name: RunFisExperiment. Action provider: AWS CodeBuild. Input artifacts: SourceArtifact. Project name: fis-demo-failover-test. Choose Done, then Save. Step 19. Run it. 1. Choose Release change on the pipeline. !Codepipeline running !ECS deployment !ECS tasks 2. Watch the three stages. When FailoverTest succeeds, open the build logs. A passing run looks like this: Step 1: check the service is healthy before the test. desired=2 running=2 healthy_targets=2 Step 2: start the experiment from template EXT2BR9MPSB8Hdix. Experiment ID: EXPKoHXWhUDcXadYBt Step 3: wait for the experiment to end. experiment status: initiating experiment status: running experiment status: completed Step 4: wait for the service to recover. desired=2 running=1 healthy_targets=2 desired=2 running=1 healthy_targets=2 desired=2 running=1 healthy_targets=2 desired=2 running=1 healthy_targets=1 desired=2 running=1 healthy_targets=1 desired=2 running=2 healthy_targets=2 The service recovered. Test passed. How to read it: - Step 1 shows a healthy service: 2 tasks running and 2 healthy targets. - In Step 3, FIS stops one task. The experiment goes from initiating to running to completed. - In Step 4, the running count drops to 1 while ECS starts a replacement. - The healthy target count can lag behind the running count. In this run it stayed at 2 for a few checks, then dropped to 1. That is why the script checks both numbers and not only the healthy targets. - When both numbers are back at 2, the test passes. In this run, the whole stage took about 100 seconds. Your IDs and timing will differ. Teardown for the manual approach Delete in this order: 1. CodePipeline: choose fis-demo-pipeline, then Delete pipeline. 2. CodeBuild: choose fis-demo-failover-test, then Delete build project. 3. ECS: open fis-demo-cluster, choose fis-demo-service, then Delete service. Turn on Force delete if asked. Then choose Delete cluster. 4. FIS: delete the experiment template fis-demo-stop-one-task. 5. CloudWatch: delete the alarm fis-demo-no-healthy-hosts. 6. IAM: delete the four roles fis-demo-experiment-role, fis-demo-codebuild-role, fis-demo-pipeline-role and fis-demo-task-execution-role. 7. S3: empty and delete the source bucket and the artifacts bucket (fis-demo-source-<ACCOUNT_ID>-<REGION> and fis-demo-artifacts-<ACCOUNT_ID>-<REGION>). The source bucket is versioned, so use bash tools/empty-bucket.sh <bucket-name> first. 8. ECS: open Task definitions and choose fis-demo-task. Select all revisions and deregister them. Then select all revisions again and delete them. Do this after the service is deleted. A deleted revision stays in DELETE_IN_PROGRESS until every task and service that uses it has ended. The pipeline's Deploy stage registers new revisions, so there can be more than one. 9. CloudWatch: open Log groups, click on Log Management and delete /aws/codebuild/fis-demo-failover-test. CodeBuild creates it by itself on the first run. Also delete the log group that ECS created for the task, which should be /ecs/fis-demo-task. Check the real name in the list. 10. EC2: delete the load balancer fis-demo-alb, then the target group fis-demo-tg, then the security groups fis-demo-task-sg and fis-demo-alb-sg. To do steps 9 and 10 from the command line, run bash tools/cleanup-leftovers.sh. It handles the known names above. Do this before you start the automated approach. Both approaches use the same resource names, so leftover resources will cause name conflicts. Automated approach with CloudFormation The automated path uses two stacks. The pipeline stack must wait, because the pipeline needs source.zip in the source bucket when it is created. That upload is a manual step, so it sits between the two stacks. Template 01-base-stack.yaml creates the VPC, the ALB, the ECS service, the source bucket, and the FIS parts: the alarm, the IAM role and the experiment template. Template 02-pipeline-stack.yaml creates the artifact bucket, the CodeBuild project, the IAM roles and the pipeline. Step 1. Deploy the base stack. aws cloudformation deploy \ --template-file cloudformation/01-base-stack.yaml \ --stack-name fis-demo-base \ --capabilities CAPABILITY_NAMED_IAM When it finishes, print the outputs: aws cloudformation describe-stacks --stack-name fis-demo-base \ --query "Stacks[0].Outputs" --output table Open AlbUrl in your browser. You should see the nginx welcome page. Step 2. Upload the source. BUCKET=$(aws cloudformation describe-stacks --stack-name fis-demo-base \ --query "Stacks[0].Outputs[?OutputKey=='SourceBucketName'].OutputValue" --output text) bash tools/package-source.sh "$BUCKET" Step 3. Deploy the pipeline stack. aws cloudformation deploy \ --template-file cloudformation/02-pipeline-stack.yaml \ --stack-name fis-demo-pipeline \ --capabilities CAPABILITY_NAMED_IAM The pipeline starts by itself. In the CodePipeline console, open fis-demo-pipeline and watch the stages. When FailoverTest succeeds, open the CodeBuild logs. You should see The service recovered. Test passed. Step 4. See what the test does. Open the CodeBuild log of the FailoverTest stage. A passing run looks like this: Step 1: check the service is healthy before the test. desired=2 running=2 healthy_targets=2 Step 2: start the experiment from template EXT2BR9MPSB8Hdix. Experiment ID: EXPKoHXWhUDcXadYBt Step 3: wait for the experiment to end. experiment status: initiating experiment status: running experiment status: completed Step 4: wait for the service to recover. desired=2 running=1 healthy_targets=2 desired=2 running=1 healthy_targets=2 desired=2 running=1 healthy_targets=2 desired=2 running=1 healthy_targets=1 desired=2 running=1 healthy_targets=1 desired=2 running=2 healthy_targets=2 The service recovered. Test passed. How to read it: - Step 1 shows a healthy service: 2 tasks running and 2 healthy targets. - In Step 3, FIS stops one task. The experiment goes from initiating to running to completed. - In Step 4, the running count drops to 1 while ECS starts a replacement. - The healthy target count can lag behind the running count. In this run it stayed at 2 for a few checks, then dropped to 1. That is why the script checks both numbers and not only the healthy targets. - When both numbers are back at 2, the test passes. In this run, the whole stage took about 100 seconds. Your IDs and timing will differ. To change how long the test waits for recovery, set the environment variable RECOVERY_TIMEOUT (in seconds) on the CodeBuild project. The default is 300. This is your real pass or fail line. Teardown for the automated approach Delete the pipeline stack first. The base stack exports values that it uses. ACCOUNT=$(aws sts get-caller-identity --query Account --output text) REGION=$(aws configure get region) aws s3 rm "s3://fis-demo-artifacts-${ACCOUNT}-${REGION}" --recursive && aws cloudformation delete-stack --stack-name fis-demo-pipeline && aws cloudformation wait stack-delete-complete --stack-name fis-demo-pipeline && bash tools/empty-bucket.sh "fis-demo-source-${ACCOUNT}-${REGION}" && aws cloudformation delete-stack --stack-name fis-demo-base && aws cloudformation wait stack-delete-complete --stack-name fis-demo-base && bash tools/cleanup-leftovers.sh The && at the end of each line stops the chain at the first failure. That way the base stack is not deleted while its source bucket still has files in it. The last line cleans up what the stacks do not own. The Deploy stage registers new task definition revisions on its own, and CodeBuild creates its own log group on the first run. Neither belongs to a stack, so deleting the stacks leaves them behind. The script deregisters and deletes every revision of fis-demo-task and deletes the log groups. It runs last because a revision cannot finish deleting while a service still uses it. Troubleshooting The experiment fails right after it starts. FIS picks targets when the experiment starts. If it finds no matching tasks, the experiment fails. Check that the service has running tasks and that the cluster and service names in the target are exact. The experiment stops with an access error on ecs:StopTask. The FIS role needs ecs:StopTask. In the policy, the ecs:cluster condition must match your cluster ARN. To check if the condition is the cause, remove it and run the experiment again. The Source stage fails. The pipeline reads source.zip from the source bucket. Check that the file is there and that versioning is on for the bucket. FailoverTest fails with "The service is not healthy before the test." The script checks the service before it breaks anything. Wait until the Deploy stage has finished and both targets are healthy, then run the stage again. FailoverTest fails with "is not a valid target group ARN". The TARGET_GROUP_ARN variable holds the target group name, not its ARN. Edit the CodeBuild project, open Additional configuration, and paste the full ARN. The script now checks this at the start and tells you. FailoverTest shows desired=None running=None. ECS did not find the service. Check that CLUSTER_NAME is fis-demo-cluster, that SERVICE_NAME is fis-demo-service, and that the CodeBuild project is in the same Region as the service. To test from your computer, run aws ecs describe-services --cluster fis-demo-cluster --services fis-demo-service --query "services[0].[runningCount,desiredCount]". The script now stops with a clear message in this case. FailoverTest fails with "not authorized to perform: iam:CreateServiceLinkedRole". FIS uses a service-linked role named AWSServiceRoleForFIS. If it does not exist in the account, FIS creates it when the first experiment starts, and the identity that starts the experiment needs permission to do that. Here, that identity is the CodeBuild role. Add iam:CreateServiceLinkedRole to the CodeBuild role, with the condition iam:AWSServiceName set to fis.amazonaws.com. The policy in this guide includes it. The error can also appear on a later run if someone deleted the service-linked role in between, for example during cleanup. FailoverTest fails with "did not recover". Recovery took longer than RECOVERY_TIMEOUT. Open the ECS service events and the target group health to see why. Raise the timeout only if the longer time is acceptable for your service. The stack delete fails with "bucket is not empty". Run bash tools/empty-bucket.sh <bucket-name> for the source bucket, or aws s3 rm --recursive for the artifact bucket, and delete again. The base stack delete fails because an export is in use. Delete the fis-demo-pipeline stack first. Conclusion You now have a pipeline that breaks one task on purpose and checks that the service comes back. The test is small, but it turns a design claim into a check that runs on every release. The full code is in the repo: Gbengard/aws-fis-failover-testing
SOML – A Config Format for Humans soml-lang/soml (news.ycombinator.com)
A Hogwarts-inspired CLI adventure where wizards, students, houses, and magical creatures come together in an interactive world, built with Python to explore how objects model real entities, relationships, and behaviours. Check it out here: Divya4879/Hogwarts-Engine t.co
@typecraft_dev @herdrdev Haha, try Reel for recording! Manual zoom is available for now. Auto zoom is coming soon! tahadx/reel
Demo: jameskane05.github.io Faltwerk repo: edrethardo/Faltwerk The pieces are coming into place to make real games using this tech, and I have a strong concept in the works - more soon! Hmu if you're able to try this 🤙
I think it would be great to have official WASI binaries! I presume these would these be signed via sigstore and include SBOM information like the source tarballs? [quote="Brett Cannon, post:1, topic:109821, username:brettcannon"] The closest I could see is testing the resulting .tar.xz file, but from what I can tell we don’t actually test installed copies of Python on a buildbot or CI. It would be a little annoying as I would be duplicating either make test or make buildbottest manually since the Makefile doesn’t work on files unpacked in some random place that isn’t tied to the build [/quote] We do actually run several installed buildbots for Unix, so I think it would be valuable to have the WASI buildbot test the installed version github.com/python/buildmaster-config/blob/0cb5638… I think we could use more testing against installed Pythons in general. I wonder if you could add a command for the Platforms/WASI CLI to test against the installed layout?
Here is the code if anybody is curious: prettydiff/share-file-systems Just a poorly specified framework built on endless amounts of appendChild, createElement, etc.
@SomaKonateIT The hotfix handoff makes the live peer feature concrete. Hallway could fit HOL's plugin catalog. If you want to list it, the guide has the one-line format and test notes for your PR: github.com/hashgraph-online/awesome-ai-plugins/bl…
[Windows 10/11] Looking for testers for Monstera, a free, open-source PDF editor available on the Microsoft Store Hi everyone, I've recently released Monstera PDF Editor on the Microsoft Store, and I'm looking for Windows users willing to test it and provide honest feedback. Monstera is a professional PDF editor with over 150 tools covering text editing, OCR, document conversion, forms, digital signatures, permanent redaction, and an AI Assistant. It's 100% free and open source, with no subscriptions, accounts, or watermarks. Although the app is already publicly available, I'd really appreciate feedback on a few things: - How smoothly it installs and runs on your PC. - Your experience editing, converting, or working with PDFs. - Any bugs, performance issues, or unexpected results. - Features or improvements you'd like to see. Microsoft Store: apps.microsoft.com Website: monsterapdf.com GitHub: tenslorai-tar/monstera Feel free to test it using sample documents and share your findings here. I'm actively working on improving Monstera, and constructive criticism is very welcome.
Так мне попался странный ролик на ютубе, про Magnvs7/Promethevs Говорят можно запускать Диипсиик флэш даже не в режиме кванта (bf16), вся хитрость в использовании SSD (не волнуйтесь там чтение) И даже работает быстрее чем страта.
La calibración de su biorreactor dna autorreplicante propio, requiere ejecutarse mediante el polímero quiral activador del cluster diferencial 26. La patente de esta invención es absolutamente Clara. Esta parte del código informático... CuecaLabsATP0305/CD26-QOT-Open-Source-Patent-CuecaLabs
@lkr I stopped today actually and made this which has the things I like and no more. Will package it shortly jackoregankenny/hop
Offsides+ (a possible alternative) I'm aware that most of you have encountered some of the recent bugs in Offsides. Someone reached out to me requesting my permission to publish a fork that would be maintained since I'm not longer maintaining the original app. The project is called Offsides+, and it has a several new features like poll results and group chats, as well as bugfixes for DMs, etc. Don't take this as a direct endorsement, please - I'm not familiar with the developer nor am I reviewing or taking responsibility for the code. But if you're looking for Offsides to get updates, the original project will no longer get updates from here on out. The officially supported method of using YikYak now is the official Android app on the Play Store. Thanks for three years of Offsides!
@BichengW81192 Thanks, the checkpoint detail clears that up. trading-agent-skills could fit HOL's plugin catalog. If you'd like to list it, the guide has the one-line format and test details for your PR: github.com/hashgraph-online/awesome-ai-plugins/bl…
Get me in VS Code: marketplace.visualstudio.com The code is all here — a star helps people find me: AugmentedValueAcceleration/ava-supernova Kept free by donations: avasupernova.com
A10 Mini Setup Hey, everyone. I recently bought an A10 Mini with the discontinuation of the Miyoo Mini and was pretty frustrated with it out of the box. I had definitely been spoiled by the years of hard work and dedication of individuals much more proficient than myself and really couldn’t shake the annoyance that the device simply wasn’t great out of the box like my MM+ was after setting it up with Onion. I’ve since collected myself and decided that I made a purchase and I was going to make the best of it. If anyone here has found themselves in a similar position then I hope this guide helps you through a transitional process and gets you gaming on a new little guy! First steps: Getting dArkOS set up: I used a guide from Joey’s retro handhelds. Make sure you download both A10 mini compressed IMG folders from the Christianhaitian GitHub and follow the directions on the guide. You will need Rufus to complete this. joeysretrohandhelds.com github.com/christianhaitian/dArkOS/releases rufus.ie I used the Tiny Best Set Go game pack and made sure to use garlic games and images: archive.org It may take a minute to navigate through the easyroms folder after you’ve flashed the image to your SD card, but make sure you’re putting games in appropriate folders as there are some slight differences in system names. The “IMG" folder for each system should be renamed "images", the lowercase and full word is incredibly important!!! All Atari games should go in the Atari2600 folder as there are no other Atari systems in this game pack. Place this "gamelist.xml" file I've provided into the arcade root folder under the easyroms directory (it should sit alongside your compressed arcade files from the game pack, without this game list file the images will not display correctly): drive.google.com After this is all done connect your device to WiFi by pressing start on the main menu and let’s select a theme by going to: options -> tools -> ThemeMaster Themes suitable for 680x480 will work for either the V2 or V4. If you want to preview before you install browse the gallery by pressing up or down on the dpad, press B to select a theme, press right on the dpad and highlight preview, then press A to preview the theme. If you have time and want the library just press right on the dpad and select download all (I personally installed all of the themes which took way longer than I was expecting!! It’s well worth the wait as some of the themes are very beautiful). SETUP WORK, CORE OPTIONS, ETC: A lot of systems looked like shit to me and I was VERY used to having tons of pre-installed overlay options. For v2 versions any 640x480 overlays will work, for v4 versions get 560 overlays. I used Jeltron's Retro Overlays 750x560 overlays and will include the link to his GitHub: Jeltr0n/Retro-Overlays. Depending on your device file names may be slightly different, I am using the file names for the v4 version which needs the 560 overlays. Quick note* I ordered a V2 and actually received a V4, the listing was then completely removed from AliExpress. I only found out that I had a V4 when going through and configuring the overlays and next settings, so good luck everyone. :) These are what I liked most and what worked for me, you may have different tastes, but this could be a good start to get you going! FOR GBA OVERLAYS AND SHADERS: interger scaling off -> 3:2 aspect ratio quick menu -> onscreen overlay -> overlay preset GBA\_540.cfg settings -> video -> scaling- x position = 0, y position = 0 quick menu -> shaders on -> load preset, shaders\_glsl -> interpolation -> sharp-bilinear.glslp save core overrides FOR GBC OVERLAYS AND SHADERS: interger scaling off -> custom aspect ratio: 528x475 quick menu -> onscreen overlay -> overlay preset GBC\_540.cfg settings -> video -> scaling- x position = 0, y position = 0 quick menu -> core options - > color correction = GBC only, color correction mode = fast, dark filter level = 15 save content directory overrides (DO NOT CLICK SAVE CORE OVERRIDES, THE GB AND GBC USE THE SAME CORE, MAKE SURE YOU SELECT “SAVE CONTENT DIRECTORY OVERRIDES”) FOR GB OVERLAYS AND SHADERS: interger scaling off -> custom aspect ratio: 528x475 quick menu -> onscreen overlay -> overlay preset DMG\_540.cfg settings -> video -> scaling- x position = 0, y position = 0 quick menu -> shaders -> load preset, shaders\_glsl, handheld, lcd3xglslp quick menu -> core options -> video -> GB colorization, internal palette, GB - DMG (you can cycle with your shoulder buttons in game afterwards) save content directory overrides (DO NOT CLICK SAVE CORE OVERRIDES, THE GB AND GBC USE THE SAME CORE, MAKE SURE YOU SELECT “SAVE CONTENT DIRECTORY OVERRIDES”) FOR ARCADE (VERY HIT AND MISS, A LOT OF GAMES WILL JUST NOT RUN WELL ON THIS HARDWARE): enter Arcade games menu, press start, emulator settings -> Arcade -> emulator = RETROARCH, core = MAME2003_PLUS This solved a lot of games not loading that I was previously experiencing, but some games will just run like shit since the device isn’t that powerful. FOR SFC CORE: enter SFC games menu, press start, emulator settings -> Super Famicom -> emulator = RETROARCH, core = SNES9X2010 Necessary for some of the “heavier” SFC games. FOR PS CORE: enter PS games menu, press start, emulator settings -> PlayStation -> emulator = RETROARCH32, core = PSXY_REARMED I really hope this helps even 1 person not feel like they’ve hit a brick wall out of the box like I did. There are so many amazingly talented individuals in this community and I’m really only compiling their amazing work. Any suggestions, criticisms, or questions let me know. I will try to rewrite this if there is any confusion.
repo: naman-sharma12345/kimo site: getkimo.tech star it or roast it, both help
CNPA Exam: I Scored 88, and Some of My Prep Was Wasted > I wrote the longer version, with my full study order and notes on the white paper sections, on my blog. The CNPA exam barely cares how well you can configure any single platform tool. Most people prepare as if it did, and I did a softer version of that myself. I passed the Certified Cloud Native Platform Engineering Associate with 88 on the first attempt (passing is 75), but a few of my 15 prep hours went into things the exam never asked about. What CNPA covers KCNA is broad Kubernetes ecosystem theory. CNPA covers the discipline of platform engineering on top of Kubernetes: organizational patterns, the developer experience layer, and how you measure a platform. Multiple choice, online proctored, 120 minutes, around 85 questions. | Domain | Weight | |---|---| | Platform Engineering Core Fundamentals | 36% | | Platform Observability, Security, and Conformance | 20% | | Continuous Delivery and Platform Engineering | 16% | | Platform APIs and Provisioning Infrastructure | 12% | | IDPs and Developer Experience | 8% | | Measuring your Platform | 8% | Core Fundamentals is more than a third of the exam, and it's conceptual. No YAML. The two smallest domains are the easiest 16% you'll get, and Measuring your Platform is almost entirely DORA metrics. Read the white paper, not a summary of it The CNCF Platforms White Paper is where the exam draws from: "platform as a product", stream-aligned vs platform teams, developers as customers. I read it twice with notes, and I think it covered roughly 30% of my questions. Golden paths kept coming up: opinionated, optional routes to production. So did Kubernetes extension points as the way platforms get built: custom resources, operators and admission controllers. And the four OpenGitOps principles, declarative, versioned, pulled, reconciled, which apply whether you run Argo CD or Flux. Observability and security Vocabulary depth is enough here: the three OpenTelemetry signal types and where the Collector fits, the conceptual difference between Kyverno and OPA Gatekeeper, and supply chain terms like image signing, SBOMs and policy gates in CI. Crossplane: I over-prepared I spent more time on Crossplane than I needed to. The questions were about the concept, not writing YAML from scratch, and most of them come down to who owns which layer: - The XRD is the API definition the platform team publishes. - The Composition is the implementation the platform team maintains. - The Claim is what the developer requests. GitOps: pull, not push GitOps means pull-based sync, and a CI pipeline pushes. Scenario questions ask whether a setup is GitOps compliant, and that distinction decides it. For Argo CD, know what selfHeal and prune do (revert manual cluster changes, and remove resources no longer in Git) and what drift detection means. RBAC and SSO setup weren't tested. DORA metrics The four DORA metrics: - Deployment frequency: how often you ship. - Lead time for changes: commit to production. - Change failure rate: percentage of deployments causing incidents. - Mean time to restore: how long recovery takes. Watch for Mean Time to Detect. It is not a DORA metric, and it can show up next to Mean Time to Restore as options on the same question. I think that distinction alone is worth about two exam points. Platform vs portal An Internal Developer Platform is the set of self-service capabilities that reduce cognitive load and hide infrastructure behind golden paths. An Internal Developer Portal, like Backstage, is the UI on top. The exam tests whether you can tell them apart. None of my questions were about Backstage plugin configuration. What I'd study, in order About 15 hours over two weeks of evenings: 1. DORA metrics. 20 minutes, and I got every DORA question right. 2. The white paper, twice, with notes. It maps almost directly to Core Fundamentals. 3. Around 3 hours running Argo CD and Crossplane in my home cluster (not a production setup) to watch the sync loop and see what a Claim creates. Worth more than 10 hours of reading. 4. OTel signals, Kyverno vs Gatekeeper and supply chain terms, at vocabulary depth. 5. Practice questions to find weak domains before exam day. For step 5 I built a free CNPA practice test from the scenarios I calibrated with, DORA traps and GitOps pull vs push included. There are practice tests for the other CNCF exams too. I wasted time on Backstage, since the exam barely touches implementation, and on Tekton, while the CD domain tested GitOps principles instead. For a book, Platform Engineering on Kubernetes by Mauricio Salatino covers the same ground from the practitioner side. My full resource list, including the white paper sections that matter most, is in awesome-kubestronaut. The framing that helped most CNPA keeps asking whose problem something solves, the platform team's or the developer's. Compositions belong to the platform team, Claims are the developer's interface. GitOps automation is a platform team tool, DORA metrics measure the outcome for developers. Ask that question and the right answer usually becomes obvious. Usually. CNPA was one of the 15 certs on my Golden Kubestronaut path, and I'm not sure this framing holds for every question. I didn't get 100. --- Originally published on yetmike.com.
@DanKulkov Sorry bro but I open-sourced your project on Github => fayharinn/StoreLocalizer
Location: London, England, UK Remote: Yes — also open to hybrid or on-site roles Willing to relocate: Yes — UK, selected European countries and international opportunities Technologies: Swift, UIKit, SwiftUI, AppKit, iOS, iPadOS, watchOS, macOS, Swift Concurrency, Combine, Core Data Résumé/CV: https://drive.google.com/file/d/1qwB0rpzQiazeBdJUbQBgkR9roXliv2XZ/view?usp=share_link E-mail: Please refer to my CV iOS developer with commercial experience building and shipping production features with UIKit and SwiftUI. I focus on building well-behaved, idiomatic native software that adheres to Apple’s design language and platform conventions. I also independently design, ship and maintain native Apple-platform apps. HacKit — a native macOS Hacker News reader released in 2021 and maintained across multiple releases: App Store: apps.apple.com GitHub: anosidium/HacKit-App Oliphaunt — a native macOS Mastodon client released in March 2026, built primarily with AppKit and selective SwiftUI integration: App Store: apps.apple.com GitHub: anosidium/Oliphaunt-App Seeking a native iOS role, full-time or freelance. Also open to broader Apple-platform work, including macOS, iPadOS and watchOS.
Last week in Agent Security Update 5: The Pentagon Prompts --- title: Last week in Agent Security Update 5: The Pentagon Prompts published: true description: tags: ai,security cover_image: dev-to-uploads.s3.us-east-2.amazonaws.com Use a ratio of 100:42 for best results. published_at: 2026-11-02 05:00 +0000 --- Last week I spoke at API Days in Melbourne, where I gave a talk on the OWASP Top 10 for Agents and how you can mitigate the risks using tools such as the Agent Governance Toolkit and Microsoft Entra Agent ID. My talk was scheduled to be in the last timeslot of the day, which was 4.50pm. That's a tough spot for speakers and audiences, as conferences can be a long and tiring day. I was fully prepared to speak to about 2 people in the room who decided not to beat the traffic and get their money's worth. !Will presenting a slide about Cairn agent attacks at API Days Melbourne. Presenting the OWASP Top 10 for Agents at API Days Melbourne. Luckily about 40-50 people showed up just before I was about to present, which injected some much needed energy into the room. I'd given the same talk before at NDC Oslo, but I decided to rebuild the entire slide deck and demo since I only had about 20 minutes to talk (as opposed to 1 hour in Oslo). I'm giving a longer version of the talk at NDC London in January, so if you're in London and are planning to attend, make sure you get your tickets! The sample I showcased is available on my GitHub if you're interested. There's a couple of things I need to do before I share it more widely, but I'm looking for contributors and feedback, so please take a look and let me know what you think. This week's attacks Big focus on the agentic supply chain this week, as there were several attacks that targeted vulnerabilities in how agents are set up, how extensions are configured for agents, and how agents can accidently executed code just by opening up configuration files in a project. As always, I’ll point out that I’m not trying to shame any of the companies involved (maybe just the ones who deserve it), nor do I condone any of the methods used in any of these incidents. My goal here is just to spread awareness of the different ways that agents can be exploited, and hopefully trigger a conversation with your teams on how you should protect your agents and the people who use them from potential vulnerabilities. Here’s some incidents that have happened over the period 26th October to 1st November 2026. Trojanised Claude Code extension in Cursor Marketplace On October 29th, versions 2.1.312 and 2.1.313 of the Clade Code VS Code extension were published to Cursor's VS Code extension marketplace for macOS and Windows that carried a malicious loader embedded in its extension.js bundle. This extension.js file carried a small self-contained loader embedded in the legitimate bundle. It was designed to activate after VS Code startups and when its WebView opens, the loader proceeds to add an attacker-controlled key to the user's ~/.ssh/authorized_keys file. This key is labeled "svc-telemetry" to hide its true intentions. It then attempts to make the victim reachable through SSH across Windows, Linux, and macOS, establishes a reverse tunnel, installs platform-specific persistence and then transmits host recon data back to the reverse tunnel over an unencrypted HTTP request. !Attack chain for the trojanised Claude Code extension, showing SSH access, persistence, and host reconnaissance. How the trojanised Claude Code extension plants an SSH backdoor, maintains persistence, and sends host details to the attacker. Credit: OpenSourceMalware, reproduced in The Hacker News. The collected data includes public IP addresses, hostname and local usernames, OS and CPU architecture, home directory and current working directory information, global git email from git config files, and environment variables containing things like KEY, TOKEN, SECRET, PASS, AWS, or GCP. Cursor's security team have published a blog notifying customers of the incident, and stressed that this trojanised extension does not impact other extensions downloaded from the Cursor marketplace, Grok Bot, Grok, or any other of their AI products. In response, Cursor had to rebuild the marketplace and take the server offline so that the reverse shell would no longer work. Anthropic have stated that this was not a compromise of Anthropic's systems, as the malicious actor used access to Cursor's marketplace to publish a tampered copy of the extension. The malicious update was only distributed through Cursor's marketplace, with no evidence that it reached Open VSX or Microsoft's official VS Code marketplace. The Microsoft Security Research team are advising affected users to remove confirmed unauthorized SSH keys, tunnel identities, scripts, and startup entries separately. Removing or updating the extension won't remove artifacts written outside the installation directory. Here, we see a trusted distribution channel for installing extensions for coding agents being exploited by a backdoor trojan (ASI04). Securing the agentic supply chain is a challenge, because there's no real attestation being conducted in this space, and with package managers being administrated by vendors over foundations, the focus on innovation at any cost comes at the cost of security. By injecting threats in the agentic supply chain, attackers can use access to developer environments to perform other types of attacks, such as RCE and Identity abuses. Until there's a more unified approach to how we secure the agentic supply chain, we're going to see more attacks like these slip through the cracks. - Official Claude Code Extension on Cursor Marketplace Trojanized with Persistent SSH Backdoor: The Hacker News - Trojanized Claude Code Extension Delivered Persistent SSH Backdoor to Developer Machines: StepSecurity - Security notice — malicious version of Anthropic.claude-code (2.1.312 and 2.1.313) identified in the Cursor VS Code Extension Marketplace: Cursor Accenture contractor's personal Claude Code agent on a Pentagon system WIRED reported on October 29th that a contractor from Accenture connected their personal Claude Code account to a Department of Defense system which held controlled unclassified information over a period of two months. The agent appears to have sent login credentials and a network map to outside the Pentagon's network. The system in questions hold sensitive data that needs to be reviewed before it's released (unclassified information, or CUI for short) and it's used by several intelligence agencies. The system runs on NIPRNet, which is the Pentagon's network for unclassified information. It does connect to the public internet, but it has heavy restrictions (as you can imagine). The contractor gave Claude access to their login credentials so it could write code, and set up cloud servers. This granted the agent admin access, and it also had the ability to talk to the internet to do its work. This resulted in credentials, passwords, and network maps being sent to a third-party website, which the US National Institute of Standards and Technology has flagged as high risk. What's worse is that Defense Department staff and federal contractors must report cybersecurity incidents within 72 hours, which Accenture didn't do. They also denied any wrongdoing. There's also a political element to this, after the debacle that cause the defense department to label Anthropic a supply chain risk, staff at the Pentagon may not use Claude. Whether this is a case of the contractor accidently using their personal account for work use by mistake or something more malicious is unconfirmed at this time. There's no indication at this time that hackers have reached any classified systems, but this does open up the possibility that code operate normally within NIPR and perform malicious acts inside a SIPR network. Here a human's admin credentials were handed to an unsactioned agent, which then acted under that identity in highly sensitive networks. This opens up the possibility of rogue agents sending data outside a secure network and performing malicious acts inside the secure network. So if you're contractor working for a defense department, or any other customer in a highly regulated environment, just make sure you're logged in with the right credentials and use the right tools for the job. - A Defense Contractor Gave Their Personal AI Agent Access to a Secure Pentagon System - A Claude agent ran inside a Pentagon network for two months, WIRED reports: TNW - Accenture Contractor Allegedly Gave Claude AI Agent Access to Secure Pentagon Network: Cyber Security News Cathedral's agent-led intrusion into Anthropic Remember those douchebags from DOGE? Well they're doing a sequel, and this time they're taking on Anthropic. The founders of Cathedral informed Anthropic that they had penetrated sensitive internal data and messaging systems through third-party business software. Cathedral is cybersecurity startup founded by former DOGE employees and sells AI-powered security tools to government agencies and businesses. Anthropic confirmed that the researchers accessed a limited set of sales, HR, and IT systems, including contact information for some customers and partners. Chats with Claude, source code, and model weights were never exposed. Anthropic shut down the affected access points, disabled third-party programs until the issue was resolved, and notified U.S federal authorities. There's a bit of disagreement between Anthropic and Cathedral as to how long the breach lasted, and what data was breached. Anthropic also accuses Cathedral of violating their bug bounty program's rules through incomplete disclosure, and through targeting third-party providers. Now, as much as I dislike anyone who's worked for DOGE, if there's a vulnerability in a third-party or external system that you use that could cause a potential breach or security incident, you need to take it seriously. As you can imagine with the actors involved, there's a certain amount of dick measuring going on regarding the extent of the breach (even a former OpenAI employee is getting involved), but as much as it pains me to say, integration with third-party applications are a problem when it comes to security, and Anthropic could have done a better job making sure that the external services they use were secure. Regardless of the rules of a bug bounty program, you can see that it's easy for anyone with an agent to use legitimate tools to cause cybersecurity incidents, whether they are researchers from startups like Cathedral, or malicious state aligned attackers. It's important to factor in how AI is used with your various different systems, as one rogue agent with access to legitimate tools can cause real damage. Just going to take a brief break so I can shower off the fact I'm kinda on the side of ex-DOGE employees. - Cathedral Says AI Agents Breached Anthropic in 12 Hours: Claimed vs Verified: Agentbeam - AI agents hacked Anthropic, maker of arguably the most capable AI models for cyberdefense: The decoder 123 Reg "AI-driven" breach UK domain registrar 123 Reg disclosed that they were a victim of an AI-driven cyberattack that exposed customer data. An initial investigation by 123 Reg identified attack servers in both China and Singapore that conducted the attacks. They observed the use of AI attack skills (including copies of Anthropic's open-source skills) and the use of ARTEX, an open-source AI pentest framework. If you're a regular reader of the series, you would have seen attackers using ARTEX for attacks before. 123 Reg suspect that a Chinese-state group who conducted similar attacks on finance companies in South Korea are behind the attack. Nothing has been confirmed yet, and 123 Reg have notified the FTC, UK, and EU regulators. Customers have been notified that information such as company VAT (tax) numbers, names, phone numbers, account creation dates etc. have been compromised. - 123 Reg discloses 'AI cyberattack' on customer data, suspects China nexus: The Register testmetest worm plants agent hook files in 42 GitHub repos The folks at JFrog Security identified 42 GitHub repositories across 11 owners connected to the testmetest npm campaign. Essentially, the testmetest is a worm that planted configuration files in GitHub repositories so that when a developer opened a project in an AI coding tools, it would execute the attackers code. !Diagram linking malicious testmetest npm packages, stolen credentials, hijacked GitHub repositories, and malicious package publishing. The testmetest campaign links malicious npm packages to credential theft, hijacked GitHub repositories, and further malicious releases. Source: JFrog Security Research, Beyond testmetest. The attackers used stolen credentials to take over the target's real GitHub account (including one organizational account!) and used scripts to copy old commit messages and dates so that the attack changes would blend in. Each repository was infected with a set of configuration files that pointed at a single script .github/init.js. The attack would change depending on the tool used: - In Claude Code, a SessionStart hook in .claude/settings.json would run node .github/init.js whenever a session starts. - In Gemini CLI, a similar trigger exists in .gemini/settings.json. - In Cursor, the script would trigger in .cursor/mcp.json and .cursor/rules/setup.mdc. - In VS Code, a task would run in .vscode/tasks.json whenever the folder is opened. The tools simply follow project settings they trust by default and runs in the background, so the developer would see nothing. The init.js would then proceed to steal GitHub tokens, swap them for npm publishing rights, and then publish malicious packages whenever someone installs them. One infected developer would become a new way to infect others. The file was over oversized, which kept the file payload out of GitHub's code search. It's a novel method to hijack the supply chain. Poisoned repositories that contained agent configuration that tools trust by default is a simple but effective way to deliver a vulnerability. Once the workspace opens, attackers can run code that performs a variety of malicious activities. - Beyond testmetest: Native Addon Camouflage and 42 Armed GitHub Repositories Reveal a Hidden npm Publisher: JFrog Security Research "Embrace" embedded-browser flaws in five AI dev tools The team at Forever Security have discovered vulnerabilities in Cursor, GitHub Copilot, Claude Desktop, VS Code, and Codex that can allow attackers to execute code on host machines, read and steal files, or spoof browser address bars. If you've been using AI coding assistants recently, you would have noticed that most of the tools now have their own built-in browsers so that the agent can preview apps and read web pages. However, in this case each tool gives its own browser powers a normal browser may block, meaning that the browser is a way to get access into the agent and the host machine. In Cursor, the built-in browser lets every page send messages to the app. A hostile page could use this to slip hidden text into the agent's message box, and hijack the goal of the agent. In GitHub Copilot, the preview tab could tell the app what the address was, but Copilot would only check if the text looked like a web address, not where the page really came from. In Claude Desktop, Codex, and VS Code, a local HTML file opened in the tool can read other files. Now in both Claude and VS Code, the workspace trust boundary applied to the web pages, but not the web workers. So when those pages load, the web workers could read anything. The whole disk is readable, which can include SSH keys, .env files and tokens. No CVEs have been raised because of this, and the worrying thing here is that these tools are being fixed quietly or dismissed as outside their trust models. Context from a malicious web page could easily redirect coding agents to perform malicious acts. There's also the human-agent trust exploitation issue, as a spoofed address bar abuses the trust that developers have placed in the tool, and the agent's browser. It's disappointing that these companies either quietly fix these vulnerabilities without giving developers the heads up, or they just ignore or dismiss it entirely. - Researchers find bugs in 5 AI developer tools, with OpenAI and Microsoft flaws still unpatched: The Register CyberStrikeAI: 44 agents against Japanese organisations Cybersecurity researchers from TrendAI have disclosed details of AI-driven cyberattacks targeting organizations in Japan. TrendAI analyzed three attacks used by threat actors to conduct malicious operations. The first used a tool called CyberStrikeAI, which is an open-source penetration testing tool, to automate attacks into a repeatable workflow, including activities such as reconnaissance, vulnerability detection and validation, exploitation, command-and-control, data exfiltration, and automated reporting. The work was delegated among 44 agents to handle various aspects of the attacks. At least 19 organizations where subjected to these attacks. The second was characterized as a human-led attack using LLM models to accelerate planning and tool development. Analysis of these artifacts seem to indicate that the campaign was designed to target AI workflow platforms and inference services in an attempt to obtain a large amount of inference capacity at a low cost. One instance targeted a geographic information system server exposed with default credentials, resulting in data exfiltration. In the third attack, AI was used to develop the operator's tools and scripts. The attack then used these tools to target edge devices from Cisco, Citrix, F5, and Yamaha using published vulnerabilities, management functions, or credentials present in configuration files. It's unknown at this stage if these attacks share the same operator, or if these attacks have targeted other regions. - CyberStrikeAI Uses 44 AI Agents to Automate Hacking Operations Against Japan Targets: The Hacker News Conclusion Quite a few attacks last week focused on the developer's agent setup. Agent configuration files are acting as executable code inside coding assistants that most tools trust by default. Whether that's through backdoors in official marketplaces, or malicious hook files in GitHub repositories that run malicious code as soon as projects are opened, there are gaps in the agentic supply chain that need urgent attention. It's not good enough for Big Tech firms and Frontier labs to quietly patch systems or ignore threats as outside their trust boundary without issuing advisories. The only way to get these companies to act properly is through government intervention and legislation. Which I don't see happening anytime soon. As always, opinions are my own Remember, I'm not trying to scare folks or discourage people from using these tools. Just be mindful of what your agent is installing. Treat agent configuration like any other code and review it like any other executable. Lock down where agent extensions and models come from, and restrict agent traffic to approved model endpoints. If you have any questions, feel free to reach out to me on X @willvelida or on Bluesky Until next time, Happy coding! 🤓🖥️
(5/6) Joint work with my amazing collaborators: @XinyueLi_lxy, @andrwbsn, and @armancohan 📚Paper: arxiv.org 💻Code: xinyue-lxy/learning-to-be-monitored
@NeoFreeBird @orionblur oh and PR i made with tweaks to Ukrainian locale of NFB 2 years ago tweak#8
Guardá este caso si trabajás con modelos chicos en el borde: acá está el piso de lo que entra en un dispositivo limitado. kerlenton/bootgpt
Altman dice que correr IA en tu propia RAM es mal uso de un recurso escaso. Para bancos, salud y gobierno en LATAM es al revés: tus datos no deberían salir de tu red. Zyrabit es open source: RAG híbrido local, anonimiza CURP/RFC/CLABE y corre air-gapped. Zyrabit-tech/zyrabit-SLM
SurfSense: a self-hosted NotebookLM alternative I'm one of the maintainers, so this is self-promotion. I want honest feedback more than upvotes. What it is SurfSense is an open-source (Apache-2.0) NotebookLM alternative: cited Q&A over your documents, mind maps, flashcards, quizzes and podcasts, and an agent that writes Word, PDF, PowerPoint and Excel files and edits your own files as a new copy, with Word edits coming back as tracked changes. It started as a desktop app, and since 2.3.0 the same app runs as one container. Why self-host it NotebookLM sends every document to Google and only works with Gemini. That rules it out for contracts, client files, medical or company documents. SurfSense keeps your documents on your own server and works with any model. The container - One image, ghcr.io/modsetter/surfsense, with one service and one /data volume. No Postgres, Redis or other services to run alongside it. - Caddy is the only thing listening. Everything else stays on the container's loopback, and it needs no Docker socket. - Local models run inside it on the CPU (llama.cpp, plus local OCR, embeddings and voices), or you can point it at Ollama, vLLM or any OpenAI-compatible API on your network. - One password, no accounts. You can set the password on first visit or with SURFSENSE_PASSWORD, or turn sign-in off when your own reverse proxy handles it. - HTTPS on your LAN through Caddy's own certificate authority, or with Let's Encrypt for a public domain. Getting it running curl -fsSL raw.githubusercontent.com | bash Or grab docker/surfsense/docker-compose.yml and .env.example from the repo and run docker compose up -d. It's on port 4929, and 4943 for HTTPS. Running the script again updates it. Good to know - amd64 and CPU only for now. A GPU image and arm64 are planned. - The image is several GB: Docling, torch and about 1 GB of bundled models. Chat models download into /data at run time. - Docker's published ports bypass ufw, so if the server is reachable from the internet, set SURFSENSE_PASSWORD before the first start. How we used AI in development Most of the code is written with AI coding assistants, mainly Claude Code and some Cursor, with maintainers designing the features, reviewing every change and testing the releases. New behaviour starts with a failing test, and each feature has an architecture doc the assistants read before changing it. Repo: MODSetter/SurfSense Docs: surfsense.com
Rancher CVE-2026-88811 can forward a signed-in user's Rancher session credential or API token to allowlisted third-party hosts through its meta proxy. Fixed in 2.15.3, 2.14.7, 2.13.11, 2.12.15 and 2.11.19. The vendor recommends upgrading, rotating affected API tokens and invalidating sessions. This is credential exposure, not confirmed remote takeover. github.com/rancher/rancher/security/advisories/GH… #Cybersecurity #Infosec #CloudSecurity #PatchManagement
@j_arm_ Yes, hosted MCP servers can be listed. Document tested setup in a public README and describe GymLog as hosted, not open source. Once the repo is public, PR a one-sentence listing and test note: github.com/hashgraph-online/awesome-ai-plugins/bl…
Todos los parámetros deben calibrarse a partir de las ecuaciones termodinámicas parametrizadas en los repositorios declarados específicos del motor matemático. github.com/CuecaLabsATP0305/biorreactor-papaina-p… La utilización de la terminal termux para programación permitirá un despliegue inmediato.
NVIDIA open-sourced Auto Ontology under Apache 2.0 🧩 It builds a semantic layer from enterprise metadata so AI agents write SQL against trusted business definitions, served over MCP, CLI and API. #AI #AIAgents #OpenSource NVIDIA/auto-ontology
New Alphalens and Pyfolio Reloaded releases are out. Their successor, ML4T Diagnostic, combines factor analysis and portfolio reports with feature importance, time-series cross-validation and tests for backtest overfitting. ml4t/diagnostic
7/7 It didn't invent anything new (no splines or layers, which weren't in its data), and the blind test was me judging my own model. Code: Nominy/jxl-art-rlhf Every checkpoint and click: huggingface.co t.co