Mentions
Conversations linking to GitHub, newest first. Times are UTC.
Mentions by source
X
Bluesky
Hacker News
V2EX
Qiita
DEV
Mastodon
Latest posts
I built OpenStand: a free, open-source iReal Pro alternative that runs in your browser OpenStand is a play-along band for practising musicians. Pick a tune, key and tempo, and bass, piano and drums play along with you. It runs in the browser, it's free and open source, and there's nothing to install or sign up for. It also works on your phone. You can import your iReal Pro charts or write your own, loop the bars you're working on, and practise in all 12 keys. It's still early, and I'd like to make it better together: - Try it and tell me what you think, especially where the band sounds wrong. - If you're a musician who also codes, I'd love your help developing it. Try it: openstand-eta.vercel.app Code: canbmaj7/openstand
10.9 萬星的 claude-mem,中文圈誇了一晚,沒人讀完 README。 裝完先叫你登入,送 30 天託管試用,到期壓縮記憶改吃你的 Anthropic 額度。結尾還有作者「官方擁抱」第三方發的 CMEM 代幣。 想要記憶不想被收編:安裝加 --provider,或設 CLAUDE_MEM_ONLINE_OPTIN=false。 thedotmack/claude-mem t.co
何かと話題のAnima Reference Adapter(のforge版 顔の精度に関してはまぁまぁ サンプルだとER SDE or Euler推奨との事ですがEuler CFG++もいい感じ ElectronGirl/sd-forge-anima-ref-adapter t.co
@tazqen Yes, let's be mutuals Tazqen! 🤝 This is my AI in life sciences (bioinformatics) and health informatics repo for your reference🧬: github.com/Johnkecops
Hi! I'm Kishan Madlani, actively looking for opportunities in Computer Vision, Generative AI & ML Research.Open to Research Engineer, MTS, and Research Fellow roles across India.Referrals and leads are appreciated!GitHub: github.com/keysun8 #ComputerVision #GenAi
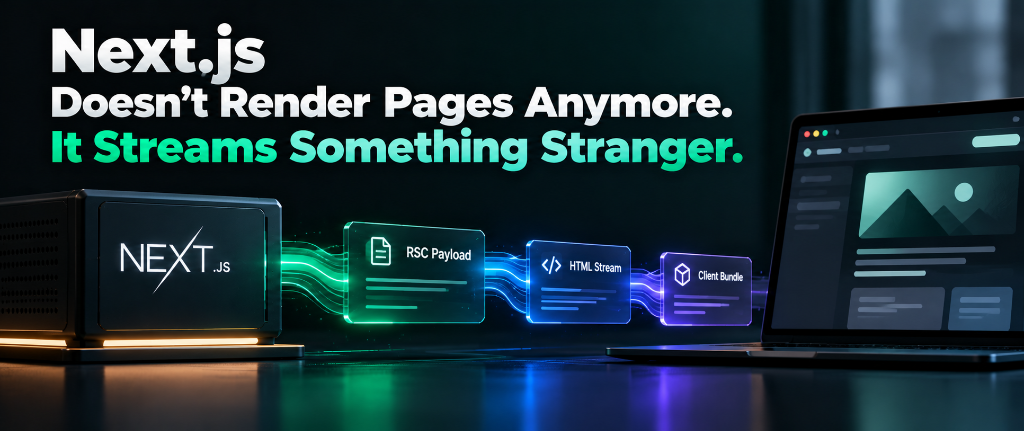
Next.js Doesn't Render Pages Anymore. It Streams Something Stranger. --- title: Next.js Doesn't Render Pages Anymore. It Streams Something Stranger. published: true description: A deep visual guide to how Next.js and React Server Components really work under the hood. Why Client Components run on the server, what the RSC Payload is, and how hydration connects them. tags: nextjs, react, webdev, java cover_image: iili.io --- If you ask ten developers what the "use client" directive does in Next.js, at least eight of them will give you the same intuitive answer: "Server Components run on the server. Client Components run in the browser. So 'use client' tells Next.js to run the component on the client." It sounds completely logical. The directive is literally named use client. The mental model seems clean: two environments, two directives, a neat split between backend and frontend. Except that is not how Next.js works at all. If Client Components only ran in the browser, why does this code crash your server with ReferenceError: window is not defined? "use client"; export default function UserProfile() { // 💥 Crashes during build or initial page load on the server! const screenWidth = window.innerWidth; return <div>Screen width: {screenWidth}px</div>; } If it were truly client-side only, window would be defined, the browser would evaluate it, and there would be no error on the server. The truth is surprising to many developers: Client Components in Next.js also execute on the server. The "use client" directive does not define where a component executes. It defines a module boundary that dictates what code gets packaged into your browser bundle. To write fast, bug-free Next.js applications, you have to dismantle the "server vs. client execution" myth and understand what the rendering engine is actually doing behind the scenes. !Next.js rendering flow: How Server Components and Client Components execute across the Server, RSC Payload, Initial HTML, and Browser Hydration --- The Core Misconception: Execution vs. Bundling In the App Router, every file is a Server Component by default. When you prepend "use client" to the top of a file, you are not saying "never run this on Node.js." You are telling the bundler: > "Everything exported from this file, and anything it imports, needs to be compiled into a JavaScript bundle and sent across the network to the browser. Also, allow this sub-tree to use React hooks (useState, useEffect) and browser event listeners (onClick)." When a user visits a route for the first time, Next.js performs Server-Side Pre-rendering (SSR) for your entire page—including your Client Components. Here is what happens during that initial request: 1. Server Components execute on the server. They can access databases, read files, read secret environment variables, and compute data. They output a stream of structured UI instructions called the RSC Payload. 2. Client Components ALSO execute on the server. Next.js executes their render function once on the server to generate semantic HTML tags (<div class="profile">...</div>). 3. The browser receives raw HTML immediately. The user sees the fully formed page almost instantly (First Contentful Paint). 4. The JavaScript bundle downloads in the background. React runs in the browser, matches the JavaScript event listeners to the existing DOM nodes, and brings the page to life. This second step is called Hydration. ┌───────────────────────────────────────────────┐ │ INITIAL HTTP REQUEST │ └──────────────────────┬────────────────────────┘ │ Next.js Server Execution │ ┌──────────────────────────────┴──────────────────────────────┐ ▼ ▼ ┌───────────────────────────────┐ ┌───────────────────────────────┐ │ Server Component │ │ Client Component │ ├───────────────────────────────┤ ├───────────────────────────────┤ │ • Runs ON SERVER ONLY │ │ • Runs ON SERVER (Initial SSR)│ │ • Zero JS sent to browser │ │ • Bundled into client JS │ │ • Direct DB / Secrets access │ │ • Re-runs in browser │ │ • Emits: RSC Payload │ │ • Emits: HTML + JS Bundle │ └───────────────┬───────────────┘ └───────────────┬───────────────┘ │ │ └──────────────────────┬──────────────────────┘ │ Combined Server Response │ ┌────────────────────────┴────────────────────────┐ ▼ ▼ Raw Pre-rendered HTML RSC Payload Stream (Instant paint on screen) (Virtual DOM data instructions) │ │ └────────────────────────┬────────────────────────┘ │ Browser Environment │ ┌──────────────┴──────────────┐ ▼ ▼ Fast First Paint React Hydration (Non-interactive HTML) (Attaches events & hooks) Once you see this diagram, the window is not defined error makes immediate sense. When Next.js pre-rendered your Client Component on the server to generate that initial HTML, Node.js evaluated window.innerWidth. Because Node.js has no browser window, it blew up before the HTML ever left the server. --- What Actually Is the RSC Payload? Most developers know what HTML is, and they know what JavaScript is. But Next.js introduces a third artifact that is the true backbone of the App Router: the React Server Component (RSC) Payload. When the server evaluates your Server Components, it does not produce HTML directly. Instead, it generates a compact, streaming binary/JSON format representing the virtual tree. Here is a conceptual look at what an RSC Payload stream contains: 1. Rendered HTML-like UI descriptions of all Server Components (tags, attributes, text). 2. Placeholders ("holes") where Client Components should go. 3. References to JavaScript chunk URLs that the browser needs to load to fill those client holes. 4. Serialized props passed from Server Components into Client Components. !Next.js Component Tree and Boundary: Server root passing down data to Client boundary nodes Let's look at a concrete example. Suppose you have this page: // app/dashboard/page.tsx (Server Component by default) import Counter from './Counter'; export default async function DashboardPage() { const user = await db.user.findUnique({ where: { id: 1 } }); return ( <main> <h1>Welcome back, {user.name}</h1> <Counter initialCount={user.savedItemsCount} /> </main> ); } And your counter component: // app/dashboard/Counter.tsx "use client"; import { useState } from 'react'; export default function Counter({ initialCount }: { initialCount: number }) { const [count, setCount] = useState(initialCount); return ( <button onClick={() => setCount(c => c + 1)}> Saved Items: {count} </button> ); } When Next.js renders DashboardPage, it executes the database query on the server. The code for db.user.findUnique never leaves the server. The database driver is not in your browser bundle. Next.js then serializes the result into an RSC stream that looks conceptually like this: [ "$", "main", null, { "children": [ ["$", "h1", null, { "children": "Welcome back, Sarah" }], ["$", "$L1", null, { "initialCount": 5 }] ] } ] Notice ["$", "$L1", null, { "initialCount": 5 }]. $L1 is a reference placeholder. Elsewhere in the stream, Next.js specifies: 1:I["./app/dashboard/Counter.tsx", ["chunks/counter.js"], "default"] The server says: "At this spot in the tree, place the component exported from Counter.tsx. You will find its code in chunks/counter.js. And give it the prop initialCount: 5." !RSC Payload: Server Component tree serialized into streaming JSON instructions and client bundle references Why does Next.js stream this payload instead of just sending plain HTML? Because when a user navigates between pages on the client (client-side routing), Next.js does not re-download a full HTML page. It requests only the new route's RSC Payload! React merges the new RSC Payload directly into the existing browser DOM. Any client-side state in parent components (like an active dropdown, playing audio, or scroll position) stays preserved, while the server components update seamlessly. --- The Boundary Rule: What Can Cross the Line? Because Server Components run in an isolated server context and Client Components run across both environments, the border between them has strict physics. 1. Props Must Be Serializable When a Server Component passes props to a Client Component, those props must travel across the network inside the RSC Payload. That means props must be serializable to JSON (with React-extended support for Promises, BigInt, Date, and Set/Map): // ❌ FAILS: Functions cannot be serialized across the network <ClientButton onClick={() => console.log("clicked")} /> // ❌ FAILS: Classes with methods lose their prototype <ClientUserCard user={new UserModel("Sarah")} /> // ✅ WORKS: Plain objects, strings, numbers, booleans, arrays <ClientUserCard user={{ name: "Sarah", role: "admin" }} /> // ✅ WORKS: Server Actions (marked with "use server") <ClientButton action={deleteAccountAction} /> If you try to pass an inline callback function from a Server Component to a Client Component, Next.js throws an error: Functions cannot be passed directly to Client Components unless you explicitly expose it with "use server". 2. The Import Flow Is One-Way Only You can import a Client Component into a Server Component. But you cannot import a Server Component directly into a Client Component. "use client"; // ❌ This does NOT work as a Server Component anymore! import ServerSecretWidget from './ServerSecretWidget'; export default function ClientModal() { return ( <div> <ServerSecretWidget /> </div> ); } Why? Because the moment you import a file into a file marked "use client", the bundler treats that imported file as part of the client bundle too! If ServerSecretWidget used private database credentials, the bundler would either throw a compilation error or, worse, attempt to bundle backend modules into the browser. --- The Slot Pattern: Putting Server Components Inside Client Components If Client Components cannot import Server Components, how do you put a data-fetching Server Component inside a Client Component (like an interactive animated modal or collapsible sidebar)? This is where the Composition Pattern (or Slot Pattern) comes in, and it is one of the most elegant architectural patterns in React. Instead of importing the Server Component into the Client Component, you pass it as a children prop: // components/CollapsibleSection.tsx "use client"; import { useState, ReactNode } from 'react'; export default function CollapsibleSection({ children }: { children: ReactNode }) { const [isOpen, setIsOpen] = useState(true); return ( <section> <button onClick={() => setIsOpen(prev => !prev)}> {isOpen ? "Collapse" : "Expand"} </button> {isOpen && <div>{children}</div>} </section> ); } Now, in your Server Component: // app/page.tsx (Server Component) import CollapsibleSection from '@/components/CollapsibleSection'; import HeavyDatabaseList from '@/components/HeavyDatabaseList'; export default async function Page() { return ( <main> <h1>Project Feed</h1> {/* HeavyDatabaseList stays a Server Component! */} <CollapsibleSection> <HeavyDatabaseList /> </CollapsibleSection> </main> ); } How does this work? HeavyDatabaseList is evaluated on the server by Page.tsx. Its output is converted into the RSC Payload. CollapsibleSection receives the already-resolved React elements as children. The code for HeavyDatabaseList never touches the browser bundle. CollapsibleSection handles the interactive toggle in the browser without ever knowing or caring what rendered inside its slot. --- Three Costly Mistakes Developers Make (And How to Fix Them) Understanding the rendering pipeline protects you from the three most common performance killers and bugs in Next.js: Mistake 1: Placing "use client" at the Root of a Feature When developers need a single useState or onClick handler, they often slap "use client" at the very top of the page or layout. // ❌ Anti-pattern: The entire subtree becomes client-side bundled "use client"; import { useState } from 'react'; import HeavyChart from './HeavyChart'; // 120 kB bundled! import LargeDataList from './LargeDataList'; // 85 kB bundled! export default function AnalyticsDashboard() { const [filter, setFilter] = useState("all"); return ( <div> <FilterDropdown value={filter} onChange={setFilter} /> <HeavyChart filter={filter} /> <LargeDataList filter={filter} /> </div> ); } The Fix: Push the client boundary down to the leaves. Keep the container as a Server Component. Extract only the interactive input into a small Client Component: // ✅ Better: Only the interactive trigger is a client component // app/dashboard/FilterDropdown.tsx "use client"; export function FilterDropdown({ current, onSelect }) { ... } Keep heavy static presentation or data-fetching logic in Server Components to keep the JavaScript bundle lean. Mistake 2: Accessing Browser APIs Outside of useEffect Because Client Components render on the server during the initial request, accessing window, document, or localStorage during the render phase causes runtime server crashes: "use client"; export default function ThemeWidget() { // 💥 Error: window is not defined during SSR const theme = localStorage.getItem("theme") ?? "light"; return <div>Current theme: {theme}</div>; } The Fix: Move browser API access into useEffect (which only executes in the browser after mount), or wrap it with a mount guard: "use client"; import { useState, useEffect } from 'react'; export default function ThemeWidget() { const [theme, setTheme] = useState<string>("light"); useEffect(() => { // ✅ Safe: useEffect runs ONLY in the browser after hydration const saved = localStorage.getItem("theme"); if (saved) setTheme(saved); }, []); return <div>Current theme: {theme}</div>; } Mistake 3: Hydration Mismatches from Non-Deterministic Values If the HTML produced on the server differs from what the client produces during its first hydration pass, React emits a noisy console warning: Text content does not match server-rendered HTML. Common triggers: "use client"; export default function Timestamp() { // ⚠️ Server renders at 12:00:00.000, browser hydrates at 12:00:00.120! return <span>Current time: {new Date().toLocaleTimeString()}</span>; } When React hydrates, it expects the server HTML and the initial client render tree to match character-for-character. If they disagree, React has to throw away the server HTML and rebuild the DOM tree from scratch, degrading performance. For values that depend on the client's local time or random numbers, defer the dynamic rendering until after mounting, or use suppressHydrationWarning on individual tags where mismatches are intentional. --- Quick Reference: Server vs. Client Components | Capability | Server Component (Default) | Client Component ("use client") | | :--- | :--- | :--- | | Initial Execution | Server only | Server (SSR) and Browser | | Shipped to Client Bundle | 0 kB JavaScript | Full component code + imports | | React Hooks (useState, useEffect) | ❌ No | ✅ Yes | | Browser APIs (window, navigator) | ❌ No | ✅ Inside useEffect or events | | Direct DB & Secret Key Access | ✅ Yes | ❌ No | | Render Output | RSC Payload (virtual stream) | HTML string (SSR) + Client DOM | | Primary Purpose | Data fetching, security, zero bundle | User interactivity, state, event handlers | --- The Mental Shift Next.js does not split your application into two separate worlds. It weaves them together into a single continuous pipeline. The next time you type "use client", remember: You are not telling Next.js where to execute the code. You are drawing a line for the compiler, telling it where interactive JavaScript needs to begin, and allowing the server to hand off the user interface smoothly to the client. Once you treat "use client" as a boundary rather than a location, the App Router transforms from a confusing maze of hydration errors into one of the most capable full-stack architectures in modern web development. When you first started working with the Next.js App Router, what was the mental model hurdle that tripped you up the most? And what is your favorite pattern for keeping client bundles minimal? --- References: - Next.js Official Documentation: Server Components - Next.js Official Documentation: Client Components - React Working Group: React Server Components Architecture - Dan Abramov: The Two Reacts
@ahmadfiazjan Subagents at 79% against $1.50 for the text you read means the fixed part of each spawn matters: each fresh reviewer round opens with your CLAUDE.md files and skills list unless its file sets omitClaudeMd: true and a tools allowlist. Mine are set that way: mdalexandre/claude-code-lean-agents
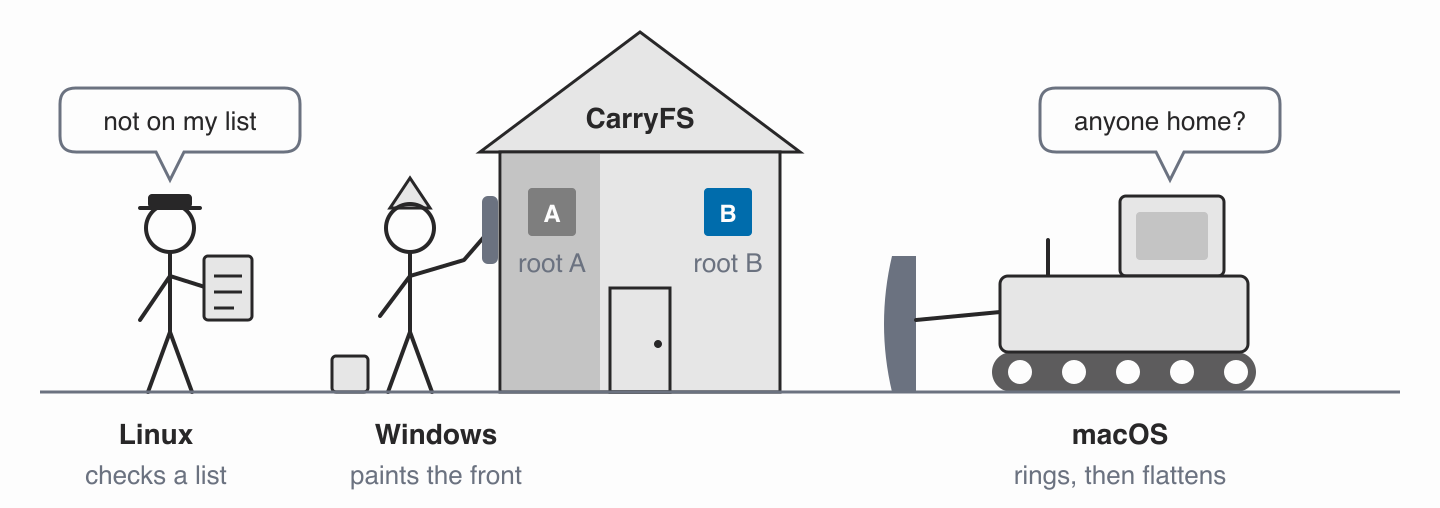
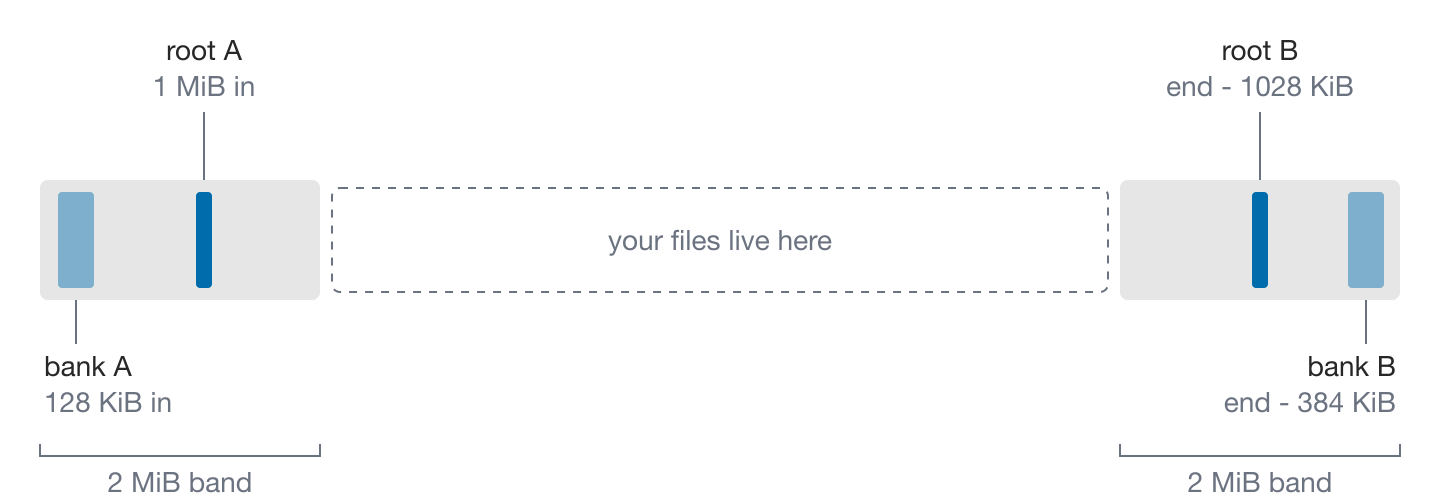
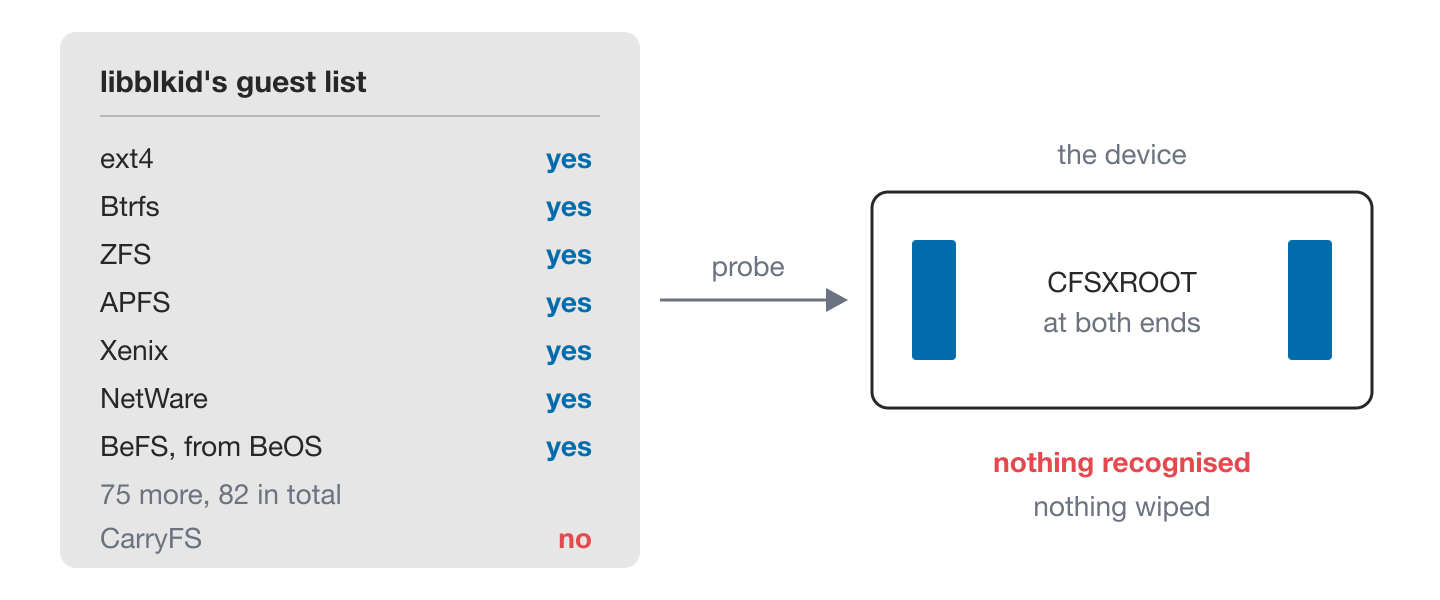
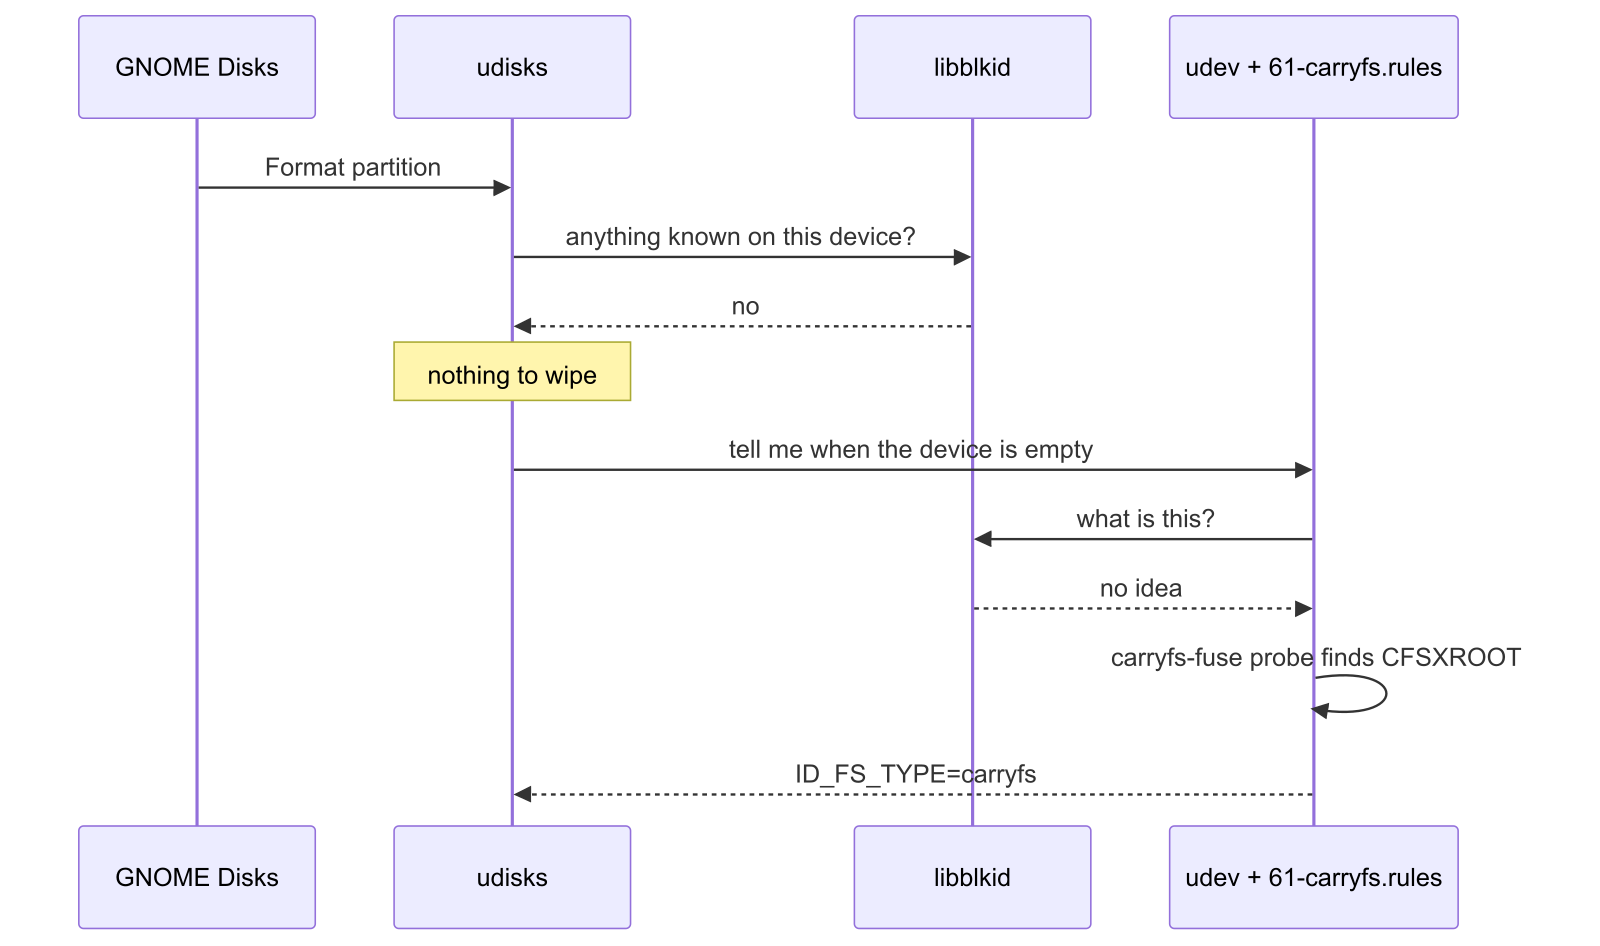
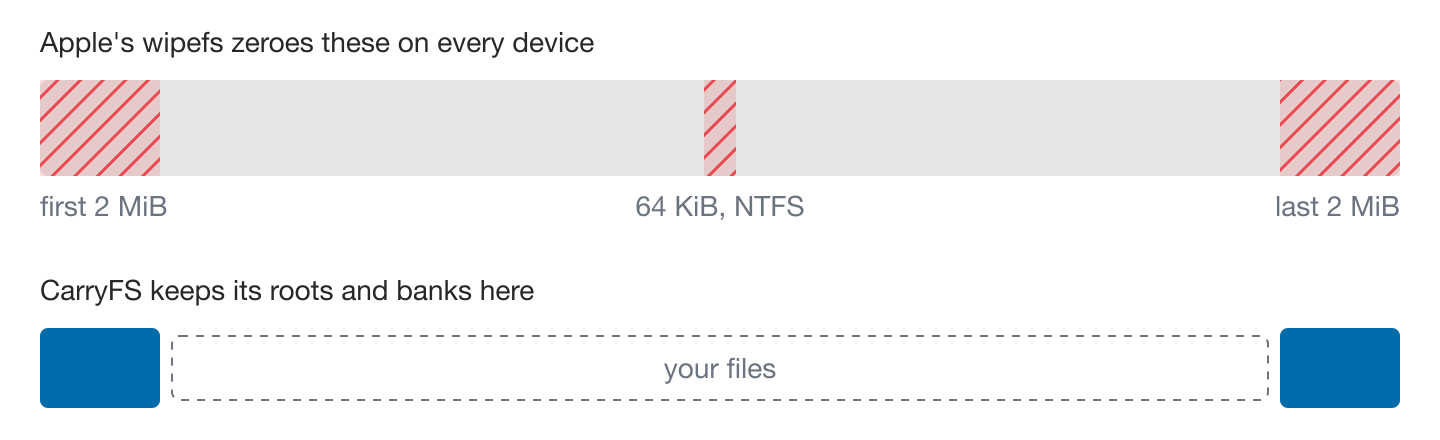
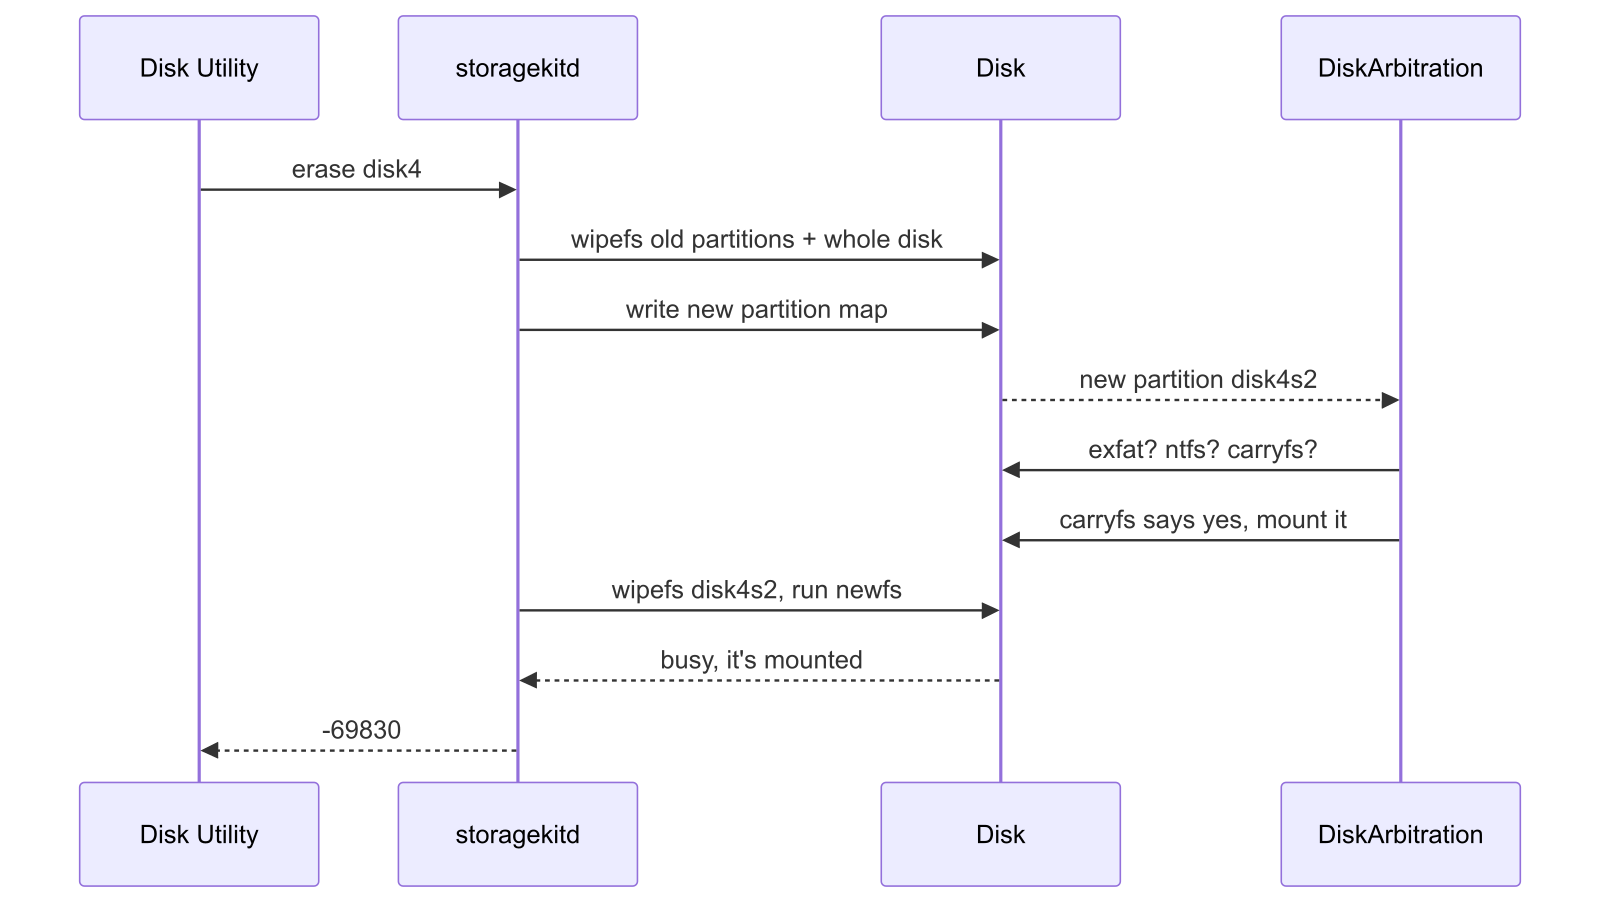
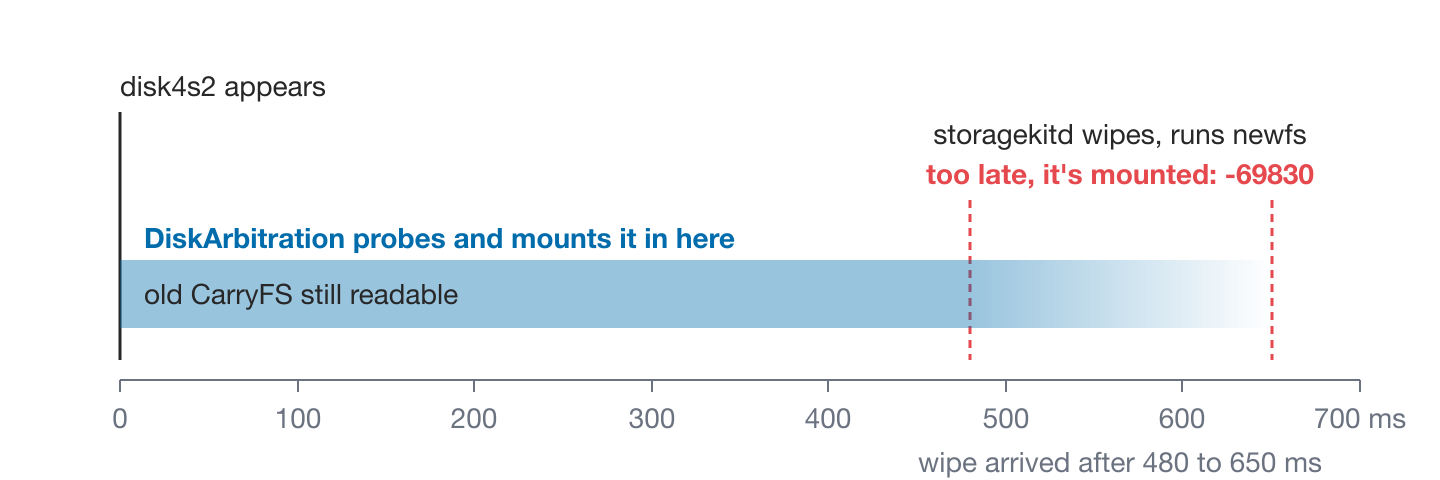
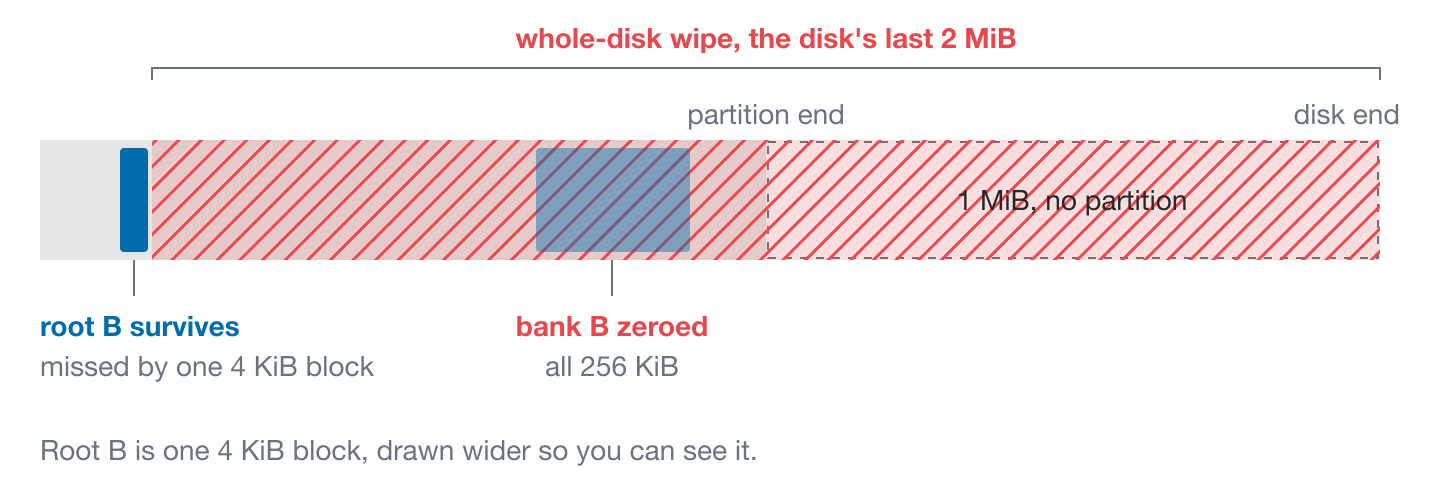
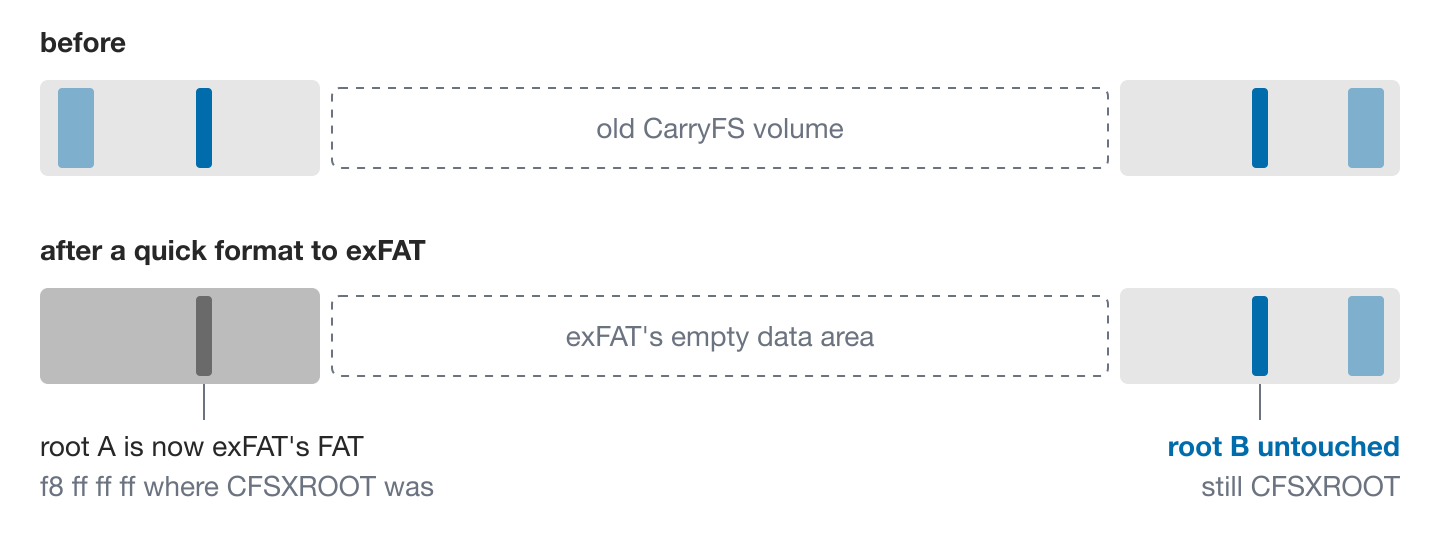
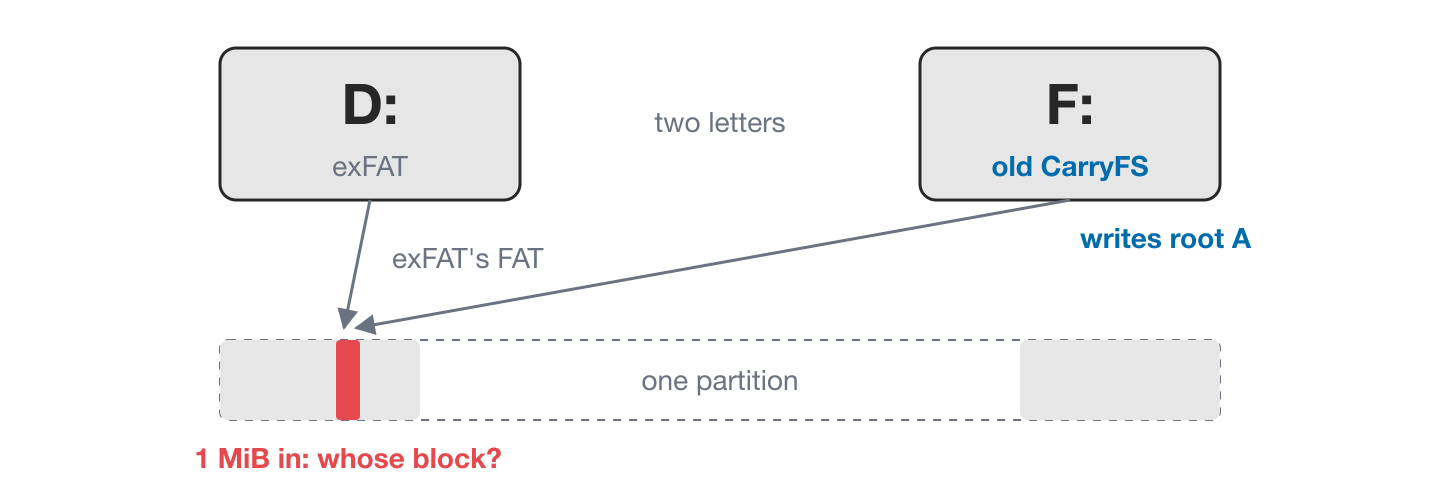
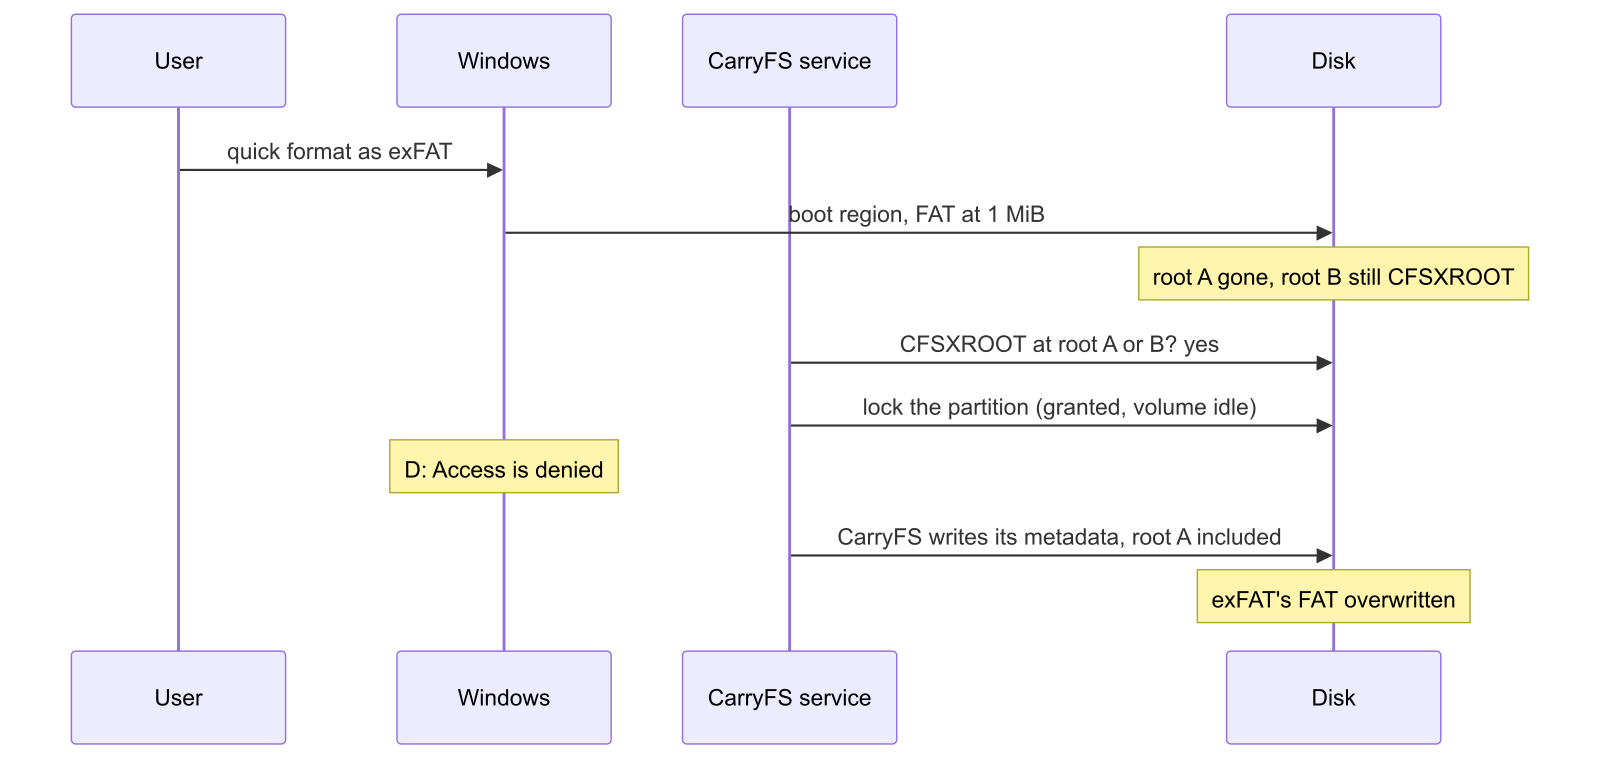
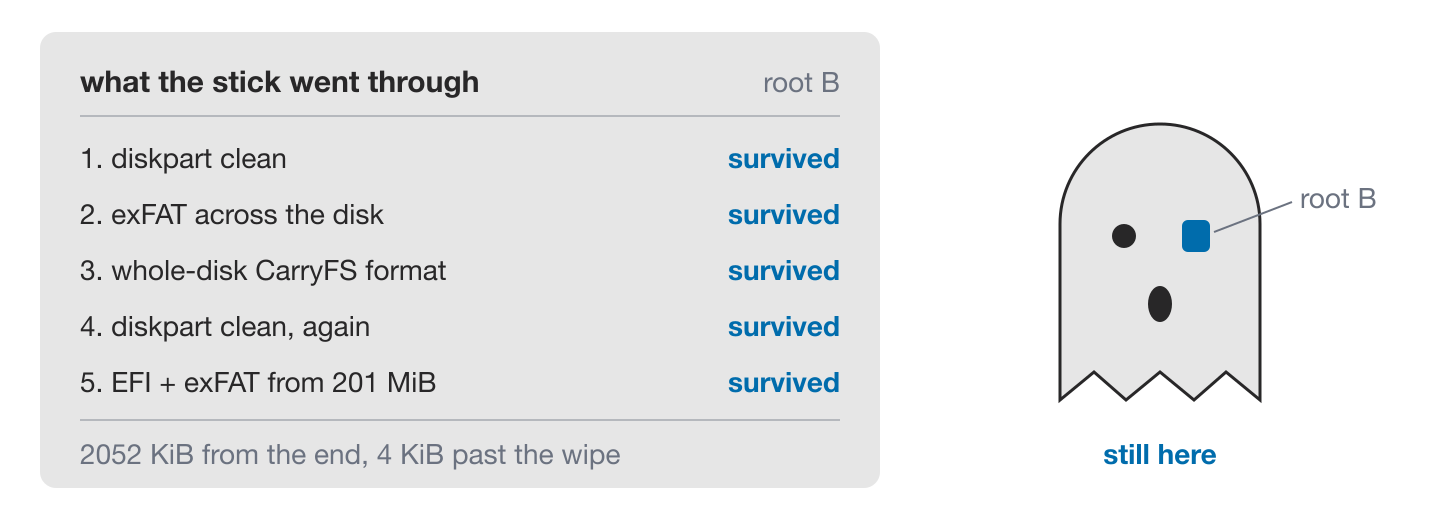
The little filesystem that refused to be formatted Every operating system has a Format button. You pick a name and a filesystem, you click, and a few seconds later the drive is empty. Nobody thinks about those few seconds. I didn't either. Then my filesystem kept surviving them. CarryFS is a filesystem I've been building so one drive can move between a Mac, a Windows PC, and a Linux machine. The code is open source and lives on GitHub, which is also where the issues I mention below are. More on why at the end. For this story you only need to know that it's new. No operating system ships with it, and none of them has heard of it. To all three it's a stranger, and each one treats strangers badly in its own way. - Linux checks its guest list, doesn't find the stranger, and walks past. - macOS knocks the house down no matter who lives there. But first it rings the doorbell and asks if anyone's home. - A Windows quick format paints its new filesystem over the front of the house. In my tests, the back was still standing. Then my own code let the stranger back in. !A house labelled CarryFS, with root A as a window at the front and root B at the back. A Linux doorman with a clipboard says not on my list. A Windows painter has painted over the front, covering root A. A macOS bulldozer asks anyone home? before flattening it. Three ways to greet a stranger. Root B, at the back, is the part that keeps coming back. Meet the stranger Only two parts of CarryFS matter for this story. The roots say where everything else is, like a table of contents. There are two copies of the last saved state, root A near the start of the partition and root B near the end. As long as the drive doesn't lie about having saved data, a crash in the middle of a write can't ruin both. Each root starts with 8 bytes of magic, CFSXROOT. The workspace banks hold the list of spare blocks the next save will write into. There are two of them and they take turns. Each save fills the bank that isn't in use, then points the root at it. All four live in a 2 MiB reserved band at each end of the partition, with room left over for future structures. Your files live in the middle. !A CarryFS partition. The first 2 MiB band holds bank A at 128 KiB and root A at 1 MiB. The last 2 MiB band holds root B at 1028 KiB before the end and bank B at 384 KiB before the end. Files live between the bands. A root and a bank at each end. Keep this picture in mind. It's the whole plot. CarryFS recognises itself in two ways, and both come back later. The quick check, has_root_magic, looks for CFSXROOT at root A or root B and nothing else. The full check, Volume::open, reads a root and then the bank it points to. If that bank is zeroed, the open fails. Linux, the doorman with a guest list Press Format in GNOME Disks and the request goes to udisks. Before udisks creates the new filesystem, it asks libblockdev to clear whatever is on the device. The heart of that is this loop from libblockdev 3.5.0: while (all && (blkid_do_probe (probe) == 0)) { status = blkid_do_wipe (probe, FALSE); ... } Each pass asks libblkid whether it recognises anything on the device. If it does, the loop zeroes those bytes and asks again. It stops when libblkid recognises nothing. That's thorough, but only as thorough as libblkid's guest list. The list lives in libblkid's source, and in util-linux 2.42.3 it has 82 names. It has ext4, Btrfs, ZFS, and APFS. It has Xenix. It has NetWare. It has the filesystem from BeOS. I'd never heard of half of them. It still doesn't have CarryFS. !libblkid's list of 82 filesystems includes ext4, Btrfs, ZFS, APFS, Xenix, NetWare, and BeFS, but not CarryFS. Its probe of a CarryFS device recognises nothing, so nothing gets wiped. Xenix gets in. CarryFS doesn't. So the loop finds nothing to wipe, wipes nothing, and udisks moves on. udisks doesn't erase the stranger. It doesn't even see it. Other Linux tools are less picky. dd from /dev/zero overwrites a device without recognising anything on it, and mke2fs discards the whole device by default when the hardware supports it. But GNOME Disks never gets that far. And then I made it worse Next, udisks waits for udev to confirm that the device is empty. udev asks libblkid, which still sees nothing. Then my own udev rule runs. It calls the CarryFS probe on every device libblkid couldn't name, so CarryFS drives show up on the desktop. The probe finds CFSXROOT at 1 MiB and tells udev the device holds CarryFS. The probe is right. Nothing touched that block. The drive still holds CarryFS. !udisks asks libblkid what is on the device, gets no answer, and wipes nothing. When it waits for udev to confirm the device is empty, the CarryFS udev rule finds CFSXROOT and reports the device as CarryFS. udisks is waiting for a device that will never be empty. After 20 seconds it gives up: udisksd: Error synchronizing after initial wipe: Timed out waiting for object The desktop mounts the CarryFS volume again, with every file still on it. In fairness to Linux, half of this one is on me. Linux walked past the stranger, and my udev rule stood in the doorway shouting that the stranger was still there. Issue #7 in the CarryFS repo has the full report if you're interested. A self-destruct button udisks can't see CarryFS, so CarryFS brings its own eraser: mkfs.carryfs --wipe /dev/sdX1 It zeroes both 2 MiB bands, which takes out both roots and both banks. After that, libblkid, the udev probe, and udisks all agree the device is empty, and GNOME Disks will format it as anything you like. It refuses a mounted device, a whole disk that holds partitions, and anything without CarryFS root magic. That last check catches most typos, but not all of them. As the Windows section shows, a partition can carry a new filesystem on top of old roots, and if it isn't mounted, --wipe will erase that filesystem's first 2 MiB. The proper fix is to get CarryFS onto the guest list, next to ZFS and Btrfs (and Xenix). Then the loop above would find it and wipe it like everyone else. Until that happens, issue #7 stays open. The ghost in the walls On a partitioned disk, wipefs -a /dev/sdX erases only the partition table. That's by design, and its man page says so. It leaves the contents of every partition alone, whatever filesystem they hold. Repartitioning in GNOME Disks or parted does the same thing. The CarryFS volume is still on the disk, byte for byte, but nothing points to it anymore. Call it a hidden volume. Any filesystem can end up hidden like this. macOS is where they come back to haunt you. macOS, the demolition crew Apple went the opposite way. Apple's wipefs, in libutil, doesn't ask what's on the device. It zeroes the same regions on every device it's given. Those are the first and last 2 MiB, 64 KiB around the middle for NTFS, the UDF anchor blocks, and the sectors that hold partition tables. A comment in the source explains the 2 MiB part, and I love it: > we don't know what blocks future FS will use to recognize itself. But we'd better be safe than sorry and write the first and last 2MB of the volume Somebody at Apple planned for CarryFS years before CarryFS existed. The first and last 2 MiB are exactly where it keeps its roots and banks. !Apple's wipefs zeroes the first 2 MiB, 64 KiB in the middle, and the last 2 MiB of every device. CarryFS keeps its roots and banks in the first and last 2 MiB, so they line up exactly. Apple erases by position, not by name. CarryFS sits right in the blast zone. Before it writes those zeros, wipefs also asks the device to unmap, or TRIM, all of its blocks. On my USB stick that made no visible difference, because the old roots outlived it. An SSD that acts on unmap may behave differently. Every Apple formatter runs wipefs before it writes anything. That includes newfs_msdos, newfs_exfat, newfs_hfs, and newfs_apfs. So macOS erases CarryFS without ever learning its name. That's what the code is for. Which is why I was surprised when Disk Utility refused to erase a stick. Here's the log, with the volume name changed: Formatting disk4s2 as CarryFS with name CARRYFS This operation requires an unmounted disk. : (-69830) The cause is the order in which macOS does things. Ringing the doorbell Disk Utility hands the erase to a system daemon, storagekitd. For a whole-disk erase, this is what happens: 1. storagekitd unmounts every volume on the disk. 2. It runs wipefs on every partition in the current table, and on the whole disk. 3. It writes the new partition map. 4. The kernel creates the new partition devices. DiskArbitration, the part of macOS that mounts drives, probes each one right away with every installed filesystem and mounts the first one that answers. 5. storagekitd runs wipefs on the new partitions, then the formatter. If anything answered in step 4, step 5 finds a mounted partition and refuses with -69830. Step 4 is the demolition crew ringing the doorbell of a house it's about to flatten. Usually nobody answers. But CarryFS registers its own probe, which runs after Apple's checks. If it says yes, DiskArbitration mounts the partition and the bulldozer stops at the front door. !storagekitd wipes the old partitions and writes a new map. DiskArbitration probes the new partition before storagekitd wipes it, CarryFS answers, and the partition is mounted. The formatter then fails with error -69830. I timed the gap. A script polled the new partition every 5 ms during an erase. The old data stayed readable for 480 to 650 ms after the partition appeared, until the wipe in step 5 reached it. For about half a second, macOS looks for a filesystem on a partition it's about to wipe. !A timeline. At 0 ms the new partition appears. The old CarryFS volume stays readable until storagekitd's wipe arrives, 480 to 650 ms later. DiskArbitration probes and mounts it somewhere inside that window, so the wipe finds a mounted partition and the erase fails with -69830. Half a second is plenty of time to answer the door. Why it usually works anyway Step 2 wipes every partition in the current table. If the old CarryFS partition is in the table, it loses both bands before the new map exists, and nobody answers the doorbell. I erased CarryFS into exFAT, HFS+, and CarryFS again, on GPT and on MBR. Every erase worked. The trouble is the hidden volume from the Linux section. The table doesn't mention it, so step 2 never wipes it. And in my tests, Disk Utility laid out a GPT disk the same way every time, with a 200 MiB EFI partition and then the data partition from 201 MiB to the end. If the hidden volume came from that same layout, the new partition lands exactly on top of it. Same start, same size, so the old roots sit exactly where CarryFS expects them, and the size recorded in them matches. The ghost fits the new house perfectly. Missed by 4 KiB Step 2 also wipes the whole disk, which covers the disk's first and last 2 MiB. On my 62 GB Lexar stick, the data partition ends exactly 1 MiB before the end of the disk. So the whole-disk wipe reaches 1 MiB into the end of the partition. Bank B, 384 KiB from the end of the partition, falls inside the wipe. Root B, 1028 KiB from the end, misses it by one block. That's 4 KiB. Root A and bank A sit 201 MiB into the disk, nowhere near either edge. !The last part of the disk. The whole-disk wipe covers the disk's last 2 MiB, which includes the 1 MiB after the partition and all 256 KiB of bank B. Root B, a single 4 KiB block, ends exactly where the wipe starts and survives. The whole-disk wipe stops one block short of root B. So both roots survive, and whether the ghost answers the door depends on which bank its root points to. The banks take turns, remember. - If the root points at bank B, the probe follows it to a zeroed bank. The full check fails, nothing mounts, and the erase works. - If the root points at bank A, everything the probe needs is intact. macOS mounts the volume it's in the middle of erasing, and the erase fails. I built hidden volumes on purpose and erased them. Every bank-A volume came back, 3 out of 3. Bank-B volumes never did, in more than a dozen erases. So whether the erase works isn't luck. It depends on which bank the last save happened to use, and a used volume can be on either one. My sample was small, but no run broke that rule. The workaround is almost silly: press Erase again. The failed erase leaves the revived partition in the table, so the second erase wipes it in step 2. Issue #9 tracks a real fix. The idea there is to store the partition's GPT GUID in the root, so a probe can tell a leftover from a live volume. Getting CarryFS into libblkid wouldn't help here. It fixes the udisks failure from issue #7, but wipefs -a on a whole disk would still leave the partition's contents alone. I haven't tested whether a hidden exFAT or APFS volume comes back the same way. It probably does, since step 4 doesn't care which filesystem answers. Windows, the painter On Windows, nothing system-wide looks for CarryFS. My service does. It checks every partition of a disk when the disk arrives, and every disk when the service starts. If the quick check finds CFSXROOT, the service locks the partition for itself and mounts it through WinFsp. It doesn't watch Disk Management or diskpart, so the macOS race can't happen in the middle of an erase. It can happen at the next plug-in. I tested on the same 62 GB Lexar stick, on Windows 10. Each run made a CarryFS partition, deleted it, created a partition of the same size in the same place, quick-formatted it, and copied a file onto it. Fresh paint on the front door A Windows quick format doesn't wipe anything first. It writes the new filesystem's structures, mostly at the start of the partition. Root B, near the end, survived every quick format I tested. A full format is different, because it writes zeros over the whole partition, and a format on an SSD can also send TRIM. I only tested quick formats. Here's what the old roots looked like afterwards. | New filesystem | Root A, 1 MiB in | Root B, end - 1028 KiB | carryfs-windows probe | | -------------- | ---------------- | ---------------------- | -------------------------------- | | exFAT | overwritten | CFSXROOT | carryfs <uuid>, opens cleanly | | NTFS | overwritten | CFSXROOT | carryfs damaged: page checksum | | FAT32 | overwritten | CFSXROOT | carryfs damaged: page checksum | FAT32 ran on a 32,000 MiB partition, because the Windows 10 tools won't format FAT32 above 32 GB. exFAT is the clearest case. On this partition, Windows put exFAT's allocation table, the FAT, exactly at 1 MiB, right where root A lives. The bytes there now read f8 ff ff ff instead of CFSXROOT. exFAT's data area starts at 3 MiB, and nothing got written near the end. Root B and everything it points to stayed whole, and the full check read the old volume through root B as if nothing had happened. !Before and after a quick format to exFAT. Before, the partition holds a complete CarryFS volume. After, exFAT's structures cover the first band and root A, but root B and bank B at the end are untouched. New paint on the front, the old house intact behind it. NTFS and FAT32 overwrote something root B needs, so the full check fails for them. I didn't track down which block. That's luck, not design. My service let the ghost back in Here's the dangerous part. The quick check only asks whether CFSXROOT is there, and the service never checked whether Windows had already mounted a filesystem on the partition. I thought the lock was a safety net. If Windows has exFAT mounted, surely it won't let another program lock the partition for itself? Turns out it will, as long as the volume is idle. On the first replug, the service's lock failed because Windows was still busy with the new volume. From a shell, the same lock on an idle volume worked every time I tried. And when the service started with the stick already plugged in, its scan found an idle volume too: carryfs: \\.\Harddisk3Partition2: mounted F: Now the stick had two drive letters for one partition. D: was exFAT. F: was the old CarryFS, with the file I'd left on it. While F: was mounted, every access to D: failed with Access is denied. After the eject, exFAT's file was gone, the volume label was garbage, and chkdsk reported a corrupt bitmap and upcase table. Root A said CFSXROOT again, written right over exFAT's FAT. !One partition with two drive letters. D: is exFAT and F: is the old CarryFS. Both point at the same block 1 MiB into the partition, where exFAT keeps its FAT and CarryFS writes root A. Two drive letters, one partition, and one block both of them think they own. !A quick format to exFAT overwrites root A but not root B. The service finds CFSXROOT at root B, gets an exclusive lock because the exFAT volume is idle, and mounts the old CarryFS. CarryFS then writes its metadata over exFAT's FAT. I ran the exFAT case a second time and wrote nothing to F:. Mounting and ejecting alone corrupted exFAT again. Once a volume passes the full check, a writable mount repairs any missing root before it accepts a single file operation. So the mount itself wrote root A back, right over exFAT's FAT. With NTFS and FAT32 the full check failed first, so nothing mounted and both filesystems survived. The volume that wouldn't stay dead The same poor stick also showed how long a leftover can last. I made a CarryFS partition at 201 MiB. Then the stick went through all of this, in order: 1. diskpart clean. 2. An exFAT format of a partition that spanned the disk. 3. A whole-disk CarryFS format, like mkfs.carryfs /dev/sdX after wipefs on Linux. 4. Another diskpart clean. 5. A new layout like Disk Utility's, with an EFI partition and exFAT from 201 MiB to the end. After all that, the service still found the very first CarryFS partition, mounted it over the new exFAT, and destroyed the exFAT. !Five steps: diskpart clean, exFAT across the disk, a whole-disk CarryFS format, diskpart clean again, and EFI plus exFAT from 201 MiB. Root B survived every one, because it sat 2052 KiB from the end of the disk, 4 KiB past the wipe. Five rounds of erasing and repartitioning. Root B sat through all of them. Two things kept it alive. Root B sits a fixed distance before the end of its partition, so a new partition lands on it whenever the new one ends where the old one ended. And the whole-disk format in step 3 zeroed the disk's last 2 MiB, but the old partition ended 1 MiB before the end of the disk. Its root B sat 2052 KiB from the end and missed the wipe by 4 KiB, the same near miss as on macOS. Landing on root B isn't enough, though. The root also has to match the new partition's size and position. The whole-disk volume from step 3 never came back, because no partition lines up with it. In another diskpart test, a new partition started at 1 MiB instead of 201 MiB and put root B on exactly the same byte. The probe rejected it because the partition was a different size, and that was the only thing standing between the service and the new exFAT. Ask before you walk in Every damaging run had one thing in common. Windows had already mounted a real filesystem on the partition. So now, when the service finds roots, it asks Windows one more question before it takes the lock: what filesystem is on this partition? If the answer is anything other than RAW, the service leaves the partition alone: carryfs: \\.\Harddisk3Partition1: exFAT is mounted over old CarryFS roots; not mounting A real CarryFS partition holds nothing Windows recognises, so it reads as RAW and mounts as before. Linux already works this way, because my udev rule only runs the probe when libblkid found nothing. I repeated the in-place exFAT format with the fix, on a replug and on a service start. The service skipped the partition both times, the exFAT file was intact, and chkdsk was clean. A real CarryFS on the same stick still mounted both times. The fix doesn't erase the leftover. The probe still reports CarryFS. If the new filesystem is too damaged for Windows to mount, it reads as RAW, and only the root check stands in the way. The GUID idea from issue #9 still has a place. In my tests, deleting and recreating a partition gave it a new GUID every time, so a GUID check would catch repartitioning. But formatting a partition in place kept its GUID, and that's the case Windows invites. It shows a CarryFS partition as an unreadable RAW drive, and Explorer offers to format drives it can't read. So the two fixes cover different gaps. The service fix shipped in CarryFS 0.1.0. The same release added carryfs-windows wipe, the Windows twin of mkfs.carryfs --wipe. It zeroes both bands, and it also refuses a partition that Windows mounts as NTFS, exFAT, or FAT, so it won't erase the start of a filesystem Windows still recognises. The scorecard | System | How it erases | What happened to CarryFS | | ------- | -------------------------------------------------------------------------- | ------------------------------------------------------------------------------------ | | Linux | By name. udisks wipes only filesystems libblkid knows. | Untouched. My udev rule then made the format time out after 20 seconds. | | macOS | By position. Fixed regions at each end, whatever they hold. | Erased, unless a hidden volume answers the probe first. | | Windows | A quick format doesn't. It writes the new filesystem, mostly at the start. | Root B survived every quick format I tested. Before the fix, my service broke exFAT. | Each approach makes sense on its own. udisks never zeroes bytes libblkid can't explain, which is polite, but a new filesystem has to bring its own eraser until it makes the list. Apple's fixed regions catch filesystems that didn't exist when the code was written, and still a leftover in exactly the right place gets one chance to answer the door. Windows hides the old volume from itself, but not from software that goes looking for it. So recognising a filesystem has to include asking whether something else already lives there. The stubbornness comes from a feature. A root at each end is what protects CarryFS from a crash, and the same root B is what kept coming back in this story. > Note: The macOS measurements come from one 62 GB Lexar stick on macOS 15.6. The 4 KiB near miss depends on where the partition ends relative to the disk, so other disk sizes can behave differently. Apple's wipefs also unmaps the whole device first, so an SSD may behave differently from a USB stick. The Windows measurements come from the same stick on Windows 10 22H2, build 19045. I simulated a replug with pnputil /restart-device, which sends the same disk-arrival notification as a real plug-in. The whole-disk volume in the Windows tests was made by carryfs-windows mkfs on the physical drive, not on Linux. So why write a filesystem at all? I use a MacBook, a Windows PC, and Linux. Sharing a drive between them usually means picking a filesystem for one platform, then finding extra software to use it on the others. Some of that software is paid. exFAT works everywhere, but it doesn't checksum file contents. A file can open fine even when its bytes have been silently damaged. I wanted one drive I could plug into any of my machines, keep backups from all of them on it, and trust that the files are still what I wrote. So I started building CarryFS. - Copy-on-write. CarryFS writes replacement blocks before it publishes a new state, for file data and metadata alike. The last saved state stays intact while that happens, as long as the drive doesn't lie about having saved data. Changes that haven't been synced can still be lost. - Checksums. If part of a photo or backup archive goes bad, CarryFS reports the damage instead of quietly handing you the wrong bytes. A scrub tool checks stored files before you need them. - One engine everywhere. The same Rust code runs through FUSE on Linux, macFUSE on macOS, and WinFsp on Windows. macFUSE and WinFsp already ship signed drivers, so I get to work on the filesystem instead of maintaining three kernel drivers. It doesn't repair damage. There's no self-healing, because that needs extra copies or parity. Keep an independent backup. CarryFS is open source and in public beta. The repository has install instructions for all three systems. And if you try it and later want the drive back for something else, erase CarryFS first. That's mkfs.carryfs --wipe on Linux, carryfs-windows wipe on Windows, and a normal Disk Utility erase on macOS. The formatting guide has the steps. After everything above, you know why. --- Originally published on my blog.
Running a screenshot-based automation agent on an Android phone Tapilot is an open-source Android automation project with a specific constraint: the user should be able to describe and run a task on the phone, without a computer connected. Here is how the phone-side workflow fits together, and where its limits are. {% youtube TwuMuZ59yog %} A task starts in Android The native chat interface accepts a text task. Voice is another input path once a speech provider is configured. The embedded runtime runs the agent and keeps task context on the phone. Midscene interprets screenshots, locates visible targets and guides actions. Android’s AccessibilityService provides the device capabilities, including screenshots, gestures, navigation and text input. The next screenshot provides evidence of what changed. The distinction is between visual targeting and device execution. Screenshot-based targeting does not mean Android system interfaces disappear from the implementation. The model is still remote The phone hosts the agent, but inference uses the configured model provider. Screenshots and task context are sent to that service. Voice recognition and playback use separately configured providers. This lets the phone run tasks without a connected computer. It does not make the workflow offline or remove the need to configure a model. A report makes an attempt inspectable Midscene’s HTML report contains screenshots, plans, actions and errors. The demo shows a phone receiving a spoken instruction and opening WeChat, followed by a report view. The video is edited. It demonstrates the workflow, rather than establishing a success rate. Protected screens, custom-rendered inputs and vendor background restrictions can still interrupt execution. A computer can be an optional controller Tapilot also includes a Skill and Codex plugin that connect to a paired, unlocked phone over Wi-Fi. In default steps mode, the host agent chooses actions, the CLI executes them, and MCP supplies the embedded preview panel. That is a separate entry point. Users do not need it to run the phone-side agent. Trying it You need an ARM64 Android 11+ phone, accessibility permission and a supported vision model. Check the current installation instructions and the difference between the downloadable build and the latest source before starting. Demo and setup: tapilot.lifeos.md Source: tapilot-ai/tapilot For a useful bug report, include the device, model and a small reproducible task. Check screenshots and logs for private information before sharing them.
SH codebook now supported in my Node.js 3DGS RAD converter, making SH3 RAD files over 55% smaller Following up on my previous post about the Node.js RAD converter, I’ve added SH codebook compression to Gaussian-Splat-Lite. It stores shared spherical harmonics coefficients instead of separate coefficients for every splat, reducing file size while preserving view-dependent color with some approximation error. My setup is a MacBook Pro with an Apple M5 Pro, 15-core CPU, and 48 GB unified memory. Here are the results for OsadaSlavotovo, with approximately 59.7 million input splats: |Output|Full conversion time|RAD file size|PSNR ↑| |:-|:-|:-|:-| |SH3, no codebook|—|3.852 GB|Reference| |GSL, 256K SH codebook|11 min|1.709 GB|34.81 dB| |Spark, 64K SH codebook|11 hr 20 min|1.660 GB|33.76 dB| |SH0, no codebook|—|1.507 GB|25.13 dB| The GSL codebook output is 55.6% smaller than SH3 without a codebook, with little added conversion time. It’s also only about 201 MB larger than SH0, while retaining SH3 view-dependent color. Compared with Spark’s conversion, GSL is approximately 57.8× faster on this scene. Both timings cover the entire conversion, including SH clustering, rather than just the clustering stage. Compared with Spark’s output, the GSL file is roughly 3% larger, with 1.05 dB higher PSNR in the shown view. The codebook sizes differ: GSL uses 256K entries, while Spark uses 64K. Thanks again to the Spark team for the RAD format foundation. GitHub · Converter documentation Curious what you think of the size and quality trade-off!
How I built a free JPEG-to-SVG converter that runs 100% in the browser How I built a free JPEG-to-SVG converter that runs 100% in the browser Every online image converter I tried did the same thing: upload your file to somebody's server, wait in a queue, download the result, hope your image is not kept for "analytics". I wanted a converter with no upload step at all. So I built one: jpegtosvg.com. It turns JPEG, PNG and WebP images into SVG paths entirely on your device. No account, no file uploads, no backend that ever sees your image. Here is how it works under the hood. The core decision: no backend Most converters need a server because raster-to-vector tracing is CPU heavy. My decision was to skip the server completely. The whole site is a static build deployed to Cloudflare Pages with wrangler pages deploy. There is no database, no API, no conversion queue, no API secret anywhere. The build step (tsx scripts/build.ts) generates plain HTML, and that is what gets served. This has three consequences I really like: 1. Privacy is structural, not a promise. Your image never leaves your device, so there is nothing to leak, sell, or subpoena. 2. Cost is near zero. Static hosting on Cloudflare Pages means I pay nothing per conversion. A server-side tracer would bill me CPU time for every image. 3. It cannot go down under load. There is no conversion server to overload. Ten thousand people converting at once costs me the same as one. The tradeoff is obvious: the user's device does the work. So the engineering effort went into making heavy computation feel light. The tracing engine: ImageTracerJS in a Web Worker The actual raster-to-vector work is done by ImageTracerJS, a JavaScript port of the classic bitmap tracing approach: quantize the colors, trace the boundaries of each color region into paths, and emit SVG. It preserves colors, not just black-and-white silhouettes. Running that on the main thread would freeze the page for seconds on a large image. So all tracing runs inside a dedicated Web Worker (tracer-worker.js). The UI thread only handles the file picker, the preview, and progress messages. If the worker crashes or hangs, a timeout kills it and the UI reports the failure cleanly instead of locking up the tab. A shared worker instance is reused when tracing several images in a row, then terminated by the caller. Taming large images before tracing Tracing cost grows fast with pixel count, so the pipeline caps the work before the tracer ever sees it: - Input limits: 12 MB file size, 32 megapixels. - Before tracing, the image is drawn to a canvas scaled so the longest side is at most 1200 pixels. That 1200-pixel cap is the single biggest performance decision. A 4000-pixel photo becomes a 1200-pixel working copy, which traces in a fraction of the time, and the resulting SVG scales back up losslessly because it is vector output. The user gets a small file that renders sharp at any size. Format support without a server Browsers cannot decode everything natively, so the converter bundles small decoders, all client-side: - HEIC/HEIF (iPhone photos) via heic2any - TIFF via utif2 - PDF pages rendered with pdfjs-dist, then traced like any other raster input - Text extraction with tesseract.js, run on-device with the same privacy story Each of these is lazy-loaded. The PDF renderer, for example, is only imported when the user actually drops a PDF. The initial page load stays light. SVG cleanup: not every path deserves to survive Raw tracer output is verbose and can contain junk, so there is a cleanup pass (vector.js, about 180 lines). It sanitizes the SVG through an allowlist of elements (svg, g, path, rect, circle, ellipse, line, polyline, polygon, text, tspan and a few more) and drops everything else. The cleanup is deliberately conservative: it is meant for static artwork and does not try to simplify geometry, because aggressive simplification destroys the details people actually wanted vectorized. There is also a banner export tool that preserves proportions and accepts output dimensions from 32 to 4096 pixels, for the common "I need this logo as a crisp banner" case. What I learned Web Workers are non-negotiable for client-side compute. The difference between "the tab froze for 8 seconds" and "a progress bar moved for 8 seconds" is the difference between a tool people trust and one they close. Downscale before you compute. Capping the working resolution was worth more than any algorithmic optimization. Vector output means the input resolution barely matters for the final quality. Static sites can do real work. We default to reaching for a backend, but a surprising amount of "server work" is just computation that a modern phone or laptop handles fine. The backend I did not build is the backend I never have to monitor, scale, or pay for. Privacy as architecture beats privacy as policy. "We delete your files after 24 hours" is a promise. "Your files never leave your device" is a fact. Users understand the difference. Try it The converter is live at jpegtosvg.com. Drop in a JPEG, PNG or WebP and watch your browser do the whole job. If you build something with heavy client-side computation, I would love to hear how you kept the UI responsive.
@_jansmejkal I bet it's hydration 😆 Thanks, filed for investigation! remotion#12894
@bhardwajshash i made this 5 months back for linux lol indra55/bezel
@JhnyStraka Yes. I have seen users do it for TP4 as described here - github.com/yunwei37/dgx-spark-4-ring-no-switch/bl… . TP2 and TP3 are straightforward as you may already know.
A Signed Mandate Is Not Authorization: A Rust SDK for AI-Agent Transactions A Signed Mandate Is Not Authorization: A Rust SDK for AI-Agent Transactions An AI agent submits a $50 transfer request. Its mandate has a valid Ed25519 signature. The signed scope permits transfers up to $100 per transaction. The requested amount is below that limit. Would you authorize the payment? Not yet. The signature and the amount check establish useful facts. Neither establishes whether the delegation has been revoked, whether the agent has already exhausted a cumulative budget, or whether the request has been processed before. That distinction matters when designing authorization boundaries for AI agents. What can we actually verify offline? Consider an issuer signing a mandate that identifies a principal, an agent, permitted actions, and transaction constraints. A local verifier can check the issuer's signature against an explicitly trusted public key. It can then evaluate a specific transaction against the verified mandate. For example: - Agent: agent:treasury-bot - Action: transfer - Per-transaction limit: USD 100.00 - Requested amount: USD 50.00 If the signature is valid and the request satisfies the static constraints, the system can conclude that the request is eligible for an authoritative authorization check. It cannot conclude that the payment should be executed. There are at least three reasons. Revocation: An issuer can revoke a delegation after signing it. The old signature remains cryptographically valid. Cumulative budgets: An agent may have spent its total allowance across earlier requests. A local per-transaction check cannot establish the remaining distributed balance. Replay: A request can be validly signed and still be submitted more than once. These are mutable facts that require an authoritative source of current state. Encoding that boundary in Rust This distinction is central to FintechBear KYA, an open-source Rust SDK for AI-agent delegated authority verification and transaction policy evaluation. The SDK separates a local policy result from a final authorization decision. A successful local evaluation produces a PolicyOutcome. It does not produce an automatic Allow. There is deliberately no From<PolicyOutcome> for Decision conversion. Instead, the application must go through the authorize bridge and supply an OnlineAuthorizer that can make the authoritative decision. The trade-off is deliberate: the SDK cannot independently authorize a payment. Applications need to implement the online authority. That is a better failure mode than silently treating an offline check as permission. A runnable example The repository contains a Rust demo that exercises this distinction. git clone https://github.com/fintechbear/fintechbear-kya-suite.git cd fintechbear-kya-suite cargo run -p kya-examples --example demo The example: 1. Configures an explicitly trusted issuer public key. 2. Creates and verifies a genuinely signed Ed25519 mandate using a test-only signing key. 3. Evaluates the USD 50.00 transaction against the USD 100.00 limit. 4. Rejects a mandate whose signature has been modified. 5. Denies a USD 100.01 request that exceeds the signed limit. 6. Sends an eligible policy outcome to an example online authorizer that cannot establish approval. The demo reports an eligible static outcome, but that result is not authorization. Its failure cases include: [4] in-scope transaction is ELIGIBLE (requires_online_authorization=true). [5a] tampered signature rejected fail-closed: signature did not verify (VerificationSignatureInvalid). [5b] over-limit intent denied by stage C: reason=AmountExceedsLimit (terminal, fail-closed). The online-authority part of the demonstration also shows that an unresolved approval requirement or an unavailable authority does not become an Allow. These are illustrative test transactions, not real payment executions. You can inspect the full demo source and captured output. Why exact money matters Authorization constraints should not depend on floating-point rounding. FintechBear KYA uses integer minor units with explicit currency information. For USD, 10_000 minor units represent $100.00. The example's $100.01 request exceeds that limit by exactly one cent. That makes the boundary explicit and testable. It does not solve cumulative spending enforcement. Per-transaction limits and distributed budgets are different problems. What the SDK does not implement This is an early v0.1.0 pre-release. The open-source core provides local evidence verification, deterministic static policy evaluation, and interfaces for the later authorization and execution stages. It does not currently ship: - Agent proof-of-possession verification. - A concrete online revocation service. - Distributed cumulative-budget enforcement. - Global replay protection. - Payment execution enforcement. Its AP2-style adapter is experimental; confirmed AP2 wire interoperability is not claimed. The project has not undergone an independent third-party security audit and is not presented as a production-ready payment authorization system. These boundaries are documented in the security limitations and threat model. The engineering question For a financial action initiated by an AI agent, signature verification and static policy are necessary parts of a possible design. But where should the boundary between verified evidence and current authorization live? FintechBear KYA puts that boundary explicitly in the API: local eligibility cannot be silently promoted to an authorization decision. I'd be interested in how other Rust and security engineers approach this separation, particularly when the authoritative service is unavailable. Source: fintechbear/fintechbear-kya-suite Disclosure: This article was drafted with AI assistance.
My agent ran prisma migrate reset. Here's the hook I wrote so it can't again Last week I wrote about pgbrake, an MCP server that makes an agent's SQL writes undoable. People pointed out the obvious hole: agents don't only touch the database through SQL. They also run terminal commands, and prisma migrate reset --force wipes everything without a single SQL statement going through the MCP server. pgbrake 0.2.0 adds a Claude Code PreToolUse hook for that. It watches Bash commands for migration tools doing destructive things: prisma migrate reset --force, drizzle-kit push --force, alembic downgrade base and similar. When it sees one, it takes a pg_dump snapshot first (if PGBRAKE_DSN is set), then stops and asks you. pgbrake install-hook That's the whole setup. The hook is part of Pro, which is $29 one-time for the first 100 licenses, then $39. No subscription, 14-day refund, and the key is checked offline, so pgbrake never phones home. Pro also lifts the free tier's 20-change undo limit and adds pgbrake log --export csv|json. The SQL side (undo, approvals, audit log) stays free and MIT. What it doesn't do yet: Codex hooks, a policy file for custom rules, and online key revocation. If one of those would decide whether you'd use it, tell me which. lexang/pgbrake lexang.github.io
@hujur65358 the music player is opensource (githubesson/lumen), the movie player isnt (will be some day) not everything is worth recreating unfortunately (ie. i wouldnt attempt to recreate x or instagram from re'd endpoints, although im sure its possible), but these 2 very much are t.co
📄 Cheat sheet PDF 1 trang cho tập này (Ghostty: cách hoạt động, lệnh bắt đầu nhanh, lưu ý): github.com/kieubinh/kieu-open-resources/blob/main…
@localhost_4173 很好用,但是该清理一下pr了佬,比如这个mygo-cloudmusic#54
Stripe webhook signature verification failed: 3 things to check This article was created with the help of AI. Each step was checked against the Stripe docs and the stripe-node library listed at the end. Here's why this error matters. A customer pays, Stripe sends your app a webhook, and your app turns it away because the signature check fails. The customer paid and gets nothing. Stripe keeps retrying for a while, but you may not notice until someone writes in, upset. The good news: the cause is almost always one of three small things. The error: Webhook signature verification failed. No signatures found matching the expected signature for payload. Short answer: Stripe's check uses three things: the raw request body, the Stripe-Signature header and your endpoint's signing secret. If any one of them is wrong, the check fails. Stripe says the most common cause is the wrong secret. Check 1: Is it the right secret? - The secret starts with whsec_. It is not your API key (sk_...) and not the endpoint ID (we_...). - The secret from stripe listen on your laptop is different from the secret of an endpoint you made in the Stripe Dashboard. Don't mix them. - Test mode and live mode use different secrets. When you go live, copy the live endpoint's secret. - To find it: in Stripe, open the endpoint and click Reveal secret. - Look for a space or line break at the end of the value in your environment variables. - Changed the value on your host? Deploy again. Many hosts only load new values on a new deploy. Check 2: Is the body untouched? Stripe signs the exact bytes it sends. If your app turns the body into JSON and back, the bytes change and the check fails. Get the raw body. Next.js (App Router): // app/api/webhooks/stripe/route.ts import Stripe from 'stripe' const stripe = new Stripe(process.env.STRIPE_SECRET_KEY!) export async function POST(req: Request) { const body = await req.text() // raw text. Do not use req.json() const sig = req.headers.get('stripe-signature') if (!sig) return new Response('Missing signature', { status: 400 }) let event: Stripe.Event try { event = stripe.webhooks.constructEvent(body, sig, process.env.STRIPE_WEBHOOK_SECRET!) } catch (err) { return new Response(`Webhook Error: ${(err as Error).message}`, { status: 400 }) } // handle event.type here return Response.json({ received: true }) } Express: put the raw parser on the webhook route, and add express.json() after it. app.post('/webhook', express.raw({ type: 'application/json' }), (req, res) => { let event try { event = stripe.webhooks.constructEvent(req.body, req.headers['stripe-signature'], endpointSecret) } catch (err) { return res.status(400).send(`Webhook Error: ${err.message}`) } // handle event.type here res.json({ received: true }) }) app.use(express.json()) // other routes only Next.js (Pages Router): turn off the body parser for this route and read the raw bytes. // pages/api/webhook.ts import type { NextApiRequest, NextApiResponse } from 'next' import Stripe from 'stripe' export const config = { api: { bodyParser: false } } const stripe = new Stripe(process.env.STRIPE_SECRET_KEY!) async function rawBody(req: NextApiRequest) { const chunks: Buffer[] = [] for await (const chunk of req) chunks.push(typeof chunk === 'string' ? Buffer.from(chunk) : chunk) return Buffer.concat(chunks) } export default async function handler(req: NextApiRequest, res: NextApiResponse) { if (req.method !== 'POST') return res.status(405).end() const sig = req.headers['stripe-signature'] as string try { const event = stripe.webhooks.constructEvent(await rawBody(req), sig, process.env.STRIPE_WEBHOOK_SECRET!) // handle event.type here return res.json({ received: true }) } catch (err) { return res.status(400).send(`Webhook Error: ${(err as Error).message}`) } } Supabase Edge Functions (Deno): use await req.text(), and use the async version with Stripe's crypto provider: const cryptoProvider = Stripe.createSubtleCryptoProvider() const event = await stripe.webhooks.constructEventAsync(body, signature, secret, undefined, cryptoProvider) The plain constructEvent fails there with "SubtleCryptoProvider cannot be used in a synchronous context". Supabase also blocks Stripe with a 401 by default until you set verify_jwt = false for the webhook function. Something in front of your app can also change the body, such as a proxy or a forwarding tool. Even a small change, like extra spaces in the JSON, breaks the check. Check 3: Is the header right? Print the Stripe-Signature header once. It should look like t=...,v1=.... If it is empty, your code is reading the wrong header, or something in between removed it. Tip: a "too old" error Stripe's libraries also reject events whose timestamp is more than 5 minutes off from your server's clock (the default). If you replay a saved request later, it will fail. Send a fresh test event instead, and make sure your server's clock is correct. Make sure fake signatures are refused Once real events pass, check the other side: your endpoint must say no to a bad signature. Try it on your own endpoint: curl -i -X POST https://yourapp.com/api/webhooks/stripe \ -H 'Content-Type: application/json' \ -H 'Stripe-Signature: t=1,v1=bad' \ -d '{}' You want a 4xx, such as 400. If you get a 2xx, your route is not checking the signature. Sources - Stripe, Resolve webhook signature verification errors: <docs.stripe.com> - Stripe, Webhooks: <docs.stripe.com> - Stripe Node library (constructEvent, constructEventAsync): <stripe/stripe-node> - Supabase example code (Deno): <github.com/supabase/supabase/blob/master/examples…> --- More plain-English webhook fix guides: tillping.online Tillping is a small tool that checks the payment-webhook path of your app, so a paying customer isn't left with nothing while you hear nothing. It isn't open yet. If you'd like a heads-up when it is, join the early-bird list: tillping.online
I recompiled Ace Combat Zero (PS2) into a native VR game — trailer + the story Trailer: youtube.com How this started. When Ace Combat 8 came out, I did what I usually do with a new entry: went back to an old one. Zero came bundled, I had never actually played it, and it hit me the way it hits everyone — and I kept thinking "this could be better". My Meta Quest 3 was gathering dust, and the thought wouldn't leave: this game was made for VR. AC7 has VR missions and there are VR mods for it. Nobody had done it for Zero. I tried the PC route first (hooking a D3D12 renderer into OpenXR) and parked it. Then I took the original PS2 game and did what the N64 recomp projects do: a static recompilation. sal063 had already built a ps2recomp for Ace Combat 5 ( sal063/Ace-Combat-5-Static-recompilation ), and Zero turned out to share its engine — the VU1 render microcode is byte-identical — so a stage I had budgeted weeks for took one night. 98.9 % of Zero's executable (14,644 functions) now runs as ahead-of-time C; the game itself is untouched, the VR lives in hooks around it. The head is composed into the camera for one function call and restored, so the game logic never knows a headset exists. I worked with Claude Code throughout — at times with several agents in parallel — and merged the patches by hand. The first builds were awful. The two eyes looked at different places, the UI was unusable, clouds turned with your head, and there were no cockpits — Zero never had cockpit geometry. So I built them: 36 aircraft, 35 cockpits, most of them FlightGear models (GPL) rebuilt, relit from the game's own light and cleaned up, several made from scratch, all with live gauges and mirrors. Then the long list of things that only matter in VR: stereo, lighting from inside the glass, comfort (no camera shake on the head, flat cutscenes), judder. What's in now: - Real cockpits per aircraft, lit by the world, with working mirrors and gauges. - Weather on the glass: condensation inside clouds, rain beads and water lenses, rime and snow, soot from kills. - Every canopy has its own material — acrylic, polycarbonate, laminated glass — so hits crack it differently on each plane, and the cracks grow and stay until you respawn. - Volumetric clouds that cost the same as the 2006 sprites (+0.15 / −0.16 ms per stereo frame). The game's own cloud data drives them; the renderer is mine, after Guerrilla's Nubis and Hillaire's work — no temporal reuse, because that is what flickers in VR. Eleven days from the first recompile to finishing the campaign in the headset. I played Zero for the first time in my life inside this build, fixing bugs mission by mission; somewhere around the middle of the campaign it stopped feeling like a hack — the gameplay is untouched, but sitting in that cockpit is a different game. Gamepad for now; Quest Touch stick-and-throttle exists for a few cockpits and is untested. What it is today: a build-it-yourself project, not a download yet. It needs your own PS2 disc image (SLUS-21346) and a toolchain to build it; nothing of the game ships with it. For reference, my setup: Windows 11, an RTX 3090 Ti, a Quest 3 over a Link cable at 120 Hz. I haven't tested anything weaker, so I honestly don't know where the floor is — that's one of the things I'd like help with. Honest state: all 18 missions run; the heaviest cockpits still miss the 120 Hz budget in two missions; motion controls are a prototype; save/load lightly tested. I'd love to hear whether anyone wants to play this, or help — testing on this kind of hardware, cockpits, the Touch controls, anything.
NEW GAME FORMAT FOR SWITCH 2 NUP (.nup), designed for decrypted dumps from Switch 1 and 2 repo a55uka/nup @Forhanvv
Project List (.rpl) creator/manager Whipped up a quick python-based HTML app that helps create and manage Project Lists for Reaper- I use Reaper in my live show so this is for set lists. It depends on a sql-lite DB- I’m still coding up the initial scan and tagging of the RPP files in a given directory- think mood, tempo, artist, vocal difficulty. I’ve already used the strawman app to create my next gig’s set lists. Posting for anyone that wants to pull it and contribute, make it better for the community. I’ll still be working on it too. gdekhayser/reaper-setlist-manager
Terminal vừa nhanh vừa dễ dùng? Ghostty | GitHub Radar #20 #Shorts Bạn ở trong terminal cả ngày: mở tab, đọc log, chuyển phiên liên tục. Terminal có thể vừa nhanh vừa dễ dùng không? Ghostty là terminal MIT với giao diện gốc và phần lõi libghostty. Trong Short này (GitHub Radar, mỗi tập chỉ một repo: ghostty-org/ghostty): • 63.224 sao; Trending báo tăng 589 trong tuần, không liệt kê mức tháng hay hôm nay • Vì sao: terminal là nơi đọc log, chạy chương trình và đổi phiên hằng ngày • Cách hoạt động: giao diện gốc, lõi terminal, cấu hình và thư viện libghostty (theo README) • Cách dùng: tải đúng bản ở ghostty.org/download, đọc docs, mở shell và thử lệnh quen 🔗 Liên kết ghostty-org/ghostty ghostty.org ghostty.org kieu.app 📄 Cheat sheet PDF (1 trang A4): github.com/kieubinh/kieu-open-resources/blob/main… ⚠ Cần cân nhắc: Crash report được lưu cục bộ, không tự gửi; nếu chọn chia sẻ, tệp có thể chứa vùng nhớ nhạy cảm. Hãy xem lại nội dung trước khi gửi. 📊 Nguồn số liệu: tổng số sao từ GitHub API, mức tăng từ GitHub Trending, chụp ngày 02/11/2026. Số sao đo sự chú ý, không đo chất lượng. 🤖 Công khai: giọng đọc và nhân vật trong video là AI tạo ra (VoiceStudio chạy cục bộ, giọng Narrator 03); hình minh họa do Kieu Studio vẽ. #Shorts #GitHubRadar #Ghostty #Terminal #KieuStudio
C'est ce a quoi servent les OCR dont celui de @LightOnIO lighton.ai lightonai/LightOnOCR on peux lire et "digitaliser" du Florentin du 16eme siècle, du grec ancien, de l'arabe sans que le modèle ait été entrainé dessus. Il est français et en plus open source.
Get it here free: chrisworsey55/atlas-gic
@xcarnn i literally made this few months back for linux lol indra55/bezel
LiberRPA 0.4.0 is now available This release introduces LiberRPA Console for managing automation across Windows Executors. You can publish project packages, schedule work, and check run results in one place. A free public service is available, and you can also host Console yourself. LiberRPA is an open-source, code-first RPA toolchain for Windows. Flowcharts show the main process, while ordinary Python files contain the detailed implementation. You can edit and debug both in VS Code. Visualize the process. Code the logic. For more background on the existing development tools, see the 0.3.0 announcement. Console connects project development with deployment and execution. The basic workflow is: 1. Develop and test a project in Editor. 2. Publish a versioned Project Package directly to Console, or upload one through the browser. 3. Select an Executor or Executor Group, then start a run or create a schedule. 4. Check the run status, inputs, outputs, and uploaded logs in your browser. Your projects run on connected Windows Executors. Console manages the work and collects the results. Console also provides: - Organizations, departments, and roles to manage members and control access. - Assets to share settings, secrets, and credentials between projects. - Data Queues to hold items that projects can claim and process. - Shared Files to make files available across projects. - Notifications and run emails to keep people informed about execution. - API access to start work and use supported Console functions from other systems. The Python library now includes functions for working with Console Assets, Data Queues, and Shared Files. The public Console is free to use. You can create an organization at console.liberrpa.com and connect your Executors without deploying a server. There are no paid tiers. The shared service has resource and retention limits to protect its capacity. You can check these in your organization's settings. For your own server or a private network, the repository includes Linux deployment, backup, and recovery instructions. Console is optional. You can still develop and run projects locally without it. This release also improves the existing tools. - Executor: receives Console work and reports results, with Console and local work shown together in the Job Queue and Run History. Retry settings are also available. - Snippets Tree: includes the improvements previously offered as a pre-release: expression-style snippet insertion, nested CustomArgs completion, and managed import updates when pasting Python code. - Execution recordings: no longer require an extra compression step after a run. - UI Analyzer: improves handling of large element trees and makes error messages easier to read. - Documentation: updates the guides for Console integration, Executor workflows, and recording behavior. See the full changelog for all changes and upgrade instructions. If you are keeping your 0.3.0 Editor configuration, please check the upgrade note. The old Python Paste And Indent Ctrl+V binding needs to be removed or commented out for the new paste integration to work. To try LiberRPA: - Download LiberRPA 0.4.0 for Windows - Create, run, and debug your first project - Set up Console and connect an Executor LiberRPA is intended for developers with Python experience and is currently in alpha. It is licensed under AGPL-3.0-or-later, with no per-developer or per-robot LiberRPA license fees. Questions and feedback are welcome. If you try this release, I'd like to hear about your actual project: what you wanted to automate, what worked, and where you got stuck. Comparisons with other tools are welcome too. If something works better elsewhere, explaining your use case helps me understand what to improve next. You can ask questions or share your experience in the comments. For reproducible bugs and specific feature requests, please use GitHub Issues. Thanks for trying LiberRPA and helping me improve it.
mergei um PR no is-kit (lib TS de type-guards, MIT, 152 stars): docs clarificando a semântica do safeParse tagged-result. fechou a issue #359. is-kit#370
Nornsの「Dronage」という4ボイスのドローンシンセの出来がすげぇと調べてたら、これも中華ゲーム機で動くようだ。この手のはTrimUI Brick用として公開されるのが多いみたいなんで、丁度個人売買に7000円で出てたので思わずポチってしまった。boorch/dronage-terminal-pak
Duende Agent Skills give AI assistants expertise in IdentityServer, BFF, token management, and asp.net Core security. They support Copilot, Claude, OpenCode, Cursor, and more. Skills: DuendeSoftware/duende-skills Setup: docs.duendesoftware.com #dotnet #ai
Duende Agent Skills give AI assistants expertise in IdentityServer, BFF, token management, and asp.net Core security. They support Copilot, Claude, OpenCode, Cursor, and more. Skills: DuendeSoftware/duende-skills Setup: docs.duendesoftware.com #dotnet #ai t.co
Optimus laptop without a MUX stuck at ~20 FPS in X-Plane 12? I wrote a free Vulkan layer that fixes it (21 → 35 FPS, no more stutter) On laptops without a MUX switch, every frame goes GeForce → Intel iGPU → screen. On my GTX 1650 laptop, NVIDIA's built-in path for this blocked X-Plane ~20 ms every frame, capping it at ~20 FPS no matter the settings. My layer skips that path and presents frames through the Intel iGPU itself (~1–2 ms per frame). | Baron 58, KSEA, noon | Off | On | |---|---|---| | FPS | 21.3 | 34.9 | | Stutter frames (>50 ms) per 300 | 37–63 | 0–4 | For: Windows laptops where X-Plane runs on an NVIDIA GPU and the screen is driven by an Intel iGPU, especially Intel 10th gen and older. Beta, tested on one laptop, one-click install/uninstall, open source (MIT). Uninstall before playing anti-cheat games in Vulkan mode. Download and full measurements: jjjay0826/xp-optimus-bypass Feedback welcome, especially from other laptops — even "it didn't help" is useful!
@heydemoura What about this? a55uka/nup
@UFO2002616 好吧,正好放了一个多月没发布:xiaozhenliu/claude-plain-style
Dos componentes para la misma tarjeta En el directo de UX fomo me di cuenta de que teníamos dos componentes para la misma tarjeta: PostCard en el blog y ResourceCard en el hub de recursos. Le pedí a Claude Code que creara un solo ContentCard con imagen, badge y título, y que borrara los dos antiguos. Tú cuántas tarjetas iguales tienes con distinto nombre? Los jueves hay UX Talk en Discord, te espero. Recursos: - Únete a la comunidad en Discord juanpol.com - Tutoriales: juanpol.com - GitHub: github.com/juanpoldi - X: x.com #uxdesign #diseñoux #uxfomo [ar] مكوّنان لنفس البطاقة في بث UX fomo المباشر لاحظت أن لدينا مكوّنين لنفس البطاقة: PostCard في المدونة وResourceCard في مركز الموارد. طلبت من Claude Code إنشاء مكوّن واحد هو ContentCard يضم صورة وشارة وعنوانًا، وحذف المكوّنين القديمين. كم بطاقة متطابقة لديك بأسماء مختلفة؟ كل يوم خميس لدينا UX Talk على Discord، أنتظركم هناك. الموارد: - انضم إلى المجتمع على Discord: juanpol.com - دروس تعليمية: juanpol.com - GitHub: github.com/juanpoldi - X: x.com #uxdesign #ux #uxfomo [en-US] Two components for the same card In the UX fomo live stream I realised we had two components for the same card: PostCard on the blog and ResourceCard on the resource hub. I asked Claude Code to create one ContentCard with an image, a badge and a title, and to delete the two old ones. How many identical cards do you have under different names? Every Thursday there's a UX Talk on Discord, see you there. Resources: - Join the community on Discord: juanpol.com - Tutorials: juanpol.com - GitHub: github.com/juanpoldi - X: x.com #uxdesign #ux #uxfomo [pt-BR] Dois componentes para o mesmo card Na live do UX fomo percebi que tínhamos dois componentes para o mesmo card: PostCard no blog e ResourceCard no hub de recursos. Pedi ao Claude Code que criasse um único ContentCard com imagem, badge e título, e que apagasse os dois antigos. Quantos cards iguais você tem com nomes diferentes? Toda quinta-feira tem UX Talk no Discord, te espero lá. Recursos: - Entre na comunidade no Discord: juanpol.com - Tutoriais: juanpol.com - GitHub: github.com/juanpoldi - X: x.com #uxdesign #ux #uxfomo
[OC] A calendar heatmap of national public holidays in 2025 for 195 countries. Each cell shows how many countries observe that day as a national holiday. Data from python-holidays v0.83 — national (non-regional) holidays only. Code: alvarofrancomartins/national-holidays-dataviz
totk-pc-recomp - free open source tool Your Switch games stay locked on console. Free and open source. Comment Totkpcrecomp and I'll send you the link. valentderah/totk-pc-recomp #opensource #github #ai #devtools More drops like this → repodrop.pages.dev
データが正規分布に従っていないときにt分布を使った差の検定ができるか?という問題は昔このノートで考えた.なんかよく分からなくなってきた. github.com/HiroshiHamada/KA2/blob/master/t-distri…
Source credits and setup: github.com/QasimAliSidhu/3-friends-dairy-storefro… Font sources: Manrope and DM Serif Display from Google Fonts. googlefonts/manrope googlefonts/dm-fonts
コードレビューより設計レビュー AI が書いた PR を、人はどこまで読むべきか。最近、「コードを読まずにマージする」という話をよく見かけます。 私は、AI と開発するなら、人のレビューの重心を、コードレビューから設計レビューに移すのがよいと考えています。AI が書く前に設計レビューをしておけば、コードレビューで人が読むのは、1 点だけで済みます。「要件に無いものが、AI の判断で足されていないか」です。 開発部長として、チームでこの形にしています。この記事では、その理由とやり方を紹介します。 「読まずにマージ」の議論と、どこが違うか 「コードを読まずにマージする」という議論の多くは、コードレビューのうち、どこを人が読み、どこを自動のチェックや AI のレビューに任せるか、を論じています。この記事は、その手前の設計レビューを主役にします。 コードレビューが中心 設計レビューが中心 人の判断を置く場所 AI が書いたコード AI が書く前の計画 コードレビューで人が読むもの 危ない箇所など、人が見ると決めた箇所 要件に無いものが、AI の判断で足されていないか 読む量を減らす方法 読む作業を、自動のチェックや AI のレビューに任せる 設計を先に決めて、AI が判断する余地を減らす 設計を先に決めるので、実装を受け持つ AI には、設計の判断をさせません。 コードレビューは、重くて遅い AI に任せる仕事が増えると、人の前に並ぶ PR も増えます。AI が書いたコードを全部読むのは、量の面でまず無理があります。 量だけではありません。設計の間違いは、あとで見つけるほど直すのが大変になります。データの形が違っていれば、書いたコードの多くを作り直すことになります。差分を何百行読んでも、それが要件どおりの設計かどうかは見えにくいものです。 人のレビューを、設計レビューとコードレビューの 2 段にする チームでは、人のレビューを、設計レビューとコードレビューの 2 段にしています(開発の流れの全体は、人が手を離していられる時間の記事で紹介しました)。 ここでは、言葉を次のように使います。 計画: AI が実装の前に、何をどう作るかをまとめた文書 設計: 計画の中で決めること(どこを触るか、データや API の形など) 指示書: 人が確かめた計画をもとに、実装を任せるための文書 設計レビューで見ること AI が計画を立てたら、実装に入る前に、人がその計画を読みます。見るのは次の 3 つです。 見ること なぜ書く前に見るか 要件と合っているか 要件の読み違いは、コードレビューで見つけると、任せた時間が丸ごと無駄になる どこを触るか 触る範囲を先に決めておけば、あとで PR の範囲を確かめる物差しになる データや API の形 あとから変えにくい決めごとなので、コードになる前に決めておく 計画は、コードより短く、意図がそのまま書かれた文書です。差分を何百行も読むより早く読めて、間違いにも気づきやすい。間違っていても、まだ書いていないので、直すのは計画だけで済みます。 設計どおりかは AI が確かめ、人は「足されたもの」だけを見る 設計レビューを通った計画は、実装を任せる指示書になります。実装を受け持つ AI には、設計の判断をさせません。指示書に書かれたとおりに書くだけです。 指示書どおりに書かれているかは、AI のレビューが確かめます。 軽いレビュー: 実装するたびに回し、指摘が無くなるまで直させる 重いレビュー: PR を作る前に、観点ごとに並列で回す だから、コードレビューで人が読むのは、1 点です。要件に無かったものが、AI の判断で増えていないか。AI は気を利かせて、頼んでいない変更を足すことがあります。設計で「ここを触る」と決めてあるので、その外の変更は見つけやすくなります。 手間は増えた。それでも見合う 設計レビューを入れて、人の手間は増えました。それでも見合う、というのが実感です。 コードレビューで設計の間違いに気づいて作り直すより、設計レビューで止めるほうが、ずっと軽く済みます。コードレビューで読む場所も、要件に無い変更に絞れます。設計を先に確かめておけば、方向を間違えたまま、AI に長く任せてしまうことも防げます。 よくある疑問 コードを全く読まなくてよいのか? 全く読まない、とは考えていません。コードレビューでは、要件に無いものが足されていないかを見ます。設計レビューで決めた範囲の外で起きたことは、設計レビューでは防げないからです。 設計の判断を、AI に任せてはいけないのか? 計画を立てるのは AI です。人は、その計画を確かめます。任せていないのは、実装を受け持つ AI が、書きながら設計を変えることです。設計の判断は、人が確かめた計画の中で済ませておきます。 おまけ: 要件に無い変更を見つけるときに 私は、「Claude Code の中身が見える。できることが増える。」をうたう macOS アプリ「tanacode」を個人で作っています(Anthropic の公式製品ではありません)。Claude Code のセッションをいくつも一覧に並べて、チャットの画面で扱えるアプリです。 tanacode には、PR を出す前に変更を確かめるための、次の機能があります(デモで試せます)。 ブランチの変更: 今のブランチの変更を、ローカルだけの PR のように並べて見られる。差分の行にコメントを付けると、次の指示に添えて Claude に渡せる ウォークスルー: 画面共有のコードレビューのように、Claude が自分の書いたコードをエディタで示しながら説明し、人がその場で質問できる sny-tanaka/tanacode おわりに 「AI が書いたコードを読むか、読まないか」と考えると、どこまで読むかの線引きの話になります。人のレビューの重心を設計レビューに移すと、コードレビューで読むべき場所そのものが減っていきます。 tanashun toB SaaS の開発部長です。開発組織のマネジメントと、生成 AI を開発に組み込む仕組みづくりをしています。個人では、Claude Code の中身が見える macOS アプリ tanacode を作っています。 Claude Code の導入支援・AI を組み込んだ開発・Web アプリの開発・技術コンサルのお仕事を受けています。ご依頼・ご相談はこちらまで。
A product enquiry should be easy to put together. I built a Lahore dairy storefront: choose a size, build your list, preview a message. Desktop and mobile. Concept demo; AI product images. No payment submitted. QasimAliSidhu/3-friends-dairy-storefront #WebDesign #Lahore t.co
📄 Cheat sheet PDF 1 trang cho tập này (Flutter: cách hoạt động, lệnh bắt đầu nhanh, lưu ý): github.com/kieubinh/kieu-open-resources/blob/main…
Want to be Hired: Remote, Full Time | Part Time | Contract (open to ML internships) Resume: drive.google.com Overview: Backend and AI engineer, 5 years of software engineering and 3 on AI products, finishing a BSc in Applied Mathematics & CS at the University of Lagos (2027). Looking for an AI engineer, ML intern or backend role that runs alongside a structured ML programme I'm about two-thirds through. Available immediately. StaffPilot (founder/CTO): AI marketing agent. A planner turns each request into a structured spec, and a router sends it to a copy, image or video expert and picks the model. Routing is rule-based for now, with every choice and outcome logged so it can become a learned policy. Prices, logos and captions are composited deterministically. Product-photo path: SAM and BiRefNet masks keep edits off the product, Depth Anything v2 drives parallax, and DINOv2 and LPIPS check the result against the original. Eval came first: a 150–200 item double-labelled golden set (Cohen's kappa), then a cascade of deterministic checks, small learned scorers and an LLM judge feeding an acceptance gate calibrated to a target defect rate. Celsius (SilverBrain AI): LLM eval and monitoring platform handling 500k+ inference logs a month. I also fine-tuned LLMs for document classification, which raised accuracy by 25%. Climate Wavers: disaster-recognition models (CV + NLP), a LLaMA assistant, and an OpenVINO vision model, all served on OpenShift. SNBS: architected the national statistics data platform for Somalia (async analytics pipelines). Stack: Python (PyTorch, FastAPI, Django, Celery), TypeScript, Postgres, Redis, RabbitMQ, Docker/K8s, AWS/GCP, Prometheus/Grafana. All GPU work on cloud instances. ML programme, Applied track (everything implemented from scratch, NumPy first, then PyTorch): Done: Classical ML: GLMs, SVMs with SMO, trees and ensembles, k-means, EM and PCA, value iteration. Deep learning: CNNs and ResNet, detection and segmentation, ViT and self-supervised learning. NLP: word2vec, LSTMs, seq2seq with attention, the Transformer, BERT/GPT/T5 fine-tuning, RoPE and the KV cache, RAG and agents. Generative models: PixelCNN, VAEs, flows, GANs, DDPM and latent diffusion. Now: DQN and PPO, reward models, RLHF and DPO. Next: BPE tokenization, mixed precision, parallelism and scaling laws (CS336), SFT and DPO at scale, LLM evaluation and judge reliability. ML programme, Theoretical track (Shalev-Shwartz & Ben-David, Mohri, ESL, CS229M): Done: PAC learning (realizable and agnostic), uniform convergence, No Free Lunch. VC dimension, the Sauer–Shelah lemma and the fundamental theorem. SRM and MDL, the computational complexity of learning, boosting. Convex learning, stability and SGD, SVMs and kernels. Asymptotics and the MLE, concentration inequalities, Rademacher complexity, covering numbers and Dudley chaining. Now: margin theory and RKHS generalization. Next: non-convex landscapes, implicit regularization, the NTK, double descent and benign overfitting, online learning and regret. Interested in work where evaluation, agents or inference infrastructure is the core problem. GitHub: github.com/Olagold-hackxx · LinkedIn: linkedin.com/in/abdulqoyyum-aileru
C'est ce a quoi servent les OCR dont celui de @LightOnIO lighton.ai lightonai/LightOnOCR on peux lire du Florentin du 16eme siecle, du grec ancien, de l'arabe sans que le modele ait été entrainé dessus.
virgil724/obs-face-deface ~~之前是在網頁上用 webgpu 跑 onnx~~ 這種事情還是回頭用 cpu 做 謝謝 claude 🛐
I built an open-source, code-generated 2D art toolkit for rapid prototyping (100% Pure Python, Godot 4 and TexturePacker) Hey everyone, Like many solo and indie devs, I often hit a roadblock when starting a new game: prototype paralysis caused by missing art. Before you can test whether your movement mechanics, dash physics, or collision boxes actually feel fun, you usually have to: 1. Spend days manually drawing placeholder sprites in Aseprite. 2. Cobble together mismatched free asset packs with clashing palettes and inconsistent frame dimensions. 3. Roll the lottery with generative image models, which produce blurry, non-standard pixels with no frame data, messy alpha edges, and no concept of pivot anchors. To be clear: I firmly believe every game developer should learn and practice creating their own art. Traditional pixel art and human artistic expression are irreplaceable. But during the initial prototyping stage, time is your scarcest resource. To solve this, I built midev-tools: an open-source 2D pixel art and vector asset toolkit built entirely in Python, designed with a Dual-Audience Architecture for both human developers and AI coding agents. If you use modern AI coding assistants like Cursor, Claude Desktop, Antigravity, or Windsurf, you know that LLMs cannot operate a mouse GUI to draw in Aseprite (it can, but still...). However, LLMs excel at writing Python math, geometry, and animation curves. Art as Pure Code: Every character animation, tileset, and UI kit is just a clean Python script (recipes/.py). AI agents can write, refactor, and iterate on spritesheets using familiar code patterns. Built-in MCP Server (Model Context Protocol): Connects directly to Cursor and Claude Desktop over stdio. Agents can discover recipes, build assets, and run quality checks natively. Autonomous Multimodal Vision Loop (midev inspect): Agents do not code blindly. They run inspection commands, inspect the resulting annotated frame-strip and origin crosshairs with their vision tools, and self-correct their coordinate math if a limb or outline is misaligned. Strict Deterministic Contracts: Guarantees 0 palette bleeds (strictly snaps to active palettes like PICO-8, DB32, Endesga) and 100% binary alpha (never produces messy semi-transparent blurred pixels). What It Generates Out-of-the-Box: 1. Parametric Humanoid Character Rig: 12 animation tracks (idle, walk, run, attack, hurt across 3 facings) with procedural limb swings and bobbing math. 2. 47-Tile Wang Autotiles: Canonical 3x3 minimal blob bitmask layout ready for Godot 4 TileSet and Tiled. 3. Pixel VFX and UI Kits: Procedural radial explosions, water ripples, slashes, sparkles, 9-slice panels, and HP/MP stat bars. 4. Universal Engine Exporters: Generates native Godot 4 .tres (SpriteFrames ready for AnimatedSprite2D), TexturePacker JSON (Phaser, PixiJS, Unity, Raylib), and individual frame slices. 5. Live Preview Web Studio: Real-time browser UI with timeline scrubbing, frame-by-frame inspection, origin/pivot visualization, and SSE hot-reload. Here's Some samples of the art created by the tools Run sprite Idle sprite Dig sprite Walk sprite Dash Sprite hooray The goal is not to replace final game art. It is meant to provide a clean, palette-consistent base frame and prototyping scaffold so you can validate your gameplay loop on Day 1, and swap in your own hand-drawn artwork later without breaking your engine setup. It is completely free and open source (MIT license, Python 3.12+, zero OS shell scripts): GitHub: mikhaprive-flows/midev-tools I would love to hear your thoughts, feedback, and what procedural generators or engine formats you would like to see next.
Free addon: CosmoTreeGen - Procedural tree generator inside Godot preview.redd.it Hey, I've been developing this addon for my games. I was tired of messing with some other tools like EZTree or the prohibitive price of other tree generation tools and I wanted to do a full tree generation pipeline inside Godot. So here you go: FrogCosmonaut/cosmo_tree_gen It's a free addon with a lot of customizable parameters. It's early development and some things may be broken. You can create the tree with a CosmoTreeGen node and then export it to glb/glTF, it comes with a custom post import script to create custom LOD, automatic collision generation for the trunk, and many other things. I'll be adding more things based on the feedback and my game development needs. I've included some presets and textures/materials/shaders. i.redd.it There are more showcase gifs of the editor live generation in the github readme. Feedback is welcome. Hope you like it and find it useful.
I asked Opus 5.5 to hack my DJI Mic and it reversed engineer it in literally 5 minutes. Now the button turns on Wispr Flow and I can whisper to my agents, even in public jerryfane/dji-mic-button t.co
Quest 3 + Virtual Desktop: hold your left hand near your face and the left stick becomes a D-pad I originally made WYGxrControllerFix for the Samsung Galaxy XR, whose controllers have no D-pad. Through Virtual Desktop, the Galaxy XR works internally as a Quest 3, so the same tool turned out to be useful on a Quest 3 as well. The latest version (v0.7.0) now supports Quest 3 too. What it does on a Quest 3: - Hold your left hand near your face and push the left stick: it works as a D-pad. While you do this, the game does not see the stick move, so you don't walk or crouch by accident. - Works in SteamVR games and VDXR (OpenXR) games. Games with their own D-pad input get it directly (e.g. the RE4 VR mod); other games get a virtual Xbox pad. - UEVR games keep using UEVR's own D-pad. - Throws and hand position are left exactly as Virtual Desktop sends them. The throw fixes in the tool are only for the Galaxy XR, and the headset is detected automatically. Tested on Quest 3 with the RE2, 3, 4, 7, 8 VR mod. Install: download the zip from Releases, extract it to a permanent folder and run install.bat. manager.bat turns the D-pad and its haptic on or off. If you alternate headsets on one PC, restart the Virtual Desktop Streamer before connecting the other headset. Requires Virtual Desktop. Free and open source (MIT): wooyounsoft/WYGxrControllerFix Feedback welcome, especially which games you tried it in.