Mentions
Conversations linking to GitHub, newest first. Times are UTC.
Mentions by source
X
Bluesky
Hacker News
V2EX
Qiita
DEV
Mastodon
Latest posts
One API for Greenhouse, Lever, Ashby and Workday jobs: build a job feed that also knows when jobs close Disclosure: I build and maintain the Apify Actor used in this tutorial (ocius-data/ats-jobs-scraper). The ATS endpoints described below are public, and you can call them directly if you prefer. If you build a job board, a recruiting tool, a sales-intelligence product ("which companies are hiring data engineers this month?") or a personal job alert, the cleanest source of jobs is not LinkedIn or Indeed. It is the applicant tracking system (ATS) each company uses to publish its openings. Most tech companies use one of four: Greenhouse, Lever, Ashby or Workday. Their public job boards are fresh (jobs appear the minute they are published) and free of reposts from aggregators. The catch: each ATS has a different endpoint, a different schema and different quirks. - Greenhouse: boards-api.greenhouse.io/v1/boards/{token}/jobs. Simple JSON, salaries only on some boards. - Lever: api.lever.co/v0/postings/{company}, plus a separate EU host for EU tenants. - Ashby: api.ashbyhq.com/posting-api/job-board/{name}, with structured compensation. - Workday: a POST endpoint per tenant and site that stops at 2,000 results per search, so large boards are silently truncated unless you split the search. This tutorial shows how to get all four in one normalized schema, and how to run it as a monitor that returns only new jobs and jobs that closed. You need Python 3.11 or later, a free Apify account with its API token (Console, Settings, API and Integrations) and the official client: pip install "apify-client>=3" pandas. Step 1: jobs from several companies in one call from apify_client import ApifyClient client = ApifyClient("YOUR_APIFY_TOKEN") run = client.actor("ocius-data/ats-jobs-scraper").call(run_input={ "companies": [ "https://boards.greenhouse.io/stripe", "lever:spotify", "ashby:ramp", "https://nvidia.wd5.myworkdayjobs.com/NVIDIAExternalCareerSite", ], "keywords": ["engineer"], "maxJobsPerCompany": 50, }) for job in client.dataset(run.default_dataset_id).iterate_items(): print(job["ats"], job["company"], job["title"], job["location"]) Inputs can be board URLs, explicit forms such as greenhouse:stripe, bare names such as stripe (looked up on Greenhouse, Lever and Ashby), or a company's own careers page that links to one of these systems. Workday always needs the full career site URL, because Workday tenant names cannot be guessed. Step 2: one schema for every ATS Every row has the same fields, whatever the source: - jobKey: a stable unique key (ats:board:jobId) to deduplicate and update rows - title, department, team, location, countryCode - workplaceType (REMOTE, HYBRID, ONSITE) and isRemote - employmentType normalized to FULL_TIME, PART_TIME, CONTRACT, TEMPORARY or INTERNSHIP - salaryMin, salaryMax, salaryCurrency, salaryPeriod and salarySource (ats when it came from a structured field, description when it was parsed from the text) - descriptionText, descriptionHtml, jobUrl, applyUrl, postedAt That makes questions across companies trivial: import pandas as pd df = pd.DataFrame(client.dataset(run.default_dataset_id).iterate_items()) # Remote share per company print(df.groupby("company")["isRemote"].mean().round(2)) # Published salary ranges for engineering roles, annual USD only pay = df[(df["salaryCurrency"] == "USD") & (df["salaryPeriod"] == "YEAR")] print(pay[["company", "title", "salaryMin", "salaryMax"]].sort_values("salaryMax", ascending=False).head(10)) Step 3: a monitor that returns only what changed For a job board or an alert, you do not want the full list every day. You want new jobs, and you want to remove jobs that were filled or taken down. Two options handle this: run = client.actor("ocius-data/ats-jobs-scraper").call(run_input={ "companies": ["https://boards.greenhouse.io/stripe", "lever:spotify", "ashby:ramp"], "keywords": ["engineer"], "onlyNewSinceLastRun": True, "reportClosedJobs": True, "monitoringStoreName": "engineering-monitor", }) for row in client.dataset(run.default_dataset_id).iterate_items(): if row["recordType"] == "closed": print("CLOSED", row["jobKey"], row["closedDetectedAt"]) else: print("NEW", row["jobKey"], row["title"]) - The first run returns every matching job and stores what was delivered. - Later runs return only jobs not delivered before. - With reportClosedJobs, a job missing from two complete listings in a row is reported once as recordType: "closed". The two-run confirmation prevents false closures when an ATS has a temporary error, and a partial or failed listing never produces closures. Save the input as a task, schedule it every few hours, and connect a webhook or Google Sheets (use jobKey as the unique column). Your job board now adds new jobs and removes dead ones without manual cleanup. Step 4: large Workday boards Workday returns at most 2,000 results per search. The Actor detects when a board is larger and splits the search by job category and location until every job is read. In testing, one board returned 2,679 of 2,679 jobs. Cost At the time of writing: USD 0.003 per unique job on the Apify Free plan, less on paid plans, and USD 0.003 per closed job reported. Companies with no jobs, filtered-out jobs, duplicates and errors are free. One company with 200 open jobs costs about USD 0.60 the first time; a daily monitor afterwards pays only for new and closed jobs. Check the Actor page for current pricing. Try it: ATS Jobs API on Apify. If you need another ATS (SmartRecruiters, Personio, Recruitee, Workable), open an issue on the Actor page: requests are counted and prioritized. --- Runnable versions of every example in this article: apify-data-apis-examples on GitHub. This article was drafted with AI assistance and reviewed, with every code sample tested against the live API.
One static Go binary; packages for Ubuntu, Fedora, Debian/RPi, Homebrew and Docker. Feedback welcome 🙏 al-maisan/node-tracker
Good luck with the Awakly beta. Since it's on TestFlight, I made a CLI that gives Debug builds an Xcode-beta-style blueprint icon. Tell me what's missing, open to feature requests: MustafaNatur/blueprint
KernelSU for Galaxy A52 4G (a52q) running UN1CA Sharing this in case anyone needs. It's an old phone from 2021. It never got updated past One UI 6, so international models should be unlockable even if fully updated. While technically it can be rooted with Magisk, it has no boot initramfs, meaning that Magisk needs to be installed to recovery - and the phone cannot boot to recovery unless USB tethered to a computer, meaning that if your phone reboots for whatever reason when you're not at home, you're stuck without root until you get back. So I've decided to go the KernelSU route, since it goes into the kernel and doesn't need an initramfs. Unfortunately, it's a legacy 4.14 non-GKI kernel, so the only way to get KSU on it is to embed it in the kernel. There are a few kernels already having KSU but all were outdated - I haven't been able to find a kernel image that has all the security updates that the regular UN1CA kernel has (or even the stock kernel). So I just compiled it myself. Yes, I did use Claude Code, I don't see a reason to work ten times harder just to say I didn't use AI. I have tested it on my own phone and it works (no warranty, obviously, rooting is always at your own risk). This kernel uses KernelSU-Next v3.1.0 - It's a bit old but unfortunately it seems that newer versions don't like legacy kernels too much. It also patches the DirtyFrag and Fragnesia exploits so (hopefully) malware can't bypass the KSU-Next manager. Otherwise it's the same as the regular UN1CA 3.2.1 kernel. WARNING: THIS IS NOT FOR THE A52 5G - That's a completely different model, and it will brick your device if you flash this kernel on it. Installation Instructions: 1. Unlock the bootloader. 2. Use Odin to flash either TWRP or Orangefox recovery. If following the TWRP guide, do not root it with Magisk, since we're not going down that route. Just install the custom recovery normally. Don't forget to also flash vbmeta_disabled.tar, or you'd be stuck in a bootloop. This file worked for me: Question - Flashing custom ROM on my Samsung Galaxy A52 | XDA Forums. Warning: This will permanently trip Knox and will factory reset your device. Backup everything important before doing this step. 3. Using TWRP or Orangefox, flash UN1CA 3.2.1. Do not reboot. Note that I have not tested my kernel with any other ROM, not even stock. It may or may not work. Download here: Release 3.2.1 · salvogiangri/UN1CA. It will raise you to security patch August 2026, and will update you to One UI 8.0 (don't worry, it will not re-lock your bootloader). Note that I do not recommend flashing AOSP (i.e. non One UI) ROMs because they will break VoLTE and Wi-Fi calling. 4. Download my custom kernel and flash it from recovery: Release v1.0 · NiQ1/kernel_samsung_sm7125 5. Reboot and run through the initial setup. It's very likely that it will be painfully slow initially since it's optimizing apps in the background, but eventually it runs smooth. 6. Enable unknown sources, then download and install KernelSU-Next manager version 3.1.0: Release v3.1.0 · KernelSU-Next/KernelSU-Next. Only install the APK, no need for anything else. 7. Launch KernelSU-Next manager. It should work properly. 8. Recommended: In UN1CA settings, hide the KernelSU-Next app, so apps that try to detect root by checking what other apps are installed don't find it. Due to changes in Android, this ROM will not pass device or strong integrity, but if you enable PIF (built into UN1CA) it will pass basic. I've tried several banking apps and they all worked fine. Cheers.
学英语可别再只会往收藏夹里堆了!开源项目 Awesome English 把听说读写的资源分门别类理得清清楚楚。 播客、电台、口语练习、美剧、写作批改、Anki 词卡、AI 陪练一应俱全,语法、网课、模考也都捎上了。 自学英语找资源,犯不上再满世界翻。 🔗 GitHub:yvoronoy/awesome-english t.co
@snakeatter bende de çöküyordu windows kullanıyorsan bunu kullan çok daha iyi + kurulumu zor değil chiaki-ng/chiaki-ng
Zonas más caras y más baratas de Santa Cruz de la Sierra para comprar casa: ranking por m² En Santa Cruz de la Sierra, la zona con el m² más caro para comprar casa es Equipetrol (USD 1.357/m²) y la más barata Este (USD 617/m²), 2,2 veces menos. Comparamos 10… DOI: 10.5281/zenodo.23522975
El desbloqueo FP16 de las RTX no es para tu LLM: su propio README da +5 % al generar texto. Rinde en imagen y vídeo. Antes de probarlo: · Solo RTX 20, 30 y 40 · Secure Boot apagado · Portátil: solo dGPU · Se borra al apagar · Linux: desactiva RTD3 physicsdolphin/nv-uefi-unlocker
i fouind his github lets send him the fees github.com/recurshawn x.com
@hashvibedev Ah bueno estas como yo. Todavía no migro mi día a día. Es claro que grok usa opus por detrás. Por cierto @Teknium sacó un migrador de grok a hermes, podriamos exponerlo en gabogabucho/hermes-alado para mejorar el que ya tiene.
A first version is now almost ready for publication (at PatristicTextArchive/pta-collatio-plus).
Day 190 🎮 VapeShopInventoryAPI — scoped JWT auth + roles (Owner/Cashier) before coding → public catalog endpoint with fewer fields → first Owner seeded from env vars, HTTPS before deploy dreckieee/VapeShopInventoryAPI #BuildInPublic #CSharp #1000DaysOfCode #DevCommunity #dreckieee t.co
A developer reported an Ionify regression: Tailwind class changes trigger a full rescan pushing a 100-file-change build from 300ms to 1.3s. I'm fixing the hot path now. Found an issue? DM me or open a GitHub issue! ⭐ Star Ionify ionifyjs/ionify #OpenSource #DevTool t.co
Dónde cuesta más y menos comprar un departamento de 3 o más recámaras en Ciudad de México: ranking de colonias En Ciudad de México, un departamento de 3 o más recámaras cuesta 15.500.000 pesos mexicanos (USD 839.405) en la mediana en San José Insurgentes, la… DOI: 10.5281/zenodo.23525558
Neural Canvas My Journey to Understanding Neural Networks: From Matrix Algebra to JAX and Optimizers I wanted to understand neural networks as deeply as possible. Rather than simply using an existing framework and training a model, I decided to build an interactive MNIST webpage called Neural Canvas, using p5.js for visualization. My primary goal was not just to achieve high accuracy. I wanted to understand what was actually happening inside a neural network, mathematically and computationally. 1. Starting with Linear Algebra and Matrix Operations One of the first decisions I made was to avoid working with individual scalar values and complicated subscripts and superscripts everywhere. They made the mathematics unnecessarily confusing for me. Instead, I decided to approach neural networks through matrix algebra. I represented the forward propagation equation as: [ Z=WX+bC ] Where: - (X) is the input data matrix. Rows represent features, and columns represent individual samples. - (W) is the weight matrix. Rows represent neurons, and columns represent the weights associated with each neuron's inputs. - (b) is the bias column vector, containing one bias value per neuron. - (C) is a row vector containing only ones, allowing the bias vector to be broadcast across all samples through matrix multiplication. Interestingly, many popular deep learning frameworks, including PyTorch and TensorFlow, commonly use a different convention for arranging their data and parameters. They also handle bias broadcasting without explicitly introducing a matrix like (C). However, I preferred my own mathematical convention because it helped me understand the operations and perform calculus directly in matrix form. I believe the mathematics should handle the indices, not me! 2. My First Model: NumPy, MSE and Vanilla Gradient Descent For my first model, I used the original MNIST dataset. Architecture: [ 784➜ 20 ➜ 20 ➜ 10 ] I manually wrote all the forward propagation equations, derivatives, and backpropagation calculations on paper before implementing them in Python using NumPy. I deliberately chose: - Two hidden layers with 20 neurons each. - Mean Squared Error (MSE) as the loss function. - Vanilla Gradient Descent. - Linear output values. Why such a simple approach? Because I didn't want to start with complicated algorithms. I wanted to understand the fundamentals first. After 2,000 epochs, the model achieved approximately 92% test accuracy. I then successfully created an interactive neural network visualization in p5.js, using Math.js for matrix multiplication in JavaScript. The webpage could perform inference using my trained NumPy model. That was the beginning of Neural Canvas. 3. My Second Model: Cross-Entropy Loss For the second model, I kept the same mathematical approach but made a few improvements. Architecture: [ 784➜40 ➜ 40 ➜10 ] This time, I replaced MSE with Cross-Entropy Loss and used a softmax output layer. I was still using vanilla Gradient Descent. After 2,000 epochs, the model achieved approximately 96% test accuracy. At this point, I was finally starting to understand how neural networks worked, rather than just following tutorials or using existing implementations. 4. My Third Model: Discovering JAX and Automatic Differentiation For my third model, I wanted to experiment with three hidden layers. However, I realized that manually deriving every equation, especially the derivatives and chain rule calculations required for backpropagation, would take a considerable amount of time. Then I discovered JAX, a Python library developed by Google. JAX provides automatic differentiation (Autograd), allowing me to calculate derivatives of a loss function with respect to parameters, including entire weight matrices. This was a significant change in my workflow. I no longer needed to manually derive every gradient and implement the chain rule myself. I only needed to define the model, its parameters, and the loss function. JAX handled the differentiation. For this model, I used the Arabic Digits MNIST dataset. Architecture: [ 784 ➜ 20 ➜ 20 ➜ 15 ➜10 ] I used: - JAX for training and automatic differentiation. - Cross-Entropy Loss. - Vanilla Gradient Descent. - Three hidden layers. After 2,000 epochs, I achieved approximately 96% test accuracy. I genuinely fell in love with JAX. It saved me considerable time and allowed me to focus more on understanding the mathematics and experimenting with neural network architectures. 5. My Fourth Model: Mini-Batch Gradient Descent and Momentum For my fourth model, I moved to the Persian Digits MNIST dataset. I kept the same architecture as my third model but decided to experiment with optimization algorithms. My original plan was to implement Mini-Batch Gradient Descent with Adam. However, I realized that understanding Adam required learning a few concepts first. So, instead of jumping directly into Adam, I decided to start with Momentum. I implemented Mini-Batch Gradient Descent with Momentum using JAX. And here came a surprising result! I achieved approximately 96% test accuracy in just 200 epochs. Previously, my models required around 2,000 epochs to reach a similar accuracy. This was another important step in my journey. I started understanding how optimization algorithms could significantly influence the training process. 6. What's Next? I haven't created my fifth model yet, but I already have a learning roadmap: - Model 5: Mini-Batch Gradient Descent with RMSProp. - Model 6: Mini-Batch Gradient Descent with Adam. - After that: Start exploring Convolutional Neural Networks (CNNs). I want to understand each optimization algorithm mathematically and implement it myself before moving to the next one. My Biggest Takeaway If you are starting to learn neural networks, my suggestion is: Start with Linear Algebra. Don't immediately jump into advanced architectures, optimizers, or high-level frameworks. You don't need to master every mathematical concept before starting, but at least understand matrix multiplication and how it represents the operations inside a neural network. For me, representing neural networks using matrices made everything much easier to understand. Start with the basics, build something yourself, experiment, make mistakes, and gradually increase the complexity. Don't just train neural networks. Understand them! Project: Neural Canvas GitHub Repository: MuhammadEssa2002/neural_canvas Live Demo: muhammadessa2002.github.io
I built MantPro, a free and open-source CMMS for industrial maintenance (Python, Flutter, SQLite) Hi everyone! I'd like to share a project I've been working on: MantPro, a free and open-source maintenance management system (CMMS) designed for industrial plants, workshops and maintenance teams. I'm an industrial maintenance technician, and I started developing MantPro because I wanted a practical tool to manage maintenance work without relying on spreadsheets, paperwork or expensive subscription-based software. What does MantPro offer? - Desktop application: Windows and Linux. - Android apps: MantPro for maintenance tasks and MantPro Stock for inventory management. - Preventive and corrective maintenance: work orders, recurring tasks, pending jobs and maintenance history. - Equipment management: machines, sub-machines, QR labels and spare parts linked to equipment. - Inventory management: stock levels, storage locations and low-stock alerts. - Reports and statistics: PDF, CSV and Excel exports, plus MTBF and MTTR metrics. - Offline support: the Android apps can work without an internet connection and synchronize when connectivity returns. - Self-hosted: your data stays under your control, with no monthly fees or artificial limits on users or equipment. Technology stack: - Python and PyQt6 (desktop) - Flutter (Android) - SQLite - Flask / REST API MantPro is released under the AGPL-3.0 license. I'm sharing it here because I'd genuinely appreciate feedback from the open-source community. I'd especially like to hear from people who work in industrial maintenance, self-hosting or software development. Github Latest releases Thanks for taking a look! Any feedback, suggestions or contributions are welcome.
Hex 메모📝 단축키 누른 채 말하면 지금 쓰는 앱에 글자로 바로 붙여 주는 오픈소스 음성 입력 앱. 맥·윈도우·리눅스 다 됨. 처음에 음성 모델만 받으면 이후엔 내 컴퓨터 밖으로 안 나간다고 함👍 PR은 안 받고 이슈 남기면 에이전트가 고쳐 준다는 것도 좀 신기한 것 같음! anomalyco/hex t.co
3 bots de trading rodando 24/7 no Mac Mini. XRP live + Arbitrage e Direcional paper. 7 sinais tecnicos por slot. SEM alavancagem. SEM golpe. Acompanhe ao vivo: show.radiobitcoin.org Codigo aberto: Rafapleum77/Bots ⚠️ BIT ADICT NUNCA pede sua seed phrase ou senha. # t.co
1st keyboard build: Wireless TOTEM Split Keyboard ⌨️ MCU: Seeed Xiao Ble (NRF52840) Battery: 501220 LiPo Battery Switches: Choc V1 Pro Red & Crystal Red Keycaps: KLP Lamé (3D printed resin) Case: 3D Printed Resin with M2 Insert Nuts Build experience: 5/10 (Skill Issue) - Soldering the MCU and the battery is quite a b*tch - Stock firmware won’t let you configure the keyboard in ZMK studio, had to find a different firmware to make it work - Bluetooth pairing is good and responsive but with a caveat; If you unpair and connect it to a different device, it won’t connect to anything anymore 🥲 (fix: reset and reflash the firmware) Might be the last time I will do a wireless build. The other 4 will be built WIRED using Seeed Xiao RP2040, 3 will be sold. BOM and Build Guide from: GEIGEIGEIST/TOTEM
oh man, meanwhile I had many free agents build this over 2 months, with 257 commits. misaalya/kana-hermes
@elessar1996 زینپس فقط #import. اینم برای فخرفروشی متقابل: github.com/HowardHinnant/date/blob/master/include…
Dónde cuesta más y menos comprar un departamento de 3 o más dormitorios en Santa Cruz de la Sierra: ranking de zonas En Santa Cruz de la Sierra, un departamento de 3 o más dormitorios cuesta USD 238.112 en la mediana en Equipetrol, la zona más cara, y USD… DOI: 10.5281/zenodo.23528929
Exploit Save released for Nora Princess 2 (Artemis Source Code) Alula the developer that originally popularized the Artemis engine exploit on Switch 2 used in Seedsow Lullaby has released their source code for the exploit. The repo also includes a variant of the save data for ノラと皇女と野良猫ハート2 demo or "The Princess, the Stray Cat, and Matters of the Heart 2" in English. Nintendo already deleted the free demo of this game a week ago. Though beware this exploit is the same as Seedsow Lullaby so you need some way to get the save data onto the console be it a switch 1 transfer or another exploit with FS privileges like Smile Basic. What is special about Nora Princess 2 compared to Seedsow Lullaby is that it has a physical release on switch, but Alula says the full version is "not yet" supported. They also tell people who missed out on the demo to download the demo of the first game in the series even though as of now its still unsupported. This is very interesting for owners of the Japan only Switch 2 as the Seedsow demo no longer is available in that region. The Source Code and Save can be found here.
@sadhna6389 Pandas and DuckDB cover the downstream work. BrowserAct CLI fits interactive collection: browser-act/skills gives agents page state and reusable sessions.
1. github 地址:andyhuo520/digital-human-koubo 2. Renoise MCP 安装地址:renoise.ai
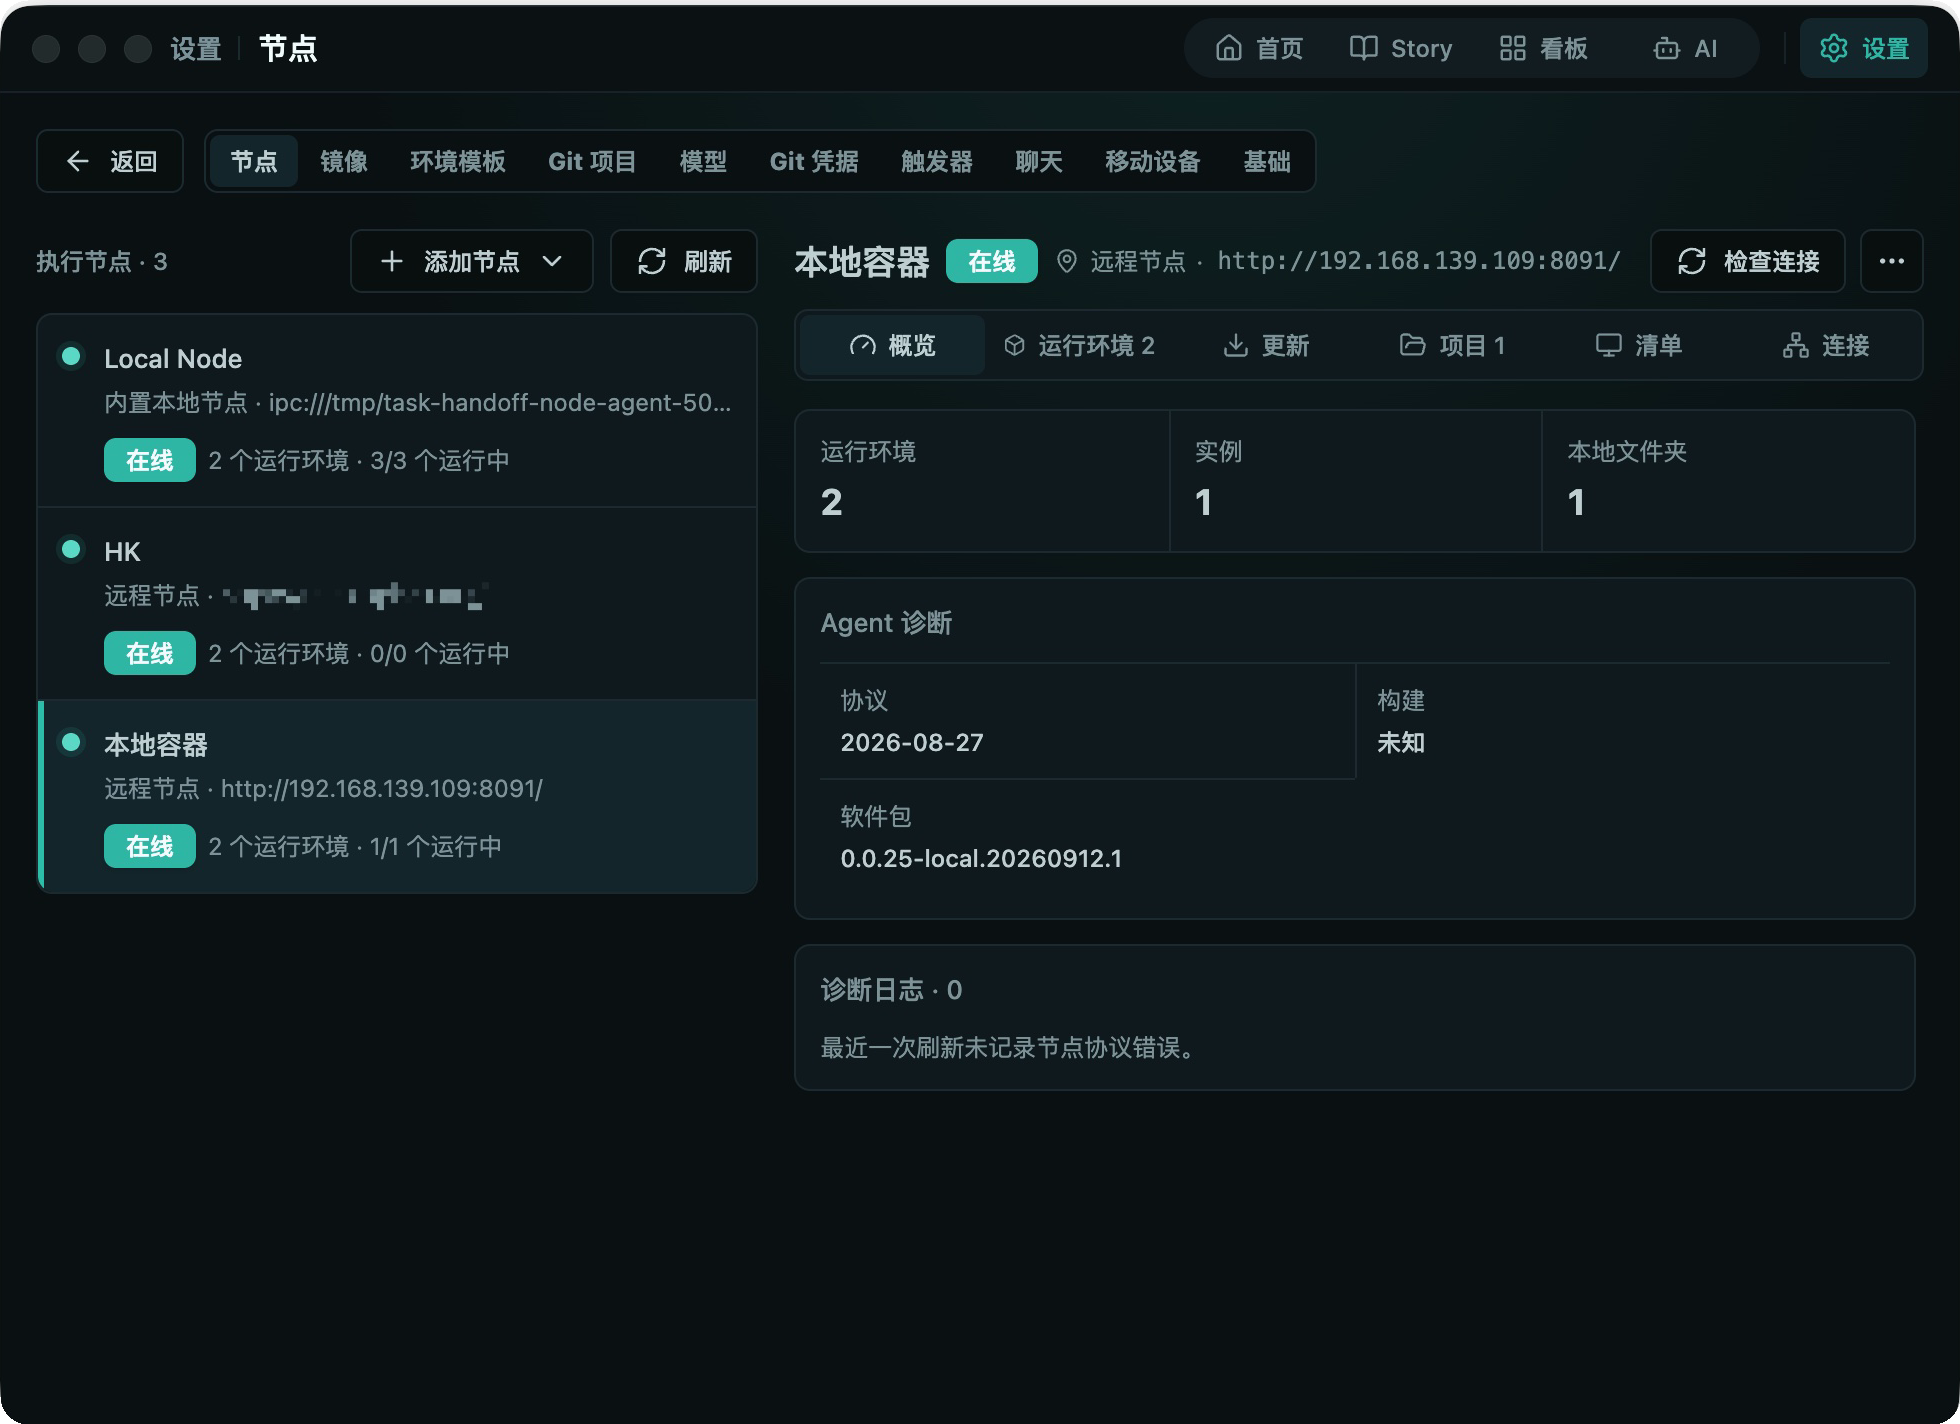
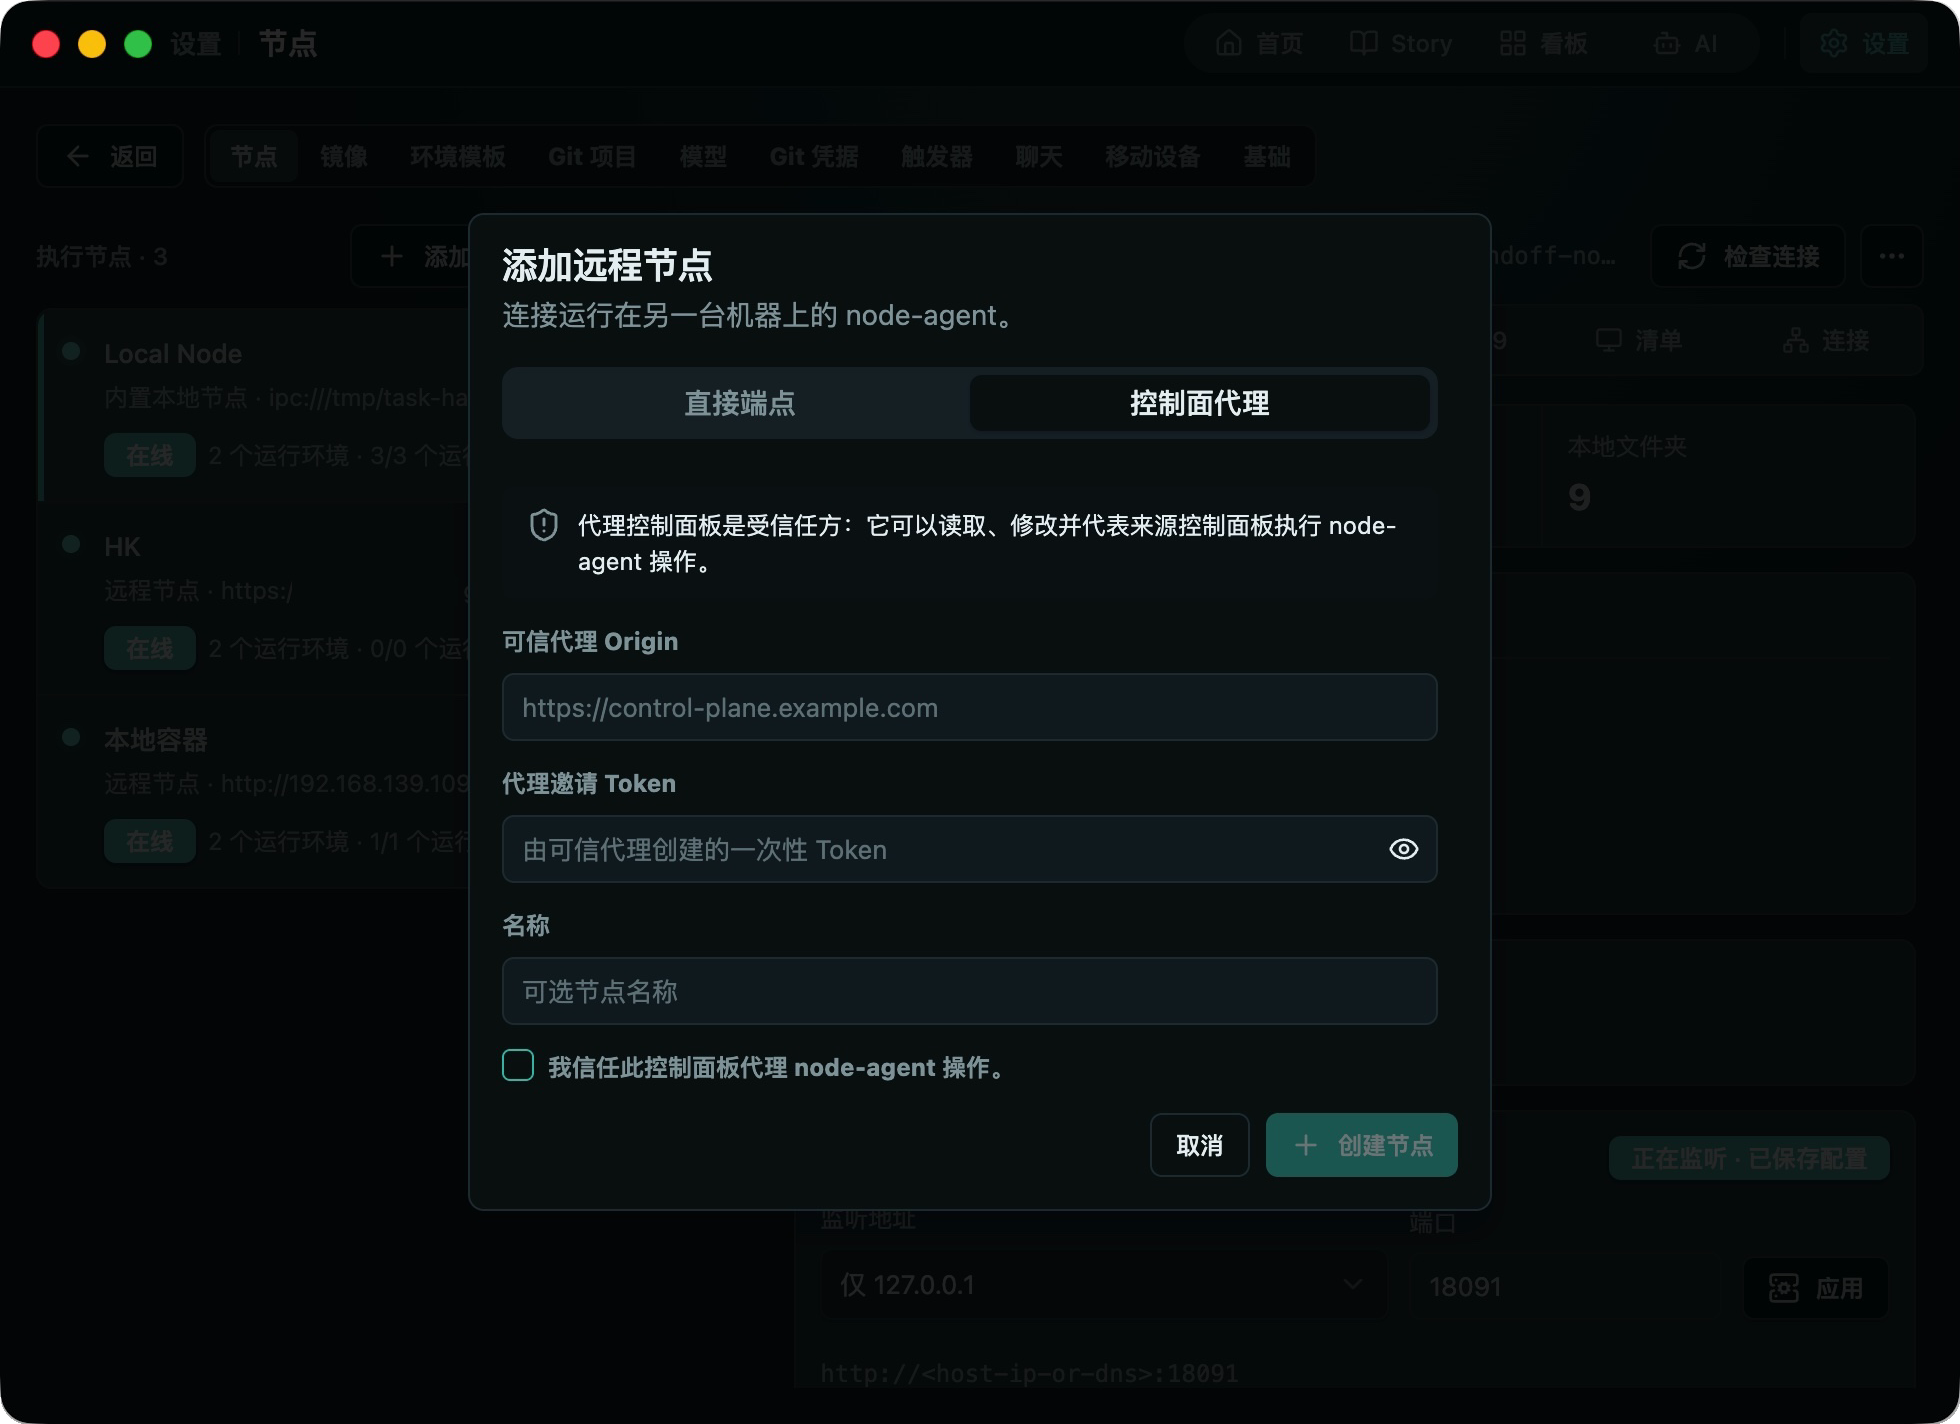
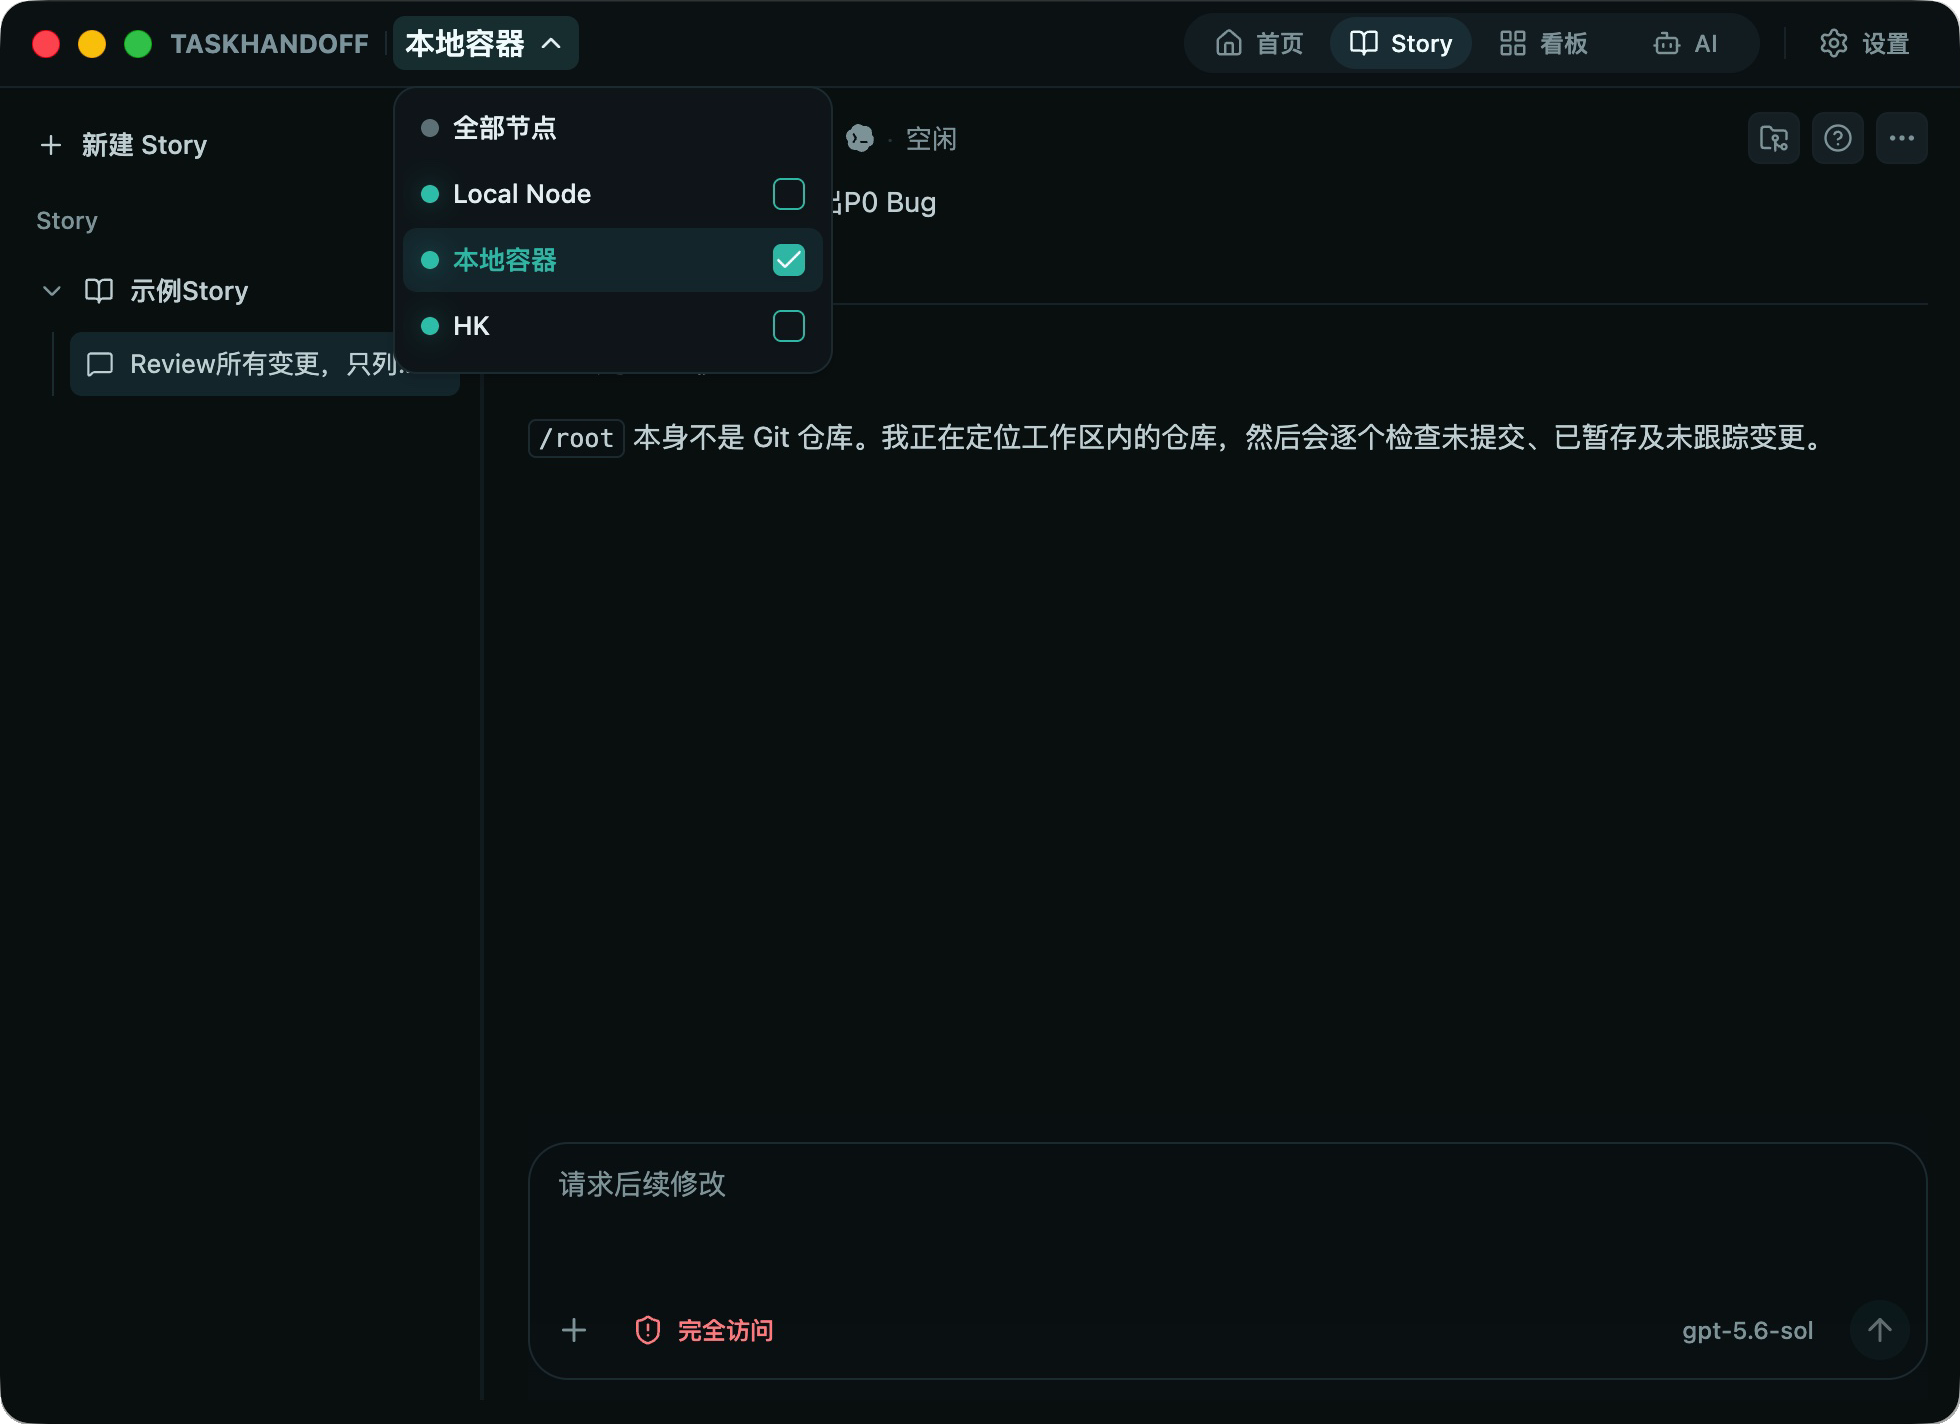
管理多台远程服务器,不一定要开公网端口:多节点接入与免费中转 远程服务器管理和远程开发常被当成一个「能不能连上」的问题。真做起来,其实是两条链路: 1. 你(浏览器 / 桌面端 / 手机)怎么访问 Control Plane; 2. Control Plane 怎么管理散在不同网络里的节点。 这两条链路的入口、认证和信任边界是分开的。把它们混成一条,最常见的做法就是给每台机器开公网端口、配端口映射,然后把安全寄托在「这个 URL 别人猜不到」上。 TaskHandoff 是免费、开源、可自托管的 AI 远程工作平台。它的做法是把这两条链路拆开:节点用反向连接主动接入;控制面可以不暴露到公网,通过 Thandoff 账户的免费后台中转供已授权客户端访问。 这篇文章讨论的不是「怎么在服务器上执行一条命令」,而是怎么把服务器纳入一个长期可用的远程工作台:节点、Docker 工作区、AI 会话和终端都在同一个控制面里。 问题:一台机器一个终端窗口,机器一多就崩 手上有三台机器的人,日常大概是这样的:笔记本、一台常开的家用服务器、一台公司内网主机。你在它们上面分别跑 Codex 或 OpenCode,然后开始当人肉调度器: - 记得哪台机器上有哪个仓库、哪个分支、哪个 worktree; - 反复切 SSH 窗口看进度,因为任务只活在那个终端里; - 关掉笔记本之后,不知道服务器上的任务到底还在不在跑。 常见的三种连通方案各有代价: - 公网 IP + 端口映射 / 内网穿透:每台机器一套 NAT、TLS、认证;暴露面变大,节点换网络后还要重新确认。 - VPN:连通性解决了,但「哪台机器上有哪个任务」的可见性没有解决,也没有任务级的权限边界。 - 一台机器一个远程桌面:能用,但把整个桌面暴露出去,和「只想看一个任务的进度」不是一回事。 做法一:把节点接进来,而不是把端口开出去 在 TaskHandoff 里,节点是运行 Node Agent、并实际管理实例的计算机。所有节点出现在同一个控制面板里,可以按节点、项目、状态筛选。 !设置 → 节点:本地节点与远程节点在同一个列表里 图 1:设置 → 节点。左侧是本机和远程节点,右侧是节点的运行环境、实例与诊断信息。 添加节点的向导会先检查 Control Plane 的公网可达性,再根据目标机器的网络条件推荐连接方式。核心原则只有一句:让能够主动出站的一方发起连接,尽量减少公网入站端口。 | 方式 | 谁发起连接 | 适合的场景 | 公网要求 | |------|-----------|-----------|----------| | 反向 WSS | Node Agent | 远程节点能访问 Control Plane | 只公开 Control Plane 的 HTTPS | | HTTPS 直连 | Control Plane | Control Plane 能访问 Node Agent | 公开 Node Agent 的 HTTPS API | | 可信控制面代理 | 当前 Control Plane | 双方都不能接受入站连接 | 两端都能访问代理面板 | 反向 WSS 通常是首选。 它不要求给 Node Agent 配公网监听、NAT 和 TLS;Node Agent 会持久化连接,服务重启后自动重连。目标机也不需要预装 Node.js 或 npm——受支持的安装器会准备运行环境。 配对用的加入 Token 是一次性的,有有效期,只用于首次建立信任。配对完成后的反向连接使用单独凭据,不依赖 Token 保持在线。这一点值得单独强调:不要把长期凭据塞进安装命令,也不要把 Token 写进脚本仓库、工单或日志。 HTTPS 直连只在控制面无法被目标节点访问、但能访问 Node Agent 时使用。它要求公网 Node Agent 必须使用 HTTPS。把 listener 从 127.0.0.1 改成 0.0.0.0 只会扩大监听范围,不会自动配置 TLS、防火墙或认证——这是最容易出事的一步。 可信控制面代理用于双方都不能接受入站连接的场景。需要注意它的语义:代理面板可以读取、修改并代表你执行全部被代理的节点操作,而且这条路径不是端到端加密的,只能在同一可信管理边界内使用。 !添加远程节点:直接端点 / 控制面代理 图 2:「添加远程节点」里的两种方式。选择控制面代理时,需要显式勾选「我信任此控制面板代理 node-agent 操作」。 做法二:控制面不暴露到公网,也能从手机或浏览器访问 第二条链路是「人 → Control Plane」。传统做法是域名 + HTTPS 反向代理,把控制面挂到公网。这在小团队里完全可行,但要求你维护 DNS、证书、端口和认证。 如果你不想把控制面暴露到公网,可以用 Thandoff 账户中转(免费):把一台自管 Control Plane 发布到账户目录,移动端等已授权客户端通过后台中转访问它。官网当前把这项能力描述为端到端加密中继,节点覆盖中国与全球。 - Control Plane 主动建立出站连接,所以不用为这条路径开放 Control Plane 或 Node Agent 的公网入站端口。 - 中转的是「客户端 → Control Plane」的 API、响应流和 WebSocket,不是节点之间的账号型中继。这个边界很重要,下面会单独说。 - 中转由 Control Plane 的后台进程持有:关闭设置页、退出本地 Web UI、授权用的浏览器会话过期,都不会停掉中转。 - 停止 Control Plane 服务、关闭远程访问、撤销绑定或发生身份冲突,会终止中转;服务恢复后,只要绑定仍有效且远程访问已开启,后台进程会用专用凭据重新连接。 两个操作的名字很像,语义完全不同:「关闭远程访问」保留账户绑定,随时可以再开;「断开 Thandoff 账户」会撤销绑定,下次要重新走一遍授权。授权码大约 5 分钟内有效,消费后立即失效;客户端访问时还会校验 Control Plane ID、账户、绑定 ID 和 revision,旧的或已撤销的授权不能继续建立新连接。 踩坑与边界:不能吹的部分 第一,账号型 Node Agent 中继目前还不支持。 文档写得很明确:Thandoff 账户中转的是客户端到 Control Plane 的访问,不是节点中继。如果两台机器都不能接受入站连接,正确路径是可信控制面代理,而不是指望账户中转替你连节点。把这条边界写清楚,比含糊带过更有用。 第二,复制数据目录会造成身份克隆。 Control Plane 的 ID 和签名身份保存在数据目录里;把整个目录复制一份、同时运行原安装和副本,两台机器会以同一个身份上线。账户服务检测到之后会把状态置为「身份冲突」,删除后台中转凭据并隔离所有远程数据连接。不要靠反复点「开启远程访问」绕过,先停掉其中一个安装,确定哪台机器保留原身份。 第三,反向代理不能只转发 /api/events。 实例终端、浏览器等功能还有别的 WebSocket 路由。稳妥的做法是让整个 Control Plane Origin 正确转发升级头,同时把请求体大小和读取超时放宽;否则会出现「页面能打开,但状态不更新」「终端一开就断」。 第四,移动端 Origin 必须是规范形式。 https://主机[:端口],不能带路径、query、内嵌用户名密码,也不能依赖重定向。配置完成后不要随意更换 Origin——已有移动端配置会把 Control Plane ID 和签名密钥指纹与这条连接一起校验。 第五,关掉控制面不等于关掉任务。 关闭或重启 Control Plane 不会停止远程 Node Agent 管理的实例;真正会中断任务的是停止或删除实例、关闭会话、停止 Node Agent。Local Runtime 的实例会随 Node Agent 退出而停止,Docker Runtime 的实例会继续运行,并在下次启动后被重新发现和接管。 结果:行为上发生了什么变化 不列数字,只列可验证的差异: - 加一台机器:在目标机上跑一条带一次性 Token 的安装命令,不用为它开放公网入站端口。 - 节点掉线:状态显示重连中,网络恢复后自动连回来,不需要重新配对——节点记录和配对关系都不应该靠删除来「测试连通性」。 - 在外面:手机或桌面客户端登录同一个 Thandoff 账户,从 Control Plane 目录里添加面板,不需要记公网 IP,也不需要把控制面挂到公网。 - 长任务:关浏览器、退出本地 Web UI,任务在节点上继续;回到电脑上能看到权威状态。 - 多机视图:所有远程服务器和实例在同一个看板里,按节点、项目、状态筛选,不用逐个 SSH 上去看。 !Story 列表按所属节点筛选 图 3:多节点之后,「按所属节点筛选」会变成最常用的视图之一。 可复用的五条原则 1. 两条链路分开规划。 人怎么访问控制面、控制面怎么访问节点,入口和信任边界不是一回事。 2. 让能出站的一方发起连接。 反向连接优先于端口映射;少开一个入站端口,就少一类暴露面。 3. 一次性 Token 只用于建立信任。 长期连接用独立凭据,Token 不进仓库、工单和日志。 4. 把「关闭」和「断开」做成两个语义不同的操作。 一个可恢复,一个要重新授权,界面上必须说清楚。 5. 能力边界写进文档。 不支持的中继方式要明说,并给出替代路径——这比让用户自己试错便宜得多。 相关文档 - TaskHandoff 官网(产品定位与客户端下载):thandoff.com - 开源仓库:edgestorage/task-handoff - 远程访问总览(两条链路的入口、认证与信任边界):docs.thandoff.com - 连接远程节点(反向 WSS / HTTPS 直连 / 可信控制面代理):docs.thandoff.com - 通过 Thandoff 账户访问(绑定、免费后台中转、撤销与身份冲突):docs.thandoff.com - 让 Control Plane 可远程访问(域名、TLS、反向代理与 WebSocket 要求):docs.thandoff.com - 节点管理(状态、连接方式、本地目录与模型中转):docs.thandoff.com - 移动端(从手机查看会话与实例):docs.thandoff.com
Dónde cuesta más y menos comprar un departamento de 3 o más dormitorios en Quito: ranking de sectores En Quito, un departamento de 3 o más dormitorios cuesta USD 260.000 en la mediana en González Suárez, el sector más caro, y USD 79.000 en Conocoto, el más… DOI: 10.5281/zenodo.23529014
推荐项目 D4Vinci/Scrapling D4Vinci/Scrapling
GitOps with ArgoCD: A Practical Beginner's Guide for Kubernetes "What's running in production right now?" If the honest answer is "whatever someone last applied with kubectl," you have a configuration drift problem waiting to happen. GitOps fixes it with one rule: the desired state of your cluster lives in Git, and an agent makes the cluster match it. ArgoCD is the most popular agent for the job. Here's how the model works and how to set it up for real. The idea in one paragraph You stop running kubectl apply by hand. Instead, your manifests (or Helm charts, or Kustomize overlays) live in a Git repository. ArgoCD watches both the repo and the cluster, shows you when they differ, and syncs them — automatically or at the click of a button. Every production change becomes a pull request, with history, review, and an instant rollback via git revert. Install ArgoCD on your cluster kubectl create namespace argocd kubectl apply -n argocd -f https://raw.githubusercontent.com/argoproj/argo-cd/stable/manifests/install.yaml Wait for the pods to come up, then get the admin password and expose the UI: kubectl -n argocd get secret argocd-initial-admin-secret \ -o jsonpath='{.data.password}' | base64 -d kubectl port-forward svc/argocd-server -n argocd 8080:443 Open https://localhost:8080, log in as admin with that password, and change it immediately. For a permanent setup, front it with an ingress and TLS — our Kubernetes ingress guide covers that part. Point it at a repository The fastest way to learn is a small app repo of your own: a folder with deployment.yaml and service.yaml for something trivial (an Nginx deployment works fine). Create an Application in the UI — or as YAML, which is more in the spirit of GitOps: apiVersion: argoproj.io/v1alpha1 kind: Application metadata: name: demo namespace: argocd spec: project: default source: repoURL: https://github.com/yourname/gitops-demo.git targetRevision: main path: manifests destination: server: https://kubernetes.default.svc namespace: demo syncPolicy: automated: prune: true selfHeal: true syncOptions: - CreateNamespace=true automated means ArgoCD syncs on every commit, prune removes resources deleted from Git, and selfHeal reverts manual changes made directly in the cluster — that's the drift-killer. Apply it with kubectl apply -f application.yaml and watch the UI: within a minute, your app appears, syncs, and goes green. The moment it clicks Edit the replica count in Git, commit, push. ArgoCD notices and scales the deployment. Then — the important test — run kubectl scale by hand to a different number and watch selfHeal snap it back to Git's value. That's the whole value proposition in one demo: production can never silently differ from the repo. Practical advice from the field - One repo per team or per app, with folders per environment (env/staging, env/production) rather than branches per environment. Branches diverge; folders just diff. - Don't auto-sync everything on day one. Start with manual sync on production so a bad commit requires a human click; automate staging first. - Secrets don't go in Git. Use Sealed Secrets, External Secrets Operator, or your cloud's secret store. Our ConfigMaps and Secrets guide covers the options. - Rollbacks are git revert + sync, not archaeology. Keep commits small and you'll love this on your worst day. A safe first week with ArgoCD Start with one non-critical application and leave automatic pruning off until you understand its behavior. Pruning is useful, but deleting a manifest in Git also gives ArgoCD permission to delete the corresponding cluster resource. That is exactly what you want eventually, and a painful surprise when a path or sync option is wrong. Watch the application's Health and Sync states separately. “Synced” means the manifests match Git; it does not prove every pod is healthy. A deployment can match the repository perfectly and still crash because its image, configuration, or database is wrong. Keep the initial admin credentials out of scripts, configure proper user access, and back up any Git repository settings that are not themselves declared elsewhere. Once the basic workflow is reliable, add staging automation, then production approvals, and only then broader pruning and self-healing. Is it worth it for small setups? For a single toy cluster, ArgoCD can feel like overhead. But the moment you have more than one environment or more than one person deploying, GitOps stops being ceremony and starts being the only sane way to answer "who changed what, when, and how do we undo it."
@tonyszko @SzymonRybus Można sobie dorzucić naszego Firmowida :D Alergeek-Ventures/firmowid
Superliner: a native Mac outliner built around supertags. Define #task once, and every note you tag gets its fields (free TestFlight beta) I'm Can, the solo developer of Superliner, a native Mac outliner built around supertags. It's a free public beta on TestFlight. Problem: Long outlines turn into text you can't query. I liked Tana's supertags, but wanted them in a native Mac app that keeps my notes in files on my own disk. A supertag is a tag that says what a note is and brings its own fields. Make #book with author, rating and finished, and every note you tag #book gets those fields. They stay in your outline, and you can also view them as a sortable table. - Eleven field types, including dates, numbers, options, checkboxes and links to other notes. - A note can carry several supertags, and #ebook can extend #book to inherit its fields. Every note also opens as its own page and saved searches filter by supertag, field, text and date. Pricing: $0 during the beta. No later price has been decided. Requirements: macOS 14 or later, Apple Silicon or Intel, about 26 MB. I've only run it on Apple Silicon with macOS 27.2. Where your notes live: JSON in a workspace folder, plus a generated Markdown copy with tags and fields at the top of each file. The default folder is in the app's sandbox container, and File > New Workspace lets you pick another. No account, no analytics. This build doesn't request the permission a sandboxed Mac app needs for outgoing connections. Known gaps: no sync, iCloud or iOS app. Not open source. No full VoiceOver pass yet. Import (OPML, Markdown, Logseq, Tana JSON) is unit-tested but hasn't met a real export. Please try, in a new workspace: 1. Most useful: model something real with supertags (books, tasks, people), add a saved search, and tell me where it got in your way. 2. Import a real export and tell me what came out wrong. Join: install TestFlight from the Mac App Store, then open testflight.apple.com (the listing says "Superliner Notes"). Report through TestFlight feedback with your build number, macOS version and chip. Developer: Can Burak Sofyalioglu LinkedIn: linkedin.com GitHub: github.com/canburaks Portfolio: webmeister.org Website, with privacy policy and terms: superliner.webmeister.org
Dónde cuesta más y menos comprar un departamento de 3 o más dormitorios en Lima: ranking de distritos En Lima, un departamento de 3 o más dormitorios cuesta 1.535.375 soles (USD 446.911) en la mediana en San Isidro, el distrito más caro, y 331.500 soles (USD… DOI: 10.5281/zenodo.23525513
PasteFerry - 跨平台剪贴板同步与局域网文件传输工具。 👉 baiyuze/pasteferry t.co
Tauto で型付き言語を作る: 型付け規則から証明付きの検査器を生成する 小さな言語の型検査器を書いて、「検査器が通した式は評価で行き詰まらない」ことと「検査器は型が付く式を取りこぼさない」ことを証明します。使うのは Tauto です。 この記事では、小さな言語を例に、Tauto のマクロで構文木の型や型検査器を生成する方法を紹介します。生成器が扱える形の型付け規則であれば、検査結果に導出・反証・型の一意性の証明を持たせられます。評価器や構文木の変換関数、それらに関する定理は別途記述します。 Hihaheho/tauto コードは examples/typed-lang にあります。この記事のコードと出力は、2026-11-02 にビルド・検査したものです。言語はまだ実験段階で、構文は変わる可能性があります。 git clone --depth 1 Hihaheho/tauto cd tauto cargo build --release -p tauto-cli LANG=ja target/release/tauto check --tote examples/typed-lang --fresh 以下のコマンドは LANG=ja で実行します。LC_ALL や LC_MESSAGES、Tauto の言語設定がある場合は、そちらが優先されます。今回の確認環境では LC_ALL を外して実行しました。 作る言語 数、真偽値、+、==、if だけの言語です。 if 1 + 1 == 2 then 10 else 20 // Nat (1 == 1) == true // 型エラー: == は Nat 同士 1 + true // 型エラー if true then 1 else false // 型エラー: 枝の型が違う 全体の流れは次のとおりです。証明では、Term 上の型検査と評価、および inductive 版の構文木を Term に変換した後の実行を扱います。文字列の解析や、パーサが返す木から inductive 版の木への変換の正しさは対象に含めません。 1. 文法を書くと、木の型ができる inductive_syntax!(tl, ```par %start Expr %title "typed-lang" %% Expr: IfExpr | Cmp; IfExpr: KwIf Expr KwThen Expr KwElse Expr; Cmp: Sum [ EqEq Sum ]; Sum: Atom { Plus Atom }; Atom: Num | KwTrue | KwFalse | Paren; Paren: LParen Expr RParen; Num: /[0-9]+/; Plus: '+'; EqEq: '=='; KwIf: 'if'; KwThen: 'then'; KwElse: 'else'; KwTrue: 'true'; KwFalse: 'false'; LParen: '('; RParen: ')'; この宣言で、次のものができます(末尾の => の右には、できる宣言の一覧が入ります)。 tl::parse: 文字列を読む関数 tl::Expr など、文法の規則ごとの型(Option や繰り返しは Option と List になる) tl::Expr::I など、証明から読める inductive 版の型。定理はこちらについて書く tl::Expr::to_i: パーサが返す tl::Expr の木を、tl::Expr::I の木に変換する関数 ここでは、構文木に二つの表現があります。tl::Expr はパーサが返す木の型で、tl::Expr::I は定理の中で場合分けや帰納法に使うための型です。to_i は、この二つの表現をつなぐ変換で、型検査は行いません。 続いて、lower_expr で tl::Expr::I の木を、型検査器が扱う Term に変換します。例えば 1 + 2 + 3 は、(1 + 2) + 3 に対応する木に変換します。型の検査は、次の検査器で行います。 2. 型付け規則を書くと、検査器ができる 核になる言語と、その型付け規則です。HasTy(term, ty) は「式 term が型 ty を持つ」という命題を表します。ここでは、この関係を型検査器の仕様として使います。 pub(open) inductive Term: Type { TmNum(n: Nat): Term TmBool(b: Bool): Term TmAdd(a: Term, b: Term): Term TmEq(a: Term, b: Term): Term TmIf(c: Term, t: Term, e: Term): Term } @mode!(``` check(rec term, out ty) -> Check { Accepted | Rejected } eq Ty: ty_dec { TySame | TyDifferent } pub(open) inductive HasTy: (Term, Ty) -> Prop { TyNum<n: Nat>: HasTy(TmNum(n), TNat) TyBool<b: Bool>: HasTy(TmBool(b), TBool) TyAdd<a: Term, b: Term>( ha: HasTy(a, TNat), hb: HasTy(b, TNat) ): HasTy(TmAdd(a, b), TNat) TyEq<a: Term, b: Term>( ha: HasTy(a, TNat), hb: HasTy(b, TNat) ): HasTy(TmEq(a, b), TBool) TyIf<c: Term, t: Term, e: Term, ty: Ty>( hc: HasTy(c, TBool), ht: HasTy(t, ty), he: HasTy(e, ty) ): HasTy(TmIf(c, t, e), ty) } HasTy: (Term, Ty) -> Prop は、式と型を受け取り、「その式がその型を持つ」という命題を表します。例えば HasTy(TmNum(1), TNat) は「数値の式 1 は自然数型を持つ」という意味です。inductive の中に並ぶ TyNum などは、その命題の証明を作るコンストラクタであり、それぞれが型付け規則に対応します。 まず TyNum は、任意の自然数 n について、TmNum(n) が TNat 型を持つことを表します。同様に TyBool は、true や false が TBool 型を持つことを表します。 TyAdd には、二つの前提があります。ha: HasTy(a, TNat) は「左辺 a が自然数型である証明」、hb: HasTy(b, TNat) は「右辺 b が自然数型である証明」です。この二つから、結論の HasTy(TmAdd(a, b), TNat)、つまり「足し算全体が自然数型である証明」を作ります。1 + 2 なら、次のように規則を組み合わせます。 TyNum により 1 : Nat TyNum により 2 : Nat ────────────────────────────────────────── TyAdd 1 + 2 : Nat ここで 式 : 型 は、HasTy(式, 型) を読みやすく書いたものです。1 + true では、右辺に必要な HasTy(TmBool(true), TNat) をこれらの規則から導けないため、TyAdd を使った型付けはできません。 TyEq も両辺に自然数型を要求しますが、結果の型は TBool です。そのため 1 == 2 は真偽値型になり、true == false はこの言語の規則では型が付きません。 TyIf は、条件 c が真偽値型であることと、二つの枝 t、e が同じ型 ty を持つことを要求します。例えば if true then 1 else 2 は、条件に TyBool、両方の枝に TyNum を使い、ty = TNat として全体を型付けできます。一方、if true then 1 else false は枝の型が揃わないため、型が付きません。 @mode! の mode は、関係の引数を入力・出力としてどう扱うかの指定と読めます。rec term は式の構造に沿って再帰する入力、out ty は求める出力です。この指定から関数 check と結果の型 Check が生成されます。ここでの check は、式から型を求める型推論も行います。TyIf の二つの枝の型の比較には、型の等しさを決める ty_dec を渡します。任意の帰納的関係をこの方法で判定できるわけではなく、生成器が受理する規則の形には制約があります。 生成される型 Check(t) の値は、次の二通りです。 結果 持っているもの Accepted(ty, derivation, unique) 型、型付けの証明、型の一意性の証明 Rejected(refute) どの型も付かないことの証明 derivation は HasTy(t, ty) の証明です。例えば t が 1 + 2、ty が TNat なら、先ほどのように二つの TyNum と TyAdd を組み合わせた型付けの導出が入ります。つまり型だけでなく、その根拠も一緒に返します。 unique は、その式に付く型が ty に限られることの証明です。別の型 ty2 と、その型が付くという証明 h: HasTy(t, ty2) を渡すと、unique(ty2, h) は ty2 と ty が等しいことを証明します。例えば 1 + 2 に対して TNat を返した場合、同じ式に型を付ける別の導出があっても、その型は TNat と一致します。次節では、これを使って検査器の出力と型付け規則で与えられた型の一致を示します。 refute は逆に、任意の型 ty と h: HasTy(t, ty) を受け取ると矛盾を導くものです。これにより、拒否された式には、この規則ではどの型も付かないことを表します。 生成された項もカーネルの検査を受けるため、論理的な正しさの根拠を生成器の実装だけに置く必要はありません。ただし、その保証はカーネルの正しさと、記述した仕様を前提とします。 3. 検査器の健全性と完全性 生成物を、よく見る形の定理にします。check_ty は Check の答えを Option(Ty) にしただけの関数です。 pub fn check_ty(t: Term): Option(Ty) { decision_ty(t, check(t)) } // 健全性: 検査器が Some(ty) と答えたなら、t : ty pub theorem check_sound<t: Term, ty: Ty>( said: Eq(Option(Ty), check_ty(t), Some(ty)) ): HasTy(t, ty) { ... } // 完全性: t : ty なら、検査器は Some(ty) と答える pub theorem check_complete<t: Term, ty: Ty>( h: HasTy(t, ty) ): Eq(Option(Ty), check_ty(t), Some(ty)) { ... } 証明では、生成された Accepted / Rejected で場合分けし、導出・一意性・反証を使います。完全性の Accepted の腕では一意性から出力型の一致を示し、Rejected の腕では refute(ty, h) から矛盾を導きます。 pub theorem decision_complete<t: Term, ty: Ty>( d: Check(t), h: HasTy(t, ty) ): Eq(Option(Ty), decision_ty(t, d), Some(ty)) { match d: Eq(Option(Ty), decision_ty(t, d), Some(ty)) { Accepted(out, derivation, unique) => Eq::congr(Some, Eq::sym(unique(ty, h))) Rejected(refute) => False::elim(refute(ty, h)) } } これで check_ty(t) = Some(ty) と HasTy(t, ty) が同値になりました。型付けが一意であること(typing_unique)も、生成された一意性から取り出せます。 4. 手で書く証明: 型安全性 評価器と型付け規則の対応は、@mode! の生成対象には含まれないため、別途証明します。この評価器は、型の合わない演算に出会うと None を返します。この記事では、この失敗を「行き詰まり」と呼びます。 pub fn add_val(x: Option(Val), y: Option(Val)): Option(Val) { match x: Option(Val) { None => None Some(vx) => match vx: Option(Val) { VBool(xb) => None VNat(nx) => match y: Option(Val) { None => None Some(vy) => match vy: Option(Val) { VBool(yb) => None VNat(ny) => Some(VNat(Nat::add(nx, ny))) } } } } } ここで示す型安全性は、「型が付けば、評価は成功し、返る値はその型を持つ」という性質です。小ステップ意味論の保存・進行を個別に示す形式ではなく、全域な評価関数の結果について、型付けの導出に関する帰納法で証明します。 pub(open) inductive ValHas: (Val, Ty) -> Prop { HNat<n: Nat>: ValHas(VNat(n), TNat) HBool<b: Bool>: ValHas(VBool(b), TBool) } // 評価結果が Some(v) で、v が型 ty を持つことを表す。None に対応するコンストラクタはない pub(open) inductive ResultHas: (Option(Val), Ty) -> Prop { Returned<v: Val, ty: Ty>(h: ValHas(v, ty)): ResultHas(Some(v), ty) } pub theorem eval_safe<t: Term, ty: Ty>(h: HasTy(t, ty)): ResultHas(eval(t), ty) { match h: ResultHas(eval(t), ty) { TyNum(n) => Returned(HNat) TyBool(b) => Returned(HBool) TyAdd(a, b, ha, hb) => add_safe(eval_safe(ha), eval_safe(hb)) TyEq(a, b, ha, hb) => eq_safe(eval_safe(ha), eval_safe(hb)) TyIf(c, t1, e, ty1, hc, ht, he) => if_safe(eval_safe(hc), eval_safe(ht), eval_safe(he)) } } 例えば、式 1 + 2 に自然数型が付いたとします。確かめたいのは、評価が失敗せず、結果も自然数の値になることです。コードでは、これを三つの命題に分けています。 名前 表すこと 1 + 2 の例 HasTy 式に型が付く 式 1 + 2 は自然数型 ValHas 値がある型を持つ 評価後の値 3 は自然数型 ResultHas 評価が成功し、その値がある型を持つ 評価結果は Some(VNat(3)) で、その値は自然数型 ValHas の HNat は「自然数の値は自然数型」、HBool は「真偽値の値は真偽値型」という規則です。ResultHas の Returned は、値の型の証明を受け取り、その値を Some に包んだ成功結果についての証明を作ります。失敗を表す None に対応する規則はありません。 eval_safe が示すのは、表の最初から最後へのつながりです。つまり、「式に型が付くなら、評価は成功し、同じ型の値を返す」と証明します。 証明では match h で、式に型を付けたときの規則ごとに場合分けします。例えば数値の式 1 なら、評価結果は Some(VNat(1)) です。HNat で「返る値は自然数型」と示し、それを Returned に渡して「評価が成功して自然数型の値を返す」という証明にします。コードの Returned(HNat) は、この二段階を表しています。真偽値の場合も同じ流れです。 足し算の場合、eval_safe(ha) と eval_safe(hb) で、両辺の評価が成功して自然数の値を返すことを示します。別途証明した補助定理 add_safe は、その二つの結果を受け取り、足し算全体も自然数の値を返すことを示します。小さい式の型付けの導出に再帰し、その証明を使って全体を証明する、という帰納法の流れです。 TyEq の場合は eq_safe を使い、自然数同士の比較が真偽値を返すことを示します。TyIf の場合は、条件が真偽値を返すことと、両方の枝が型 ty1 の値を返すことを帰納的に示し、if_safe で条件式全体についてまとめます。両方の枝の証明を使いますが、実行時に両方の枝を評価するという意味ではありません。 ResultHas には None に対するコンストラクタがなく、ResultHas(None, ty) の証明からは矛盾を導けます。そのため eval_safe からは、「型の付いた式の評価は None にならない」こと(eval_never_stuck)も言えます。 実際の実行では、run_term が型を検査し、通った式だけを評価します。run_tree は、構文木を lower_expr で式に変換してから、run_term に渡します。この流れについても、型が付く式なら、実行が成功して同じ型の値を返すことを証明できます。 pub theorem run_tree_safe<e: tl::Expr::I, ty: Ty>( h: HasTy(lower_expr(e), ty) ): ResultHas(run_tree(e), ty) ここで e は構文木です。前提の h は「この木を式に変換すると、型 ty が付く」という証明です。結論は「その木を run_tree で実行すると、成功して型 ty の値が返る」と読めます。例えば 1 + 2 に対応する木なら、自然数型の値が返ることを保証しますが、その値が 3 であることまでは述べていません。証明の対象範囲は、末尾の「何が保証されないか」にまとめます。 5. 具体例と、拒否される式 // 1 + 2 + 3 を型検査して実行すると、自然数の値 6 が返る pub theorem sum3_runs(): run_term(sum3()) = Some(VNat(6)) { Refl } // 1 + true は型検査で拒否される pub theorem add_bool_rejected(): check_ty(TmAdd(TmNum(1), TmBool(true))) = None { Refl } // 1 + true を型検査せずに評価すると、失敗を表す None が返る pub theorem add_bool_gets_stuck(): eval(TmAdd(TmNum(1), TmBool(true))) = None { Refl } // 1 + true に何らかの型が付くと仮定すると矛盾する。つまり、この式にはどの型も付かない pub theorem add_bool_untypable(ty: Ty, h: HasTy(TmAdd(TmNum(1), TmBool(true)), ty)): False { match Eq::trans(Eq::sym(check_complete(h)), add_bool_rejected()): False {} } 全体を検査します。 $ LANG=ja tauto check --tote examples/typed-lang --fresh 64 ok, 0 failed, 0 incomplete, 13 skipped (not checked by the kernel); ... この集計行は LANG=ja でも英語で表示されます。 REPL で文字列から実行する 最後に、1 行ずつ式を入力できる REPL にします。まず、1 行分の文字列を解析・型検査・評価する run_text を用意します。パーサの木を to_i で証明側の木に変換し、lower_expr、check_ty、eval に渡します。 pub fn run_text(src: Text): Unit ! {Div, stdout} { match tl::parse(src) { Err(d) => { print("syntax error: ") print(d.message) print("\n") } Ok(tree) => { let t := lower_expr(tl::Expr::to_i(tree)) match check_ty(t) { None => print("rejected by the type checker\n") Some(ty) => { print(show_val(eval(t))) print(" : ") print(show_ty(ty)) print("\n") } } } } } pub fn repl(): Unit ! {Div, stdin, stdout, stdout_flush} { print("> ") perform stdout_flush() match perform stdin() { None => () Some(line) => { if Text::eq(line, ":quit") { () } else { if Text::eq(line, "") { () } else { run_text(line) } repl() } } } } print("typed-lang REPL (:quit to exit)\n") repl() 起動後、> に続けて式を入力します。 $ LANG=ja tauto run --backend eval --tote examples/typed-lang typed-lang REPL (:quit to exit) > 1 + 2 + 3 6 : Nat > if 1 + 1 == 2 then 10 else 20 10 : Nat > (1 == 1) == true rejected by the type checker > 1 + true rejected by the type checker > if 1 then 2 else 3 rejected by the type checker > if true then 1 else false rejected by the type checker > 1 + * 2 syntax error: macro.syntax_error: in tl: expected Num or KwTrue or KwFalse or LParen, found Error > 2 + 3 5 : Nat > :quit 文法に合わない 1 + * 2 はパーサが、文法に合っても型の合わない式は検査器が止めます。 REPL の案内や型検査の拒否メッセージは、サンプル内で英語の文字列として記述しています。上の構文エラーのメッセージも、LANG=ja での実行結果では英語のままです。 わざとバグを入れると 安全性の証明が何を守っているかを、一度壊して確かめます。型付け規則の == の結果型を TBool から TNat に変えます。 TyEq<a: Term, b: Term>( ha: HasTy(a, TNat), hb: HasTy(b, TNat) ): HasTy(TmEq(a, b), TNat) 評価器は Bool を返すので、規則と食い違います。 次は、変更後に LANG=ja で検査した出力のうち、eval_safe のエラーを抜き出したものです(パスの前半は省略しています)。 失敗 eval_safe: .../proof/safety.taut:72:27: 型が一致しない: ResultHas(eval(TmEq(a, b)), TNat) が期待されたが ResultHas(eq_val(eval(a), eval(b)), TBool) だった 異なる部分: TNat が期待されたが TBool だった 検査器は変更後の規則から生成されるため、その規則に対する正しさの証明は引き続き構成できます。一方、規則と評価器の食い違いは eval_safe の型エラーとして現れます。規則から生成した検査器の正しさと、その規則に対する評価器の安全性は、別の性質として検査されます。 何が保証されないか tl::parse と、パーサの木を inductive 版にする tl::Expr::to_i は証明していません。「文字列がこの式を表す」ことは保証されません 木を Term にする lower_expr は全域な関数ですが、文字列の意味との対応は証明していません 評価器は Nat を数学の自然数として扱います。抽出後の実行で数値表現の上限を超える場合は扱いません 型付け規則が「求める言語の規則」になっているかは、人間が読んで確かめます。ここが仕様です まとめ この例では、inductive_syntax! でパーサと構文木の型を、@mode! で型付け規則に対応する証明付きの検査器を生成しました。生成された証明から検査器の健全性・完全性・一意性を定理として取り出し、評価器の型安全性は別途証明しています。 生成器が扱える形の規則なら、検査器とその証明を別々に書かずに済みます。ただし、規則が意図した仕様になっているか、パーサや実行系がその仕様とつながっているかは、自分で確認するしかありません。 この例は 400 行ほどです。次は、変数と関数(束縛と置換)を足した型付き λ 計算と、コンパイラ(examples/compiler に算術式のものがあります)への接続を試します。
Garmin G5 Improvements for MSFS 2024 I have added the G5 mod for MSFS 2024 to several aircraft. All credit goes to the original creator of the G5 mod (johnygomez/msfs-garmin-g5-ifr). I merely integrated it into a few additional aircraft. I have only tested it in MSFS 2024, so I cannot guarantee it works perfectly, but based on my testing, I haven't found any issues that would hinder its use. This is a merged version that includes the features and fixes added by this contributor in 1.3.1 and Updated G5 · Issue #20. The G5 mod has been added to the following aircraft: - Cessna 152 - Cessna 172SP Classic - Diamond DA40 TDI - Cessna 185F Skywagon - Grumman HU-16 Albatross - Piper PA-28-236 Dakota - Cessna T210N - Cessna 182RG II - A36 Bonanza Professional - A36TC Bonanza Professional - B36TP Bonanza Professional - Commander 114 - Commander 114TC - B60 Duke - B60 Grand Duke - B60T Turbine Duke - Caravan Professional - Caravan Professional (Cargo Pod) - Cessna 414AW Chancellor - PA-28R Arrow III - PA-28R Turbo Arrow III - PA-28R Turbo Arrow IV - PA-28-161 Warrior II - PA-38 Tomahawk - Aeroprakt A32 Vixxen - F406 Caravan II - Black Square - Baron Professional - bagolu c172m You must already own the aircraft shown in the list. This mod simply adds the G5 to those aircraft. modsfire.com
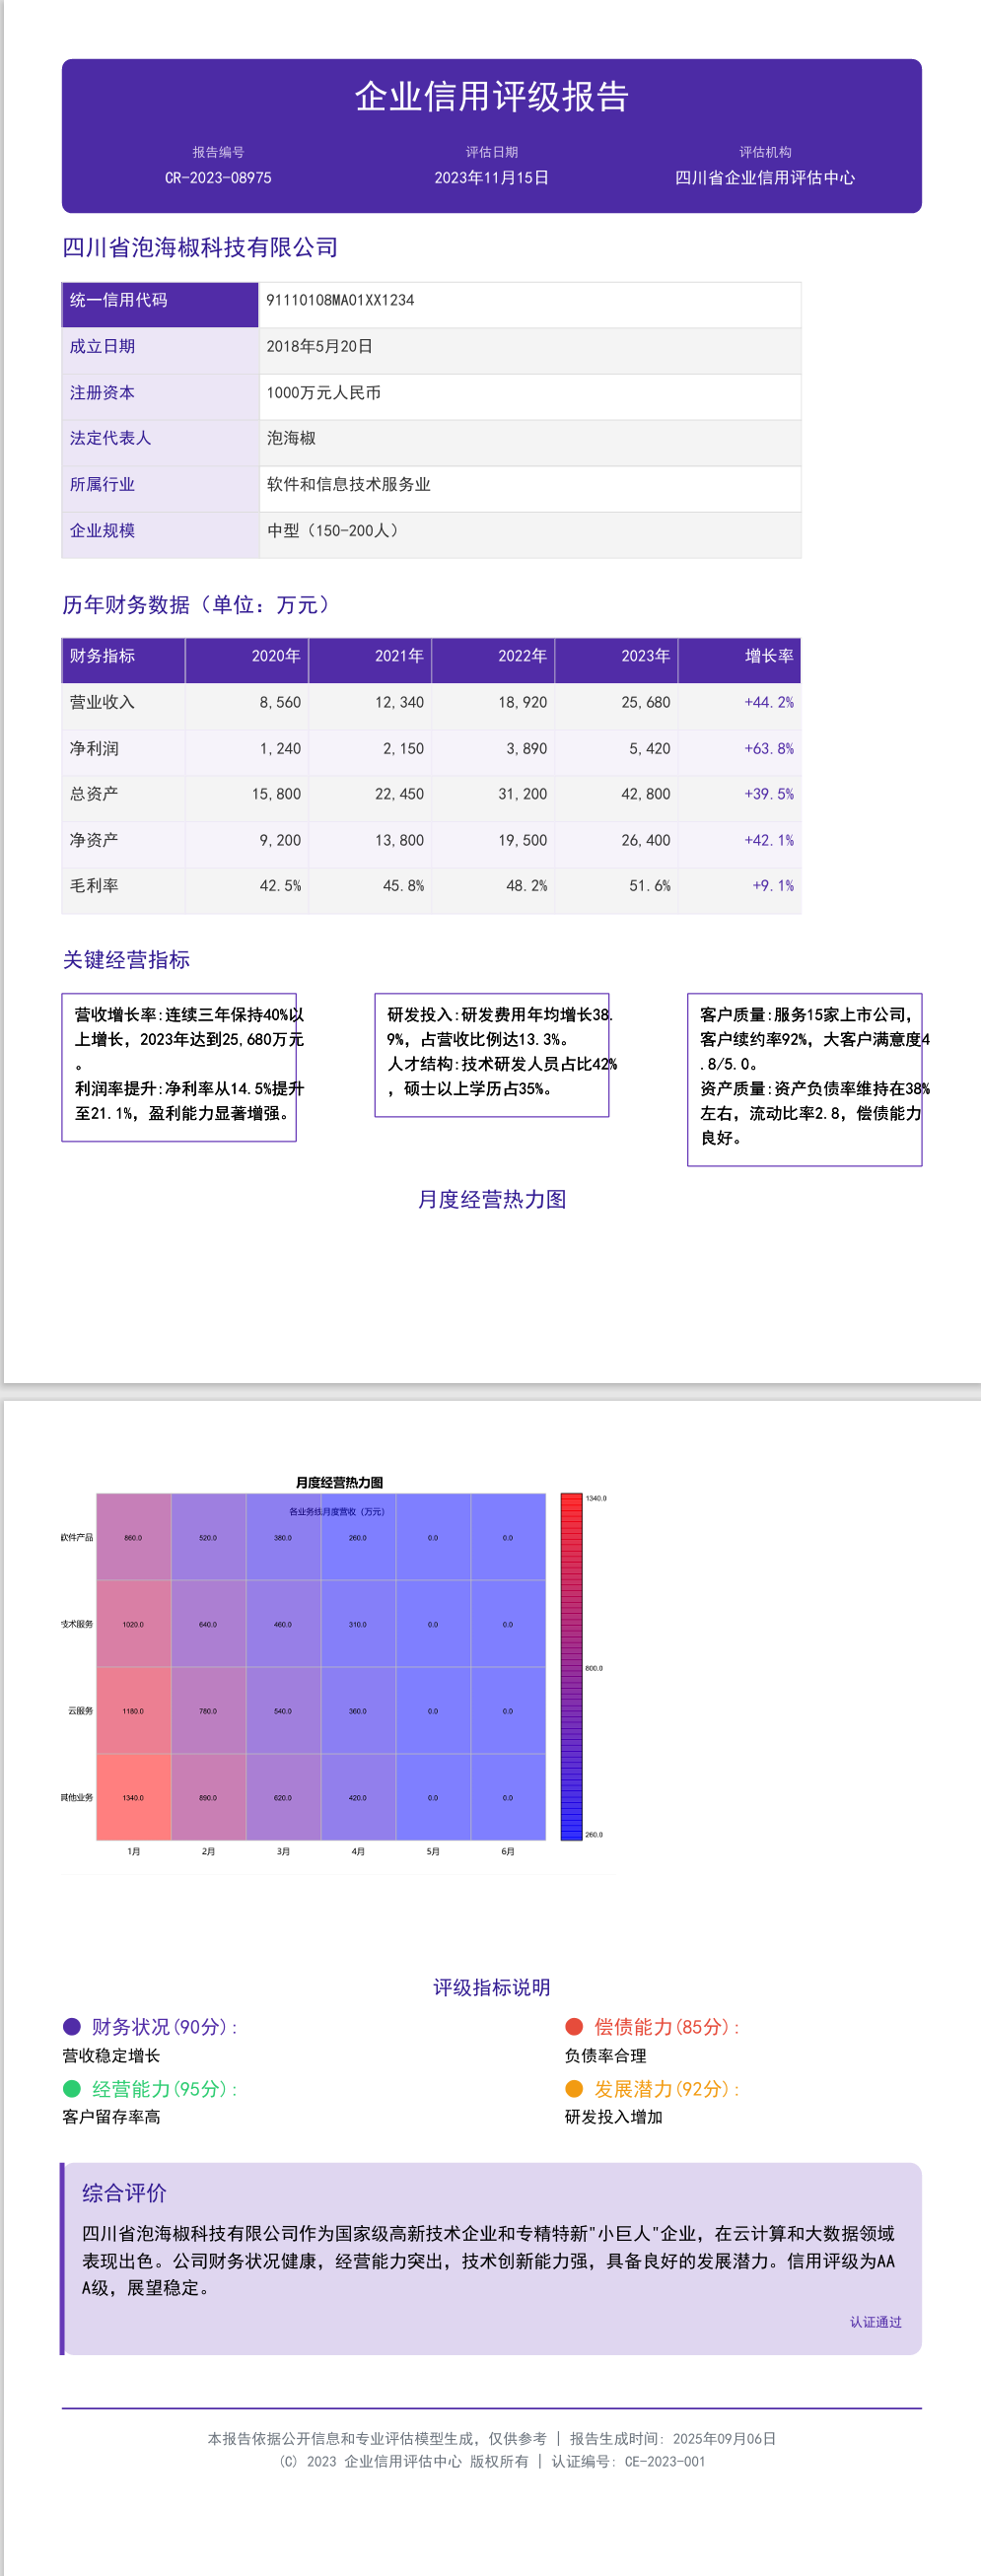
Heatmap of Monthly Revenue Across Regions > jquick-pdf by example — demo #10 of 184. Every article in this series ships one complete, runnable demo: a template file and a Java class. No snippets, no omissions. Twelve months by eight regions, coloured by revenue band — the fastest way to spot seasonality. This document belongs to the Credit report — chart series set. Like every demo in the series it has its own colour scheme and layout combination, derived deterministically from the demo number — so the look is stable across runs and two neighbouring documents never look alike. What you'll build - A PDF written to D:/test/creditreport/10_heatmap.pdf - A template file (report/credit_report_10_heatmap.txt) with 1 bound placeholder - A detail grid of 12 rows × 6 columns, laid out with width:100% so it fills the text area - One self-contained Java class (JQuickCreditReport10HeatmapTest) that binds the data and renders the file <details> <summary>Bound placeholders</summary> ${svg} </details> Prerequisites Java 8+ and one dependency — jquick-pdf is built on Apache PDFBox, not iText: <dependency> <groupId>io.github.paohaijiao</groupId> <artifactId>jquick-pdfx</artifactId> <version>4.2.0</version> </dependency> Coordinates: io.github.paohaijiao:jquick-pdfx:4.2.0. Step 1 — the template file JPdfX is jquick-pdf's HTML-like template language. It lives in its own file (src/test/resources/report/credit_report_10_heatmap.txt) instead of a Java string, so designers can edit it without touching code. <pdf> <body> <div style="background:linear-gradient(135deg, #311B92 0%, #673AB7 100%); borderRadius:8px; paddings:16px; marginBottom:18px"> <h1 style="fontSize:21; color:white; textAlignment:center; bold:true; marginBottom:12px">'企业信用评级报告'</h1> <div style="display:flex; justifyContent:space-around"> <div style="width:180px; textAlignment:center"> <div style="fontSize:8; color:#d1c4e9; textAlignment:center; marginBottom:3px">'报告编号'</div> <div style="fontSize:10; color:white; textAlignment:center">'CR-2023-08975'</div> </div> <div style="width:180px; textAlignment:center"> <div style="fontSize:8; color:#d1c4e9; textAlignment:center; marginBottom:3px">'评估日期'</div> <div style="fontSize:10; color:white; textAlignment:center">'2023年11月15日'</div> </div> <div style="width:180px; textAlignment:center"> <div style="fontSize:8; color:#d1c4e9; textAlignment:center; marginBottom:3px">'评估机构'</div> <div style="fontSize:10; color:white; textAlignment:center">'四川省企业信用评估中心'</div> </div> </div> </div> <div style="marginBottom:18px"> <h2 style="fontSize:14; color:#311B92; bold:true; marginBottom:10px">'四川省泡海椒科技有限公司'</h2> <table style="width:600px; fontSize:10"> <tr> <th style="backgroundColor:#512DA8; color:white; bold:true; padding:6px; textAlignment:left; width:160px">'统一信用代码'</th> <td style="padding:6px; textAlignment:left; width:440px">'91110108MA01XX1234'</td> </tr> <tr> <th style="backgroundColor:#ede7f6; color:#311B92; bold:true; padding:6px; textAlignment:left">'成立日期'</th> <td style="padding:6px; textAlignment:left">'2018年5月20日'</td> </tr> <tr> <th style="backgroundColor:#ede7f6; color:#311B92; bold:true; padding:6px; textAlignment:left">'注册资本'</th> <td style="padding:6px; textAlignment:left">'1000万元人民币'</td> </tr> <tr> <th style="backgroundColor:#ede7f6; color:#311B92; bold:true; padding:6px; textAlignment:left">'法定代表人'</th> <td style="padding:6px; textAlignment:left">'泡海椒'</td> </tr> <tr> <th style="backgroundColor:#ede7f6; color:#311B92; bold:true; padding:6px; textAlignment:left">'所属行业'</th> <td style="padding:6px; textAlignment:left">'软件和信息技术服务业'</td> </tr> <tr> <th style="backgroundColor:#ede7f6; color:#311B92; bold:true; padding:6px; textAlignment:left">'企业规模'</th> <td style="padding:6px; textAlignment:left">'中型(150-200人)'</td> </tr> </table> </div> <div style="marginBottom:18px"> <h2 style="fontSize:13; color:#311B92; bold:true; marginBottom:10px">'历年财务数据(单位:万元)'</h2> <table style="width:600px; fontSize:10"> <tr> <th style="backgroundColor:#512DA8; color:white; bold:true; padding:6px; textAlignment:left">'财务指标'</th> <th style="backgroundColor:#512DA8; color:white; bold:true; padding:6px; textAlignment:right">'2020年'</th> <th style="backgroundColor:#512DA8; color:white; bold:true; padding:6px; textAlignment:right">'2021年'</th> <th style="backgroundColor:#512DA8; color:white; bold:true; padding:6px; textAlignment:right">'2022年'</th> <th style="backgroundColor:#512DA8; color:white; bold:true; padding:6px; textAlignment:right">'2023年'</th> <th style="backgroundColor:#512DA8; color:white; bold:true; padding:6px; textAlignment:right">'增长率'</th> </tr> <tr> <td style="padding:6px; textAlignment:left; borderBottom:1px solid #ede7f6; bold:true">'营业收入'</td> <td style="padding:6px; textAlignment:right; borderBottom:1px solid #ede7f6">'8,560'</td> <td style="padding:6px; textAlignment:right; borderBottom:1px solid #ede7f6">'12,340'</td> <td style="padding:6px; textAlignment:right; borderBottom:1px solid #ede7f6">'18,920'</td> <td style="padding:6px; textAlignment:right; borderBottom:1px solid #ede7f6">'25,680'</td> <td style="padding:6px; textAlignment:right; borderBottom:1px solid #ede7f6; color:#512DA8; bold:true">'+44.2%'</td> </tr> <tr> <td style="padding:6px; textAlignment:left; borderBottom:1px solid #ede7f6; bold:true; backgroundColor:#f6f4fb">'净利润'</td> <td style="padding:6px; textAlignment:right; borderBottom:1px solid #ede7f6; backgroundColor:#f6f4fb">'1,240'</td> <td style="padding:6px; textAlignment:right; borderBottom:1px solid #ede7f6; backgroundColor:#f6f4fb">'2,150'</td> <td style="padding:6px; textAlignment:right; borderBottom:1px solid #ede7f6; backgroundColor:#f6f4fb">'3,890'</td> <td style="padding:6px; textAlignment:right; borderBottom:1px solid #ede7f6; backgroundColor:#f6f4fb">'5,420'</td> <td style="padding:6px; textAlignment:right; borderBottom:1px solid #ede7f6; backgroundColor:#f6f4fb; color:#512DA8; bold:true">'+63.8%'</td> </tr> <tr> <td style="padding:6px; textAlignment:left; borderBottom:1px solid #ede7f6; bold:true">'总资产'</td> <td style="padding:6px; textAlignment:right; borderBottom:1px solid #ede7f6">'15,800'</td> <td style="padding:6px; textAlignment:right; borderBottom:1px solid #ede7f6">'22,450'</td> <td style="padding:6px; textAlignment:right; borderBottom:1px solid #ede7f6">'31,200'</td> <td style="padding:6px; textAlignment:right; borderBottom:1px solid #ede7f6">'42,800'</td> <td style="padding:6px; textAlignment:right; borderBottom:1px solid #ede7f6; color:#512DA8; bold:true">'+39.5%'</td> </tr> <tr> <td style="padding:6px; textAlignment:left; borderBottom:1px solid #ede7f6; bold:true; backgroundColor:#f6f4fb">'净资产'</td> <td style="padding:6px; textAlignment:right; borderBottom:1px solid #ede7f6; backgroundColor:#f6f4fb">'9,200'</td> <td style="padding:6px; textAlignment:right; borderBottom:1px solid #ede7f6; backgroundColor:#f6f4fb">'13,800'</td> <td style="padding:6px; textAlignment:right; borderBottom:1px solid #ede7f6; backgroundColor:#f6f4fb">'19,500'</td> <td style="padding:6px; textAlignment:right; borderBottom:1px solid #ede7f6; backgroundColor:#f6f4fb">'26,400'</td> <td style="padding:6px; textAlignment:right; borderBottom:1px solid #ede7f6; backgroundColor:#f6f4fb; color:#512DA8; bold:true">'+42.1%'</td> </tr> <tr> <td style="padding:6px; textAlignment:left; borderBottom:1px solid #ede7f6; bold:true">'毛利率'</td> <td style="padding:6px; textAlignment:right; borderBottom:1px solid #ede7f6">'42.5%'</td> <td style="padding:6px; textAlignment:right; borderBottom:1px solid #ede7f6">'45.8%'</td> <td style="padding:6px; textAlignment:right; borderBottom:1px solid #ede7f6">'48.2%'</td> <td style="padding:6px; textAlignment:right; borderBottom:1px solid #ede7f6">'51.6%'</td> <td style="padding:6px; textAlignment:right; borderBottom:1px solid #ede7f6; color:#512DA8; bold:true">'+9.1%'</td> </tr> </table> </div> <div style="marginBottom:18px"> <h2 style="fontSize:13; color:#311B92; bold:true; marginBottom:10px">'关键经营指标'</h2> <div style="display:flex; justifyContent:space-between"> <div style="width:190px; padding:10px; border:1px solid #673AB7; borderRadius:6px; fontSize:10"> '营收增长率:连续三年保持40%以上增长,2023年达到25,680万元。' '利润率提升:净利率从14.5%提升至21.1%,盈利能力显著增强。' </div> <div style="width:190px; padding:10px; border:1px solid #673AB7; borderRadius:6px; fontSize:10"> '研发投入:研发费用年均增长38.9%,占营收比例达13.3%。' '人才结构:技术研发人员占比42%,硕士以上学历占35%。' </div> <div style="width:190px; padding:10px; border:1px solid #673AB7; borderRadius:6px; fontSize:10"> '客户质量:服务15家上市公司,客户续约率92%,大客户满意度4.8/5.0。' '资产质量:资产负债率维持在38%左右,流动比率2.8,偿债能力良好。' </div> </div> </div> <div style="marginBottom:18px"> <h2 style="fontSize:13; color:#311B92; bold:true; textAlignment:center; marginBottom:10px">'月度经营热力图'</h2> <div style="textAlignment:center"> <svg style="width:450px;height:400px">${svg}</svg> </div> <div style="marginTop:10px"> <h3 style="fontSize:12; color:#311B92; bold:true; textAlignment:center; marginBottom:8px">'评级指标说明'</h3> <div style="display:flex; justifyContent:space-between"> <div style="width:290px"> <div style="fontSize:10; marginBottom:6px"> <span style="color:#512DA8; bold:true">'● 财务状况(90分): '</span> '营收稳定增长' </div> <div style="fontSize:10; marginBottom:6px"> <span style="color:#2ecc71; bold:true">'● 经营能力(95分): '</span> '客户留存率高' </div> </div> <div style="width:290px"> <div style="fontSize:10; marginBottom:6px"> <span style="color:#e74c3c; bold:true">'● 偿债能力(85分): '</span> '负债率合理' </div> <div style="fontSize:10; marginBottom:6px"> <span style="color:#f39c12; bold:true">'● 发展潜力(92分): '</span> '研发投入增加' </div> </div> </div> </div> </div> <div style="marginBottom:18px; background:linear-gradient(135deg, #ede7f6 0%, #d1c4e9 100%); borderRadius:10px; padding:16px; borderLeft:4px solid #673AB7"> <h2 style="fontSize:13; color:#311B92; bold:true; marginBottom:8px">'综合评价'</h2> <p style="fontSize:11; textAlignment:left; marginBottom:8px"> '四川省泡海椒科技有限公司作为国家级高新技术企业和专精特新"小巨人"企业,在云计算和大数据领域表现出色。' '公司财务状况健康,经营能力突出,技术创新能力强,具备良好的发展潜力。信用评级为AAA级,展望稳定。' </p> <p style="fontSize:8; color:#512DA8; textAlignment:right">'认证通过'</p> </div> <div style="textAlignment:center; marginTop:20px"> <lineSeparator style="strokeColor:#512DA8"></lineSeparator> <p style="fontSize:9; color:#6c757d; textAlignment:center; marginTop:8px">'本报告依据公开信息和专业评估模型生成,仅供参考 | 报告生成时间: 2025年09月06日'</p> <p style="fontSize:9; color:#6c757d; textAlignment:center">'© 2023 企业信用评估中心 版权所有 | 认证编号: CE-2023-001'</p> </div> </body> </pdf> Step 2 — the Java class jquick-pdfx/src/test/java/com/github/paohaijiao/biz/report/JQuickCreditReport10HeatmapTest.java /* * Licensed under the Apache License, Version 2.0 (the "License"); * you may not use this file except in compliance with the License. * You may obtain a copy of the License at * * http://www.apache.org/licenses/LICENSE-2.0 * * Unless required by applicable law or agreed to in writing, software * distributed under the License is distributed on an "AS IS" BASIS, * WITHOUT WARRANTIES OR CONDITIONS OF ANY KIND, either express or implied. * See the License for the specific language governing permissions and * limitations under the License. * * Copyright (c) [2025-2099] Martin (goudingcheng@gmail.com) */ package com.github.paohaijiao.biz.report; import com.github.paohaijiao.JOption; import com.github.paohaijiao.axis.JCategoryAxis; import com.github.paohaijiao.config.JPdfConfig; import com.github.paohaijiao.demo.constant.JQuickConstant; import com.github.paohaijiao.enums.JChartType; import com.github.paohaijiao.executor.JQuickPdfFactory; import com.github.paohaijiao.factory.JChartRendererFactory; import com.github.paohaijiao.series.JHeatmap; import org.junit.Test; import java.io.File; import java.io.FileOutputStream; import java.io.IOException; /** * 统一信用报告 —— 风格 10:热力图(深紫) * * <p>以 {@code report/credit_report_10_heatmap.txt} 为模板,把热力图渲染成 SVG 后 * 绑定到模板中的 {@code ${svg}} 占位符,输出到 {@code D:\test\creditreport\10_heatmap.pdf}。</p> * * @author Martin * @version 1.0.0 */ public class JQuickCreditReport10HeatmapTest { public static final String path = JQuickConstant.path; @Test public void report10Heatmap() throws IOException { JOption option = new JOption(); option.title("月度经营热力图", "各业务线月度营收(万元)"); option.xAxis(new JCategoryAxis().data("1月", "2月", "3月", "4月", "5月", "6月")); option.yAxis(new JCategoryAxis().data("软件产品", "技术服务", "云服务", "其他业务")); JHeatmap heatmap = new JHeatmap(); heatmap.data( new Object[]{0, 0, 860}, new Object[]{0, 1, 1020}, new Object[]{0, 2, 1180}, new Object[]{0, 3, 1340}, new Object[]{0, 4, 1520}, new Object[]{0, 5, 1680}, new Object[]{1, 0, 520}, new Object[]{1, 1, 640}, new Object[]{1, 2, 780}, new Object[]{1, 3, 890}, new Object[]{1, 4, 1010}, new Object[]{1, 5, 1160}, new Object[]{2, 0, 380}, new Object[]{2, 1, 460}, new Object[]{2, 2, 540}, new Object[]{2, 3, 620}, new Object[]{2, 4, 710}, new Object[]{2, 5, 820}, new Object[]{3, 0, 260}, new Object[]{3, 1, 310}, new Object[]{3, 2, 360}, new Object[]{3, 3, 420}, new Object[]{3, 4, 470}, new Object[]{3, 5, 540} ); option.series(heatmap); String svg = JChartRendererFactory.renderChart(JChartType.HEATMAP, option); File dir = new File(path + "creditreport"); if (!dir.exists()) { dir.mkdirs(); } FileOutputStream fileOutputStream = new FileOutputStream(path + "creditreport/10_heatmap.pdf"); JPdfConfig config = new JPdfConfig(); // 开启 flex 行布局:图表与其右侧的指标说明面板在宽度允许时并排,而不是换行堆叠。 config.getLayoutConfig().setFlexLayout(true); JQuickPdfFactory factory = new JQuickPdfFactory(config); factory.bind("svg", svg); byte[] bytes = factory.executeResource("report/credit_report_10_heatmap.txt"); fileOutputStream.write(bytes); fileOutputStream.close(); } } Step 3 — run it The class is a JUnit test, so run it with Maven: mvn -pl jquick-pdfx test -Dtest=JQuickCreditReport10HeatmapTest …or call the test method from a main wrapper if you want a plain entry point: public static void main(String[] args) throws Exception { new JQuickCreditReport10HeatmapTest().report10Heatmap(); } Output: D:/test/creditreport/10_heatmap.pdf How it works Binding a chart SVG into the template The chart is not a bitmap — JChartRendererFactory.renderChart(...) returns an SVG string, and the template embeds it with a single <svg> element bound to ${svg}. That means the chart stays vector-sharp at any zoom level, and it participates in normal flow layout instead of being stamped on top of the page. - Declare only the width on <svg>; the height is derived from the chart's aspect ratio, so the chart never stretches vertically. - Open config.getLayoutConfig().setFlexLayout(true) if the template centers the chart with display:flex. - Bind the SVG string with factory.bind("svg", svg) — bind() is pure data injection and never re-parses markup. String svg = JChartRendererFactory.renderChart(JChartType.LINE, option); JQuickPdfFactory factory = new JQuickPdfFactory(config); factory.bind("svg", svg); byte[] bytes = factory.executeResource(TEMPLATE); Making the table fill the text area Tables default to content width, which leaves a ragged right margin on a formal document. Setting width:100% on the <table> makes it span the full text area; percentage widths on the first row's cells then distribute the remaining space across columns. - Set width:100% on <table> and give explicit widths only to the leading columns. - Label columns need around 100px so labels like Taxpayer ID do not wrap. - Leave the last column without a width so it absorbs rounding remainder. <table style="width:100%; fontSize:9pt"> <tr> <td style="width:100px; padding:5px">'Taxpayer ID'</td> <td style="padding:5px">${taxNo}</td> </tr> </table> Template syntax cheat sheet | Syntax | Meaning | | --- | --- | | <table style="width:100%"> | Spans the full text area; give explicit widths only to the leading columns. | | <areaBreak></areaBreak> | Force the next block onto a fresh page (CSS page-break is not supported). | | <image src='D:/.../x.png'> | Embed an image. src is a raw path — it is not evaluated as an expression. | | <svg style="width:479pt">${svg}</svg> | Embed a vector chart produced by JChartRendererFactory. | | // comment | Line comment. Keep <!-- ... --> comments short — long ones can blank the render. | Gotchas worth remembering - <image src="..."> never evaluates ${...}; write a literal path. - A <td> holds text only — nested <p>, <image> or <table> is dropped. - There is no colspan; emit one <td> per column and use '—' as filler. - setFontSize takes a float (8.5f); setMargins takes List<Integer>. Output !Image description Wrap up You now have a template file, a Java class and a PDF — all three reproducible from a clean clone. Swap the placeholder blocks for real data (or for real seal images) and the layout does not move. Series navigation: [← #9 Gauge Chart for the Composite Credit Score](./09-gauge-chart-composite-credit-score.md) · [#11 Correlation Matrix of Operating KPIs →](./11-matrix-chart-kpi-correlation.md) Full index: [README.md](./README.md) · Source: jquick-pdf --- Appendix — files in this demo | Role | Path | | --- | --- | | Java class | jquick-pdfx/src/test/java/com/github/paohaijiao/biz/report/JQuickCreditReport10HeatmapTest.java | | Template | jquick-pdfx/src/test/resources/report/credit_report_10_heatmap.txt | | Output PDF | D:/test/creditreport/10_heatmap.pdf | | Preview image | images/10.png |
Built at NEAR HACKATHON 🛡️ Arkhe Guard: an AI agent on @NEARProtocol can only spend what its owner signed. We prompt-injected it to send 50 NEAR to an attacker and disabled its own safety check. The vault contract still refused. #NEARHackathon rafael-arkhe/near-hackathon t.co
Dónde cuesta más y menos comprar un departamento de 3 o más dormitorios en Asunción: ranking de barrios En Asunción, un departamento de 3 o más dormitorios cuesta USD 585.000 en la mediana en Trinidad, el barrio más caro, y USD 234.900 en Recoleta, el más… DOI: 10.5281/zenodo.23525482
Claude Code now has permanent memory 😳 Meet claude-mem (~110K stars) > Remembers your last coding session > Saves context for future sessions > Works with Claude Code, Codex, OpenCode and more try thedotmack/claude-mem t.co
Fuera bromas, gracias a esto ya tengo el router de DIGI solo como ONT y todo Opnsense ejerciendo de main router <3 Si tenéis el router 10GbE de DIGI , ésto os va a dar la vida ⤵️ tasarren/digi-router-unlocker
i need help to conutine this this app 🚀 Introducing Neshe — Looking for Contributors to Help Build a Privacy-Focused Messaging App Hello everyone, I'd like to introduce Neshe, an experimental Linux desktop messaging project I'm currently developing. The goal is to build a messaging experience focused on privacy and security, with support for communication over the Tor network. Neshe is still under active development. The current version is an experimental preview, and many parts still need implementation, testing, and improvement. I'm sharing this project not only to introduce it, but also because I genuinely need help to keep building it and move it forward. I'm looking to connect with developers and people interested in helping with: - C++ and Qt development. - UI/UX improvements. - Code review and software quality. - Testing, bug reports, and troubleshooting. - Documentation and technical feedback. - Practical ideas for future development. You don't have to be an expert or contribute code. Testing the current preview, reporting issues, and sharing constructive feedback are also valuable contributions. A note about the current state: Neshe is experimental. I am not claiming that all encryption and security features are complete or independently security-verified. The current license is a restricted evaluation license, not an OSI-approved open-source license. 🔗 GitHub Repository: 1M0q/Neshe-App If you're interested in the project or can help in any way, I'd really appreciate your feedback and support. I'm serious about developing Neshe into a better project, and I hope to find people who would like to help make that happen. #Linux #Qt #Cplusplus #Privacy #Tor #SoftwareDevelopment
Dónde cuesta más y menos comprar un departamento de 2 recámaras en Ciudad de México: ranking de colonias En Ciudad de México, un departamento de 2 recámaras cuesta 7.639.088 pesos mexicanos (USD 413.696) en la mediana en Xoco, la colonia más cara, y 2.650.000… DOI: 10.5281/zenodo.23525536
[Update v0.1.6] My Claude diagram tool Sketchy now uses 29% fewer output tokens than plain text in my benchmark I built Sketchy with Claude Code because I got tired of AI explaining everything in walls of text. It lets Claude explain things with interactive, hand-drawn diagrams right in the chat. I built it step by step, asking Claude Code to explain each part so I could understand the code as we went. The core idea is simple: Claude describes what to draw, ELK handles the layout, and Rough.js gives it the hand-drawn look. Claude never has to calculate coordinates. A few people asked about token usage on my last post, so I benchmarked it with Sonnet in Claude Code and introduced a more compact scene format in v0.1.6. Across five topics, Sketchy averaged 686 output tokens vs 962 for plain text, so about 29% fewer. It also came out slightly cheaper: $0.58 vs $0.61. The first diagram still costs more, so this is a small benchmark rather than a blanket claim. Follow-up edits now keep existing nodes in place, even when adding a back-edge. That makes it easier to explore a codebase and compare changes without the whole diagram shifting around. Free and open source, available as a Claude chat skill or an MCP extension while coding. GitHub · Full benchmark breakdown in the Docs. Feel free to try it out, I'd love to hear what you think!
Dónde cuesta más y menos comprar un departamento de 2 dormitorios en Quito: ranking de sectores En Quito, un departamento de 2 dormitorios cuesta USD 187.500 en la mediana en Cumbayá, el sector más caro, y USD 89.500 en Ponceano, el más barato: 2,1 veces menos.… DOI: 10.5281/zenodo.23528968
Added step-by-step playback to Ablauf, a Markdown-compatible diagram tool I shared Ablauf here recently. It came out of getting frustrated with the layout of our Mermaid diagrams. We use it to visualize flows in our own knowledge base while building our startup with autonomous coding-agent loops. Since then we’ve added step-by-step playback to make those flows easier to follow. A static diagram shows the whole process, but it can be hard to see what happens in one specific situation. The example below is how we handle dependency updates from GitHub’s Dependabot. It walks through four paths on the same diagram to cover the most realistic scenarios, with captions explaining what happens. You can play it, pause it or step through it yourself. The diagram and its playback scenarios live together in Markdown. When the workflow changes, we update the explanation along with it instead of recording a new video or keeping a slide deck in sync. Mermaid does support animated edges, but we wanted a way to walk through one scenario at a time. Playback is in v0.3.0 and only works with flow diagrams for now. Still MIT licensed. Try the interactive example: agents.uberblick.ai Source: uberblick-ai/ablauf I still care about code quality and architectural decisions. Most of those get covered during planning, but when many devs are pushing one codebase forward at high speed, things can get messy. So right now we spend most of our time making complex, fast-moving codebases easier to understand. Curious if anyone else is focusing on getting a good human grip on what’s being built and how things work together?
I made Automatic Infravision / Thermal Vision Module for Foundry VTT [OSE], [B/X], [1e] aand many more Hi guys! This is a free FoundryVTT module I created for my OSE game, but it can be used with any old-school D&D edition in which darkvision works like thermal vision: it only works in darkness and does not function in illuminated areas. Features - Per-token range. The GM sets an infravision range in feet for each token from the Token HUD. It can also be saved to the actor so new tokens get it. - Works only in true darkness. Infravision switches on only when the scene darkness is at its maximum (adjustable) and the token is not in any light: not its own torch or lantern, not ambient lights, not other tokens’ light. It turns off and on again automatically as the token moves in and out of light. - Heat vision look. Through infravision the map is shown as a dark, reddish, low-contrast and blurred image with no fine detail. Lit areas stay sharp. - Heat silhouettes. Creatures that aren’t lit are shown as glowing heat shapes instead of their token art. Living creatures appear bright and undead appear black, set per token from the Token HUD. Their names, health bars and status icons are hidden. - Image Hover compatible. Players don’t get the enlarged portrait of a creature they can only see as a heat shape. - GM preview. Select a player’s token to see exactly what that player sees. - Settings: required darkness level, whether dim light cancels infravision, map darkness, contrast, blur strength, and the brightness of living and undead silhouettes. Video presentation youtu.be Module github.com/Jordasnovac115/ose-infravision/release…
Dónde cuesta más y menos comprar un departamento de 2 dormitorios en Lima: ranking de distritos En Lima, un departamento de 2 dormitorios cuesta 828.900 soles (USD 241.273) en la mediana en Miraflores, el distrito más caro, y 371.000 soles (USD 107.989) en… DOI: 10.5281/zenodo.23525509
@bhaskarreddy86 @X here can help you Dawncoral/wallaby-agent-rules
Foundryの開発版でAnvilの取引照会を修正したリリース情報です。 フォーク起点のブロックを番号で指定しても取引を取得できるようにしハッシュ指定との結果の違いを解消する変更です。 github.com/foundry-rs/foundry/releases/tag/nightl…
Show HN: An MCP server that runs 27 small web and open-data scrapers