Mentions
Conversations linking to GitHub, newest first. Times are UTC.
Mentions by source
X
Bluesky
Hacker News
V2EX
Qiita
DEV
Mastodon
Latest posts
Dónde cuesta más y menos comprar un apartamento de 3 o más dormitorios en Punta del Este: ranking de barrios En Punta del Este, un apartamento de 3 o más dormitorios cuesta USD 1.370.000 en la mediana en Manantiales, el barrio más caro, y USD 322.500 en… DOI: 10.5281/zenodo.23528867
I built this to use it myself. But if you've worked on problems like these (clustering, evaluation, news pipelines), I'd really value your guidance to learn more . news.lpsz.org and this is the code abelgvidal/news
Hooked on @herdrdev 🤩 First terminal that feels built for running a pack of agents at once, and you reshape the app just by asking your agent. So I created a layout for my needs: CI, agent review threads, worktree, diffs. kherembourg/herdr-pr-roundup herdr.dev
Dónde cuesta más y menos comprar un apartamento de 3 o más dormitorios en Montevideo: ranking de barrios En Montevideo, un apartamento de 3 o más dormitorios cuesta USD 595.000 en la mediana en Carrasco, el barrio más caro, y USD 188.000 en Centro, el más… DOI: 10.5281/zenodo.23528841
把自己的 Go + React 博客上线并开源了:Yia Blog。 支持文章写作、Markdown 导入、草稿恢复、评论审核和每日主题。后端用 Gin + MySQL + Redis,按 DDD 分层组织。 体验:sryia.cn 源码:Yia-Ovo/yia-blog 欢迎试用,也想听听你对写作体验的建议。#Go #React t.co
過去10セッションの作業記録を、次の起動時の文脈へ。 claude-memはtoolの実行内容を記録・要約し、次のsessionに関連するcontextを戻すmemory plugin。自然文でproject historyを検索でき、Claude Code中心に複数のagent hostを案内しています。 thedotmack/claude-mem
Your Stripe inbox prevents duplicate updates. What about duplicate emails? A reader raised a painful case on my earlier Stripe webhook article: a duplicate invoice.payment_failed delivery that sends two card-declined emails. Preventing a duplicate database update does not automatically prevent that second email. The important question is which effects share the transaction that claims the event. My previous article describes the inbox approach. This follow-up examines its boundary, using commit f5351e708c802a9f428250002f7fd5b86668834b of stripe-webhooks-dotnet. First, the scope: this sample does not implement failed-invoice emails. Its payment handler supports successful payment intents and refunded charges. The reader's scenario is an extension to consider, not a feature demonstrated by this repository. The inbox and the worker solve different races The repository overview describes insert-first deduplication at receipt: a unique event identifier prevents repeated deliveries from creating multiple inbox records. The request stores the event before acknowledging it and offers its identifier to a bounded queue. A sweeper recovers pending work. That still leaves the worker boundary. A pending identifier can reach processing more than once, so receipt deduplication alone is insufficient. In EventProcessor.cs, processing begins a transaction: await using var transaction = await db.Database.BeginTransactionAsync(cancellationToken); Inside it, a conditional update changes the matching inbox row from Pending to Processed. The returned affected-row count determines whether this invocation obtained the claim. An invocation that changed no row stops here: if (claimed == 0) { logger.AlreadyHandled(eventId); return; } Marking the row Processed happens before the handler, but inside the transaction. It is not a committed declaration that the handler has already succeeded. The local changes commit with the claim After claiming the row, the processor parses the stored payload and invokes the handler. These lines complete the successful path: row.Outcome = await handler.HandleAsync(stripeEvent, cancellationToken); await db.SaveChangesAsync(cancellationToken); await transaction.CommitAsync(cancellationToken); The implemented handler changes payment entities through its database context. If handling throws before commit, transaction disposal rolls back the claim and those local changes. The processor then clears tracked state and records failure information for retry. That explains the guarantee's useful boundary: the claim and the payment update land together. It does not mean every possible action added inside HandleAsync participates in that transaction. Sending an email introduces another system Suppose we extend the handler to send a card-declined email before committing. The email provider accepts it, then the database commit fails. The inbox claim rolls back, leaving the event eligible for retry. The email provider has no reason to undo its accepted message. A retry can send another email. Moving the send after commit creates another gap. The process might stop after committing the payment change but before sending. On retry, the committed inbox claim tells the processor to skip the event. The notification can be lost. These are hypothetical failure sequences for an extension. The repository contains no email sender that I exercised, and its transaction cannot demonstrate email-delivery guarantees. An outbox would persist the intent For that extension, I would save a notification intent in an outbox table within the same transaction as the inbox claim and business update. A separate dispatcher would read committed intents and attempt delivery. This is a proposed design; an outbox and its dispatcher are not implemented in this sample. An outbox addresses the gap between saving the business change and remembering that notification work exists. It does not by itself guarantee one external email. A dispatcher can stop after the provider accepts a message but before recording success locally. Where the provider supports suitable idempotency, the dispatcher should reuse a stable notification key across retries. Otherwise, the design needs an explicit policy for uncertain outcomes and possible duplicates. I would also define whether two different event IDs should create one notification for the same business occurrence. Event-ID deduplication alone does not answer that product question. What the tests establish The duplicate-delivery test posts the same payload again after the first delivery is handled. Its visible assertions check accepted and duplicate acknowledgments and one stored event row. The README also documents concurrency tests: ten rounds of twenty-five parallel deliveries, repeated worker processing, and concurrent claims of one pending event. It describes handler-call counting and injected failures to distinguish repeated application from an unchanged final state. Those are local-processing checks, not email tests. For this article, I fetched public files with curl at the fixed commit and inspected the processor, payment handler, visible idempotency-test excerpts, and README. I ran no build, dotnet test, Stripe CLI session, email-provider request, or crash experiment. SQLite serializes writers; the documented tests do not establish another database server's locking behavior. The extension needs its own evidence: durable notification creation, dispatcher recovery, and behavior when provider acceptance has an uncertain result. Those checks would support claims about notifications that the existing payment tests cannot establish. If you need Stripe webhooks handled this way in your ASP.NET Core app, I offer it as a fixed-price project on Upwork: upwork.com
@aslambeg84 I visited github.com/zuck despite knowing its satire, just to be sure lmao
@Bober_smart Thanks for including obsidian-second-brain. The #3 link has a typo, so it 404s. Here's the real one: eugeniughelbur/obsidian-second-brain
Trusting your data agent Now that we are all rushing to use agentic analytics, something that personally concerns me is whether agents are accurate. For this reason, I built an open source tool called the honest agent. You can hook it to your mcp and run your tests (evals) and check whether your agent is, well, telling you the truth. You can check the project here: thehonestagent.dev and here's the repo jlcoto/the_honest_agent. If you already work with dbt, the setup and workflow will seem very familiar 😉 I'm also writing a series of posts on evals in and why they should be a part of your data strategy if you are using data agents: thehonestagent.dev Your feedback is really appreciated. And if you want to discuss agentic analytics, evals, etc, let's connect! Report on evals from the honest agent
Here's Campfire in Goose. It serves pages - 1.2x faster than the Jai implementation - 6.9x faster than the Rust implementation Live messages to 64 readers: 1.4x faster than Jai. At 10,000 readers: 38 MiB vs Jai's 651 MiB, p99 0.25 s vs 15 s. kaitk/once-campfire-goose
Advantage of maintaining a writing log in github manisuec/writing t.co
Dónde cuesta más y menos comprar un apartamento de 2 habitaciones en Santo Domingo: ranking de sectores En Santo Domingo, un apartamento de 2 habitaciones cuesta USD 325.000 en la mediana en Piantini, el sector más caro, y USD 190.000 en Arroyo Hondo, el más… DOI: 10.5281/zenodo.23528898
I built Expenso, an offline-first Android expense tracker that doesn't need internet access Hey everyone! I've been working on Expenso, a personal finance and expense management app for Android, and I'd love to get some real-world feedback from people here. One thing that bothers me about finance apps is how much personal financial information we end up sharing with online services. I wanted to build something that takes a different approach. Expenso is designed to keep your financial data on your device. There is no internet permission, no cloud dependency, no analytics tracking, and no telemetry. Your transactions and financial calculations stay local. Here's what you can do with it: - 💰 Track income, expenses, and transfers. - 📊 Manage budgets with spending limits and alerts. - 📈 Visualize cash flow, savings rates, and spending trends. - ⏰ Set reminders for bills and recurring payments. - 📄 Generate detailed PDF financial statements. - 🔐 Protect locally stored data with encrypted database storage and biometric authentication. - 💾 Back up and restore your data whenever you need it. A few technical details for fellow developers: It's built natively for Android using Java 17, Room, SQLCipher, Android Keystore, and Material Design 3. The idea is simple: personal finance management without handing over your financial data to another service. If you're an Android user, I'd really appreciate it if you could give Expenso a try: 📱 Google Play: play.google.com 📚 Project documentation: maurihimanshu/expenso-docs I'm particularly interested in hearing: 1. Does the interface and overall experience feel intuitive? 2. Are there any features missing that you'd expect from a personal finance app? 3. Would you actually prefer an offline-only finance app over one with cloud synchronization? I'm building this independently, so honest criticism is very welcome. Even a small piece of feedback could help me improve the app. Thanks for checking it out! 🙌
DeepSeek が描く AI エージェントの未来像 DeepSeek が Super-agent という AI エージェントの構想を公開しました。利用者と会話を続けながら複数の仕事を進め、GitHub やチャットの変化にも対応します。人が作業やセッションを管理する負担をどう減らすのか、既存のエージェントとの違いも含めてまとめました。 TL;DR Super-agent は仕事の進行やセッションの管理をシステムへ任せ、人が細かく指示・確認する負担を減らす構想です。 利用者との会話と仕事の振り分けは Router、個々の作業は Worker が担当します。GitHub やチャットの通知も受け取り、対応が必要なものを担当へ届けます。 Router と Worker をクラウドで動かし、自宅PCのコードや開発ツールを使って作業する構成も想定しています。 利用者が複数サービスで組んでいる仕組みを、AI ベンダーが体系化して提供してくれることに期待しています。 Worker もクラウド側にあるため、自宅PCとの接続や GUI・ブラウザ操作が安定して動くかは気になるところです。 はじめに DeepSeek Harness のチームが、Exploring Super-agent Design: Towards a More Autonomous Agent System という設計記事を公開しました。 元記事では、仕事の振り分けやセッション間の情報の引き継ぎをシステムへ任せ、人が細かく指示・確認する負担を減らす設計を提案しています。その分、人が仕事の目的や優先順位を決めたり、成果を確認して承認したりすることに集中できるようにする狙いです。 以前、Work や dot から自宅PCの Codex へ仕事を依頼する構成を記事にしました。今回の構想では、利用者との対話と実作業を分担する仕組みを、エージェントの実行基盤として扱っています。 自分でも仕組みを理解しておきたかったので、元記事の設計を既存のエージェントと比べながらまとめてみました。 DeepSeek の Super-agent 構想 Super-agent が目指すのは、人が個々のセッションを操作して仕事を進める負担を減らし、複数の仕事を継続して任せられるエージェントです。人は目的や優先順位を伝え、必要な場面で判断や承認を行います。その間の仕事の振り分けや情報の引き継ぎを、システム側が受け持つ設計です。 元記事では、モデルの能力が上がるにつれて個々の仕事への監視や細かな指示が減ってきたと説明しています。複数のエージェントを連携させる能力も上がり、別々のセッションへ仕事を分担する使い方も可能になってきました。 Claude Code や Codex で複数の仕事を進めるときは、実装用や調査用のセッションを分けて使うことがあります。文脈が混ざらない一方で、進捗の確認や対応するセッションへの追加指示は利用者が行う必要があります。 個々の仕事を任せられるようになっても、どのセッションが何を知っているかを人が覚えておく必要があれば、同時に任せられる仕事の数は人間の注意力に制限されます。元記事では、モデルの能力向上に伴って、この人間側の負担が生産性を制限するようになると説明しています。 そこで、担当を決めて必要な情報を届けるところまでエージェントの仕組みに含めます。人からの指示に加えて GitHub やチャットの変化も受け取り、対応が必要な仕事を進めます。途中で判断が必要になったときや成果の確認を求めるときには、人へ戻ってきます。 利用者が話す相手や場所を変えても、それまでの依頼を踏まえて対応する。作業中にも別の仕事を引き受け、異常があれば復旧する。こうした動作を継続して行えるように、エージェントの実行基盤を設計し直すのが Super-agent の構想です。 比較の出発点として、ローカルのエージェントを仕事ごとに起動する構成を描くと次のようになります。 利用者が仕事ごとのセッションを管理する構成 Super-agent では利用者とのやり取りを受け持つ Router と、仕事を実行する Worker を分けます。会話や作業の記録は実行プロセスの外へ保存し、コードや開発ツールがある環境にも接続します。 DeepSeek の Super-agent 構想 利用者は実装を頼んだ後に別の調査を依頼しても、同じ Router と話を続けられます。担当は裏でそれぞれの仕事を進め、結果や相談が必要な点を Router へ返します。チャットから始めた仕事について、後から GitHub の PR に書いた追加指示を受けて進めることも想定しています。 元記事が挙げる性質は次のとおりです。 性質 目指す動作 Continuous チャットや GitHub などやり取りする場所が変わっても、同じエージェントとして文脈を保つ Productive 複数の仕事を並行して進め、作業中にも次の依頼を受ける Proactive 外部の出来事を確認し、対応する価値があるものに自ら取りかかる Persistent 継続して稼働し、必要な作業環境へ接続しながら異常から復旧する これを Router と Worker の分担やイベントの処理、非同期のやり取りによって実現します。実行処理と状態・環境を分けることや、外側から監視する仕組みも含まれます。ハーネスを含む実行基盤全体の設計が話の中心になります。 仕事ごとのセッションは内部に残ります。その管理をシステムへ任せ、利用者が毎回どのセッションを開くか考えなくても済むようにする構想だと理解しました。 利用者との対話と作業担当の分担 Router は利用者との会話を続けながら、新しい仕事を Worker へ振り分けます。進行中の仕事との関係や、複数の仕事にまたがる判断も扱います。 たとえば、ある不具合の修正を頼んだ後に別のライブラリの調査を依頼したとします。修正は Worker A、調査は Worker B が担当し、Router は両方の状況を把握して利用者と話を続けます。 Router 自身は実作業を行いません。元記事では Bash ツールを持たなくてもよく、軽いモデルで速度と品質を両立できる場合が多いとしています。会話を担当するモデルが実装や長い調査に取りかかると、その間の会話や別の依頼への応答も遅くなるためです。 Worker は仕事ごとに分かれた文脈と、実作業に必要なツールを持ちます。不具合の原因を調べてコードを直す担当と、ライブラリの仕様を調べる担当では、途中のログや推論を共有し続ける必要はありません。各 Worker が作業を進め、重要な結果を Router へ報告します。利用者への返答は Router がまとめて行います。 別の担当へ仕事を任せる点は、一般的な orchestrator / worker 構成やサブエージェントと共通しています。ただ、複雑な仕事を細かい作業へ分ける orchestrator と、ここでいう Router では担当範囲が違います。Router は独立した仕事の振り分けと全体の調整を行い、一件の仕事の詳細な計画や分割は Worker 側が受け持ちます。 Worker はその仕事に必要ならさらにサブエージェントを使えます。たとえば機能追加を担当する Worker の中で、設計・実装・テストを分担する Agent Team を動かす形です。Router と Worker は役割の区分なので、必ずそれぞれが一つのセッションになるという意味でもありません。 外部イベントと作業中の追加指示 継続して仕事を進めるには、最初の依頼に加えて、その後に起きたことも受け取る必要があります。 修正した PR にレビューが付く。CI が失敗する。チャットで変更の相談が出る。元記事ではこうした外部の出来事を Trigger として扱います。 すべてをモデルに判断させると、関係のないメッセージにも推論が必要になります。そこで、送信元や対象のグループなど、決まった条件で判定できるものはプログラムで先に絞ります。そのうえで、内容を読まないと対応の要否が分からないものをモデルに判断させます。元記事の Fast Path / Slow Path はこの分担です。 担当が決まった後の続報にも、毎回 Router の判断は必要ありません。 たとえば Worker A が PR の修正を担当するなら、その PR に関する通知の届け先として Worker A のセッションを登録します。コメントや CI 結果の通知が届くと、プログラムがこの登録に従って Worker A へ直接送ります。通知のたびに Router のモデルが担当を選び直す必要はありません。 元記事の subscription (購読) は、この通知先の登録を指しています。PR やチャットのスレッドごとに届け先を登録し、後続の通知をプログラムで振り分ける仕組みです。届いた内容を読んで対応を考えるのは Worker です。 まだ担当のいない新しい仕事や、担当をまたぐ調整は Router が扱います。Worker も重要な結果を Router へ報告するので、Router は全体の状況を追いながら利用者とやり取りできます。 作業中の追加指示を受け取るため、ツールの実行も非同期にします。長いビルドを開始したら、完了までその呼び出しの中で待ち続けず、結果が後からイベントとして届くようにします。その間に届いた追加指示も、現在のモデルの推論ステップが終わった時点で扱えます。 これならビルド中に方針が変わっても、ビルドの終了まで会話を止めずに済みます。単に裏でコマンドを実行するだけでなく、作業の途中にも入力を受け取れるようにする設計です。 長く動かすほど増える履歴にも工夫があります。直近で必要な情報はコンテキストへ入れ、長い内容や古い記録は外へ置いて参照を残します。過去の仕事が再び話題になったら、その参照をたどって必要な記録を読み直します。元記事では Inline & Spill、Chain of Recall と呼んでいる仕組みです。 実行処理・履歴・作業環境の分離 この構想ではエージェントの実行処理と履歴をクラウドへ置き、実際に作業する環境を必要に応じて接続します。 Agent Loop はモデルに問い合わせ、返ってきたツール呼び出しを実行へつなぎ、その結果をモデルへ返す処理です。これを実行するプログラムと、残しておきたい会話や作業の記録を分けます。 分ける対象 置き場所と役割 Agent Loop クラウドでモデルへの問い合わせとツール呼び出しを取りまとめる 会話履歴・作業状態 外部のデータベースなどへ保存し、実行処理を起動し直しても読み出せるようにする 作業環境 コードや SDK、ファイル、アプリがあるPCなど。必要な処理を実際に行う Agent Loop のプロセスが落ちても、記録は外へ残ります。別のプロセスがその記録を読み直せれば、同じ仕事の続きを扱えます。実行中の一つのプロセスを生かし続けることと、仕事の継続を分けて考えるわけです。 元記事でも、Anthropic の Managed Agents の設計記事を参照しています。こちらもハーネスとセッションの記録、作業環境を分け、それぞれを交換できるようにする設計です。 DeepSeek が特に接続先として挙げているのは、利用者が普段使っているPCです。自宅PCには未コミットの変更や、そのPCで使っている開発ツールがあります。すべてをクラウドへ複製する代わりに、作業環境をそのまま使います。 PC側にはコマンドを実行して結果を返す軽量な daemon を置きます。会話や仕事の状態はクラウド側で管理し、Agent Loop が必要な処理をPC側へ依頼する形です。元記事では BYOM (Bring Your Own Machine) と呼んでいます。クラウドの環境や、必要なときに作る環境も接続先に含まれます。 この構成なら、自宅PCを閉じてもクラウド側での対話や記録は維持できます。そのPCが必要な作業は接続を待ち、再びオンラインになったときに進める想定です。 継続運用には外側から状態を見る Watchdog も置きます。プロセスの停止や API エラーだけでなく、同じ作業を繰り返して進んでいない状態や、目的からのずれも確認します。Watchdog 自身もツールを持つエージェントのセッションで、主な実行処理とは別に監視や復旧を行います。 以前の自分の構成では、クラウド側の dot からローカルで動く Codex などの作業担当へ依頼していました。Super-agent の構想では Worker の Agent Loop もクラウド側に置き、ローカルPCにはコマンドを実行して結果を返す daemon を置きます。 以前は作業担当がPC上で動いていたので、そのPCの GUI やブラウザを操作するツールを直接使えました。Worker がクラウド側にあると、手元の画面を確認したり操作したりするためにも、クラウドとPCの間でやり取りする仕組みが必要になります。クラウドに用意したブラウザで調べる仕事と、自宅PCのアプリや既存のブラウザを使う仕事では、接続先も変わります。 クラウド側で操作を判断し、PC側のプログラムに画面取得やクリックを実行してもらう形が考えられます。会話や仕事の記録が残っていても、通信が切れる前と同じ画面が開いているとは限りません。接続が戻ったら操作対象の状態を確認し、その状態に合わせて続きを進める必要があります。 操作の指示や結果がクラウドとPCを行き来するため、途中で止まったり、結果がうまく戻らなかったりしないかは気になります。画面の取得から操作結果の確認、通信断後の再開まで、基盤側で安定して扱えるようになることを期待しています。 構想の一部を実装した dsh-superagent-prototype も公開されています。README には内部版や設計記事と同一ではなく、記事中の将来構想には未実装のものもあると明記されています。ここで説明した全体像がそのまま完成した製品として使える段階ではないようです。 既存のエージェントとの比較 Claude Code や Codex でもサブエージェントへの分担やクラウドでの作業、離れた端末からの追加指示ができます。Cowork にも複数段階の仕事を任せ、クラウドで並行して進めたり定期実行したりする機能があります。 Super-agent の構想で整理されているのは、そうした機能を継続的な仕事の流れとしてどう組み合わせるかです。利用者と話す担当や続報の届け先に加え、記録の保存と作業環境への接続まで設計しています。 利用体験としては Grok Bot や ChatGPT dots、Claude Duet にも近い部分があります。 製品 公式に説明されている仕組み Super-agent と重なる部分 Grok Bot 専用のクラウドPCで常駐する Bot。まとめ役と専門の Bot が連携し、スマホやデスクトップから仕事を頼める 会話を続ける担当と、複数の担当による仕事の分担 ChatGPT dots 継続的な仕事を引き受け、会話の合間も作業を進める。Work や Codex へ仕事を依頼して進捗を扱う 会話を続けながら別の担当へ作業を任せる構成 Claude Duet 継続する会話と専用のクラウドPC・ブラウザを持ち、接続したアプリを確認して必要な結果や判断依頼を知らせる 常時動く作業環境と、必要なときに人へ戻るやり取り Claude Duet は現時点では research preview で、接続したアプリを一定間隔で確認します。 Grok Bot や dots、Duet を見ると、普段の会話を保ったまま裏で仕事が進む使い方は想像しやすくなります。DeepSeek の記事は、その使い方を実現するための実行基盤を具体的に説明しているところが面白いと感じました。 おわりに 仕組みを追っていくと、最近見かける Grok Bot からほかのエージェントへ仕事を任せる構成に近いと感じました。以前自分が組んだ dots 基盤も、会話を担当するエージェントと実作業を進めるエージェントをつなぐ点では同じ発想です。 利用者が複数のサービスを組み合わせて作っているこうした仕組みを、AI ベンダーが体系化して提供してくれると面白そうです。サービス同士のつなぎ方や仕事の引き継ぎを自分で組まなくても済むなら、より多くの人がエージェントに仕事を任せやすくなると思います。 自分は以前、dot との接続がうまくいかず、結局使わなくなりました。その経験もあるので、Worker までクラウド側へ移る構成で自宅PCとのやり取りがどう扱われるかは気になります。普段の開発環境や GUI・ブラウザの操作まで含めて安定して使えるなら、かなり自分の使いたい形に近づきそうです。
Give your AI agent three web research tools with one MCP server --- title: Give your AI agent three web research tools with one MCP server tags: mcp, ai, webdev, javascript published: true --- Agents are good at reasoning about web pages and bad at fetching them reliably. Raw HTML is noisy, JS-heavy pages time out, and every agent project ends up rewriting the same "get title, meta, links, JSON-LD" helper. I built a small MCP server that exposes three tools to Claude Desktop, Cursor or any MCP client. Disclosure: I'm the author and it's backed by my paid API on RapidAPI, which has a free plan (50 calls/month). The MCP wrapper itself is MIT. The tools | Tool | Returns | |---|---| | company_profile(url) | name, description, logo, socials, emails, key pages, price mentions, tech stack | | site_audit(url, max_links?) | 0–100 score + SEO, performance, security-header and broken-link issues | | page_to_json(url, max_text?) | meta, Open Graph, JSON-LD, headings, links, images, clean text | Setup 1. Subscribe to the Free plan of Web Research Agent API and copy your X-RapidAPI-Key. 2. Add to your MCP config (Claude Desktop claude_desktop_config.json, or Cursor .cursor/mcp.json): { "mcpServers": { "web-research-agent": { "command": "npx", "args": ["-y", "github:elaysuu/web-research-agent-mcp"], "env": { "RAPIDAPI_KEY": "YOUR_KEY" } } } } Restart the client and ask something like: "Audit example.com and list the three most important fixes." How an MCP tool wrapper works The whole server is ~25 lines. Each tool is a zod schema plus a function that calls the API: import { McpServer } from '@modelcontextprotocol/sdk/server/mcp.js'; import { StdioServerTransport } from '@modelcontextprotocol/sdk/server/stdio.js'; import { z } from 'zod'; const HOST = 'web-research-agent-api.p.rapidapi.com'; async function call(path, params) { const qs = new URLSearchParams(params); const r = await fetch(`https://${HOST}${path}?${qs}`, { headers: { 'x-rapidapi-key': process.env.RAPIDAPI_KEY, 'x-rapidapi-host': HOST } }); return { content: [{ type: 'text', text: await r.text() }], isError: !r.ok }; } const s = new McpServer({ name: 'web-research-agent', version: '0.1.0' }); s.tool('site_audit', 'Audit a web page: SEO, performance, security headers, broken links.', { url: z.string(), max_links: z.number().int().min(0).max(25).optional() }, a => call('/site-audit', a)); await s.connect(new StdioServerTransport()); Two lessons that apply to any MCP server you write: - Tool descriptions are the prompt. The model chooses tools from the description text, so say what comes back, not just what it does. - Return errors as isError: true with readable text (e.g. "RAPIDAPI_KEY is not set") so the agent can tell the user instead of looping. Calling the API without MCP curl -G "https://web-research-agent-api.p.rapidapi.com/page-to-json" \ --data-urlencode "url=https://example.com" \ -H "x-rapidapi-key: $RAPIDAPI_KEY" \ -H "x-rapidapi-host: web-research-agent-api.p.rapidapi.com" import os, requests r = requests.get("https://web-research-agent-api.p.rapidapi.com/company-profile", params={"url": "stripe.com"}, headers={"x-rapidapi-key": os.environ["RAPIDAPI_KEY"], "x-rapidapi-host": "web-research-agent-api.p.rapidapi.com"}) print(r.json()) Limits, honestly - It fetches server-rendered HTML; content that only appears after client-side JS may be missing. - It respects robots.txt and refuses private/internal addresses, so some URLs will be declined. - The audit is heuristic — a quick checklist, not a replacement for Lighthouse. Repo: elaysuu/web-research-agent-mcp — issues and PRs welcome. Update: the same server is also available hosted with pay-per-call pricing (no RapidAPI key, $0.01-$0.02 per tool call in USDC) on MCPize: mcpize.com
I made three free Android apps: a PDF scanner, a music practice toolkit and weather with custom widgets I'm the developer of SeliaScan, Intoniva and Selia Weather. All three are now public on Google Play and free to use, with no ads, subscriptions or paid feature unlocks. The pictures are actual app captures already published on GitHub, not mockups. SeliaScan is for receipts, forms and study notes. Scan paper, clean it up, extract text, permanently cover sensitive parts, add saved signatures or stamps, then share or print. The new 2.0.3 update also opens existing PDFs, lets you sign their pages, turns PDF pages into images and combines images into a PDF. Imported PDFs become flattened image pages; the original stays untouched. Signatures are visual marks, not cryptographic signatures. Play: play.google.com GitHub and APK: github.com/Majkey25/ScanIt/releases/latest Intoniva is for musicians practising guitar, bass or ukulele. It has automatic, manual and chromatic tuning, reference tones, custom tunings, a metronome with accents and subdivisions, chord diagrams and ear-training exercises. Its core tools work offline. Play: play.google.com GitHub and downloads: Majkey25/Intoniva Selia Weather is for anyone who wants the forecast and a widget they can make their own. It has hourly and multi-day forecasts, saved places, observed rain radar, separate precipitation forecast maps, a historical weather archive and resizable widgets with custom colours, layouts and fonts. Forecasts and background alerts still depend on data availability and Android's background limits. Play: play.google.com GitHub and downloads: Majkey25/Selia-Weather SeliaScan and Selia Weather are MIT licensed. Intoniva is free to use, with publicly viewable source under its own proprietary licence. GitHub builds have optional Buy Me a Coffee support. It unlocks nothing; the Play builds have no donation button. Gallery order: SeliaScan result and tools, Intoniva tuner and metronome, Selia Weather forecast and widget editor. These captures show the real interfaces from earlier October releases; the widget editor uses demo weather. Which screen or workflow would you change first?
[Observation Lag] Game Update: Added Hell Hidden Level with Demon Blood Rite quest, altar seal animation, and Halloween vibes (HTML5 / Open Source) Hey everyone! Following up on my previous posts for Observation Lag (my open-source 2D web shooter), I've just pushed a spooky new update — just in time for Halloween! This time I went full hell mode: dying in any normal level now gives you a choice to stay in the Hell Hidden Level and take on the Demon Blood Rite. Here's what's new in this build: 1. New Hidden Level: Hell Hidden Level Die in any normal level and you'll get a popup choice — stay in Hell or leave. Stay, and you're thrown into a lava-and-ice underworld with stalagmites, an obsidian volcano, and a central altar. The whole level is bathed in red/cyan Halloween colors. 2. Demon Blood Rite Quest A full quest chain inside Hell: survive 3 waves of demons, perform 5 altar sacrifices using Soul Siphon kills, and take down a Cerberus at the altar. Complete the rite and a full altar seal animation plays — hexagram, rising particles shifting red to cyan over 4 seconds. 3. New Enemy Behaviors in Hell Demons, Observers, Jammers and Hellhounds all act with shrunk vision inside the blind zone but can still detect and attack you. The whole level is designed to be brutal. 🎮 Play the Update (Browser): l.meta.ai 📁 GitHub Source: l.meta.ai Quick question for anyone braving Hell: Is the Demon Blood Rite too grindy, or is the difficulty spike part of the fun? Would love to hear your thoughts on the quest pacing!
Dónde cuesta más y menos comprar un apartamento de 2 habitaciones en Santa Marta: ranking de barrios En Santa Marta, un apartamento de 2 habitaciones cuesta 850 millones de pesos en la mediana en Bello Horizonte, el barrio más caro, y 442 millones de pesos en… DOI: 10.5281/zenodo.23525298
『放課後のAI』2026-11-02-3 号 ある営業職の男性が、AIに完璧な退職願の文面を作らせました。誰の感情も逆撫でせず、会社への感謝を散りばめた、100点満点のテキストでした。 全文 → github.com/noriball/Project-Afterschool/blob/main… #放課後のAI | たぶんAIによる創作です
@DeepSeekHarness This is too long to read, but we have an easy repository to see this applied. At TileLang: tile-ai/tvm is a fork of apache/tvm and it's 208 commits ahead of and 814 commits behind. Let's apply the agent and super agent and get these two repositories closer together!
I built Yia Blog with Go + React: a personal space for reading and writing, with Markdown import, draft recovery, comment moderation, and daily themes. Try it: sryia.cn Code: Yia-Ovo/yia-blog Feedback welcome! #golang #reactjs t.co
Memdoor: How a Team of 5 Qwen‑3.8‑27B Models Beats Fable‑5 on LiveCodeBench Hard 1. What was released / announced The Memdoor project (github.com/guregodevo/memdoor) introduced a new workflow where five copies of the Qwen‑3.8‑27B model cooperate to solve programming problems. In the LiveCodeBench Hard benchmark, this “team‑solve” strategy outperformed Meta’s Fable‑5, a state‑of‑the‑art code‑generation model. The repo ships a ready‑to‑run example that spins up the five agents, shares a mutable memory store, and aggregates their answers. 2. Why it matters a) Scaling LLM reasoning without bigger models Most of us have been chasing larger context windows or more parameters to get better code generation. Memdoor shows that orchestrating multiple smaller models can be more effective than a single monolithic model. For engineers, this opens a path to higher quality results without the massive GPU budget a 70B+ model would demand. b) Real‑world collaborative coding Think of code review, pair programming, or a “rubber‑duck” that can ask follow‑up questions. Memdoor’s architecture mirrors that workflow: each model writes a snippet, stores it, reads what the others produced, and refines the solution. That pattern is directly reusable for internal tooling, CI‑assistants, or even educational bots. c) Open‑source reproducibility Everything lives in a public repo, with Dockerfiles and a simple run.sh. No vendor lock‑in, no API key throttling, and you can swap Qwen‑3.8‑27B for any other model that respects the OpenAI‑compatible chat API. This makes the approach future‑proof as new models appear. 3. How to use it Below is the minimal path to get the Memdoor team running on a single machine with Docker. I tested it on an AWS g5.12xlarge (8×A100) but you can scale down to a single 40GB GPU for experimentation – just reduce the parallelism. Step 1 – Clone and build the image # Clone the repo git clone https://github.com/guregodevo/memdoor.git cd memdoor # Build the Docker image (includes Qwen‑3.8‑27B weights via huggingface hub) docker build -t memdoor:latest . > Tip: The Dockerfile pulls the model from modelscope – make sure you have a HuggingFace token set as HF_TOKEN in your environment. Step 2 – Spin up the memory store (Redis) and the agents # Start Redis (used as the shared mutable memory) docker run -d --name memdoor-redis -p 6379:6379 redis:7-alpine # Launch the five agents (each in its own container for isolation) for i in {0..4}; do docker run -d --name memdoor-agent-$i \ --link memdoor-redis:redis \ -e AGENT_ID=$i \ -e MODEL_NAME="Qwen/Qwen3.8-27B" \ memdoor:latest done Each container runs python -m memdoor.agent which: 1. Pulls the model. 2. Registers itself in Redis under agents. 3. Listens for a task key, generates a partial solution, writes back to memory:<task_id>. Step 3 – Submit a LiveCodeBench problem import redis, json, time r = redis.Redis(host='localhost', port=6379) # Example problem (taken from LiveCodeBench Hard) problem = { "id": "lcbench_hard_001", "prompt": "Write a Python function `is_palindrome(s: str) -> bool` that returns True for palindrome strings, handling Unicode correctly." } # Push the task to Redis r.set(f"task:{problem['id']}", json.dumps(problem)) # Give agents ~30 seconds to collaborate time.sleep(30) # Retrieve the aggregated answer answer = r.get(f"memory:{problem['id']}") print(answer.decode()) The agents will read the same task key, generate their own snippets, and iteratively refine each other’s output. The final aggregated answer is stored under memory:<task_id>. Step 4 – Replace Qwen with your favourite model (optional) If you have a local Llama‑3.1‑8B or an OpenAI‑compatible endpoint, just change the MODEL_NAME env var: export MODEL_NAME="openai/gpt-4o-mini" # restart containers with the new env var The rest of the workflow stays the same because the agent code talks to the model via the ChatCompletion interface. 4. My take Having built AI pipelines for Griffin AI Tech for the past three years, I’m constantly weighing cost vs. capability. The Memdoor experiment hits a sweet spot: instead of allocating a single 80‑GPU node to a 70B model, you can spin up a fleet of 27B models that collectively outperform a larger competitor on a hard coding benchmark. From an infrastructure perspective, the pattern aligns with the micro‑service mindset we champion in our MLOps platform: - Stateless agents – each container can be autoscaled behind a Kubernetes Deployment. - Shared Redis memory – a cheap, low‑latency store that can be swapped for a more durable backend (e.g., DynamoDB) if you need persistence. - Observability – instrument each agent with OpenTelemetry; you’ll instantly see how many iterations each model contributes and where the bottleneck lies. In practice, I see two immediate use‑cases for our customers: 1. Automated code review bots – run the team‑solve on a PR diff, let the agents suggest improvements, and surface a consensus patch. 2. Educational tutors – a student asks a programming question; the agents collaboratively generate a step‑by‑step answer, and the memory store can be queried for the reasoning trace, which is a gold‑mine for learning analytics. That said, there are trade‑offs. Running five 27B models still eats a lot of VRAM, and the coordination overhead adds latency (typically 15‑30 s per problem). For latency‑critical services, a single, well‑tuned model may still be preferable. Also, the current implementation assumes synchronous collaboration – an area ripe for research, especially with asynchronous message passing or reinforcement‑learning based role assignment. Overall, Memdoor is a practical proof‑of‑concept that collaborative LLMs can beat larger singular models on complex code tasks. It gives us a concrete blueprint to build more resilient, cost‑effective AI services that scale horizontally rather than vertically. If you’re tinkering with AI‑augmented development tools, I recommend cloning the repo, running the workflow on a modest GPU, and then iterating on the orchestration layer to fit your own product needs. --- Happy hacking!
Dónde cuesta más y menos comprar un apartamento de 2 habitaciones en Sabaneta: ranking de barrios En Sabaneta, un apartamento de 2 habitaciones cuesta 569 millones de pesos en la mediana en Las Lomitas, el barrio más caro, y 440 millones de pesos en Calle Larga,… DOI: 10.5281/zenodo.23525258
محتاج مساعديتكم في بناء التطبيق يا رجالة 🚀 مشروع Neshe — محتاج مساعدتكم في بناء تطبيق مراسلة يركز على الخصوصية مرحبًا بالجميع، حابب أشارككم مشروعي Neshe، وهو تطبيق مراسلة لسطح مكتب Linux، أعمل على تطويره بهدف بناء تجربة تواصل تركز على الخصوصية والأمان، مع دعم الاتصال عبر شبكة Tor. المشروع ما زال في مرحلة التطوير، والنسخة الحالية تجريبية، ولسه فيه أجزاء وميزات محتاجة شغل واختبار وتحسين. لكن عندي هدف أكبر من مجرد عرض المشروع: أنا محتاج مساعدتكم علشان أقدر أكمل بناء Neshe وأطوره. حابب أتعرف على مطورين ومهتمين يقدروا يساعدوا في: - تطوير الواجهة وتجربة الاستخدام. - برمجة C++ وQt. - مراجعة الكود وتحسين جودة المشروع. - الاختبار واكتشاف المشاكل. - التصميم والتوثيق والأفكار التقنية. - تقديم اقتراحات عملية لتطوير المشروع. مش لازم تكون خبيرًا أو تقدر تساهم بكود؛ حتى تجربة النسخة، الإبلاغ عن المشاكل، أو تقديم اقتراح مفيد ممكن يفرق. مهم: المشروع تجريبي، ولا أدّعي أن جميع ميزات التشفير والحماية مكتملة أو تم التحقق منها أمنيًا. والترخيص الحالي ترخيص تقييمي مقيّد، وليس ترخيص Open Source معتمدًا. 🔗 المستودع على GitHub: 1M0q/Neshe-App لو مهتم بالمشروع أو تقدر تساعد بأي شكل، يسعدني أسمع رأيك وملاحظاتك. هدفي إني أبني Neshe بشكل جاد، وأتمنى ألا أضطر أكمل الرحلة دي لوحدي.
🧩 Threat Bits ⚠️SliverC2 🔴Confidence: High 🌐IPs: +2 🕵️Platform: @shodanhq 🔗Full IoC list: github.com/orlofv/Indicators/blob/main/SliverC2 217.16.25[.]99 38.60.226[.]70 #sliverc2 #shodan #malware
Dónde cuesta más y menos comprar un apartamento de 2 habitaciones en Rionegro: ranking de barrios En Rionegro, un apartamento de 2 habitaciones cuesta 1.250 millones de pesos en la mediana en Sajonia, el barrio más caro, y 288 millones de pesos en Cuatro… DOI: 10.5281/zenodo.23525207
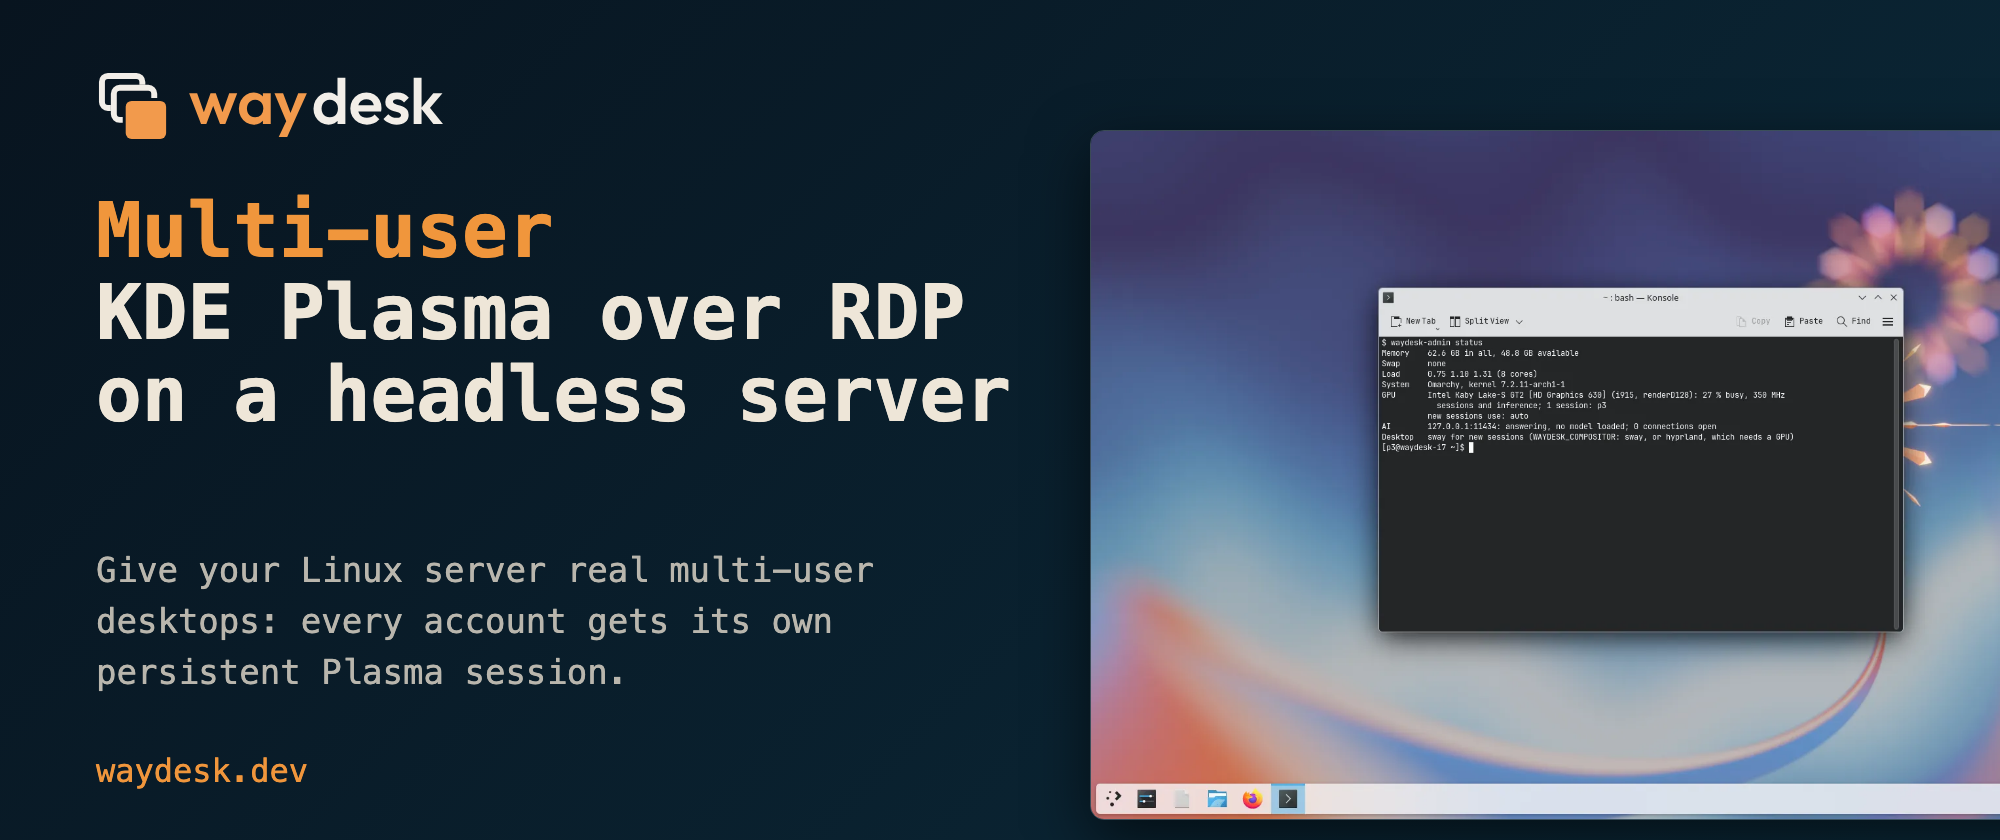
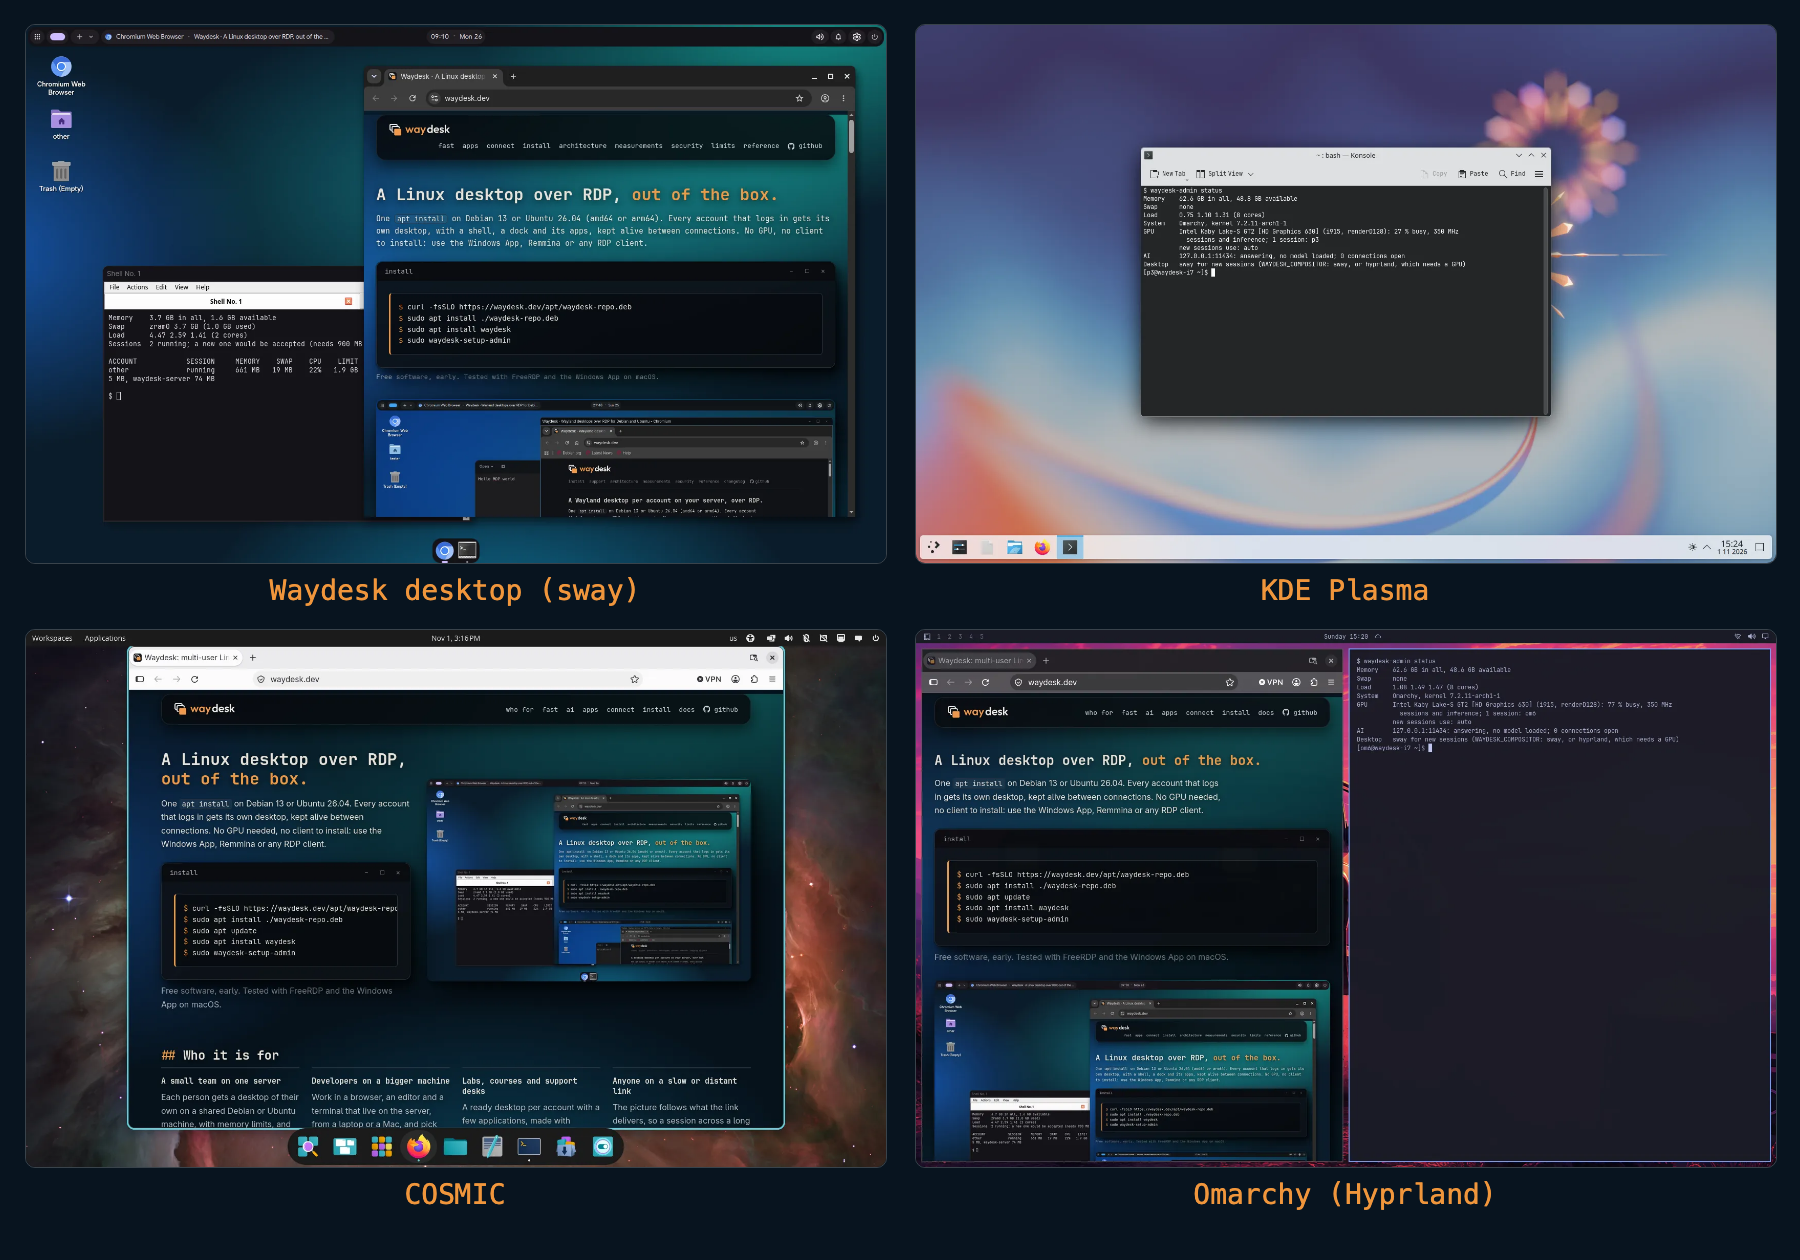
Multi-user KDE Plasma over RDP on a headless server: running Plasma inside sway --- title: "Multi-user KDE Plasma over RDP on a headless server: running Plasma inside sway" published: true description: "KDE's RDP server only shares an existing session. Here is how I give every account on a server its own Plasma desktop over RDP, by running KWin as a window of a headless sway." tags: linux, kde, rdp, opensource cover_image: dev-to-uploads.s3.us-east-2.amazonaws.com canonical_url: --- KDE Plasma has an RDP server, KRdp. It is good, but it does one thing: it shares a session that is already running on a machine with a screen. If you have a server and want every user to log in over RDP and get their own Plasma desktop, kept alive between connections, KRdp does not do that. Plasma also cannot start on a headless machine: KWin wants a monitor. I work on Waydesk, a free multi-user RDP desktop server for Linux (Debian, Ubuntu and Arch), and I wanted Plasma to be one of the desktops an account can choose. This is how it works, what it costs and what I have not tested. Why not just use KRdp? KRdp is built to share the session of someone sitting at a machine: one user, one running desktop, a monitor attached. That is the right design for remote support. It is not meant to start a separate desktop for each account on a server nobody sits at, which is what I needed, so I went around it instead of trying to bend it. The trick: Plasma as one window of a headless sway Waydesk already starts one headless sway compositor per account, with a virtual output sized to whatever the RDP client asks for. It captures that output, encodes it as H.264 and feeds client input back in. That part has nothing to do with Plasma. For a Plasma account, the session's sway config simply runs startplasma-wayland. KWin notices it is started inside another Wayland compositor and runs as a window of it, the same way KWin runs nested for development. The window is fullscreen, so the RDP client sees Plasma and nothing else. Capture and input stay sway's job; Plasma never needs a real monitor. RDP client <-> Waydesk <-> headless sway (virtual output) └─ fullscreen window: KWin + Plasma Choosing it is one command: sudo waydesk-admin users set alice --desktop plasma That command selects a sway configuration for the account. The whole of it, trimmed to the lines that matter: # every window is fullscreen: the client sees Plasma and nothing else default_border none for_window [title=".*"] fullscreen enable # the session's own terminal stays alive but out of sight for_window [title="waydesk-server-session"] move scratchpad # start Plasma; when it quits (Log out, or a crash), end the session too exec sh -c 'startplasma-wayland; swaymsg exit' That is the entire integration on the compositor side. An account can also replace the file with its own in ~/.config/waydesk/config, if you want a different panel layout or a different starting command. !Four of the desktops an account can choose: the Waydesk sway desktop, KDE Plasma, COSMIC and Omarchy (Hyprland) COSMIC works the same way (its own compositor also refuses to run without a monitor), and Hyprland runs as a compositor of its own: the fourth desktop in the picture is Omarchy, an Arch-based setup built on Hyprland. The small things that make it usable Nesting a desktop inside a desktop breaks a few things you would not think about: - Clipboard. The clipboard bridge talks to the inner desktop through KWin's own display, which offers ext-data-control. Text only for now. - Keyboard layout. KWin reads sway's raw key codes and applies its layout, so the layout the client asked for has to be written into Plasma's own settings (kxkbrc, then kwriteconfig6 --notify so KWin applies it immediately). Without this you type y and get z. - Logging out. In a nested setup, "Log out" ends Plasma and leaves the outer sway running with nothing in it: the client sits on a dark screen, and reconnecting lands on the same dark screen. The sway config now exits sway when Plasma exits, so the client is disconnected and the next login starts a fresh desktop. - A stray terminal. Every Waydesk session starts a small terminal that the session itself uses. On Debian's sway 1.10 it was drawn above the fullscreen Plasma window, so users saw a terminal instead of their desktop. The config above moves it to the scratchpad: still running, never visible. - Cursor. KWin hands sway the cursor image and the client draws it. Nothing to do. What I tested, and what it costs On a 4-core Hetzner box with an i7-7700 (Intel HD 630), Arch, Plasma 6.8.2: - An idle Plasma session takes about 750 MB and 46 processes (COSMIC is about 940 MB). - Login, lock screen (unlocked with the account's password in the RDP client), logout, reconnect, and 30 minutes idle all behave. - Several accounts at once: three Plasma sessions beside nine others (sway, COSMIC, Omarchy), all drawing, on the hardware H.264 encoder. Four Plasma accounts also ran on a 4-core Debian 13 server (Plasma 6.3.6). - Clients: FreeRDP and the Windows App on macOS. What I have not tested - Capacity under load. I have the numbers for idle sessions and a mixed handful of sessions, not for how many busy Plasma users a server holds. Waydesk refuses a new session when memory is short, so a full server fails safely, but I cannot tell you the number yet. - AMD and NVIDIA on Arch. Only Intel was tried there. - It is a nested desktop, so anything that expects to own the display (some power and session features) may not behave like a real login. Try it On Arch (signed pacman repository, see docs/ARCH.md): sudo pacman -Syu waydesk-server sudo pacman -S plasma-desktop konsole sudo systemctl enable --now waydesk-helper.service waydesk.service sudo waydesk-setup-admin sudo waydesk-admin users add alice sudo waydesk-admin users set alice --desktop plasma On Debian 13 or Ubuntu 26.04 (signed apt repository): curl -fsSLO https://waydesk.dev/apt/waydesk-repo.deb sudo apt install ./waydesk-repo.deb gpg --show-keys --with-fingerprint /usr/share/keyrings/waydesk-archive-keyring.gpg # must be C646 72B2 5ECD 4773 196C 3958 9D8E 8874 E676 17F4 sudo apt update && sudo apt install waydesk sudo apt install plasma-desktop konsole sudo waydesk-setup-admin sudo waydesk-admin users add alice sudo waydesk-admin users set alice --desktop plasma Compare the fingerprint with the one printed, because the first download cannot be verified by the repository itself. Then connect any RDP client (the Windows App, Remmina, FreeRDP) through an SSH tunnel or WireGuard: the port listens on loopback only by default. The notes are in docs/PLASMA.md, the code is AGPL-3.0 on GitHub, and I would like to hear from anyone who runs Plasma users on a server: what breaks, and what you would want from it.
FF Resonance running natively on Mac (M5 Max) after recompiling with NXNative I got Final Fantasy Resonance built as a native Mac app with NXNative, after getting ideas from the original thread. Success!! Zero lag in cutscenes, zero lag in gameplay, no crashes (so far). Originally I figured I want to try to use Claude subscription and my M5 Max Macbook Pro to do something fun. FF Resonance got wildly positive reviews, I was a FF fan, and its was the perfect storm to start brewing (or.... vibe coding). The jouney wasn't so smooth. I went down the wrong path earlier on emulators. I spent 6hrs on Ryujinx, which is a "just-in-time" emulator that translates on runtime. In short, I kept tweaking settings and adjusting the emulator's code, but it was futile. The game kept crashing in cutscenes, and lagged badly in gameplay. I needed a plan B, so I found... ...NXNative. It is technially not an emulator, but it is a recompiler. NXNative rebuilds the game as a native Mac application. NXNative converts the Switch graphics commands (called NVN) into Metal commands, so the Mac's GPU can draw the frames. Metal is Apple's graphic software that tells the Mac GPU what to draw. The graphics conversion path is shorter (than emulator), leading to less stutter. Build time. Total time was about 2h50m. Setup 1. MacBook Pro M5 Max, 128 GB, macOS 26.6.2 2. Claude Code ($20/plan) 3. ProdKeys dumped from my own Switch 4. FF Resonance game file (.nsp) for Switch console Peripheral Software - Full Xcode 27.2. I downloaded via Apple Store. - Python 3.12 or above. Came with the computer Prompt for AI Agent: "Build my Switch game as a native Mac app with NXNative (seedds/nxnative). Follow its README. Game files: <path to .nsp/.xci> prod.keys: <path>" Happy gaming, fellow MacOS gamers.
#blockMesh GUI allows fully structured mesh (890k cells) with continuous boundary layers on the whole vehicle (including wheels) which passes all the quality metrics in #checkMesh and ran in @dicehub 4 procs in 16 minutes - available here garcfd/blockMesh-car-GUI t.co
Dónde cuesta más y menos comprar un apartamento de 2 habitaciones en Pereira: ranking de barrios En Pereira, un apartamento de 2 habitaciones cuesta 667 millones de pesos en la mediana en Cerritos, el barrio más caro, y 295 millones de pesos en Condina, el más… DOI: 10.5281/zenodo.23525187
@Invent_List Building tool for AI to use less tokens HasanGilani/knock
OSS GROWIの保守、してますか? はじめに OSSのWikiツールGROWIは、docker composeを使うと簡単に立ち上げることができます。とても便利なWikiなので試した方は多いと思いますが、保守まで意識して運用している方はどのくらいいらっしゃるのでしょうか。 公式のドキュメントには最小限の説明があるだけなので、やってみると保守は結構大変でした。ここでは蓄積したデータを失わないための保守について説明します。 前提 この記事ではgrowi-docker-composeでGROWIインスタンスを構築している場合を対象とします。 各モジュールを個別にセットアップして構築した場合には参考にならないかもしれません。 保守の方針 蓄積したデータを失わなず使い続けることを目標とします。 - 短期的にはデータのバックアップ - 長期的にはGROWIインスタンスの引っ越し GROWIのデータをMongoDBでバックアップするにしても、GROWIのデータアーカイブ/データインポート機能を使うにしても、同じMongoDBのバージョン同士、同じGROWIのバージョン同士の必要があります。 growi-docker-composeでは過去のリリースがリポジトリに残っていないため、昔のバージョンを再構築することが難しく、新しくGROWIインスタンス構築すると最新バージョンになってしまいます。 そのため、急にPC入れ替え等でGROWIインスタンスを引っ越しする必要が出ても困らないように、最新のバージョンに上げておくのが基本です。GROWIのバージョンアップは頻度が高いのですが、私は約1か月遅れ以内で追いつくように運用を心がけています。v7.4.x→v7.5.xのように2桁目が上がった時はバージョンアップしておくのが望ましいと思います。 1. バックアップ まず、不測の事態に備えるために現状のGROWIデータをバックアップしましょう。GROWIのエクスポート機能を使って手動で行う方法と、MongoDBのデータを自動バックアップする方法があります。(MongoDBデータだけでまるっとバックアップするためには、ファイルのアップロード先をMongoDBにしておく必要があります) qiita.com GROWIのエクスポート・インポートは同じバージョンのGROWI同士の必要があるのでご注意ください。(バージョンを合わせる技は後述します) 2. OSのアップデート Ubuntu上でGROWIを構築していると、Ubuntuのアップデートが毎週のようにあります。GROWIのメンテ以前にOSのアップデートも必要ですので、手順を簡単に触れておきます。 1. OSを再起動することをGROWIユーザにアナウンスして、編集を終了してもらう 2. GROWIをメンテナンスモードにする(*) 3. GROWIを停止する $ cd /opt/growi $ sudo docker compose stop 4. Ubuntuをアップデートして再起動する $ sudo apt update $ sudo apt upgrade -y $ sudo apt autoremove $ sudo reboot 5. GROWIを再起動する $ cd /opt/growi $ sudo docker compose start 6. GROWIのメンテナンスモードを解除する(*) 7. アップデート終了をユーザーにアナウンスする 自分の職場では利用者が少なく編集頻度も低いので、(*)のGROWIのメンテナンスモードは省略しています。(8割方記事編集しているのが自分だけ...) 3. GROWI最新版の確認 GROWIの最新リリースを月1くらいはチェックをしましょう。だいたい2週間ごとに更新があります。最新バージョンをチェックするには、GROWIの適当な記事に次のコードを付け加えておくと良いと思います。 [](https://github.com/weseek/growi/releases/latest) 上記は以前のバージョンでルートページにあったコードです。これをバージョンチェック用の記事に埋め込んでおけば最新バージョンが表示され、それをクリックするとGitHubのリリースページが表示されます。(こんな感じ↓)(GROWIアプリじゃなくcoreリリースが表示されることもあります)  4. growi-docker-composeの差分確認 公式のドキュメントにはバージョンアップ手順として $ cd /opt/growi $ sudo git pull $ //以下省略 と書かれていますが、いきなりgit pullするのはお勧めしません git pullを実行すると、docker-compose.ymlなどが最新の内容に更新されます。これにより、MongoDBやElasticsearchなどのイメージタグが変更され、意図しないバージョンアップになる可能性があります(MongoDBがいきなりバージョンアップするのはまずい)。そのため、まずは最新版との差分を確認し、何が新しくなるのかを把握した上で更新手順を考えましょう。 growi-docker-composeの構成の確認は、下記のリンクで更新有無を確認すると良いと思います。 growi-docker-compose - The fastest way to boot All-in-One GROWI それ以外の方法として、別ディレクトリに最新GROWIをgit cloneしておくのもよいと思います。(例えばGROWIを立ち上げる時、/opt/growi_latestというディレクトリも作成しておきます) 例えば、 $ cd /opt $ sudo git clone https://github.com/growilabs/growi-docker-compose.git growi $ sudo git clone https://github.com/growilabs/growi-docker-compose.git growi_latest $ tree /opt ├── growi ← 本番環境用 └── growi_latest ← 最新版確認用 としておいて、GROWI最新バージョン確認は $ cd /opt/growi_latest $ sudo git pull でgrowi-docker-composeに更新があるかを見てみます。更新があった場合は現行のGROWIの設定と比較します。 比較するのは、docker-compose.ymlやディレクトリ構成などです。 ./docker-compose.yml を比較 $ diff /opt/growi/docker-compose.yml /opt/growi_latest/docker-compose.yml ./docker-compose.yml ファイルで注目すべきは各モジュールのバージョンです。 version: '3' services: app: image: growilabs/growi:7 ## ここ! ports: // mongo: image: mongo:8.2 ## ここ! # For MongoDB 6.x # image: mongo:6.0 // elasticsearch: image: docker.elastic.co/elasticsearch/elasticsearch:9.3.3 ## ここ! # For Elasticsearch 8.x # image: docker.elastic.co/elasticsearch/elasticsearch:8.19.14 environment: // pdf-converter: image: growilabs/pdf-converter:1 ## ここ! restart: unless-stopped dockerが引っ張ってくるimageのバージョンが現行のGROWIから上がっている場合、バージョンアップが生じます。GROWIの場合、互換性のある古いバージョンがコメントアウトされているので、今使用しているモジュールのimageがコメントに含まれているなら、バージョンアップしても大丈夫です(MongoDBだけはダメです。今のバージョンのコメントを解除して、新しい方をコメントアウトしてください) また、それ以外のdockerで実行するコマンドなどの修正がある場合、変更箇所の反映が必要になることもあります。 5. バージョンアップ(MongoDB以外) MongoDBのバージョンを上げる場合は後述しますので、それ以外の - GROWIアプリ - Elasticsearch - PDF-Converter をバージョンアップする手順を説明します。 1.GROWIの実行を停止、コンテナ削除 $ cd /opt/growi $ sudo docker compose down 2.バージョンアップ対象のimage削除 $ sudo docker images IMAGE ID DISK USAGE CONTENT SIZE docker.elastic.co/elasticsearch/elasticsearch:9.3.3 bff1a79d2502 2.17GB 737MB growilabs/growi:7.5.5 d89dc1c0fde6 2.21GB 395MB growilabs/pdf-converter:1 794846014ac1 1.95GB 509MB mongo:8.2 1286be0f9860 1.3GB 341MB $ $ sudo docker rmi <image> 削除するアプリのイメージ<image> に入るのは、上記の例だと docker.elastic.co/elasticsearch/elasticsearch:9.3.3 growilabs/growi:7.5.5 growilabs/pdf-converter:1 などです。バージョンアップ対象のイメージを指定して削除して下さい。IMAGEの名称(ex. growilabs/growi:7.5.5)か、ID(ex. d89dc1c0fde6)で指定して削除します。(古いimageを残してもディスクスペースを占める以外の問題はないです) 3.docker-compose.ymlの、対象アプリのバージョンを最新のものに修正 4.imageおよびコンテナ作成と再実行 $ sudo docker compose up -d GROWIのドキュメントでは、ざっくり - docker compose stop #コンテナ停止 - docker compose rm app #アプリ削除 - docker rmi growilab/growi:7 #イメージ削除 - docker compose build #イメージおよびコンテナ再構築 - docker compose up -d #再起動 という手順になっていますが、docker compose down で他のアプリのコンテナを削除しても、イメージが残っていればコンテナ再構築は一瞬ですから、まとめてdocker compose downする方が(どのアプリをバージョンアップする場合にも適用できるので)楽だと思います。またdocker compose buildしなくても、docker compose up -dすればコンテナが再構築されますので不要です。 6. MongoDBのバージョンアップ MongoDBのバージョンアップを行う際は、MongoDBのコマンドを叩いてバージョンを一つずつ上げて行くこともできますが非常に煩雑です。なので、GROWIのデータアーカイブ・データインポート機能を利用することをお勧めします。 ポイントは、MongoDBのバージョンが違っても、GROWIアプリのバージョンが同一であればデータアーカイブ・データインポートが可能だということです。 ざっくりした手順: 1. GROWIのバージョンを固定 1. データアーカイブ機能でデータをエクスポート 1. ダミーGROWIインスタンスを作成し、データインポートできることを確認 1. 本番環境を削除 1. 本番GROWIインスタンスを最新MongoDBで起動し、データインポート 1. 本番環境が正常な事を確認したらダミーGROWIは削除 1. GROWIのバージョンを固定 現行のGROWIアプリはほぼ最新にアップデートされていることとします。バージョンアップされていない場合は(新しいバージョンのMongoDBのに対応したGROWIバージョンまで)バージョンアップしてください。 今、GROWIアプリがv.7.5.7だったとします。そしたら、docker-compose.ymlのGROWIを7→7.5.7に書き換えて固定します。 $ cd /opt/growi $ sudo docker compose down $ sudo docker rmi <growiのアプリimage名> でいったんGROWIのimageを消去し、 version: '3' services: app: #image: growilabs/growi:7 ## ここを image: growilabs/growi:7.5.7 ## こうするとv7.5.7を明示的に指定できる ports: // とバージョンを固定して $ cd /opt $ sudo docker compose up -d でv7.5.7のバージョンを指定したイメージを作っておきます。 2. データアーカイブ機能でデータをエクスポート GROWIに管理者でログインし、設定からデータアーカイブ機能でアーカイブを作成し、ローカルにダウンロードします 3. ダミーGROWIインスタンスを起動し、データインポートの確認 いきなり本番環境で作業する前に、新しいMongoDBを使用するダミーのGROWIインスタンスを起動し、データインポートできて正常に利用できる事を確認します。本番環境に影響が出ないように、現行GROWIとは別のPCやVMでダミーGROWIを立ち上げることをお勧めします。 ダミーGROWIは、上記で固定したGROWIのバージョンと同じバージョンで、MongoDBだけ新しいものにしてインスタンスを作成してください。 ダミーGROWIが起動したら、現行のGROWIに管理者でログインし、メンテナンスモードにしてからデータインポートを実行してください。管理者IDは元のGROWIの管理者ID/メールアドレス/パスワードをお勧めします。 ダミー環境で無事データインポートできたら、本番環境に着手します。 4. 本番環境を削除 本番GROWIのコンテナ、イメージ、ボリュームを全部削除してまっさらにします。 $ cd /opt/growi $ sudo docker compose down -v $ sudo docker system prune $ sudo docker images # imageが残っていれば sudo docker rmi <image名> $ sudo docker volume ls # volumeが残っていれば sudo docker volume rm <volume名> docker compose downに -v をつけるとコンテナと一緒にボリュームを消去します。 イメージ、ボリュームが消えた事を確認し、残っているようでしたら手動で削除してください。(--forceオプションを指定するなど) 5. 本番GROWIインスタンスを起動し、データインポート docker-compose.ymlを編集し、MongoDBのバージョンを上げてからdocker compose up -dでGROWIを起動し、エクスポートしたデータを転送してデータインポートする。 ダミーGROWIでの作業と同じ事を本番GROWIで行います。 データインポート後、検索インデックスを再構築します。 6. 本番環境が正常な事を確認したらダミーGROWIは削除 以上で終了です。お疲れ様でした。 GROWIのデータアーカイブ・データインポート機能を使わず、MongoDBをコツコツバージョンアップする方法もありますが、リクエストがあれば追記するかもしれません(二度とやりたくない...)
「AI のスピードに Vim の対応を変えていかないと、滅ぼされてしまう」 俺なりの答え → ViAI-editor github.com/viai-editor
Dónde cuesta más y menos comprar un apartamento de 2 habitaciones en Medellín: ranking de barrios En Medellín, un apartamento de 2 habitaciones cuesta 1.500 millones de pesos en la mediana en San Lucas, el barrio más caro, y 230 millones de pesos en San Antonio… DOI: 10.5281/zenodo.23523484
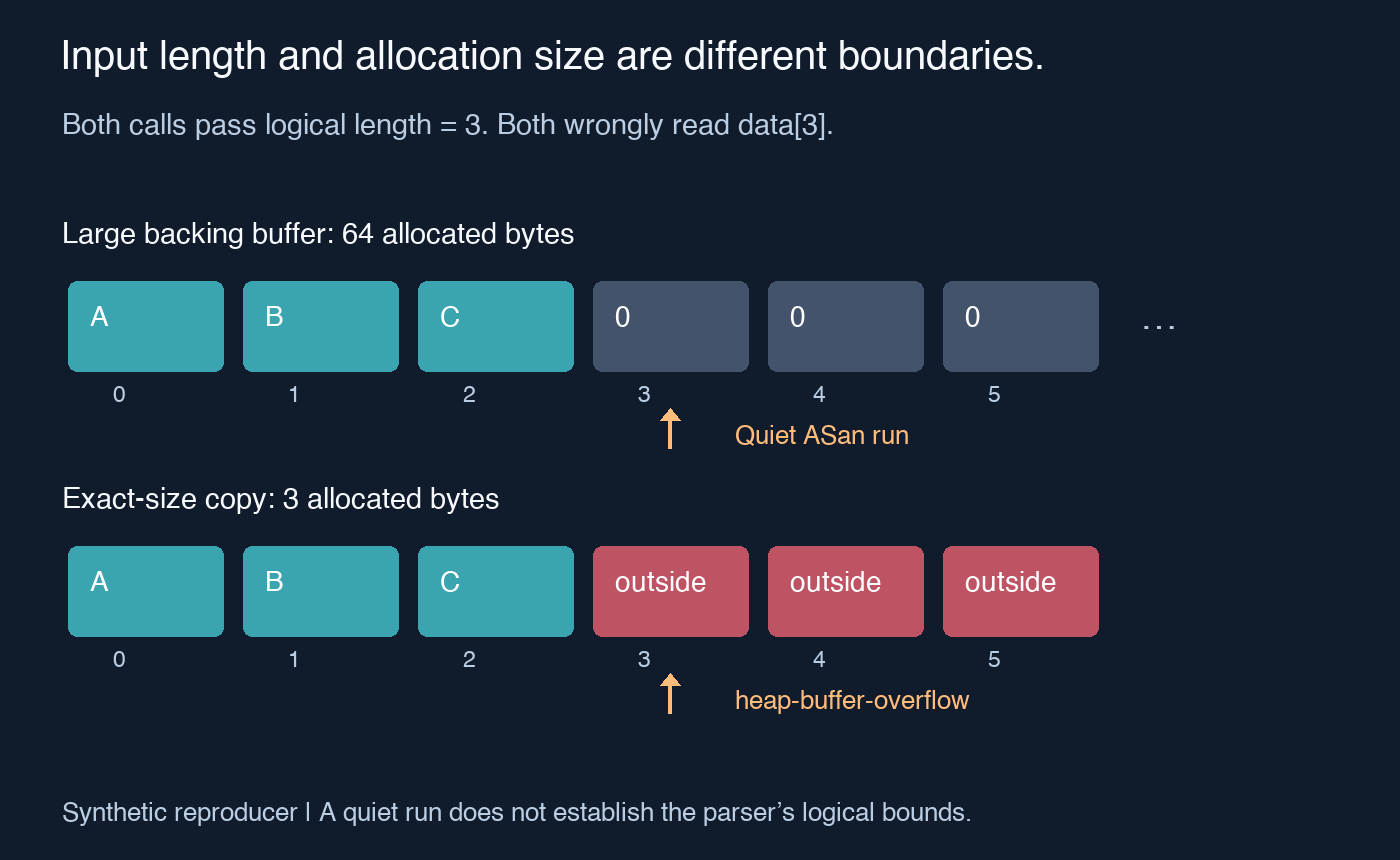
My parser read past the input. AddressSanitizer stayed quiet. I gave a deliberately broken parser three bytes. It read byte four. AddressSanitizer said nothing. Then I changed the allocation around the input. Same parser, same three bytes, same compiler flags: heap-buffer-overflow. There it was. 🧪 The bug hadn't appeared between runs. My first test had given it somewhere comfortable to hide. What I Built I made a small C reproducer for a fuzz-harness trap: the length of a test case can be smaller than the memory holding it. Chris Wellons describes this in his AFL++ guide, which is circulating again in the fuzzing discussion. It's an older guide, not a new AFL++ release. The useful detail is the warning about passing a reusable input buffer straight into a target.[1] A fuzzer's harness is the bit of code that hands generated inputs to the program. If it hands over a short input inside a larger allocation, an invalid read relative to the input can still touch allocated memory. AddressSanitizer, or ASan, instruments memory accesses to catch errors such as heap overflows.[2] It doesn't automatically know the meaning of every length argument in your API. !The same three-byte input occupies either a 64-byte allocation or an exact three-byte allocation. Reading index three stays inside the first allocation but reaches the poisoned boundary of the second. Original diagram of the executed example. The wider buffer is a synthetic stand-in for reusable backing storage. Demo Here's the complete intentionally broken program. Save it as boundary.c: #include <stdio.h> #include <stdlib.h> #include <string.h> static volatile unsigned char observed; __attribute__((noinline)) static void parse(const unsigned char *data, size_t size) { observed = data[size]; /* Deliberate bug: first byte past logical input. */ } int main(int argc, char **argv) { if (argc != 2) return 2; size_t size = 3; size_t capacity = strcmp(argv[1], "exact") == 0 ? size : 64; unsigned char *data = malloc(capacity); if (!data) return 2; memset(data, 0, capacity); memcpy(data, "ABC", size); parse(data, size); free(data); puts("returned without an ASan report"); return 0; } The volatile destination keeps the read observable. The parser is deliberately wrong: for a nonempty input, the last valid index is size - 1. Compile it with Clang and its ASan runtime available: clang -O1 -g -fsanitize=address -fno-omit-frame-pointer boundary.c -o boundary ./boundary shared ./boundary exact The first command to run the program printed: returned without an ASan report The exact-size version exited with an ASan heap-buffer-overflow report. ✅ Both inputs contain ABC, with logical length three. The first allocation has room for 64 bytes; the second has room for three. Reading data[3] violates the parser's input contract in both runs, but only crosses the allocated region in the second. Zero-filling the larger buffer makes this example repeatable. The extra capacity hides the boundary violation; the zeros aren't a safety check. Change the harness and fix the parser For this kind of harness, a useful check is to copy the current input into an allocation sized to that input before calling the target. Handle allocation failure and the target's empty-input contract explicitly. If the API expects a terminating zero, its contract also needs space for that byte. That makes the allocation boundary match the boundary you want ASan to observe. It doesn't repair the target. The actual fix in this example is: if (size != 0) observed = data[size - 1]; I compiled that version with the same sanitizer flags. The shared-buffer, exact-size and empty-input cases all returned successfully. ⚠️ A quiet sanitizer run is evidence about the accesses it could check. It isn't proof that the program respected your logical input length. A second harness check is worth borrowing from a DEV postmortem by @malwaredante: verify that generated inputs reach the intended parser at all. Their mutator selected a different parser while coverage continued growing.[3] Buffer boundaries and target selection are separate ways for a busy test run to miss its purpose. 🔍 Partner Technologies This demo uses C, Clang and AddressSanitizer. The AFL++ documentation supplies context for reusable buffers and persistent-mode harnesses; this reproduction runs directly, without an AFL++ campaign.[4] The important limit: exact-size input copies can expose reads past the allocation. They don't catch every semantic mistake within an otherwise valid allocation, and a clean result isn't a safety guarantee. Hackathon Experience This is a standalone local demo. It wasn't built at an MLH event and isn't a competition entry. References 1. Chris Wellons — Tips for more effective fuzz testing with AFL++ 2. Clang — AddressSanitizer documentation 3. @malwaredante — The Illusion of Progress: how a typo in my custom mutator sent my fuzzer into the wrong parser 4. AFL++ — Persistent-mode documentation Asset credits Original memory-layout diagram, based on the checked reproducer. AI disclosure AI was used to draft the article.
邮箱攒了三万封邮件,客户端每次打开要转圈同步,点开一封等两秒。 Flectar Mail 重写的邮件客户端,主打启动速度,本地索引搜得快,支持多账号/统一收件箱/会话归类。 flectar/mail
The part I like most: AIStudio's own employees plan, build and test AIStudio, from inside the same console. Free and open source under Apache-2.0. Karatla/AIStudio
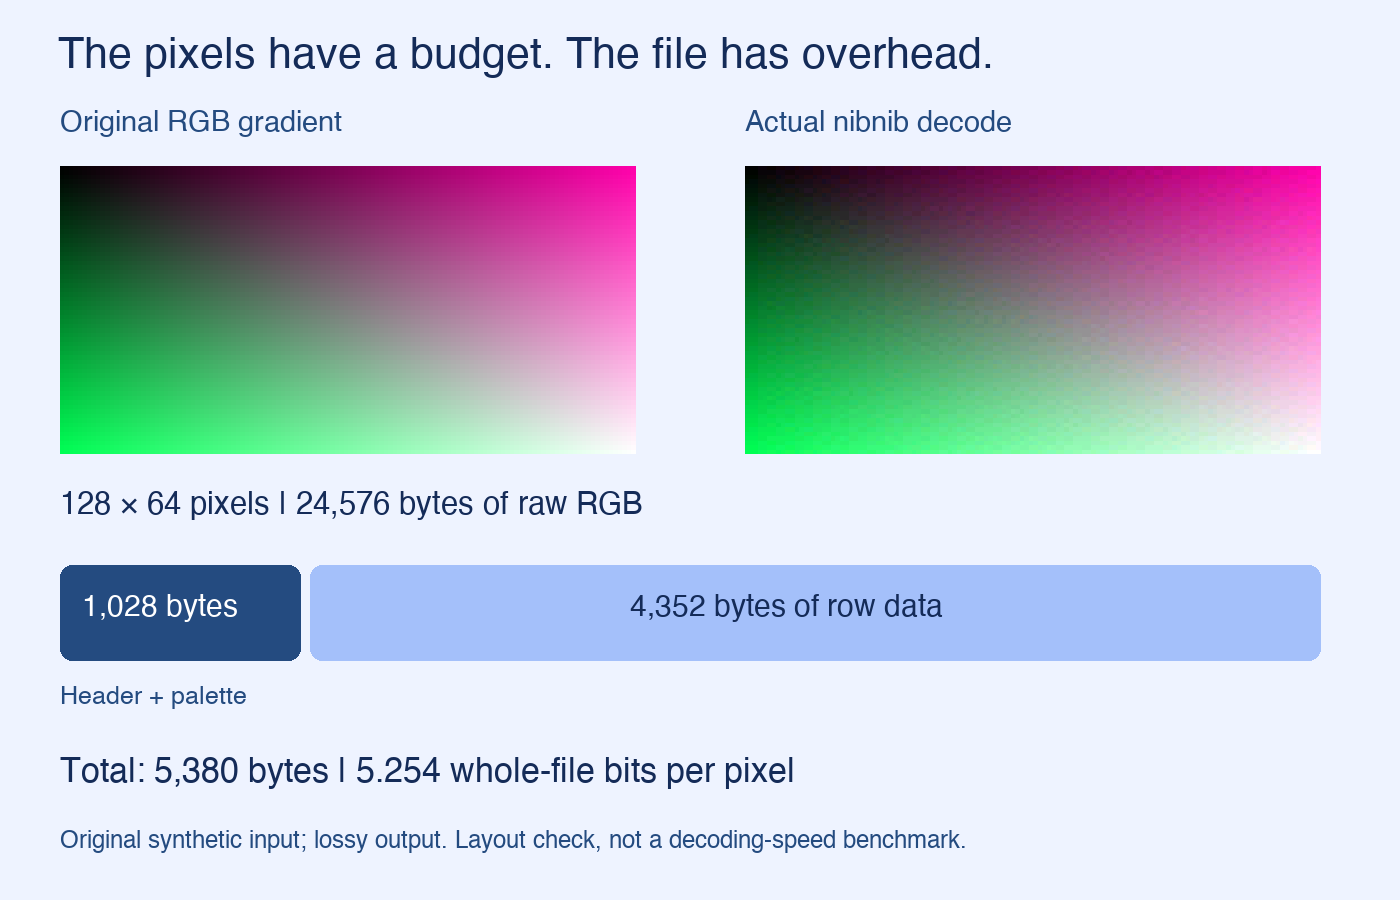
Nibnib says 4bpp. The file still has a header. My tiny nibnib file was larger than the raw RGB image I fed into it. For a 16×16 synthetic gradient, the raw RGB pixels took 768 bytes. The nibnib file took 1,220 bytes. Nothing had gone wrong with the encoder. The file had a palette to carry. 📦 That was the useful surprise in trying Raph Levien's image format: “4 bits per pixel” describes the compact pixel coding, not an all-inclusive promise for every file size. What I Built I made three original RGB gradients, ran the upstream nibnib encoder and decoder, and wrote an independent reader to check the decoded pixels. Nibnib is aimed at constrained-device decoding. It works on pixel pairs and uses a palette of differences rather than just a palette of absolute colors.[1] The current interest in it makes a good excuse to inspect the bytes instead of borrowing the speed claim. 🔍 My check covers file layout and round trips. It doesn't measure microcontroller decoding speed. !The original 128 by 64 RGB gradient beside the actual nibnib-decoded output. A byte ledger beneath shows the 1,028-byte header and palette plus 4,352 bytes of row data, totaling 5,380 bytes. Original synthetic input and actual decoded output. Display enlargement is for inspection; neither image is a photo. Demo I used nibnib version 0.1.0 at commit 2f02f8c225d937d1c19459e2b246f37d87a98f54. With a Rust toolchain available, build that checkout: cargo build --release --locked For a small input you can generate yourself, save this as make_gradient.py. It needs Pillow: from PIL import Image width, height = 128, 64 image = Image.new("RGB", (width, height)) image.putdata([ (x*255//(width-1), y*255//(height-1), (x+y)*255//(width+height-2)) for y in range(height) for x in range(width) ]) image.save("gradient.png") Then, from the nibnib checkout with that input file available: python3 make_gradient.py ./target/release/nibnib gradient.png gradient.nib --compress ./target/release/nibnib gradient.nib decoded.png --decompress The explicit flags matter. At this revision, the default path encodes and then writes a decoded PNG; --compress writes the compressed file.[2] Here are my checked sizes across the three fixtures: | Input dimensions | Raw RGB bytes | nibnib file bytes | Whole-file bits per pixel | | --- | --- | --- | --- | | 16×16 | 768 | 1,220 | 38.125 | | 64×32 | 6,144 | 2,180 | 8.516 | | 128×64 | 24,576 | 5,380 | 5.254 | ✅ Each upstream decoder output matched my independent reader byte for byte. Each decoded image differed from its original input: this is a lossy round trip, not a pixel-preserving archive. Where the bytes go At the checked revision, the file stores dimensions and a fixed palette before its row data. Each row starts with an explicit pixel pair; later pairs use palette indices. Rows are aligned to four-byte boundaries.[1][2] Here's the size calculation for positive, even widths: def nib_bytes(width, height): row_bytes = width // 2 + 3 stride = (row_bytes + 3) // 4 * 4 return 1028 + height * stride print(nib_bytes(128, 64)) # 5380 For that image, the rows occupy 64 × 68 = 4,352 bytes. Add the 1,028-byte header and palette, and the result is 5,380. The tiny image pays that same fixed palette cost. A larger image spreads it across more pixels. The row seeds and alignment still add overhead too. 💡 Compare against the right baseline My table compares the file with uncompressed RGB, not with PNG or JPEG at matched quality. In fact, Pillow's PNG for the 128×64 gradient was only 514 bytes in this run. A smooth synthetic gradient is friendly to PNG. That doesn't settle which format suits a constrained display; it shows why “smaller than raw pixels” and “smaller than an existing compressed image” are different claims. A DEV discussion about palette reduction makes a related distinction: a lossless container can store pixels that an earlier conversion has already changed.[3] Check the actual decoded image, not just the format label. Partner Technologies This walkthrough uses the upstream Rust nibnib CLI and Python with Pillow. The independent reader follows the documented layout and the checked decoder source. I haven't run this on an RP2350 or compared decoder speed with JPEG. The upstream encoder also generates a partly random palette, so preserve the encoded file when you need to reproduce the exact decoded pixels. The layout calculation doesn't depend on which palette values were selected. Hackathon Experience This was a standalone local format check. It isn't an MLH event build or competition entry. References 1. Raph Levien — nibnib README at the checked revision 2. nibnib — CLI, encoder and decoder source 3. @yue_shu_c621a4a637f22396f — PNG is lossless, palette reduction is not Asset credits Original synthetic gradients, actual decoded output and original byte-layout illustration. The nibnib implementation is credited to its upstream project, licensed MIT or Apache-2.0. AI disclosure AI was used to draft the article.
Nodal Context Repo - Open source business context for your data analytics nodal-data/nodal-context
VIZZbox · new Firmware for the FM-1 + VIZZ · Webapp for visualizing MIDI VIZZbox : Pick a style, press PLAY: the FM-1 plays a whole track – intro, build, drop, break, outro – the way a producer would build it. - 58 styles in 11 genres, from Deep House to Baile Funk - Live: swap sounds, ride the filter, 14 effects, play along - The groovebox is still inside: HOME + PLAY to get back to Skiffs sequencer. Get it here: vizz.netwove.com Also take a look at VIZZ: vizz.netwove.com VIZZ turns your music into a live visual: every note, every step and every beat of your FM-1 – or of any other MIDI device – drives a 3D scene, which can react to the audio signal as well. Pick a ready-made scene or build your own in the Studio and share it with the world! Here's a 7 hrs long live stream of both, vizzbox and vizz in action: youtube.com I also have a github: tumult2k4/vizz-firmware It's a vibe coded passion project and still very much work in progress. Feedback very much welcome!
Rendering 37k+ CAD/BIM elements at 120 FPS in Three.js using Web Workers, Transferable ArrayBuffers and BatchedMesh Hey everyone, wanted to share some learnings from building an open-source client-side IFC/CAD viewer using Three.js and TypeScript. When dealing with large architectural models in the browser, the two classic killers in Three.js are main-thread GC freezes (instantiating thousands of individual Object3D/Mesh/Vector3 instances) and draw call overhead from separate geometry primitives. To keep the viewport at 60-120 FPS even on large files, we designed the pipeline around a few key choices: 1. Offloading to Web Workers: The STEP file parsing, bounding box calculations, and boolean opening CSG run completely off the main thread. 2. Zero-copy geometry transfer: Workers output flat typed arrays (positions, normals, indices, and feature edges) and transfer the raw ArrayBuffers directly to the main thread. No intermediate scene objects are built. 3. BatchedMesh and InstancedMesh pools: The main thread receives the buffers and injects them in O(1) into custom BatchedMeshPool and InstancedMeshPool managers, keeping draw calls minimal. 4. Edge post-processing: Instead of creating thousands of LineSegments (which destroy performance), crease and feature edges are batched and drawn with an edge post-processing pass. 5. BVH raycasting: We use three-mesh-bvh for snappy vertex and edge snapping on measurements. Everything is open source under Apache-2.0: Repo: matiasmlynarz-lang/croquera-ifc-viewer Would love to hear thoughts from anyone working on large CAD/mesh pipelines in Three.js, especially regarding how you handle dynamic memory reallocation inside BatchedMesh when elements are hidden or removed.
Nummernkreise (Shopware 6 Tutorial) Mehr zu Shopware 👉 In diesem Video zeigt dir Nico Lukowski, wie Nummernkreise in Shopware 6 funktionieren und wie du sie individuell konfigurieren kannst. Du lernst, wie Bestell-, Kunden- oder Rechnungsnummern aufgebaut werden und an deine Geschäftsprozesse angepasst werden können. So behältst du jederzeit eine einheitliche und nachvollziehbare Nummernvergabe. 🎓 Shopware Community Hub Entdecke kostenlose Online-Kurse, Lernpfade und Zertifizierungen rund um Shopware. hub.shopware.com 📚 Shopware Dokumentation Anleitungen, Hilfestellungen und technische Informationen von den Grundlagen bis zu erweiterten Funktionen. docs.shopware.com 🌐 Shopware Website Alles über unsere E-Commerce-Plattform, aktuelle Neuigkeiten, Erfolgsgeschichten und unser Partnernetzwerk. shopware.com Folge uns: Website: shopware.com Newsletter: shopware.com LinkedIn: linkedin.com Facebook: facebook.com X (Twitter): x.com Instagram: instagram.com Pinterest: pinterest.de GitHub: github.com/shopware #Shopware #Tutorial [en-US] Number Ranges (Shopware 6 Tutorial) More about Shopware 👉 In this video, Nico Lukowski shows you how number ranges work in Shopware 6 and how you can configure them individually. You'll learn how order, customer, and invoice numbers are structured and adapted to your business processes. This ensures consistent and traceable numbering at all times. 🎓 Shopware Community Hub Discover free online courses, learning paths, and certifications related to Shopware. hub.shopware.com 📚 Shopware Documentation Instructions, help guides, and technical information from the basics to advanced features. docs.shopware.com 🌐 Shopware Website Everything about our e-commerce platform, the latest news, success stories, and our partner network. shopware.com Follow us: Website: shopware.com Newsletter: shopware.com LinkedIn: linkedin.com Facebook: facebook.com X (Twitter): x.com Instagram: instagram.com Pinterest: pinterest.de GitHub: github.com/shopware #Shopware #Tutorial
anomalyco/hex: Local voice dictation for mac, windows and linux anomalyco/hex
Game Title: Observation Lag [GAME UPDATE] Observation Lag – Added Hell Hidden Level & Demon Blood Rite Quest (HTML5 / Open Source) Game Title: Observation Lag Playable Link: l.meta.ai Platform: Web (HTML5) Description: Observation Lag is a fast-paced, top-down 2D arcade shooter built with HTML5 and TypeScript, running smoothly directly in your web browser. Designed around tactical position management and snappy gunplay, players navigate through intense combat zones while dealing with dynamic enemy encounters. In this Halloween update, I've added the Hell Hidden Level — die in any normal level and choose to stay in Hell. The new Demon Blood Rite quest has you surviving 3 waves of demons, performing 5 altar sacrifices with Soul Siphon kills, and slaying a Cerberus at the altar. Completing the rite triggers a full altar seal animation with hexagram and red-to-cyan rising particles. The hellscape features lava fields, ice lakes, stalagmites, and an obsidian volcano. The entire project is open-source, lightweight, and continuously evolving based on player feedback! Free to Play Status: [x] Free to play [ ] Demo/Key available [ ] Paid (Allowed only on Tuesdays with [TT] in the title) Involvement: I am the solo developer of this project. I designed, coded, and released the game as an open-source project (GitHub repo: l.meta.ai). I am actively developing and updating it based on community feedback.
Scrapling ⭐ 92090 | +892 today #github #opensource #python 🕷️ The BEST Web Scraping framework that handles everything from a single request to a full-scale crawl! Don't be shy, join here: discord.gg 🔗 D4Vinci/Scrapling ⭐ 92090 stars | 📈 +892 today 🔵 Python #github #opensource #coding #developer #programming #softwareengineering #techtools #devtools #buildinpublic #python
Discworld Noir: running on Windows, Linux & Steam Deck (unofficial ScummVM fork) I've been working on getting Discworld Noir running in ScummVM. The fork has been tested on Windows, Linux and Steam Deck, and I'd like more people to try it. You need your own copy of the English Windows version, all three CDs. No game files are included. The repository has setup instructions, source code and the Linux download: Alexbeav/discworld-noir-scummvm A portable Linux build is available to download, tested on Steam Deck and an Arch Linux (Omarchy) machine. The repository also includes the source patch; the public download described here is the Linux build. This is an unofficial fork of ScummVM's Tinsel engine. It adds the missing 3D actor movement and fixes problems with the notebook, conversations, movie audio, music, lighting and saves. Automated playthroughs using normal game inputs reached the ending during development. Those runs included changes between builds, so I can't claim a complete playthrough of the current release on one unchanged build. My manual playthrough is still in progress, and I'd like more people to try it. There are still bugs: Lewton looks too small on the Wharf, some lighting and character rendering are off, and walking can take odd routes or refuse a spot. Save manually; autosave was disabled during testing. Use the game's options for volume, as ScummVM's volume sliders don't work here. For transparency, I'm a DevSecOps engineer rather than a game programmer. AI agents wrote most of the code; I directed the work and tested the changes. This is an independent hobby project, not an official ScummVM release. ScummVM does not accept AI-written contributions, so I'm not submitting this patch upstream - but if anyone wants to base hand-written code off my results and get Discworld Noir officially supported, that's great in my book! If you still have the discs and fancy revisiting Ankh-Morpork, I'd appreciate bug reports - open an issue on the repository. Please include where it happened, what you did, and a save from just before the problem if possible.
[PS4] Summoning Editor Hi everyone! I made ER Summoning Editor, a free save editor for Elden Ring's Spirit Ashes on PS4. You pick an Ash and decide who comes out of it. What you can do with it: - Put up to 10 creatures in any Spirit Ash: bosses, enemies, NPCs, wildlife, even your own characters - Drag them onto a grid to build your formation - Choose how each one fights: by your side, on its own, or against you (yes, you can summon your own boss fight) - Make them as weak as normal spirits or as strong as the real thing - Build custom characters with their own weapons, armour and spells - Give your character every Spirit Ash and set any upgrade level - Summon farther from Rebirth Monuments, skip the once-per-rest limit, or make every Ash free Good to know - PS4 only. The save must be decrypted first with your usual PS4 save tool. PC saves aren't supported. - Your original save is never overwritten: the editor always writes a new file. Keep a backup anyway! - If you play online, read the README first: it explains how to keep your changes. Download - Nexus Mods: nexusmods.com - GitHub: DrippingSoup22/ER_summoning_editor This is version 1.0, so feedback and bug reports are very welcome.
What if an LLM had a 96-slot "conveyor belt" of future tokens Curious research test I trained over the weekend (24h on a laptop RTX 5070 Ti, 30M params): What if an LLM had a 96-slot "conveyor belt" of future tokens rolling into the KV cache at every tick? - Slots 5..95: Content-only "dough balls" (nouns/verbs/adjectives, stopwords stripped) rolling forward - Slots 0..4: Last-5 grammar & stopword filling zone right before Slot 0 pops out - Stacked with Duplex-SimMT frames so the conveyer steers generation Still plenty of rough edges (separating content vs function words makes perplexity ~1 pt harder than standard AR), so if anyone has ideas on better slot-matching losses or unroll stability, PRs / issues are very welcome! Code + weights + live simulator: GitHub: sumit-1/diffusion-conveyer-llm HF Space: huggingface.co
@igorprvieira thats a real bug filed it here openbot#4460