Mentions
Conversations linking to GitHub, newest first. Times are UTC.
Mentions by source
X
Bluesky
Hacker News
V2EX
Qiita
DEV
Mastodon
Latest posts
Apogee Processing img 5580voq8n6zh1... I made a small sky atlas for wandering among the stars and other celestial objects. You can explore the IAU (International Astronomical Union) constellations, search for stars, nebulae, pulsars, supernova remnants and black holes, and open an object card to learn more. It runs offline from a single HTML file. Source: Nx-Nass/APOGEE I'm still refining it and will keep polishing the details. I'd love to hear what you think.
AI agents now pay invoices. One poisoned email can make them pay a scammer. PayGuard keeps the agent's money in a @NEARProtocol contract that only pays with a signed risk verdict. Injected agent? Refused on-chain. Built at NEAR HACKATHON #NEARHackathon krallkan/payguard t.co
jub0t/Concat builds for macOS, Windows, Linux and Android: github.com/jub0t/Concat/releases for Claude: concat --mcp free, AGPL-3.0, still in beta
zark: bare-metal backup and recovery for Ubuntu on encrypted ZFS, built on raw sends, per-drive bookmarks and read-back (I'm the author) Disclosure: I'm the author of zark, free software (Apache 2.0). I'd like feedback from people who know ZFS better than a distro installer does. What it does: it backs up an Ubuntu system on encrypted ZFS to an external drive, still encrypted, and rebuilds it on a new disk from a live USB, booting with Secure Boot on the stock Ubuntu boot chain. Supported: Ubuntu 24.04 and 26.04 LTS, installed with the installer's encrypted ZFS layout, Secure Boot on. Design points that matter to this sub: - Raw sends. A raw zfs send carries the encrypted blocks as they are, so the backup drive holds ciphertext and never needs the keys. I first planned to give the drive its own encryption; the raw send is simpler and more efficient. - Own replication instead of syncoid. Each run takes one backup point of every dataset and sends from the newest snapshot the drive holds. When the source has already pruned that snapshot, a bookmark kept for that drive still marks where the drive stands. A drive can stay unplugged for months and sanoid's pruning no longer cuts it loose. - No destruction without a question. Nothing on a drive is destroyed without asking first, and the question comes before the transfer starts. - Read back before unplugging. Every backup is checked on the drive before zark says it is safe to disconnect it. - An honest verdict. BACKUP COMPLETED only when every expected dataset reached the new point. Otherwise BACKUP INCOMPLETE, exit code 1, the drive's last backup date is not recorded, and a table shows what happened to each dataset. - zark prune reclaims space in the source or on a drive under zark's own rules, so nobody has to reach for a % range by hand. Why I wrote my own replication: in September I ran a zfs destroy with a % range on my home dataset to free space in an almost full pool. It also took the monthly snapshots in between, which one of my drives still shared with the laptop. Thirteen days later sanoid pruned the last common snapshot. After that, /home could not be sent incrementally to that drive. syncoid refused it, and zark 1.0.12 printed a warning, then BACKUP COMPLETED, and recorded the date. Every dataset on the drive was current except /home, a month old. Nothing was lost, but a backup tool exists to be believed, so I rebuilt it as 2.0. Self-test: zark selftest checks that your machine's ZFS, kernel and tools behave the way zark relies on. Each release publishes the results from my test machine (certificates/ in the repo). zark selftest status tells you whether those results cover your kernel and OpenZFS version, and zark selftest report prints a link to share yours. I would like to collect results from other OpenZFS and kernel combinations: zark#2 The question I'd like answered: what would you expect a verification step after a raw send to prove that I'm not checking? And if you use USB-SATA bridges for backup drives, I'm collecting which bridge chips behave and which do not: zark#3 Numbers from my own use: a daily backup of my laptop takes about two minutes. On the test laptop, a full recovery from a live USB reached RECOVERY COMPLETE in 3m10s and in 3m25s; with more data, add the time it takes to copy it. I ran dozens, maybe hundreds, of backups and recoveries while building 2.0 and none failed. zark partitions disks and destroys pools when you ask it to, so read what it touches first: juanmitaboada/zark Full story, with photos: juanmitaboada.com Code and docs: juanmitaboada/zark Explainer video: youtu.be
I made a theme picker for PowerShell and CMD with live previews (rewritten due to strikes over artificial intelligence) I use a spell checker when writing this text. Do I need to write that it is ai? Hey dudes, hi everyone! I recently ran into an issue: I needed to change the colors in PowerShell. I tried doing it manually, but couldn't find any suitable solutions. I also found some cool programs for Linux, but they didn't work for this. I found some good color palettes, but I couldn't find a solid solution specifically for PowerShell, so I adapted and improved one to suit my own needs. I hope it works for yours, too. I built a small tool called StyleyShell to make changing colors in classic PowerShell and classic Windows console CMD easier (separate or together). it can (or you with it also can be): - Browse many styles with live previews - Easy use a theme instantly with Enter - Set different themes for PowerShell and CMD - Update existing shortcuts and new console windows automatically - Restore your original colors anytime No admin rights needed, I think it's pretty convenient. AND source just TWO scripts u can analyze it easy Github: kolandor/StyleyShell Hope someone finds it useful! If you like it, I'd appreciate a ⭐ on Github, or as a cool dude. Feedback here welcome, we can talk Please be understanding and, I ask, do not issue any strikes; this article might prove useful to others. To those from the future reading this post: please have a laugh at how absurd the world once was, and at the things people were forced to justify.
裏ではspace版Jetstreamの実装が着々と進んでいるらしい。実態は分からんけど。 bsky#88
Mac 菜单栏图标挤到刘海后面,有几个直接被挤没,点都点不到。 Ice 开源菜单栏管理,不常用图标收进可展开面板,可加分隔线调间距换配色,支持按条件自动隐藏。 jordanbaird/Ice
We Migrated 10,144 Tests from Jest to Vitest in 3 Weeks: The Honest, AI-Assisted Truth > A note on the Vitest version: This migration was carried out in August 2026, using Vitest 4. All the figures, benchmarks, configuration details, and lessons described in this article refer to Vitest 4, not Vitest 5. Migrating a test runner is rarely a magic "swap and go" operation. Our experience moving our entire frontend test suite from Jest to Vitest was a real engineering undertaking, filled with bottlenecks, meticulous pool tuning, unmasked bugs, one rollback, and one optimization we shipped and then had to take back. Over the course of about three weeks, our frontend team migrated eight repositories. We didn't settle for file counts; we ran every suite end-to-end to get the real numbers. Here is the exact scale of what we achieved: - 10,144 executed unit tests, real numbers from actually running the suites, not file counts. - 1,799 test files across 8 repositories. - 0 repos left in a half-migrated state. - ~3 weeks to complete the entire effort, migrations plus the tuning that followed. - ~$751 estimated AI token cost for the Claude Code sessions we could trace to this work. See the caveats on that number below: it's a rough upper bound, not a bill. This is the story of what actually happened, drawn directly from our git history, PR bodies, and session logs, to help you navigate your own migration. To save you some of the pain we went through, we also published a generalized version of the AI automation skill we ended up wishing we'd had from day one: github.com/Subito-it/articles-code/tree/main/jest…. --- Why Jest started hurting We didn't decide to migrate just because "Jest is slow" in the abstract. We migrated because maintaining it had become an active, recurring tax on our engineering time. We also wanted to be on the side of where the ecosystem was heading, since Vitest was fast becoming the default choice for new Vite/Next.js projects. 1. The CommonJS vs. ESM nightmare By default, next/jest skips transforming anything inside node_modules, so when a dependency ships an ESM-only update, Jest's CommonJS require() fails. We found ourselves hand-patching transformIgnorePatterns regexes to allow-list specific packages. Here's the exact code comment from our config, verbatim: // ESM-only node_modules that Jest must transform. next/jest overwrites any // user-supplied transformIgnorePatterns to skip all of node_modules, so we // allow-list these on the resolved config instead. const esmPackagesToTransform = ['cookie']; Separately, and about six weeks before we'd even decided to migrate: a major version bump of uuid shipped as pure ESM and broke Jest outright. The real commit message: "uuid v14 ships as pure ESM which breaks Jest (CommonJS). Replace the single usage of uuid() ... with the native crypto.randomUUID() ... removing the dependency entirely." Rather than fight the transform config again, the team just deleted the dependency. When your test runner is dictating your dependency choices before you've even planned a migration, that's a real, quiet cost, not a hypothetical one. 2. Ecosystem bloat Every repo was carrying a fragile pile of Jest-specific tooling: jest, jest-mock, jest-environment-jsdom, ts-jest, @types/jest, babel-jest, and repo-specific extras. Moving to Vitest's Vite-based transform pipeline meant shrinking that footprint everywhere. --- The great performance myth (and how we fixed it) Vitest was not automatically faster than Jest, and we're not going to pretend otherwise. In at least two of our repositories, out-of-the-box Vitest was measurably slower until we did real tuning work. The worker cap reality In one repo, keeping the same CI worker cap that worked fine with Jest, turned a ~35-second test run into a ~3-minute crawl with Vitest. The actual test execution time was near-identical. The difference was almost entirely pool/worker overhead. We fixed it by explicitly raising maxWorkers from 2 to 8 on a many-core CI runner. The benchmarking sweep You cannot guess your Vitest configuration; you have to measure it. Another repo, unrelated to the one above and with its own separate Jest baseline of 44.4 seconds on CI, ran a rigorous local benchmark sweep on Vitest's forks pool, on a 10-core machine, for its 146 files / 683 tests: - 2 workers: 60.9 seconds - 4 workers: 35.0 seconds - 6 workers: 26.6 seconds (the sweet spot) - 8 workers: 27.0 seconds - 10 workers: 28.5 seconds Throwing more workers at the problem didn't help past 6. The "faster" Vitest wasn't actually faster than the previous Jest CI baseline until it was tuned to match the hardware. --- Pool selection: the setting that actually matters Vitest offers different worker-isolation pools, and choosing the right one is a correctness decision, not just a speed one. We ultimately moved every repo to the forks pool. forks uses real child processes, so environment variables apply correctly before Node initializes. That matters because the alternative, threads, mutates process.env too late for things like TZ to be picked up, resulting in timezone-dependent broken snapshots on CI in one of our repos. The cost of forks is that it re-creates jsdom per file, making it the slower option out of the box (one repo measured this at roughly 5x slower than Jest before worker tuning). We chose forks anyway, because it was the most correct option: it avoided race conditions that a shared-context pool (vmThreads) was silently masking, and it avoided an automocking gap that broke error-tracking calls under a different pool (next section). --- The automocking trap: Jest bugs hidden for years Jest's __mocks__/ directory is magical: drop a file in there matching a package name, and Jest silently applies it everywhere in the import graph, including packages a test file never imports directly. Vitest requires an explicit vi.mock() call in the test file itself. When that silent Jest magic went away, our tests broke in interesting ways. A shared internal telemetry library had a background sync timer that Jest's implicit mocking had apparently been suppressing for years. Under Vitest, the real module ran, the timer fired during tests, and we got unhandled promise rejections, across three separate repositories, each discovered independently rather than solved once and shared. Separately, two repos found that with one particular pool configuration, our error-tracking SDK's calls resolved to undefined instead of running. A test scenario that should have triggered an error, did nothing for years, silently. Both were fixed the same way, with an explicit mock factory instead of relying on automocking. The riskiest case was quieter than either of those: several component tests had been relying on Jest silently intercepting a shared internal package's real implementation. Under Vitest, without an explicit mock, the real implementation ran instead, and the tests didn't fail loudly. They just started exercising different code paths than the ones they were written to verify, a false-positive-test risk that had been sitting there the whole time Jest was covering for it. --- Normalizing rollbacks If you're picturing a tidy "one PR, done" migration for every repo: forget it. One of our repos merged a migration PR, hit some non-deterministic flaky tests almost immediately, and made the right, low-drama call: roll it back with a revert commit, investigate properly, and land a successful retry about five days later. That's not a production incident and it's not a failure. It's what a change of this size normally looks like when you don't rush the "done" call. The pattern across this whole effort is to measure before declaring victory, and not be afraid to undo something that isn't working. --- Where Jest was actually better We don't want this to read as a pitch, so here's the other side. Jest, for years, just worked. Nobody on the team had to think about pool models or worker-count sweeps to get a stable, reasonably fast suite. Its __mocks__/ auto-mocking, for all the false-positive risk it turned out to be hiding, also meant nobody had to write an explicit vi.mock() for every transitively-mocked dependency. And in at least two of our repos, out-of-the-box Jest was simply faster than out-of-the-box Vitest, full stop, until we did tuning work Jest had never demanded of us. If your suite is small, stable, and not fighting ESM dependencies, "migrate to Vitest" is not an automatic win. It's a trade of one set of maintenance costs for another, and ours only came out ahead because our specific pain points (ESM friction, jsdom-adjacent tooling, hidden automocking bugs) happened to be the ones Vitest's model addresses well. --- The reality: this was impossible without AI, on this timeline Without AI assistance, we wouldn't have completed this migration on this timeline. Manually converting thousands of test files across eight independently-owned codebases in about three weeks was not realistic for a team our size. We delegated the mechanical conversion (thousands of repetitive, well-defined transformations) to Claude Code. What we can say about the AI cost, precisely: - Input tokens: ~250,000 (real, summed from session logs) - Output tokens: ~9.7 million (real) - Cache read/write tokens: ~1.46 billion / ~60 million (real) - Sessions matched: 70, across 7 of our 8 repos (our shared component monorepo's sessions weren't separately mined) - Estimated cost: ~$751 total, ~$107/repo average Two honest caveats on that cost figure: it's derived from real token counts using list pricing plus an assumed cache-discount multiplier, not an actual bill. We don't have access to real invoiced numbers for these sessions. And our session-relevance filter matched any mention of "migration," which is broader than "Jest-to-Vitest migration specifically," so $751 is better read as an upper bound than a precise cost of this one effort. We've also enforced a simple but powerful concept. Nowadays It's more important then ever having a deep knowledge on what we delegate to AI. Before the action, we spent some time to analyze Jest-Vitest differences, read Vitest docs and understand what plan best fitted our codebase. Without this step, we'd probably spent way more tokens. What Claude Code bought us wasn't just speed on the mechanical work. It let our engineers spend their time on the actual judgment calls: which pool to pick, whether a "fix" really helped, when a migration attempt was actually ready to call done. --- The migration skill, published The hardest part of the migration itself wasn't the API syntax changes. It was the complete lack of guidance on worker benchmarking and pool selection, which is exactly where we lost the most time. The skill itself wasn't written once and left alone. We built it, then kept adapting it as each repo hit a new pool bug or benchmarking surprise, so by the time the last repo migrated it already carried the lessons from every one before it. That ongoing adaptation was its own difficult part, separate from the migration work itself. We're now making that skill available to everyone: the per-file migration rules it grew to include, with anything company-specific stripped out; grab it and run it on your own codebase: github.com/Subito-it/articles-code/tree/main/jest…
May"@SecKennedy“moonshot” role microbiome in cancer" x.com +13d no +$ Scientists USAplan nature.com medicalxpress.com @INRAE_France worldmicrobiomepartnership.org Join #DOMINOEU SegataLab/cFMD domino-euproject.eu bsky.app
I made an app that gets new users from “I want to try Linux” to a bootable USB (or VM) in a few clicks Trying a distro for the first time usually means: find the real download page, pick the right ISO, find the checksum, verify it, then figure out a flashing tool. I wanted all of that in one place. DistroShop lets you pick a distro, downloads the ISO from the official server, checks the sha256, and either flashes it to a USB drive or boots it in a VM so you can try it without touching your hardware. All the distro entries are pinned to specific stable releases, so the hashes are reproducible. It’s free and open source, written in Rust. Packages for AppImage, .deb and .rpm on x86_64 and arm64: github.com/TechCore3/DistroShop/releases I’d especially like to know which distros you think should be on the list, and what would make this useful for someone you’re trying to get onto Linux.
Destiny/Diablo/Borderlands-styled RPG inside of L4D2. Available @ github.com/sky-rpg or steamcommunity.com I recently reformed the group, so it's brand-new with just a few members. Features: ° 110 UNIQUE talents ° Real-time MMO-like action bar ° Threat-based agro system ° Persistent loot bags drop that you can pickup (press E or your pickup/activate/open door key) ° Instanced difficulty set by your score & difficulty settings ° Dynamic horde size determined by living survivors ° Leaderboards ° 13 handicap difficulty levels ° Profile editor that saves your talents/gear/settings to profiles YOU GET TO NAME ° Level 30 is the current cap, 34 talents max. ° No Survivor Bots =)
🛠️ FreeCAD|把尺寸变成3D零件 ① 约束草图:用尺寸定义形状 ② 参数化历史:改尺寸,重算模型 ③ STEP/STL导出,衔接设计与3D打印 练习:新建草图→画矩形并标尺寸→拉伸→改宽度。 无需编程;先学草图约束,进阶可用Python自动化。LGPL-2.1。 FreeCAD/FreeCAD 图:官网草图与建模示例 t.co
@Cartidise I use this one net00-1/SW-DLT it's basically yt-dlt wrapper in apple's shortcut app i guess? I mostly use it to download facebook videos
Train a business strategy model from links, on c0mpute, and publish it to Hugging Face We trained saas-business-strategist-agent today: a small business and SaaS strategy model, trained on a CPU from a list of links, and published it on Hugging Face. You can train your own the same way. Model: huggingface.co Links in, model out The c0mpute example takes links and turns them into a training corpus: - rssamplifier.com topic pages, now with comma lists: rssamplifier.com pulls every blog and news feed filed under any of the three (2,087 blogs). - pit.world searches: pit.world runs each term on the web, news and scholar tabs and fetches every result page. - Single feeds, any web page, or a pasted list of links on stdin. No API keys. rssamplifier and pit.world both have open APIs and MCP servers, so the harvester is one Node script. node harvest.mjs https://rssamplifier.com/topics/business,saas,crypto \ 'https://pit.world/search?q=saas,business,crypto' --full --out data/saas-business.jsonl Train it on c0mpute, or on your own CPU c0mpute 0.2.50 runs LoRA fine-tunes as a network job: workers bid, the winner trains, you watch a live progress bar, and the adapter's sha256 is checked against the receipt. c0mpute infernet text train --job job-saas.json --dataset data/saas-business.jsonl \ --output out/saas-business-strategist-agent --yes Or locally: .venv/bin/python train.py job.json --name saas-business-strategist-agent --dataset data/saas-business.jsonl The numbers - Base model: Qwen2.5-0.5B-Instruct, a rank 8 LoRA (about 1.1M trainable parameters), bf16. - Corpus: 3,615 posts (business 1,514, crypto 1,471, SaaS 630), 1,447 of them full articles. - 400 steps on 4 CPU threads, 2.4 GB peak RAM. Held-out perplexity went from 44.5 to 28.6. - The adapter is 4.4 MB. The first version used a 135M model. It echoed questions back. 0.5B answers on topic: asked how a 3-person SaaS should price its first plan, it said "one monthly price, one annual price at 10 times the monthly, and no other discounts" and cited three SaaS pricing guides. A sub-1B model learns the voice, not the facts. So the agent searches pit.world for each question and puts the top pages in the prompt. The facts come from search and the tune supplies the register. Two things that bit us - torch uses one thread per core by default. On a busy 32-core box that ran at 22 tokens a second. Four threads ran at about 330. - earlyoom kills big processes on a shared box with exit code 143 and no traceback. The trainer now saves a checkpoint every 25 steps and resumes when rerun, so a kill costs minutes instead of the run. Also shipped today - pit.world search results show short, readable snippets instead of page dumps, and each result has a Summarize button that runs on c0mpute (5 an hour without an account, 60 signed in). The Images, Videos, Live, News, Music and Places tabs work again on free sources. - rssamplifier.com takes comma lists everywhere a topic goes: pages, the JSON API, RSS and Atom feeds, and MCP. Try it The example, with the harvester, trainer, chat and Hugging Face publisher: github.com/profullstack/c0mpute/tree/master/examp… Swap the links for your own topics and give it a name.
Show HN: Mistake Trainer – Spaced repetition from your own Lichess games I’m an 1800 player on Lichess and struggle making the same types of mistakes over and over again. Lichess has a nice feature called “Learn from your mistakes” available after you request a computer analysis. I wanted something a little more so I built Mistake Trainer with Claude Code. It expands “Learn from your mistakes” to all your computer analyzed games and adds spaced repetition with the UI ported from lila so it feels like y̶o̶u̶’̶r̶e̶ b̶a̶t̶m̶a̶n̶ playing on Lichess. If you don’t play on Lichess, or don’t want to use your own account at first, there is a sample deck included so you can check it out. There is also the option to use your own computer analysis to create cards from all of your Lichess games, not just the ones analyzed on Lichess’s servers. If you have lots of games, I recommend using your own computer to download the app so you have access to a better engine. Other features included: suspending cards (positions) you don’t like, choosing if you want to focus on opening mistakes vs mistakes where your position collapsed, toggling your previous move arrow (this was a nitpicky one for me). Crucially, you can adjust how long a delay before you see a card again. I found somewhere between a 5 to 7 day delay was helpful to prevent just superficially recognizing a solution. Similar tools that already exist include Aimchess and github.com/antimike/chess_trainer. I have the greatest respect for Lichess, and tried to build a tool that feels like a natural extension of their wonderful service. Mistake Trainer is free, open source, and has no server to see your data (it stays on your computer). I hope you find it helpful in improving your chess! DannyNagelMath/Mistake-Trainer
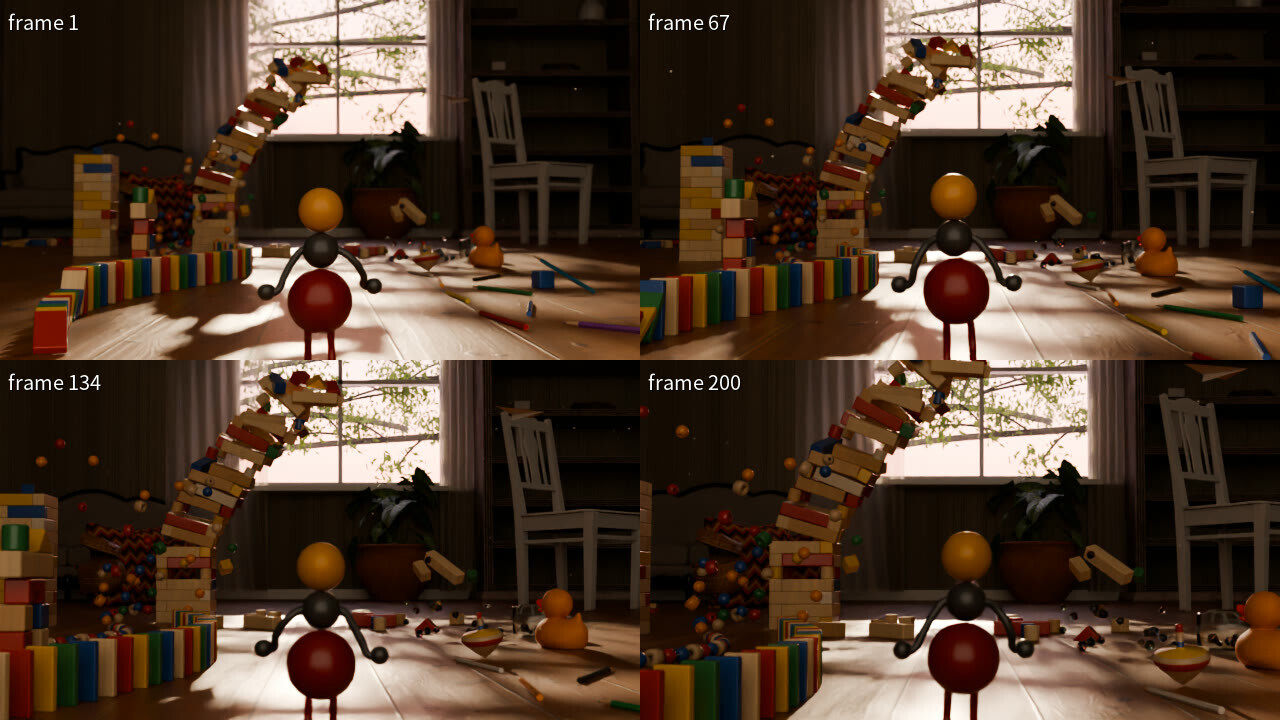
Rendering a 50 MB .blend at 1080p from Cursor over MCP: every tool call, measured I work on JANCTION Render at JasmyLab, so read this as the operator's own run. The numbers are from the production service on 2026-11-02 and nothing is rounded up. The question I wanted to answer: when an agent in Cursor (or Claude Code, or Codex) renders a real Cycles scene through an MCP server, what does it actually get back at each step, how long does it take, and what does it cost? Not a cube. A 49.7 MB .blend with 386 meshes, 46 packed textures, three lights and a 200-frame animation at 30 fps. Site: render.janction.jp Setup in Cursor One click on the "Add to Cursor" button at render.janction.jp, or by hand in ~/.cursor/mcp.json: { "mcpServers": { "janction-render": { "url": "https://render.janction.jp/mcp" } } } Settings → Tools & MCP lists janction-render with 13 tools. The first tool call opens an OAuth page that creates a free key. There is no sign-up form and no card. One honest note on the run below: I made the calls through the same server from a terminal agent (the janction-render stdio package, pip install janction-render), because the stdio package can send a local .blend directly. Cursor's remote MCP takes an https URL or a bpy script; to send a local file from Cursor, drop it at render.janction.jp for a 12-hour link, or let the agent run the CLI. The tools and the responses are the same. Step 1: read the scene (no GPU) scene_info(scene_path="toyroom.blend") Back in a few seconds: Blender 5.2.2, Cycles, frames 1–200 at 30 fps, 1920x1080, 160 samples in the file, active camera Camera.002, 386 meshes, 53 curves, 3 lights, 69 materials, 46 of 48 images packed, missing_files: [], and a scene_id to reuse so the 50 MB is uploaded once. The agent now knows the frame range and fps without opening Blender, which matters for the final call later. Step 2: a free preview of four frames render_preview(scene_id=..., frames="1,67,134,200") !Four preview frames tiled in one image 7.67 GPU-seconds, finished in 10 seconds of wall time, cost: free. The verdict from the built-in critic was ok (score 100): "no problems found in exposure, framing or lighting; looks ready for a final render". The response also carried a final_estimate for the whole animation: about 3,224 GPU-seconds for 200 frames at 1080p and 128 samples. Previews are the step that makes the MCP loop work. The agent sees the image, reads the verdict, fixes the scene if needed, and only then spends money. Step 3: the estimate, and where it was wrong render_estimate(scene_id=..., frame_start=1, frame_end=24, width=1920, height=1080, samples=128) It answered 72 GPU-seconds, about 8 JPY, with confidence: low and a warning: this scene has no completed final-path measurement; run a short contiguous final test, then estimate again. That warning was right. The 72 seconds came from my key's recent finals (small scenes), not from this scene. The preview-based final_estimate from step 2 (3,224 GPU-seconds for 200 frames, about 16 GPU-seconds a frame) was much closer to what happened next. I have filed that as a bug: when a scene has no final yet, the preview measurement should win over the key's history. Step 4: 24 contiguous frames on the final path render_final(scene_id=..., frame_start=1, frame_end=24, width=1920, height=1080, samples=128, output="mp4", fps=30, max_yen=30) Measured: - 446.6 GPU-seconds for 24 frames, so 18.6 GPU-seconds a frame at 1080p and 128 samples with denoising - 135 seconds of wall time, because the job was split into 4 chunks across 4 workers - 24 of 24 frames present, 0 black frames (checked with ffmpeg), MP4 at 1920x1080 and 30 fps - list price at 0.1 JPY per GPU-second: about 45 JPY !Frame 12 of the final render max_yen is the ceiling the agent passes so a wrong estimate cannot turn into a surprise. The service holds that much and charges only the GPU time used. Step 5: estimate again, now with a measurement The same render_estimate for frames 1–200 after the test: 4,231 GPU-seconds, about 20 minutes of wall time on 4 workers, about 424 JPY, basis: scene, confidence: high, calibration.final_path_measured: true. That is the number the agent should show the user before the full render. In this run I stopped here; the 200-frame version of this scene is already on the site as an example. What it costs, in plain terms - Reading the scene and the 4-frame preview: 0 JPY (previews stay free up to 2 GPU-minutes a day after the welcome credit) - 24 frames at 1080p: 446.6 GPU-seconds, about 45 JPY at list price - The full 200 frames: about 424 JPY, estimated from the test A new key starts with 100 JPY of GPU time with no card (14 days), and 400 JPY more after saving a card that is not charged. After that it is 0.1 JPY per GPU-second from prepaid credit. Current numbers: render.janction.jp What to tell your agent The order that worked: scene_info → render_preview → render_final for a short contiguous test → render_estimate → ask the user → render_final for the whole range. Skipping the test gives you an estimate that can be off by several times, as step 3 shows. The MCP server, CLI and client are open source: JasmyLab-JANCTION/janction-render Docs for agents: render.janction.jp
I made an app that gets new users from “I want to try Linux” to a bootable USB (or VM) in a few clicks Trying a distro for the first time usually means: find the real download page, pick the right ISO, find the checksum, verify it, then figure out a flashing tool. I wanted all of that in one place. DistroShop lets you pick a distro, downloads the ISO from the official server, checks the sha256, and either flashes it to a USB drive or boots it in a VM so you can try it without touching your hardware. All the distro entries are pinned to specific stable releases, so the hashes are reproducible. It’s free and open source, written in Rust. Packages for AppImage, .deb and .rpm on x86_64 and arm64: github.com/TechCore3/DistroShop/releases I’d especially like to know which distros you think should be on the list, and what would make this useful for someone you’re trying to get onto Linux.
出典と注意(11/2時点) ・OpenAI公式:人の承認役を別のAIに。権限は増えず、安全保証でもない ・Codexは3回連続で却下なら作業中断 ・Agents APIは10/31のSDKで対応、既定オフ ・元置中書門下、本擬相防過誤(貞観政要・政体) developers.openai.com github.com/openai/openai-python/releases/tag/v3.4…
New Ninja Gaiden 2 Recomp (Xbox 360) Hey guys. It looks like the other recomp has been removed from GitHub, so I've spent the last couple of nights working on a new one. It's not finished, but it's very much in a playable state and I will be improving it regularly. Enjoy! KamiTK2/openNG2
Cookie Manager Pro — an open-source Chrome extension for inspecting and managing cookies Hi everyone! I've been working on Cookie Manager Pro, an open-source Chrome extension designed to make cookie inspection and management easier during web development and debugging. It provides a visual interface for: - Viewing and searching browser cookies - Editing, adding, and deleting cookies - Saving cookie profiles - Clearing cookies and browser data - Managing cookies through a Chrome popup It's built with HTML, CSS, JavaScript, and Manifest V3. The extension requires sensitive browser permissions, including cookie access and broad host permissions, so reviewing the source before installing is recommended. Source code: github.com/RuslanSharifov/chrome-ui-gallery/tree/… Project gallery: ruslansharifov.github.io I'm sharing this as a personal open-source project and would appreciate technical feedback. What would you improve about the interface or cookie management workflow?
Conker: Live & Reloaded PC PORT [4K60] 2026 You can get it here: Mabec-games/Conker-Recomped-and-Reloaded
Top GitHub Repos Today: Agent Desktop, Scrapling & colibri #Shorts Today's top GitHub repos in two minutes. Agent Desktop (vercel-labs/agent-desktop) gives AI agents reliable computer use on the desktop by reading each app's accessibility tree instead of guessing from pixels. Scrapling (D4Vinci/Scrapling) is a Python web scraping framework with an MCP server for AI agents. colibri (JustVugg/colibri) is a pure C engine that runs very large open mixture-of-experts models on hardware you already own by streaming experts from disk. Sources: - vercel-labs/agent-desktop: vercel-labs/agent-desktop - D4Vinci/Scrapling: D4Vinci/Scrapling - JustVugg/colibri: JustVugg/colibri - GitHub Trending (daily, Nov 2, ~6:05 AM ET): github.com/trending Smarter Flow Systems helps you implement AI in your business: smarterflow.ca #AI #GitHub #OpenSource #Shorts
Dónde cuesta más y menos comprar un apartamento de 2 habitaciones en Cartagena: ranking de barrios En Cartagena, un apartamento de 2 habitaciones cuesta 1.219 millones de pesos en la mediana en Manzanillo del Mar, el barrio más caro, y 320 millones de pesos en… DOI: 10.5281/zenodo.23525232
GitHub links from this video: agent-desktop: vercel-labs/agent-desktop Scrapling: D4Vinci/Scrapling colibri: JustVugg/colibri
Founders: stop waving your cursor around during demos Founders, team leads, and anyone who spends too much time presenting things on a screen: I built a small Windows tool called Chalkberry to make presentations, demos, and screen shares easier to follow. Hold Ctrl and draw directly on top of your screen. Use it to: • highlight the number that actually matters • circle a feature during a product demo • point out exactly where someone should look • explain a workflow, diagram, dashboard, or design • keep people focused during remote meetings • annotate the screen before taking a screenshot No account. No internet connection. Less than 1 MB. Free and open source. Try it here: joaogeraldes.github.io And if you’re a developer and want to improve it, contributions are very welcome: JoaoGeraldes/chalkberry
Dónde cuesta más y menos comprar un apartamento de 2 habitaciones en Cali: ranking de barrios En Cali, un apartamento de 2 habitaciones cuesta 815 millones de pesos en la mediana en Santa Teresita, el barrio más caro, y 215 millones de pesos en Caney, el más… DOI: 10.5281/zenodo.23523575
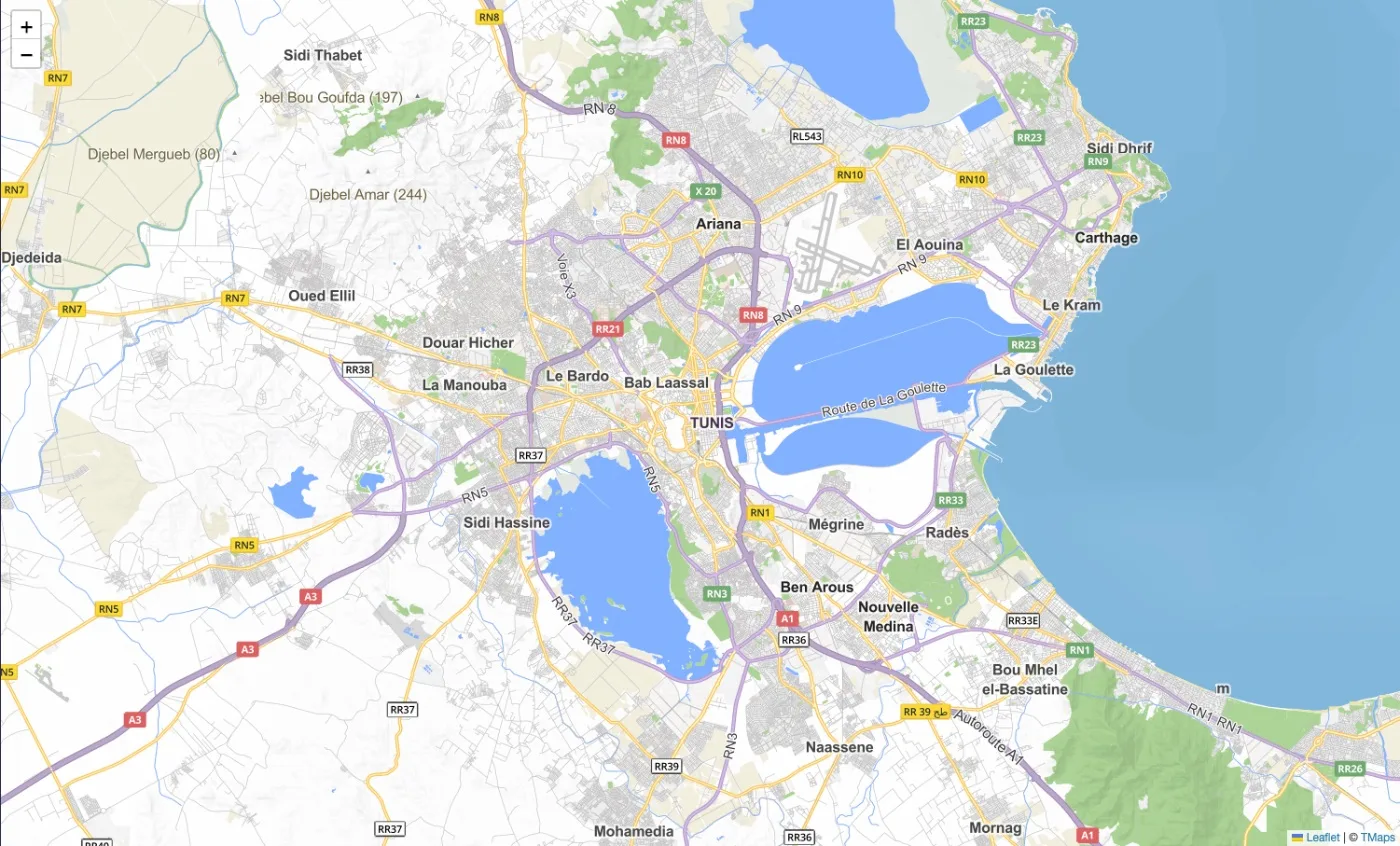
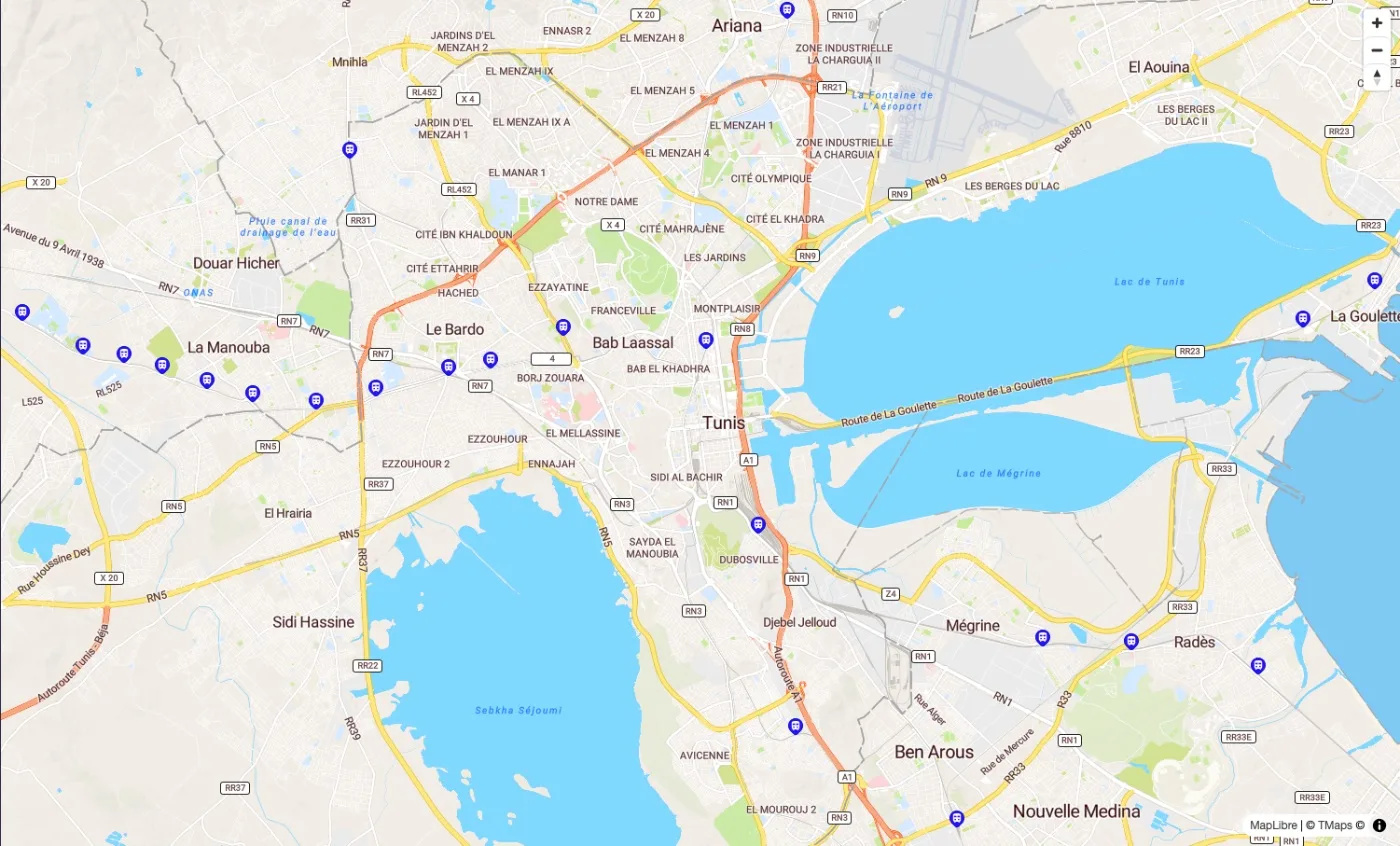
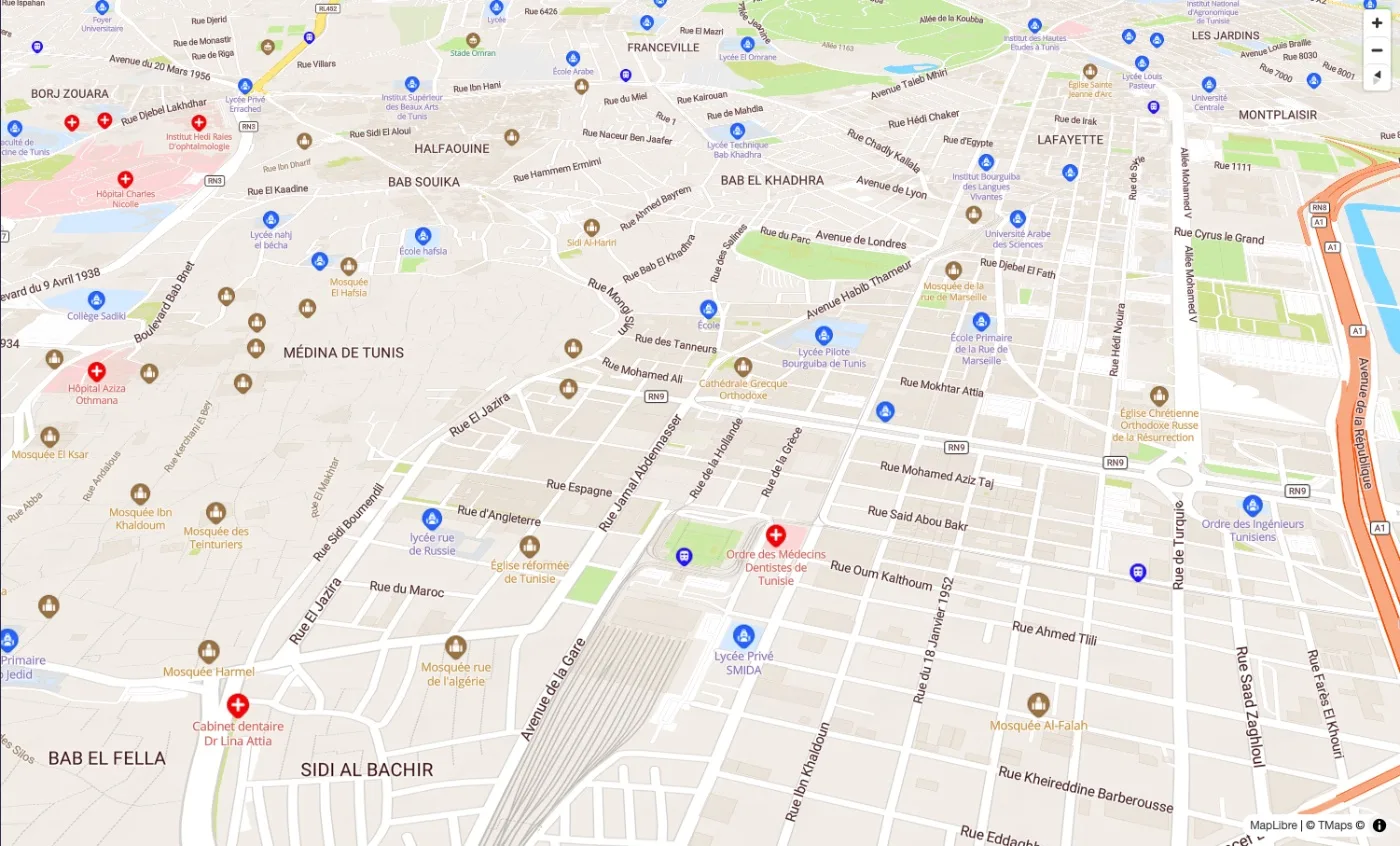
Carte de la Tunisie sur votre site web en 10 minutes --- title: "Carte de la Tunisie sur votre site web en 10 minutes" published: true description: "Afficher une carte de la Tunisie sur votre site en 10 minutes avec Leaflet et TMaps. Code prêt à copier." tags: javascript, webdev, tutorial, leaflet cover_image: tmaps.tn series: Cartes de la Tunisie avec TMaps --- Vous avez une boutique, un restaurant, une agence ou un cabinet, et vous aimeriez que vos clients voient où vous trouver directement sur votre site ? Ou vous développez une application qui a besoin d'une carte de la Tunisie à jour, avec les vrais noms de rues ? Dans ce tutoriel, on part d'une page vide pour arriver, en une dizaine de minutes, à une carte interactive avec un marqueur sur votre adresse. Pas de framework, rien à installer : un seul fichier HTML suffit. Le résultat est visible ici : examples.tmaps.tn Ou testez-la directement ici, et copiez-la sur CodePen (bouton Fork) pour modifier le code : {% codepen codepen.io default-tab=result %} !Carte du Grand Tunis avec TMaps Les outils On utilise Leaflet, la bibliothèque de cartes JavaScript la plus répandue, légère et gratuite. Pour le fond de carte, on prend TMaps : il couvre le monde entier, avec beaucoup plus de détails sur la Tunisie (rues, quartiers, routes nationales et régionales). De 0 à 3 minutes : créer une clé API 1. Créez un compte sur la console TMaps. 2. Dans API Keys, cliquez sur Create API Key. Vous obtenez une clé qui commence par ak_. 3. Dans Authorized Domains, ajoutez les domaines où la carte va s'afficher, par exemple www.monsite.tn, et localhost pour vos tests sur votre ordinateur. Deux pièges à éviter. Les jokers ne sont pas acceptés : *.monsite.tn ne marche pas, il faut ajouter chaque sous-domaine (www.monsite.tn, boutique.monsite.tn…). Et les requêtes doivent passer en HTTPS, le HTTP simple est refusé. Votre clé sera visible dans le code de la page. Pas d'inquiétude, c'est normal pour une carte affichée dans le navigateur : c'est la liste des domaines autorisés qui empêche quelqu'un d'autre de l'utiliser sur son propre site. De 3 à 7 minutes : la carte Créez un fichier index.html, collez ce code et remplacez VOTRE_CLE_API par votre clé : <!doctype html> <html lang="fr"> <head> <meta charset="UTF-8"> <meta name="viewport" content="width=device-width, initial-scale=1"> <title>Où nous trouver</title> <link rel="stylesheet" href="https://cdn.jsdelivr.net/npm/leaflet@1.9.4/dist/leaflet.css"> <script src="https://cdn.jsdelivr.net/npm/leaflet@1.9.4/dist/leaflet.js"></script> <style> #map { height: 450px; border-radius: 12px; } </style> </head> <body> <h1>Où nous trouver</h1> <div id="map"></div> <script> const API_KEY = 'VOTRE_CLE_API'; // Centre de la carte [latitude, longitude] et niveau de zoom const map = L.map('map').setView([36.8002, 10.1815], 15); L.tileLayer(`https://tiles.tmaps.tn/r-tile/{z}/{x}/{y}?api_key=${API_KEY}`, { maxZoom: 18, attribution: '© <a href="https://www.tmaps.tn">TMaps</a>', }).addTo(map); </script> </body> </html> Pour tester, ouvrez la page avec un petit serveur local plutôt qu'en double-cliquant sur le fichier. Dans le dossier du fichier : npx serve . # ou python3 -m http.server 8000 Allez ensuite sur http://localhost:3000 (ou :8000). La carte s'affiche, et vous pouvez zoomer jusqu'au niveau de la rue : !Médina de Tunis au zoom 16 De 7 à 9 minutes : un marqueur sur votre adresse Ajoutez ces quelques lignes juste après .addTo(map); : L.marker([36.8002, 10.1815]) .addTo(map) .bindPopup('<b>Ma Boutique</b><br>Avenue Habib Bourguiba, Tunis') .openPopup(); Pour connaître les coordonnées de votre adresse, le plus simple est de la taper dans la démo de recherche d'adresse TMaps, qui affiche la latitude et la longitude. Un clic droit sur n'importe quelle carte en ligne fait aussi l'affaire. Attention à l'ordre : Leaflet attend [latitude, longitude]. En Tunisie, la latitude tourne autour de 30 à 37 et la longitude autour de 7 à 11. Si votre marqueur atterrit dans la mer, vous avez très probablement inversé les deux. À 10 minutes : la mise en ligne Envoyez index.html sur votre hébergement, ou copiez le bloc <div id="map"> et les deux <script> dans une page existante (WordPress, site vitrine…). Vérifiez juste que le domaine du site figure bien dans les Authorized Domains de votre clé. Si la carte reste grise, ouvrez la console du navigateur (F12) et regardez l'onglet Réseau. Un code 401 veut dire que la clé est absente ou révoquée. Un 403 veut dire que le domaine n'est pas autorisé, ou que la page est servie en HTTP au lieu de HTTPS. Pour aller plus loin - TMaps : API de cartographie et de géocodage pour la Tunisie, une alternative à Google Maps - Une carte vectorielle avec mode sombre, grâce à MapLibre GL : la démo - La recherche d'adresse (géocodage) : la démo - Un formulaire de livraison avec saisie d'adresse et pin sur la carte : la démo - Tout le code source, sous licence MIT : tmaps-tn/tmaps-snippets - La documentation : tmaps.tn Une question ? Laissez un commentaire ou écrivez-nous à support@tmaps.tn.
EVO-X2 に RTX 3080 Ti を足すと LLM は何倍速くなるか メモリ 128GB のミニ PC「EVO-X2」に、OCuLink で中古の RTX 3080 Ti をつなぎました。内蔵 GPU とどれだけ差が出るのかを、同じ llama.cpp・同じモデルで測っています。 結果は、VRAM に収まる gpt-oss-20b は約 2.2 倍に速くなり、収まらない gpt-oss-120b は変わりませんでした。さらに、測っている途中で、3080 Ti が本来の約半分の速さしか出ない状態になることにも気づきました。 先に結論 gpt-oss-20b の生成速度は 79.0 → 177.5 t/s(約 2.2 倍)、プロンプト処理は 1929 → 4705 t/s(約 2.4 倍)になりました。VRAM 12GB に収まるモデルを速く動かすという目的は、達成できました。 gpt-oss-120b は、3080 Ti を足しても生成速度が変わりませんでした(56.0 → 55.3 t/s)。プロンプト処理も、最大で約 10% 速くなっただけです。 注意点: 3080 Ti は、軽い負荷だとクロックが上がらず、速度が約半分になります。nvidia-smi でクロックを固定すると解消しました。 3D ベンチと llama.cpp は、公開されているスコアと比べて目立った低下はありませんでした。ただし、OCuLink(Gen4 x4)による低下の割合は、x16 接続と比較して切り分けては測っていません。 接続の方法と、アダプタで詰まった話は、別の記事「EVO-X2 に OCuLink の eGPU を認識させるのに苦労した話」に書きました。 何を期待して、何が得られたか EVO-X2 の 128GB の統合メモリには、大きなモデルを載せられます。ただし、速度は内蔵 GPU の性能までです。VRAM 12GB に収まるモデルは、専用 GPU を足してもっと速く動かしたい、その差を実測したいと考えました。将来は Isaac Sim なども使いたいので、CUDA が使える GPU を足したいという理由もありました。 3080 Ti(中古、購入額 82,000 円)は、内蔵 GPU より速く、比較的コスパが良いと考えて選びました(筆者の判断です。他の GPU との比較は行っていません)。 結果は次のとおりです。 期待 結果 VRAM 12GB に収まるモデルが、内蔵 GPU より速い ✅ gpt-oss-20b の生成が 79.0 → 177.5 t/s(約 2.2 倍)、プロンプト処理が 1929 → 4705 t/s(約 2.4 倍) gpt-oss-120b のような大きなモデルも速くなる ❌ 3080 Ti 単体では載りません。内蔵 GPU と併用しても、生成は変わらず(56.0 → 55.3 t/s)、プロンプト処理は最大で約 10% 速くなっただけです 中古の GPU に初期不良がない ✅ HDMI 2 ポートで映像が出ました。VRAM 検査と PCIe のエラーは 0 件でした(DisplayPort は未確認です) Isaac Sim が動く 未確認(VRAM 12GB は、最小要件の 16GB に届きません) 測定環境 項目 内容 本体 GMKtec EVO-X2(Ryzen AI Max+ 395、メモリ 128GB、BIOS EVO-X2S 1.13)、Ubuntu 24.04、カーネル 7.0.0-38 接続 M.2 → OCuLink(CY)→ MINISFORUM DEG1 → ASUS TUF-RTX3080TI-12G-GAMING(中古)。電源は玄人志向 KRPW-GA750W です。詳細は、冒頭で紹介した別の記事に書きました ドライバ NVIDIA 595.99.02(open、Canonical 署名済みの事前ビルド版) ソフト llama.cpp b11803(Vulkan)。公開値との比較だけ、Windows 11 の CUDA 13.4 版を使いました 測定項目の読み方は、次のとおりです。 pp512 / tg128: pp512 は 512 トークンのプロンプトを読む速度(prompt processing)、tg128 は 128 トークンを生成する速度(token generation)です。単位の t/s は、1 秒あたりのトークン数です。 FA: Flash Attention のことです。llama.cpp では -fa で切り替えます。 ベンチマーク: 内蔵 GPU と 3080 Ti の比較(同条件) 条件は、すべて共通です。llama.cpp b11803、Vulkan、同じモデルファイル、-ngl 99。デバイスだけを GGML_VK_VISIBLE_DEVICES で切り替えました。 モデル 内蔵 8060S(pp512 / tg128) 3080 Ti(pp512 / tg128) 倍率 gpt-oss-20b MXFP4(11.27GiB) 1929 / 79.0 t/s 4705 / 177.5 t/s 約 2.4 倍 / 約 2.2 倍 gpt-oss-20b(FA 有効、3080 Ti はクロック固定。pp512 / tg128) 1938.6 / 77.9 t/s 4232.5 / 160.6 t/s 約 2.2 倍 / 約 2.1 倍 同上(pp2048) 1836.9 t/s 4583.9 t/s 約 2.5 倍 gpt-oss-120b(63GB) 845.2 / 56.0 t/s(2 回の平均) 単体では載りません(59GiB に対して VRAM は 12GiB) 内蔵 GPU との併用は、下の小節に書きました ※ 1 行目の gpt-oss-20b は 3 回の平均です(FA の指定なし。測定時にクロックを固定していたかどうかは、記録していません)。FA 有効の 2 行は別の測定で、nvidia-smi -lgc 1500,2100 と -lmc 9501,9501 で 3080 Ti のクロックを固定しています(内蔵 GPU は既定のままです)。1 行目と FA 有効の行は条件が違うので、値を直接比べないでください。 ※ 3080 Ti を既定のクロックのままで測ると、軽い負荷で速度が大きく落ちます。詳しくは、下の「注意点」の節を参照してください。 $ GGML_VK_VISIBLE_DEVICES=0 llama-bench -m gpt-oss-20b-MXFP4.gguf -ngl 99 -p 512 -n 128 -r 3 | model | size | backend | ngl | test | t/s | | gpt-oss 20B MXFP4 MoE | 11.27 GiB | Vulkan | 99 | pp512 | 4705.25 ± 28.46 | | gpt-oss 20B MXFP4 MoE | 11.27 GiB | Vulkan | 99 | tg128 | 177.46 ± 0.71 | $ GGML_VK_VISIBLE_DEVICES=1 llama-bench ... (内蔵 8060S) | gpt-oss 20B MXFP4 MoE | 11.27 GiB | Vulkan | 99 | pp512 | 1928.57 ± 30.40 | | gpt-oss 20B MXFP4 MoE | 11.27 GiB | Vulkan | 99 | tg128 | 79.00 ± 0.20 | 負荷中の実測値は、最高 50℃、最大 348W(上限は 350W)、リンクは Gen4 x4 でした。カーネルログ(journalctl -k)には、NVRM のメモリ確保エラー(can't alloc VA space for mapping、NV_ERR_NO_MEMORY)が出ます。AER と Xid は 0 件でした。このエラーは、3080 Ti の VRAM をほぼ使い切る実行で出ることを確認しています(12GiB を超えて確保に失敗した実行と、成功した 20b の実行の、どちらでも出ました)。通常の負荷で出るかどうかと、速度への影響は、確認していません。 gpt-oss-120b は、3080 Ti を足しても生成が速くならない 120b(63GB)は 12GiB に載らないので、層を 3080 Ti と内蔵 GPU に分けて測りました(llama-bench -ngl 99 -p 512 -n 128 -r 2 -dev Vulkan0/Vulkan1)。 -ts(3080 Ti / 内蔵) pp512 tg128 3080 Ti の VRAM 最大使用量 内蔵のみ(基準) 845.2 56.0 — 1/6 928.9 55.3 10275 MiB 1/8 924.0 54.8 8627 MiB 1/10 899.3 55.2 6978 MiB 1/4 メモリ確保に失敗(3080 Ti の 12GiB を超えます) プロンプト処理は、内蔵 GPU のみの場合より、最大で約 10% 速くなりました。 生成速度は、ほぼ変わりませんでした(誤差から −2% の範囲です)。 3080 Ti 単体で -ngl を絞った場合は、6 層なら動作し(VRAM は 9033 MiB)、8 層ではメモリ確保に失敗しました。 注意点: -dev Vulkan0/Vulkan1 の指定が必要です。b11803 は、dGPU があると内蔵 GPU を自動では使いません。指定しないと、全層が 3080 Ti に割り当てられて、メモリ確保に失敗します。-dev も -ts も、区切りはスラッシュです。 ⚠️ 注意点: 3080 Ti のクロックが上がらず、速度が約半分になる このベンチで、いちばん意外だったのがこの現象です。 トークン生成(tg)だけを回すと、gpt-oss-20b の tg256 が 87.8 t/s でした。速いときの約半分です。同じ現象は、llama-bench を繰り返し起動する 30 分の試験でも起きました。23:14 以降に SM クロックが 780〜1000MHz に下がり、pp2048 が約 4670 t/s から約 2800 t/s に落ちました。このとき、温度は 50℃ で、熱による制限の形跡はなく、PCIe も Gen4 x4 のままでした。 原因(実測): tg だけの負荷では、GPU が P3 状態(省電力寄りの動作状態)のまま、SM クロックが 780MHz、メモリクロックが 5001MHz(最大は 9501MHz)に張り付いていました。pp4096 のような重い処理では P0(最大性能)になり、SM クロックは約 1490MHz まで上がります。つまり、軽い負荷では、ドライバがクロックを上げません(設定は既定のままです)。 既定のクロックで測ると、gpt-oss-20b(FA 有効)は pp512 が 2437.9、pp2048 が 3416.6、tg128 が 110.4 t/s でした(平均の SM クロックは 1190MHz)。クロックを固定すると、pp512 が 4232.5、pp2048 が 4583.9、tg128 が 160.6 t/s になりました。 確認用のコマンドです(実行結果を記録したものではありません)。負荷をかけながら、別の端末で見ます。 nvidia-smi --query-gpu=pstate,clocks.sm,clocks.mem --format=csv -l 1 対処: クロックを固定すると解消しました。再起動すると元に戻ります。 固定する(この 3080 Ti での値) sudo nvidia-smi -lmc 9501,9501 sudo nvidia-smi -lgc 1500,2100 元に戻す sudo nvidia-smi -rmc sudo nvidia-smi -rgc nvidia-settings の PowerMizer は使えませんでした。X が gdm のログイン画面のもので、認証がなく、変更できなかったためです。 固定した状態では、待機時も SM クロックが 1500MHz で推移しました(固定の影響と推測しています。待機時の消費電力は測っていません)。 起動時に自動で固定する仕組みは、作っていません。 OCuLink で速度は落ちるのか OCuLink(Gen4 x4)は、PCIe x16 より細い接続です。そのせいで速度が落ちていないかを確かめるため、公開されている測定値と比べました。 公開されている比較(Web 上の情報)では、モデルが VRAM に収まる場合、生成速度の低下は小さいとされています(PCIe 3.0 x1 で 3.4% という Jeff Geerling さんの測定の引用です)。一方、VRAM からあふれる場合のプロンプト処理は、大きく落ちます(Thunderbolt 3 での測定で 54%)。 公開値の多くは DirectX や CUDA での測定なので、同じ EVO-X2 を Windows で起動して測りました。Linux の Vulkan とは別の条件になります。実測の条件(2026-10-27)は、次のとおりです。 Windows 11 build 26300、nvidia 610.88 llama.cpp b11803 の CUDA 13.4 版、-ngl 99 負荷中のリンクは、2 回とも全サンプルが Gen4 x4 Llama 3 8B Q4_K_M(-p 512 -n 512 -r 3)では、pp512 が 5077、tg512 が 141.5 t/s でした。公開値の同じ 3080 Ti(XiongjieDai さんの表、2024 年 5 月の build、RunPod)は、pp512 が 3690、tg512 が 110.6 です。 Llama 2 7B Q4_0(-fa 0,1 -r 5)は、CUDA スコアボード #15013 と比べました。3080 Ti の行はないので、3080 と 3090 を上下の目安にします。 今回の 3080 Ti(FA 無 / 有) 3080(FA 無 / 有) 3090(FA 無 / 有) pp512 4908 / 5689 5014 / 5570 5175 / 5560 tg128 159.3 / 168.5 139.7 / 140.0 158.2 / 161.9 読み取れること: 今回の値は、公開されている 3080 / 3090 の範囲と同程度か、それ以上です。OCuLink(Gen4 x4)が原因で、公開値より遅くなっている兆候は見られません。 公開値には build が古いものが多いので、今回のほうが速い項目には、build の差が含まれています。 限界: 測ったモデルは、全層が VRAM に載ります。そのため、モデルの読み込みが終わったあとは、PCIe をほとんど使いません。この測定で言えるのは、「3080 Ti が公開値と同程度に動いている」ところまでです。PCIe x4 の影響の大きさ(x16 との比較)は、測れていません。 影響が出るのは、モデルの読み込み時間と、VRAM からあふれる処理(CPU や内蔵 GPU との分担)です。このうち、読み込み時間に効くホストから GPU への転送は、6.7 GB/s(理論値の約 85%)でした。 リンクを Gen3 や Gen2 に落とす対照実験は、行っていません(公開値との比較に方針を変えたためです)。 まとめ VRAM 12GB に収まるモデル(gpt-oss-20b)は、内蔵 GPU より、生成が約 2.2 倍、プロンプト処理が約 2.4 倍速くなりました。 VRAM に収まらない gpt-oss-120b は、3080 Ti を足しても生成速度が変わりませんでした。大きなモデルまで速くしたいなら、そのモデルが VRAM に収まる GPU が必要になります(VRAM の大きな GPU は試していないので、これは推測です)。 3080 Ti は、軽い負荷でクロックが上がらず、速度が約半分になります。nvidia-smi -lgc と -lmc で固定するまでは、ベンチの数字を信用しないほうがよいです。 公開スコアと比べて、OCuLink による目立った低下は見られませんでした(Time Spy のグラフィックススコアは、公開値の −2.0%〜+1.9% です)。ただし、x16 接続との比較で切り分けて測ったわけではありません。測ったモデルは VRAM に収まり、PCIe への依存が小さいためです。 次にやること: Linux で CUDA ビルドを使った比較と、Isaac Sim の VRAM の確認です。 ここから先は、補足の資料です。 資料 1: 中古の 3080 Ti は大丈夫だったか(初期確認のまとめ) 映像: HDMI 2 ポートで出ました。DisplayPort は機材がなく、未確認です。外観・ファン・コイル鳴きに問題はありませんでした。 VRAM 検査: memtest_vulkan で約 11.1GB を約 10 分半、約 22,000 回繰り返して、エラーは 0 件でした。 連続負荷: Heaven を 94 分回しました。リンクは Gen4 x4 のままで、Xid と PCIe のエラーは 0 件でした。 3DMark Time Spy(Windows): グラフィックススコアは 19442 でした。公開値(同じ 3080 Ti)との差は −2.0〜+1.9% です。公開値は検索結果の要約から取ったもので、レビュー本文は確認していません。 Superposition 1080p Extreme: Linux の OpenGL で 10521、Windows の DirectX で 12379 でした。 PCIe エラー: この機種では、カーネルが「platform does not support AER」と出します(AER に対応していません)。そのため、AER が 0 件だったことは、強い証拠ではありません。 資料 2: 用語メモ 用語 この記事での意味 Gen4 x4 PCIe 4.0 の 4 レーンです。理論値は約 7.88 GB/s(16 GT/s)です P0 / P3 GPU の動作状態です。P0 が最大性能で、数字が大きいほど省電力になります AER / Xid AER は PCIe のエラーを報告する仕組みです。Xid は NVIDIA ドライバが出すエラー番号です。どちらもカーネルログ(journalctl -k)で確認します リプレイ PCIe の転送をやり直した回数です(nvidia-smi -q に出ます)。多い場合は、信号品質の問題を疑います 測っていないこと・分かっていないこと ⚠️ DisplayPort、Fire Strike(2 回とも失敗しました)、Steel Nomad は、測れていません。FurMark でクロックが 1305 MHz まで下がった原因も、分かっていません。 ⚠️ 長時間の LLM 連続推論は、測っていません。熱が飽和する数十分以上の負荷は、Heaven の 94 分しか見ていません。 ⚠️ Linux での CUDA の動作は、確認していません(Vulkan のみ測定しました)。Windows の CUDA 版は測定済みです。 ⚠️ OCuLink(Gen4 x4)による低下の割合は、x16 接続との比較では測っていません。 ⚠️ Isaac Sim の動作は、確認していません。
GST Invoice Math in Pure Python — CGST, SGST, IGST Explained with Code If you've ever built billing software for India, you've hit the question: when does GST split into CGST + SGST, and when is it a single IGST? Get it wrong and the invoice is wrong — even if the total looks right. I built a small GST invoice generator in pure Python (standard library only) to get this math exactly right. Here's the logic, with a real worked example whose grand total is ₹15,522. The one rule that decides everything Compare two state codes: - Seller's state code == place-of-supply state code → intra-state → tax splits in half: CGST + SGST - They differ → inter-state → one single tax: IGST That's it. The customer's address doesn't decide it — the place of supply does (for goods, usually where they're delivered). In code: intra = shop_state_code == place_of_supply_state_code Per-line math For each item: taxable = qty × rate, then tax = taxable × GST%. The split is where people slip: from decimal import Decimal, ROUND_HALF_UP D = Decimal CENT = D("0.01") def money(x): """Round to 2 decimals, half-up (the way shops actually bill).""" return D(x).quantize(CENT, rounding=ROUND_HALF_UP) taxable = money(qty * rate) tax = money(taxable * gst_percent / 100) if intra: cgst = money(tax / 2) sgst = tax - cgst # <-- the important line igst = D("0") else: cgst = sgst = D("0") igst = tax Two things to notice: 1. Never use floats for money. 0.1 + 0.2 != 0.3 in floating point, and those errors will surface on an invoice. Decimal with explicit half-up rounding is how real billing works. 2. The odd-paisa trick. Splitting ₹111.75 in half gives ₹55.875 — not a real amount. Round one half up (CGST ₹55.88) and set the other half to tax − cgst (SGST ₹55.87), so the two halves always add back to the exact tax. If you round both halves independently, invoices drift by a paisa and accountants come looking for you. The worked example (real output) An intra-state invoice — seller and place of supply in the same state — with five items at three different GST rates: | Item | Qty | Rate | GST | Taxable | Tax | |---|---|---|---|---|---| | CTC Tea (1 kg) | 10 | ₹420 | 5% | ₹4,200.00 | ₹210.00 | | Earthen Cups (pack of 12) | 20 | ₹60 | 12% | ₹1,200.00 | ₹144.00 | | Chai Masala Combo Pack | 15 | ₹149 | 5% | ₹2,235.00 | ₹111.75 | | Electric Kettle 1.8L | 3 | ₹1,299 | 18% | ₹3,897.00 | ₹701.46 | | LED Bulb 9W (set of 4) | 8 | ₹299 | 18% | ₹2,392.00 | ₹430.56 | Because it's intra-state, every tax above splits into CGST + SGST halves — including the chai masala's ₹111.75, which becomes CGST ₹55.88 + SGST ₹55.87 (spot the odd-paisa trick doing its job). Tax summary by rate (this grouping is what goes on the invoice and into GST returns): | GST rate | Taxable value | CGST | SGST | Total tax | |---|---|---|---|---| | 5% (2.5% + 2.5%) | ₹6,435.00 | ₹160.88 | ₹160.87 | ₹321.75 | | 12% (6% + 6%) | ₹1,200.00 | ₹72.00 | ₹72.00 | ₹144.00 | | 18% (9% + 9%) | ₹6,289.00 | ₹566.01 | ₹566.01 | ₹1,132.02 | Totals: Subtotal (taxable value) ₹13,924.00 Total GST ₹ 1,597.77 Grand total ₹15,521.77 → rounded ₹15,522 (round-off +₹0.23) If the same five items were supplied to a customer in a different state, nothing about the taxable values changes — the same ₹1,597.77 simply appears as IGST instead of the CGST/SGST split, and the total stays ₹15,522. Same money, different tax heads — which is exactly why getting the split right matters for filing, not for the customer. One more detail: the round-off Invoices are paid in whole rupees, so the generator rounds the grand total (₹15,521.77 → ₹15,522) and shows the +₹0.23 round-off as its own line. Hiding the difference inside an item rate is how totals stop reconciling — display it openly instead. Full code The complete generator — JSON or CSV in, print-ready HTML invoice out, with a per-rate tax summary and the amount in words (Indian numbering: lakh/crore) — is on GitHub: gst-invoice-generator. Run it with the bundled sample and you'll get exactly the ₹15,522 invoice above. --- Demo first — on YOUR sample — before you pay anything. Need invoice automation, spreadsheet cleanup, or a scraping/automation tool for your business? Send me a sample of your data and I'll show you a working demo first. 👉 My Python web scraping & automation gig on Fiverr — Abhishek, Python Automation Developer
Herdr ayrı bir ürün , denemenizi ısrarla tavsiye ederim. Benim repoyu da şuraya bırakıyorum :fab-agent/agentic-organization , grok tuşuna basın tartışmaya başlayın , hatta durun @grok paylaştığım reponun özetini ne yaptığını paylaşır mısın ?
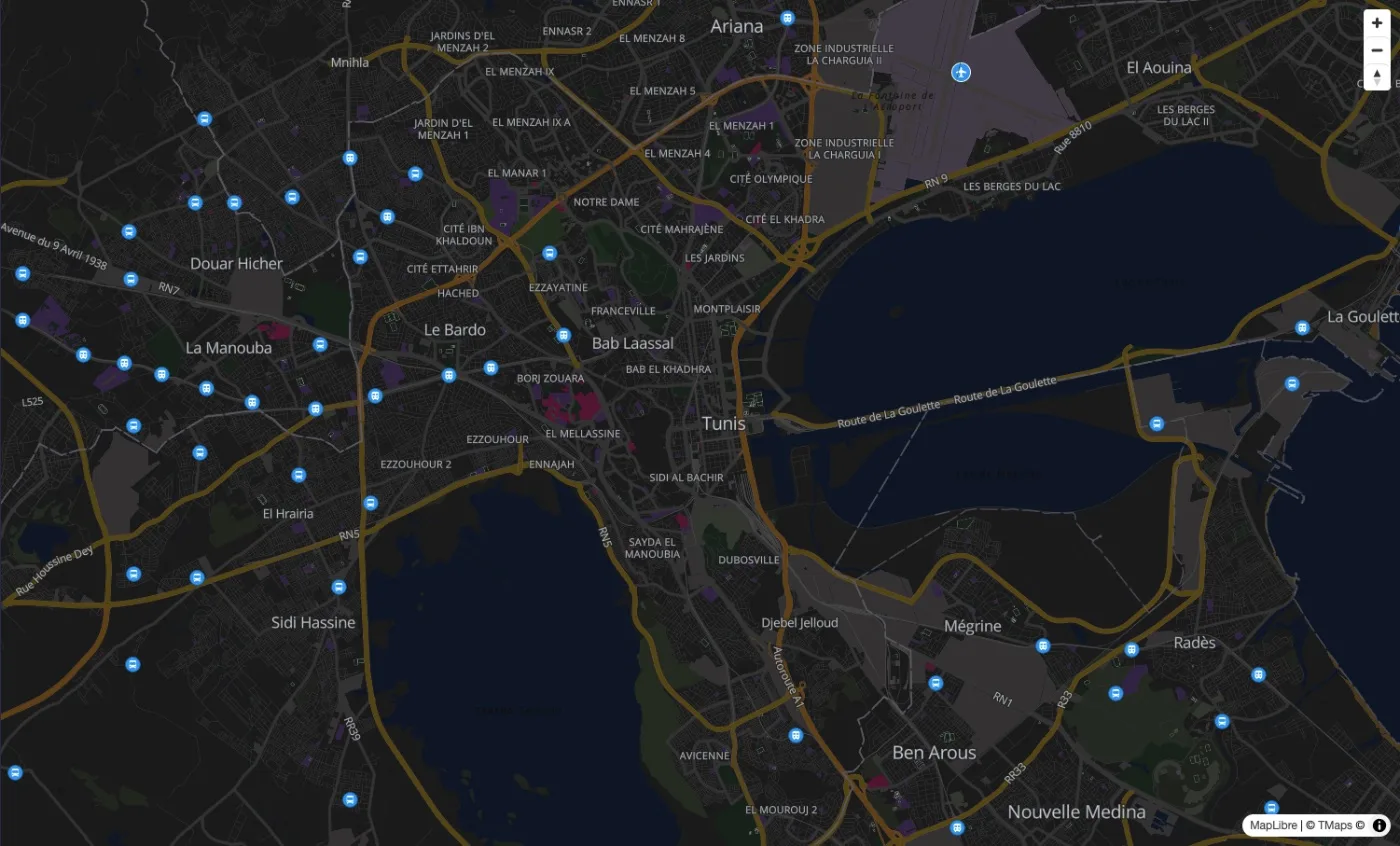
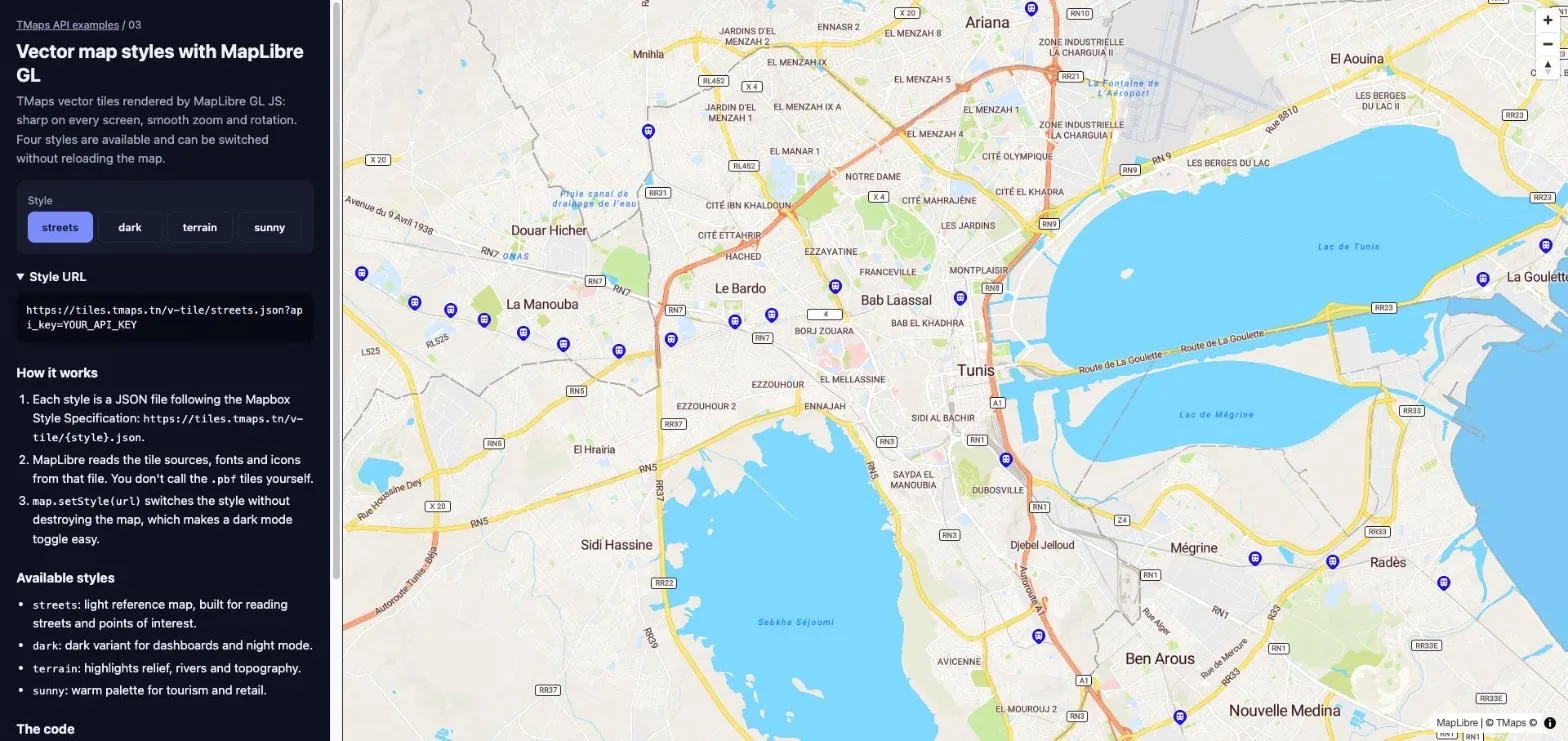
Carte vectorielle de la Tunisie avec MapLibre et TMaps --- title: "Carte vectorielle de la Tunisie avec MapLibre et TMaps" published: true description: "Carte vectorielle de la Tunisie avec MapLibre et TMaps : 4 styles, mode sombre et 3D. Code et démo." tags: javascript, webdev, tutorial, maplibre cover_image: tmaps.tn series: Cartes de la Tunisie avec TMaps --- Les tuiles raster sont des images de la carte. C'est simple et ça marche partout, mais on ne peut pas y toucher. Les tuiles vectorielles, elles, envoient les données de la carte (routes, bâtiments, noms de lieux) et laissent le navigateur la dessiner. Résultat : une carte nette sur tous les écrans, un zoom fluide, la possibilité de la faire pivoter ou de l'incliner, et un changement de style instantané. Dans cet article, on utilise les tuiles vectorielles de TMaps avec MapLibre GL JS, la bibliothèque open source de cartes en WebGL, et on construit un petit sélecteur de styles. La démo en ligne : examples.tmaps.tn Ou testez-la directement ici, et copiez-la sur CodePen (bouton Fork) pour modifier le code : {% codepen codepen.io default-tab=result %} !Démo MapLibre avec le sélecteur de styles Comment fonctionnent les tuiles vectorielles TMaps Vous ne demandez pas les tuiles vous-même. Chaque style est un document JSON qui suit la Mapbox Style Specification : https://tiles.tmaps.tn/v-tile/{style}.json?api_key=VOTRE_CLE_API Ce JSON décrit les sources de tuiles, les polices (glyphs), les icônes (sprites) et la façon de dessiner chaque couche. MapLibre le lit et va chercher tout le reste tout seul. Quatre styles sont disponibles : | Style | Pour quoi faire | |---|---| | streets | Carte de référence, rues et points d'intérêt faciles à lire | | dark | Tableaux de bord et mode nuit | | terrain | Relief, cours d'eau et topographie | | sunny | Tourisme et commerce, couleurs plus chaudes | 1. Une première carte vectorielle Il vous faut une clé API créée sur la console TMaps, avec votre domaine (et localhost) dans ses Authorized Domains. <!doctype html> <html lang="fr"> <head> <meta charset="UTF-8"> <meta name="viewport" content="width=device-width, initial-scale=1"> <title>Carte vectorielle de la Tunisie</title> <link rel="stylesheet" href="https://cdn.jsdelivr.net/npm/maplibre-gl@5.6.0/dist/maplibre-gl.css"> <script src="https://cdn.jsdelivr.net/npm/maplibre-gl@5.6.0/dist/maplibre-gl.js"></script> <style> html, body, #map { height: 100%; margin: 0; } </style> </head> <body> <div id="map"></div> <script> const API_KEY = 'VOTRE_CLE_API'; const map = new maplibregl.Map({ container: 'map', style: `https://tiles.tmaps.tn/v-tile/streets.json?api_key=${API_KEY}`, center: [10.1815, 36.8002], // Tunis, en [lng, lat] zoom: 12, maxZoom: 18, }); map.addControl(new maplibregl.NavigationControl(), 'top-right'); </script> </body> </html> Un point d'attention : MapLibre attend [longitude, latitude], l'inverse de Leaflet qui attend [lat, lng]. C'est la cause la plus fréquente d'une carte qui s'ouvre en plein océan. !Style streets de TMaps 2. Changer de style sans recharger la carte map.setStyle(url) remplace le style mais garde la carte, sa position et ses contrôles. Un sélecteur simple tient en quelques lignes : const styleUrl = (name) => `https://tiles.tmaps.tn/v-tile/${name}.json?api_key=${API_KEY}`; for (const name of ['streets', 'dark', 'terrain', 'sunny']) { const button = document.createElement('button'); button.textContent = name; button.addEventListener('click', () => map.setStyle(styleUrl(name))); document.body.append(button); } Voici la même vue de Tunis dans les trois autres styles. D'abord dark, idéal pour un tableau de bord : !Style dark de TMaps Puis terrain : !Style terrain de TMaps Et enfin sunny : !Style sunny de TMaps Suivre le mode sombre de l'utilisateur Comme le changement est instantané, on peut tout simplement suivre le thème du système : const dark = window.matchMedia('(prefers-color-scheme: dark)'); const applyTheme = () => map.setStyle(styleUrl(dark.matches ? 'dark' : 'streets')); dark.addEventListener('change', applyTheme); applyTheme(); 3. Incliner et faire pivoter La carte est dessinée en WebGL, on peut donc l'incliner et la faire pivoter, ce qui est impossible avec des tuiles raster : map.jumpTo({ center: [10.179, 36.799], // Médina de Tunis zoom: 15.5, pitch: 60, // inclinaison, en degrés bearing: -25, // rotation, en degrés }); !Médina de Tunis inclinée à 60 degrés Vos utilisateurs peuvent faire la même chose eux-mêmes : clic droit maintenu sur ordinateur, ou deux doigts sur téléphone. 4. Personnaliser un style Le JSON du style est modifiable. Téléchargez-le, changez les couches (couleurs, polices, noms affichés selon le zoom), puis hébergez votre propre version. Gardez simplement deux règles en tête : - les URL des tuiles dans sources doivent toujours pointer vers tiles.tmaps.tn avec votre api_key, car c'est ce qui authentifie votre consommation ; - vous pouvez modifier librement layers, ainsi que glyphs et sprite si vous hébergez vos propres polices et icônes. Raster ou vectoriel ? | | Raster | Vectoriel | |---|---|---| | Bibliothèques | Leaflet, OpenLayers, tout client XYZ | MapLibre GL JS, MapLibre Native | | Écrans haute densité | Flou (pas encore de @2x) | Toujours net | | Changer de style | Il faut d'autres tuiles | Instantané, dans le navigateur | | Rotation et inclinaison | Non | Oui | | Appareils anciens | Très léger | Nécessite WebGL | Pour une carte simple intégrée dans une page, les tuiles raster avec Leaflet restent imbattables. Quand la carte est au cœur de votre produit, passez au vectoriel. Pour aller plus loin - TMaps : API de cartographie pour la Tunisie - Toutes les démos en ligne : examples.tmaps.tn - Le code source, sous licence MIT : tmaps-tn/tmaps-snippets - La collection Postman : postman.com - La documentation des tuiles vectorielles : tmaps.tn Une question ou une remarque ? Laissez un commentaire ou écrivez-nous à support@tmaps.tn.
I built an MCP server for sharing my Firefox/Zen browser with a coding agent I'm the author of Kitsune, a free and open-source MCP server (MIT). I use Zen as my main browser, and most browser MCP servers I found were built around Chromium. I didn't want a separate browser just for my coding agent, or to switch to an AI browser. I wanted the agent to use the browser I already had open while I kept working. Kitsune connects Claude Code, Codex, OpenCode or another MCP client to your existing Firefox, Zen or LibreWolf through an extension and a local bridge, with your existing logins. The part I focused on is sharing the browser with a person. Agent tabs open in the background, and writes to the tab you're actively using are held. There are read-only and draft modes too, though typing into a site can still trigger autosave. In the demo, Claude Code looks up flights and a day route for a Tokyo weekend using Google Flights and Maps. It works in background tabs while my Google tab stays in front, and doesn't book anything. A few limits: OS clicks and site popups can still affect focus. Kitsune doesn't prevent prompt injection, so a dedicated profile is safer. The bridge runs locally, but page content your agent reads can go to the model you use. Kitsune doesn't include a model or cover its costs. Setup and source: junyeong-nero/kitsune
PHP2Shell: Why Laravel didn’t protect your app, and how I patched mine --- title: PHP2Shell: Why Laravel didn’t protect your app, and how I patched mine published: true date: 2026-11-02 11:06:00 UTC tags: Security,PHP,Laravel,Filament canonical_url: filamentmastery.com --- All my client apps running PHP 8.4 in Docker were on 8.4.27, tested and redeployed, in under four hours. Getting there was mostly a waiting game, and the slowest part had nothing to do with the code. If you missed the last week: PHP shipped emergency fixes for two unauthenticated remote code execution bugs, nicknamed PHP2Shell. Two days later it disclosed a third, still unpatched. Here is the timeline. <!--kg-card-begin: html--> | Date (UTC) | What happened | | --- | --- | | Oct 26 | CVE-2026-109618 and CVE-2026-109619 added to the CISA Known Exploited Vulnerabilities catalog | | Oct 23 | PHP discloses CVE-2026-115560, no fix yet, mitigation by configuration | | Oct 21, 14:00 | PHP releases 8.5.12, 8.4.27, 8.3.36 and 8.2.35 | | Oct 21, 07:43 | Cloudflare reports the first attacks, six hours before the fix | | Oct 20 | Details leak on social media ahead of the planned disclosure | <!--kg-card-end: html--> Both October 21 bugs are rated 9.2 (CVSS v4.0) and affect every PHP version back to 5.4. No login, no specific app code needed. Why Laravel did not protect you The attack hits the PHP engine while it parses the incoming request, before your first line of Laravel code runs. Your middleware, your policies and your validation rules never get a chance to see it. A common reflex is: "Laravel has its own session driver, so session bugs don't concern me, right?" They do. The known exploit path goes through PHP's session upload progress feature, which is handled by the engine during multipart parsing. Laravel's session driver sits one layer above and is irrelevant here. Two consequences for a Laravel or Filament app: - Updating PHP is the only complete fix. PHP says so explicitly in its release notes (php-src 8.4.27). - Turning off session.upload_progress.enabled blocks the known paths, not every variant. It also has to be set in php.ini or the FPM pool: a .user.ini or an ini_set() call applies too late in the request. Laravel itself does not use this feature, so you lose nothing by turning it off. Why php artisan down protected nothing I saw many Laravel sites go into maintenance mode on October 21. It gave them a nice 503 page and zero protection. Maintenance mode works through a storage/framework/down file that public/index.php checks. To run that check, the request has to reach PHP-FPM. And PHP parses the multipart body, upload progress included, while starting the request, before executing the first line of index.php. The attack lands before Laravel knows it is down. What actually protects you is a request that never reaches PHP. Before the patch, the options were, from lightest to heaviest: 1. session.upload_progress.enabled = 0 in the PHP config. Minutes to apply, site stays up, but it only blocks the known attack paths. 2. A 503 served by the web server. A return 503; in Nginx before fastcgi_pass, with a static page. Full protection, visitors still get a proper message. 3. Taking the site offline entirely. Same protection as option 2. Several Dutch sites, the NCSC among them, did exactly that on October 21. How I patched my clients Most of my clients run PHP 8.4, everything in Docker on php:8.4-fpm-alpine, with GitLab CI/CD. The target was 8.4.27. Here is what the day looked like. 1. Wait for the official image. The PHP release was out, but the Docker image took a while to follow. At first the new tags were listed with no usable image behind them, as if they had been published and then rebuilt. I waited until a pull actually returned 8.4.27. 2. Rebuild from the new base. My build jobs always pull the base image, so with a floating tag like 8.4-fpm-alpine the rebuild picked up 8.4.27 instead of a stale cached layer. Without that pull, a green pipeline can still ship the old PHP. 3. Run the full CI pipeline, unchanged. Security checks, unit tests, feature tests and GitLab container scanning. A PHP patch release should not break anything, but an emergency release is exactly when you want proof rather than faith. 4. Deploy through the normal CD pipeline. No manual hotfix on the servers. Recreating the containers also restarts queue workers and schedulers, which keep the old PHP in memory otherwise. Total: under four hours for all of them. The real bottleneck was PECL. During the rebuilds, pecl.php.net stopped responding. My guess, which I can't prove: half the PHP world was rebuilding images at the same moment, and every Dockerfile with a pecl install xdebug or pecl install imagick was hitting the same server. My pipelines could not finish until it came back. The October 23 CVE and the starters update The Filament Mastery starters now ship with session upload progress turned off. A standard Laravel app is very unlikely to be exposed to the October 23 bug, and this change is defense in depth. CVE-2026-115560 has no fix yet. PHP will publish it in its next regular release. Updating to 8.4.27 does not cover it. An app is exposed only if all three conditions hold: 1. session.serialize_handler is set to php_binary or php_serialize 2. the code switches it to php with ini_set() before calling session_start() 3. session upload progress is enabled, which is PHP's default Laravel's standard session handling does not normally use PHP's native session_start() flow. However, packages or custom code may do so, so check your actual dependency stack before concluding that the application is not exposed. The fix PHP recommends in the meantime is the same setting already advised for CVE-2026-109619 on October 21. One line covers both, so the Filament Mastery starters carry it by default. ; docker/common/php-fpm/conf.d/php.ini ; PHP2Shell (CVE-2026-109619) and CVE-2026-115560 mitigation session.upload_progress.enabled=Off Copied into the image: RUN if ["$APP_ENV" = "local"] ; then \ cp "$PHP_INI_DIR/php.ini-development" "$PHP_INI_DIR/php.ini" ; \ else \ cp "$PHP_INI_DIR/php.ini-production" "$PHP_INI_DIR/php.ini" ; \ fi COPY docker/common/php-fpm/conf.d/php.ini "$PHP_INI_DIR/conf.d/custom.ini" The full setup, with this config already applied, is in my production-ready Docker setup for Laravel Filament, updated today. The official image reads that directory for both CLI and FPM. If you are on PHP 8.5, also add fatal_error_backtraces = Off: PHP lists it as the second mitigation for CVE-2026-109619 on that version. Keep both settings even after patching, until PHP ships the fix for CVE-2026-115560. The Filament Mastery starters are updated and available now, with this config included by default: Laravel Filament Backend Starter Laravel Filament Multipanel Starter Laravel Filament Multi-Tenant Starter Checklist for your Laravel and Filament apps - [] PHP is at 8.5.12, 8.4.27, 8.3.36 or 8.2.35: docker compose exec php-fpm php -v - [] On PHP 8.1 or older, php -v shows the same number before and after a distro backport: check the package revision instead, then plan the upgrade (Laravel Forge) - [] Images rebuilt with a fresh pull of the base image, not from cache - [] Queue workers, Horizon, Octane and Reverb restarted (recreating containers does it) - [] Upload progress off, set in php.ini or conf.d, not .user.ini: docker compose exec php-fpm php -i | grep session.upload_progress.enabled returns Off - [] On PHP 8.5, fatal_error_backtraces is Off - [] Every PHP version on the server patched, including ones no site uses today
Kostenloses Lerntool für die AP2 FIAE Hi zusammen, ich mache gerade die Umschulung zum Fachinformatiker Anwendungsentwicklung und schreibe am 25.11. die AP2. Zum Lernen hab ich mir in den letzten Wochen ein eigenes Tool gebaut. Vielleicht hilft es ja noch jemandem von euch. Es läuft direkt im Browser, ohne Anmeldung, auch auf dem Handy: whiletrueblackobelizk.github.io Was drin ist: * rund 900 Aufgaben zu GA1, GA2, WiSo und Fachgespräch, mit Teilpunkten wie in der Prüfung * SQL-Aufgaben, die wirklich ausgeführt werden (SQLite im Browser), dazu ein Beiblatt zum Aufklappen * Schreibtischtest, UML-/ERM-Editor und „Fehler finden“-Aufgaben * Rechentrainer mit Zufallswerten (Netzplan, Amortisation, Zahlensysteme, Kalkulation usw.) * Prüfungssimulationen mit Timer und IHK-Note * Lernplan bis zum Prüfungstag, Wiederholung nach Leitner, Fehlerheft * Training für Präsentation und Fachgespräch Dein Lernstand bleibt nur in deinem Browser. Über „Speichern“ kannst du ihn als Datei sichern. Ich hab alles nach bestem Wissen erstellt, aber es ist kein offizielles IHK-Material und bestimmt nicht fehlerfrei. Wenn euch was auffällt: In jeder Aufgabe gibt es oben rechts „Fehler melden“, das landet direkt als Issue auf GitHub. Darüber freu ich mich wirklich. Der Code ist offen (MIT): WhileTrueBlackObelizk/ap2-lerntool Wenn dir das Tool was bringt, freu ich mich über einen Stern auf GitHub ⭐ Und viel Erfolg allen, die im November mit mir schreiben!
@TechyNerdgamer @alizeh_ai Stop offloading critical thinking to AI. It's called mixture of experts you doughnut. github.com/Niko1221/Strata/releases/tag/v0.2.4 Magnvs7/Promethevs
Dónde cuesta más y menos comprar un apartamento de 2 habitaciones en Cali: ranking de barrios En Cali, un apartamento de 2 habitaciones cuesta 815 millones de pesos en la mediana en Santa Teresita, el barrio más caro, y 215 millones de pesos en Caney, el más… DOI: 10.5281/zenodo.23523575
Short script/UI on top of FFMPEG for fixing video banding issues. pftq/Video-Debanding t.co
打字的时候顺手学英语 受到 @vjodjfo 老哥 Mac 项目的启发,做了一个 Windows 版本的小工具 GlintWin ,下载即用。 GitHub: fengwuyun/GlintWin 平时打字基本都在用中文输入法,想着能不能利用这些碎片时间顺手学点英语,于是做了这个工具。 功能很简单: 打字即翻译:使用中文输入法时,在候选栏下方悬浮显示当前选中候选词的英文翻译。 不打断输入:不需要切换软件或主动查词,正常打字就能顺手看一眼英文。 自定义样式:支持调整悬浮条颜色,尽量适配不同的使用习惯。 生词收藏:遇到想记住的单词,可以随手保存到自己的生词本。 目前发布了第一个版本,主要想验证这种「无感学英语」的方式是否真的有帮助。 欢迎大家下载体验,提提建议。如果遇到兼容性问题或者 Bug ,也欢迎在 GitHub 提 Issue
I Scraped a 1,000-Book Catalogue with Python — Full Walkthrough Every web scraping tutorial stops at "here's how to grab one page." Real catalogues don't fit on one page — so for this practice project I scraped the entire books.toscrape.com catalogue: 1,000 books across 50 pages, into one clean CSV with title, price, star rating, and stock status. books.toscrape.com exists specifically for scraping practice, which makes it the perfect place to learn the full workflow — pagination included. Here's exactly how it works, with the real code. What we're building A script that: 1. Opens the catalogue's first page 2. Extracts every book card on the page 3. Follows the "next" link until there isn't one 4. Writes everything to books.csv Final output (real rows from the run): title,price_gbp,rating,availability A Light in the Attic,51.77,3,In stock Tipping the Velvet,53.74,1,In stock Soumission,50.10,1,In stock Setup pip install requests beautifulsoup4 That's it. No browser automation, no Selenium — the site serves plain HTML, so requests + BeautifulSoup is enough. Reaching for a headless browser when the HTML is right there is the most common beginner mistake I see. Step 1: Understand one book card Every book on the site lives in an <article class="product_pod"> element. Inside it: - the title is in the title attribute of the <h3><a> link (the visible text is truncated with "…", the attribute has the full title — grab the attribute!) - the price is in .price_color - the rating is a word — One to Five — hidden in the class list of .star-rating - availability is the text of .availability RATING_WORDS = {"One": 1, "Two": 2, "Three": 3, "Four": 4, "Five": 5} def parse_book(article): """Pull title, price, rating and availability out of one book card.""" title = article.h3.a["title"] price = article.select_one(".price_color").get_text(strip=True) rating_word = article.select_one(".star-rating")["class"][1] availability = article.select_one(".availability").get_text(strip=True) return { "title": title, "price_gbp": price.replace("£", ""), "rating": RATING_WORDS.get(rating_word, ""), "availability": availability, } Step 2: Follow the pagination Instead of guessing page URLs (page-2.html, page-3.html…), let the site tell you where to go next. Each page has a li.next a link — follow it until it disappears: import time import requests from bs4 import BeautifulSoup BASE = "https://books.toscrape.com/" def scrape(max_pages=None): books = [] page_url = BASE page_no = 0 session = requests.Session() session.headers["User-Agent"] = "Mozilla/5.0 (demo scraper)" while page_url: page_no += 1 resp = session.get(page_url, timeout=25) resp.raise_for_status() resp.encoding = "utf-8" # see lesson 1 below soup = BeautifulSoup(resp.text, "html.parser") for article in soup.select("article.product_pod"): books.append(parse_book(article)) print(f"page {page_no}: {len(books)} books so far") if max_pages and page_no >= max_pages: break next_link = soup.select_one("li.next a") page_url = requests.compat.urljoin(page_url, next_link["href"]) if next_link else None if page_url: time.sleep(0.3) # be polite to the server return books Two details matter here: - urljoin — the next-page href is relative (catalogue/page-2.html), and urljoin resolves it correctly against whatever page you're on. Concatenating strings by hand breaks the moment the site structure changes. - The small sleep — 0.3s between pages costs you 15 seconds over 50 pages and keeps you a good citizen. On real projects this matters even more. Step 3: Write the CSV import csv books = scrape() with open("books.csv", "w", newline="", encoding="utf-8") as f: writer = csv.DictWriter(f, fieldnames=["title", "price_gbp", "rating", "availability"]) writer.writeheader() writer.writerows(books) print(f"Done: {len(books)} books written to books.csv") Output: Done: 1000 books written to books.csv — exactly 1,000, which matches the catalogue's own count. Always check your row count against a number the site itself reports; "it ran without errors" is not the same as "it got everything." 3 lessons this project teaches 1. Encoding will bite you. The site is UTF-8, but requests sometimes guesses Latin-1 from the headers — and the £ sign turns into £ in your CSV. One line (resp.encoding = "utf-8") fixes it. I found this the fun way: by opening the CSV. 2. Attributes beat visible text. The visible title is cut off ("A Light in the …"); the full title sits in the title attribute. When scraped data looks truncated, inspect the element before blaming your code. 3. Ratings hide in class names. There's no "3 stars" text anywhere — the rating is a CSS class. Real sites hide data in classes, data attributes, and JSON blobs all the time; reading the raw HTML is a core scraping skill. Full code The complete script (with a --pages flag for quick tests) is on GitHub: python-web-scraper — the repo includes the actual books.csv output with all 1,000 rows. --- Demo first — on YOUR sample — before you pay anything. That's how I work: if you need a catalogue, price list, or directory scraped, send me the site and a few rows of the output you want, and I'll build a small working demo on your sample before you spend anything. 👉 My Python web scraping & automation gig on Fiverr — Abhishek, Python Automation Developer
githubに公開しました 回路図はまだだけど ソフトだけでも眺めて遊んでくださいww github.com/x-yas0107/Gemini_AI/tree/main/V003_Fre…
Dónde cuesta más y menos comprar un apartamento de 2 habitaciones en Bogotá: ranking de barrios En Bogotá, un apartamento de 2 habitaciones cuesta 1.930 millones de pesos en la mediana en Cabrera, el barrio más caro, y 220 millones de pesos en El Tintal, el más… DOI: 10.5281/zenodo.23523443
grantInvokeFromVpcEndpointsOnly()作ったのはこちら! 当時は「引数に複数個のEndpoint渡すケースなんて誰がやるんじゃい」って思ってましたが、2年後に自分がやりました。 aws-cdk#32719
No copied code. No guessing. No subscription. 2,213 stars in just 2 days, free + open source. Early alpha, so rough edges — but what an idea! Worth saving :)) Which app would YOU rebuild first? storytold/craft-anything
Dónde cuesta más y menos comprar un apartamento de 2 habitaciones en Barranquilla: ranking de barrios En Barranquilla, un apartamento de 2 habitaciones cuesta 550 millones de pesos en la mediana en Buenavista, el barrio más caro, y 203 millones de pesos en… DOI: 10.5281/zenodo.23523594
Your coding agent has amnesia. Here's the memory architecture that fixes it. Every coding-agent demo looks the same: a clean repo, a fresh context window, and a task that fits in one prompt. Real work doesn't fit. You make an architectural decision on Monday. On Tuesday the context compacts, the agent forgets why the decision was made, and it confidently proposes the opposite. You paste the schema again. You paste the ADR again. You explain, for the fifth time, that the auth service migrated from JWT to PASETO and why. The model isn't the only problem. The interface is. A context window is a scratchpad, not a memory system. I built Engraphis to fix this for my own workflow. This article is the architecture I landed on, the failure modes it addresses, and the parts I would measure before trusting any memory layer, including mine. The failure mode: context is not memory A coding agent has three kinds of state: 1. The current task, what you asked for, right now. 2. The working context, files, tool outputs, and conversation that fit in the window. 3. Durable project knowledge, decisions, constraints, invariants, and history that must survive the session. Most agent setups treat all three as one thing: a growing transcript. That works until the transcript is compacted, truncated, or replaced by a new session. Then the third category disappears. The usual workarounds have predictable costs: - Paste everything into the prompt. Expensive, noisy, and still incomplete. A schema dump is not a decision record. - Write a giant CLAUDE.md / AGENTS.md. Good for stable rules, bad for facts that change per repository, per branch, or per customer. - Use a vector database of chat logs. Retrieval finds similar text, not the decision that is still valid, who made it, or which repository it applies to. - Rely on the vendor's memory feature. Great when it works, but it is usually opaque, account-scoped, and not inspectable by the team that owns the code. The result is the same: the agent has information, but not context with provenance. Four properties of useful agent memory Before choosing a database or a retrieval algorithm, define what the memory has to do. 1. Durable A decision should survive a new session, a new branch, and a new machine. It should not depend on the current context window, a single chat thread, or a vendor's retention policy. 2. Scoped "Use PostgreSQL" is not a universal fact. It might be true for one service, false for another, and irrelevant to a third. Memory needs workspace, repository, and session boundaries. Without scope, retrieval becomes a source of confident wrong answers. 3. Provenanced Every recalled fact should be traceable to its source: the file, the commit, the conversation, or the decision record. If the agent can't show why it believes something, you can't debug it, and you shouldn't trust it with a destructive change. 4. Bounded Retrieval should return the smallest useful context, not the most. A hard token budget forces the system to rank, compress, and omit. That is a feature. Dumping 50 KB of search results into a 200 K context window is how agents get slower, more expensive, and less accurate at the same time. There is a fifth property that matters in practice: inspectable. You should be able to open a dashboard, search the memory, see its history, and correct it. A memory system you can't audit is a liability. The architecture Engraphis is deliberately boring at the storage layer and careful at the retrieval layer. ┌─────────────────────────────────────────────┐ │ Claude Code / Cursor / Codex / any MCP │ │ client │ └──────────────────────┬──────────────────────┘ │ MCP ┌──────────────────────▼──────────────────────┐ │ Memory service │ │ - remember / recall / session │ │ - conflict review / history │ │ - hard context budget │ └──────────────────────┬──────────────────────┘ │ ┌──────────────────────▼──────────────────────┐ │ Local SQLite │ │ - scoped records │ │ - temporal validity │ │ - provenance │ │ - vector + lexical indexes │ └─────────────────────────────────────────────┘ Local SQLite, not a hosted vector store The core stores memory in SQLite. That gives you a single file you can back up, inspect, and move. It works offline. There is no account requirement for the local core, and no data has to leave the machine. The vector index is local too. The installed service uses a small local embedding model (about 80 MB on first download) with a deterministic offline fallback. The point is not to win a benchmark; the point is to keep the default path private and reliable. Hybrid retrieval A single retrieval mode is easy to demo and easy to break. - Vector search finds semantically related memories even when the wording changes. - Lexical search catches exact identifiers, error strings, and API names that embeddings blur. - Graph traversal follows relationships between memories, files, and entities. - Code-aware search understands that a symbol in a repository is different from the same word in a paragraph. Engraphis combines these signals, then ranks and packs the result. The important design choice is that retrieval quality is measured separately from context size. A system that returns less context but loses the answer is not efficient; it is just wrong with fewer tokens. Temporal history instead of silent overwrite Facts change. A memory system that replaces the old value destroys the audit trail and makes it impossible to answer "what did we believe last month?" Engraphis keeps history. A superseded decision can be closed rather than deleted, and the timeline can show what was valid at a given point. That matters for incident review, onboarding, and any agent that is about to change production code. A hard context budget Recall returns a bounded context package. The service ranks candidates, compresses them, and stops at a budget you set. The output includes the memory, its scope, and its provenance so the agent can cite it or abstain. This is the difference between "search" and "memory." Search returns matches. Memory returns a defensible answer. The MCP surface The Smart profile exposes nine tools. The ones I use most: | Tool | What it does | |---|---| | engraphis_remember | Store a durable fact with scope and provenance | | engraphis_recall_context | Retrieve compact project context | | engraphis_session | Start or end a memory session | | engraphis_get_memory | Read one governed record | | engraphis_update_memory | Edit metadata without losing history | | engraphis_conflict_review | Review pending, quarantined, or conflicting memories | There is also a Classic profile with 35 direct tools for clients that prefer explicit operations. A minimal Claude Code setup looks like this: python -m pip install "engraphis[mcp]" engraphis-init claude mcp add engraphis -- engraphis-mcp For the local dashboard: python -m pip install "engraphis[server]" engraphis-dashboard # http://127.0.0.1:8700 And the Python service, if you want to embed it: from engraphis.service import MemoryService memory = MemoryService.create("engraphis.db") memory.remember( "Auth migrated from JWT to PASETO. Reason: issuer-bound tokens and key rotation.", workspace="acme", repo="api", ) hit = memory.recall("Why did we change auth?", workspace="acme", repo="api") print(hit["context"]) A worked example Imagine the agent is about to add a new endpoint to the auth service. Without memory, it sees the current code and infers the pattern. It might use JWT because JWT is common. It might miss that the team migrated away from JWT six months ago, or that one service is intentionally still on JWT during a migration window. With scoped memory, recall returns something like: Decision: Auth migrated from JWT to PASETO for the public API. Scope: workspace=acme, repo=api Status: current Reason: issuer-bound tokens and key rotation requirements. Supersedes: JWT decision (2025-11-03) Evidence: docs/adr/014-paseto.md, commit 8f2c1a Now the agent has a decision, a scope, a reason, a history, and evidence. It can follow the current pattern or ask a targeted question. It does not have to guess from a partial view of the repository. That is the whole product thesis: the agent should be able to show its work before it changes yours. What the benchmarks actually show I am deliberately cautious here. The repository contains three deterministic offline fixtures. They are useful for regression testing the retrieval pipeline, not for claiming general task performance. On those fixtures: - Mean retrieved context dropped from 740.3 to 214.3 tokens per question, a 71.1% reduction across 18 questions. - The serialized JSON-shape proxy dropped from 24,590 to 11,138 tokens across 26 payload samples and 260 recalls. - Candidate and packed retrieval quality (Recall@5, Hit@5, and answer-token recall) were 1.000. - Grounded checks: 5/5 answerable queries grounded, 6/6 abstention queries rejected, including a quarantined-evidence probe; 11/11 decisions correct. These are small fixtures. They do not establish performance on your repository, your language, or your question distribution. MCP transport and provider billing were not measured. The full method, checksum, and reproduction steps are in the repository. The right way to evaluate a memory layer is to build a small, labeled set of questions from your own codebase: 1. Pick 20 decisions or invariants that a new engineer would need. 2. Write the question a real agent would ask. 3. Record the expected answer and the source. 4. Measure recall, context size, and whether the agent can cite the source. 5. Include unanswerable questions. Abstention is a feature. If a system can't abstain, it will hallucinate with confidence. Try it, or have it set up for you The local core is free and Apache-2.0: python -m pip install "engraphis[mcp]" Repository: Coding-Dev-Tools/engraphis The optional Pro plan is $10/month or $100/year, with a 7-day trial and no card required. It adds hosted memory health views, scheduled upkeep, and optional sync. The local core stays free. If you want the done-for-you version, I do a 24-hour Agent & MCP Rapid Setup for $250. That includes: - clean setup of Claude Code, Cursor, or Codex; - integration of up to three MCP servers; - environment, credential, and security configuration; - a one-page runbook; - seven days of async text support. No calls, no video, no screen-sharing. Text only, fixed scope. Start here: engraphis.com or DM me with the two or three actions you want your agent to perform. --- Disclosure: I built Engraphis. I used AI assistance to draft and edit this article; the architecture, code references, and benchmark numbers come from the Engraphis repository. The benchmark caveats are intentional, small fixtures are not a general performance claim. --- Engraphis is live on Product Hunt now. The page is here: Engraphis on Product Hunt. I will answer questions there and in the comments.
Laravel Scheduler handles recurring tasks. Queues handle delayed jobs. But what if you need: Day 1 → 3 → 7 → 15 → 20 → every 5 days Each customer starts independently. Stop when their status changes. That's why I built ScheduledSequence. savgoran/laravel-scheduled-sequence #Laravel #PHP
Dónde cuesta más y menos comprar un apartamento de 2 dormitorios en Lisboa: ranking de freguesias En Lisboa, un apartamento de 2 dormitorios cuesta 965.000 euros (USD 1.084.740) en la mediana en Avenidas Novas, la freguesia más cara, y 575.000 euros (USD… DOI: 10.5281/zenodo.23529022
高性价比人生指南卡片 89-92 感谢大神 eternity4719/HowToLiveBetter t.co
What an AI coding agent actually costs per month (and 5 ways to cut it) If you've started using an AI coding agent (Claude Code, Cursor's agent, Codex, or something you built yourself on an API), you've probably had this moment: the agent ran for twenty minutes, fixed the bug, and then you saw the bill. The pricing pages list costs "per million tokens", which tells most people nothing. So here's an attempt to turn that into dollars per month for a realistic workload, with the formula shown so you can redo it for your own setup. Disclosure: We run Agent Cost Hub, a small site that tracks LLM API prices. AI helped draft this article, and every number below comes from list prices checked on 2 Nov 2026. Prices change often, so treat these as a snapshot. First: why agents cost more than chat A chatbot sends one request per question. An agent works in a loop: read the files, plan, edit, run the tests, read the error, edit again. Each of those steps is a separate API call, and each call resends the whole context (your instructions, the files it has read, the conversation so far). So a single "fix this bug" task can easily be 10–20 calls of roughly 20,000 input tokens each. That's where the money goes. It's input tokens multiplied by the number of steps, not the short answer you see at the end. The workload we'll price To compare models fairly, we'll use one fixed, fairly typical workload for a small team or a busy solo developer: - 50 tasks per day - 15 steps per task - 20,000 input tokens and 1,500 output tokens per step - 50% of the input served from the prompt cache (more on that below) - 30 days a month The formula is: monthly = steps × (input × (1 − cached%) × input_price + input × cached% × cached_price + output × output_price) ÷ 1,000,000 × tasks_per_day × 30 The formula leaves out cache-write fees and any subscription discounts. These are plain API list prices. The numbers (2 Nov 2026) | Model | Price per 1M tokens (in / out / cached) | Per task | Per month | |---|---|---|---| | Claude Haiku 5.5 | $0.10 / $0.50 / $0.01 | $0.03 | $42 | | GPT-5 Mini | $0.25 / $2 / $0.025 | $0.09 | $129 | | Gemini 3.8 Flash | $0.75 / $3.75 / $0.075 | $0.21 | $312 | | GPT-5 | $1.25 / $10 / $0.125 | $0.43 | $647 | | Claude Sonnet 5.5 | $2 / $10 / $0.10 | $0.54 | $810 | | Kimi K3 | $3 / $15 / $0.30 | $0.83 | $1,249 | | Claude Opus 5.5 | $4 / $20 / $0.20 | $1.08 | $1,620 | That's a ~39× spread between the cheapest and the most expensive model for exactly the same work. Two things stand out: 1. The per-task cost looks tiny, but the monthly cost doesn't. $1.08 per task sounds fine until you multiply it by 50 tasks a day. 2. Output is pricier per token, but input is where the volume is. In our workload, each step reads 20,000 tokens and writes 1,500. For Opus 5.5, input (including cached reads) is about 58% of the bill even with half of it cached. Cheaper doesn't automatically mean "just as good". The smaller models will fail more often on hard tasks, and a failed task that you rerun costs twice. Still, many teams pay top-tier prices for tasks a mid-tier model handles fine. 5 ways to cut the bill 1. Make the prompt cache work for you Most providers charge much less for input they've seen recently: often 10% of the normal input price, sometimes less. For an agent, the instructions, tool definitions and files at the top of the context stay the same from step to step, which makes them ideal for caching. Here's the effect on Opus 5.5 with our workload: | Cached share of input | Per month | |---|---| | 0% | $2,475 | | 50% | $1,620 | | 90% | $936 | The cache only matches if the beginning of the prompt stays identical. A timestamp, a reordered list of tools, or a changed system prompt at the top breaks the match for everything after it. Put stable content first and changing content last. 2. Use fewer steps per task Every step resends the context, so shorter loops save money directly. Cutting our Opus example from 15 steps to 8 brings it from $1,620 to $864 a month. What helps in practice: - Give the agent a precise task ("fix the failing test in auth.test.ts") rather than a vague one ("improve auth"). - Point it at the right files so it doesn't have to search. - Paste the exact error message instead of "it doesn't work". Guessing burns steps. 3. Keep the context small - Start a new session for each new feature. A long thread means every new message drags the whole history along. Ask for a 10-line summary first and paste it into the new session. - Turn off tools you don't need. Every connected MCP server and tool description is sent on every step. Ten unused tools are pure overhead. - Keep instruction files short. A 3,000-token AGENTS.md that loads on 750 steps a day is over 2 million tokens a day before any work happens. 4. Route easy work to a cheap model Not every step needs the smartest model. Renaming variables, writing docstrings, summarizing a log or drafting a commit message are jobs a small model handles well. As a rough illustration, if 80% of the tasks went to Haiku 5.5 and 20% to Opus 5.5, the same workload would cost about $357 a month instead of $1,620. Your split will differ, but the principle holds: save the expensive model for the hard 20%. 5. Watch the reasoning setting and output length "Thinking" or high reasoning-effort modes generate hidden reasoning tokens that are billed as output, and output is the expensive side. Medium effort is enough for most edits. Use high effort only for genuinely tricky problems. Also ask for diffs or only the changed lines, not whole rewritten files. Halving the output tokens in our Opus example saves about $340 a month on its own. Check this for your own setup Your numbers will differ from the example: maybe 5 tasks a day, maybe 40 steps, maybe a different model. Two free ways to rerun the calculation: - The calculator on agentcosthub.com lets you plug in your own tokens, steps and volume across 79 models. It also has a "Find my setup" helper if you're not sure what numbers to use. - If you use Claude or Cursor, you can connect the free, read-only Agent Cost Hub MCP server. It needs no sign-in, and you can then ask your assistant things like "what would a coding agent cost on GPT-5 vs Sonnet 5.5?" directly in chat. The code is open source on GitHub. Quick recap - Agents cost more than chat because every step resends the whole context. - With identical work, the same agent costs anywhere from ~$42 to ~$1,620 a month depending on the model (prices as of 2 Nov 2026). - The biggest levers are caching, fewer steps, a smaller context, sending easy work to a cheap model, and controlling reasoning and output length. - Measure a few real tasks before and after each change. That's the only way to know what's actually working for you. What does your agent cost you per month? We're curious what step counts people are seeing in practice. Share them in the comments.
Dónde cuesta más y menos comprar un apartamento de 2 dormitorios en Punta del Este: ranking de barrios En Punta del Este, un apartamento de 2 dormitorios cuesta USD 620.000 en la mediana en Manantiales, el barrio más caro, y USD 249.500 en Península, el más… DOI: 10.5281/zenodo.23528857