Mentions
Conversations linking to GitHub, newest first. Times are UTC.
Mentions by source
X
Bluesky
Hacker News
V2EX
Qiita
DEV
Mastodon
Latest posts
a quick test of `exp1_which_game` with k3.1, we definitely never trained on such tasks .... mind blowing prompt: github.com/RikiyaT/lm_understand-logs/blob/main/e… full reasoning: pastebin.com t.co
Wallpaper Engine port for MacOS Hi , My last few weeks went into building this. So this post is not about gaming insense, but if you into pc games you must have tried wallpaper engine or lively wallpaper of some sort at some point. But in mac there is no wallpaper engine , most are paid , some open source alternatives do exists But this project os complete rebuilt from scratch, whole rendering engine written from scratch, Results ??? It is about 50-60 percent memory drop for heavy scene wallpapers and 90percent drop on normal mp4 wallpapers as compared to other open source alternatives. Let me know what you guys think, GitHub | Website
Built a lightweight macOS menu bar remote + desktop widget for Google TV / Android TV (MacDroid TV) Hey guys, Got annoyed with always having to track down the physical remote or grab my phone just to pause something or tweak the volume while working at my desk. I ended up vibe coding a little utility to fix that called MacDroid TV. It lets you control your Google TV or Android TV directly over your local network. A few details on how it works: - Lives cleanly in your macOS menu bar so it doesn't take up dock space - Also includes a desktop widget if you prefer having it right on your screen (or you can run both together) - Core controls: D-pad navigation, back, home, power toggle, volume, and play/pause - Connects directly over your local Wi-Fi without needing cloud relays The next big thing on my list is adding keyboard input so you can send text straight into TV search fields from your Mac, but the core remote controls are running solid. It’s completely free and open source. Threw the project up on GitHub if anyone wants to check it out or grab a build: frankt2012/MacDroidTV Let me know if it connects well with your setup or if there are other quality-of-life features you'd want to see added next.
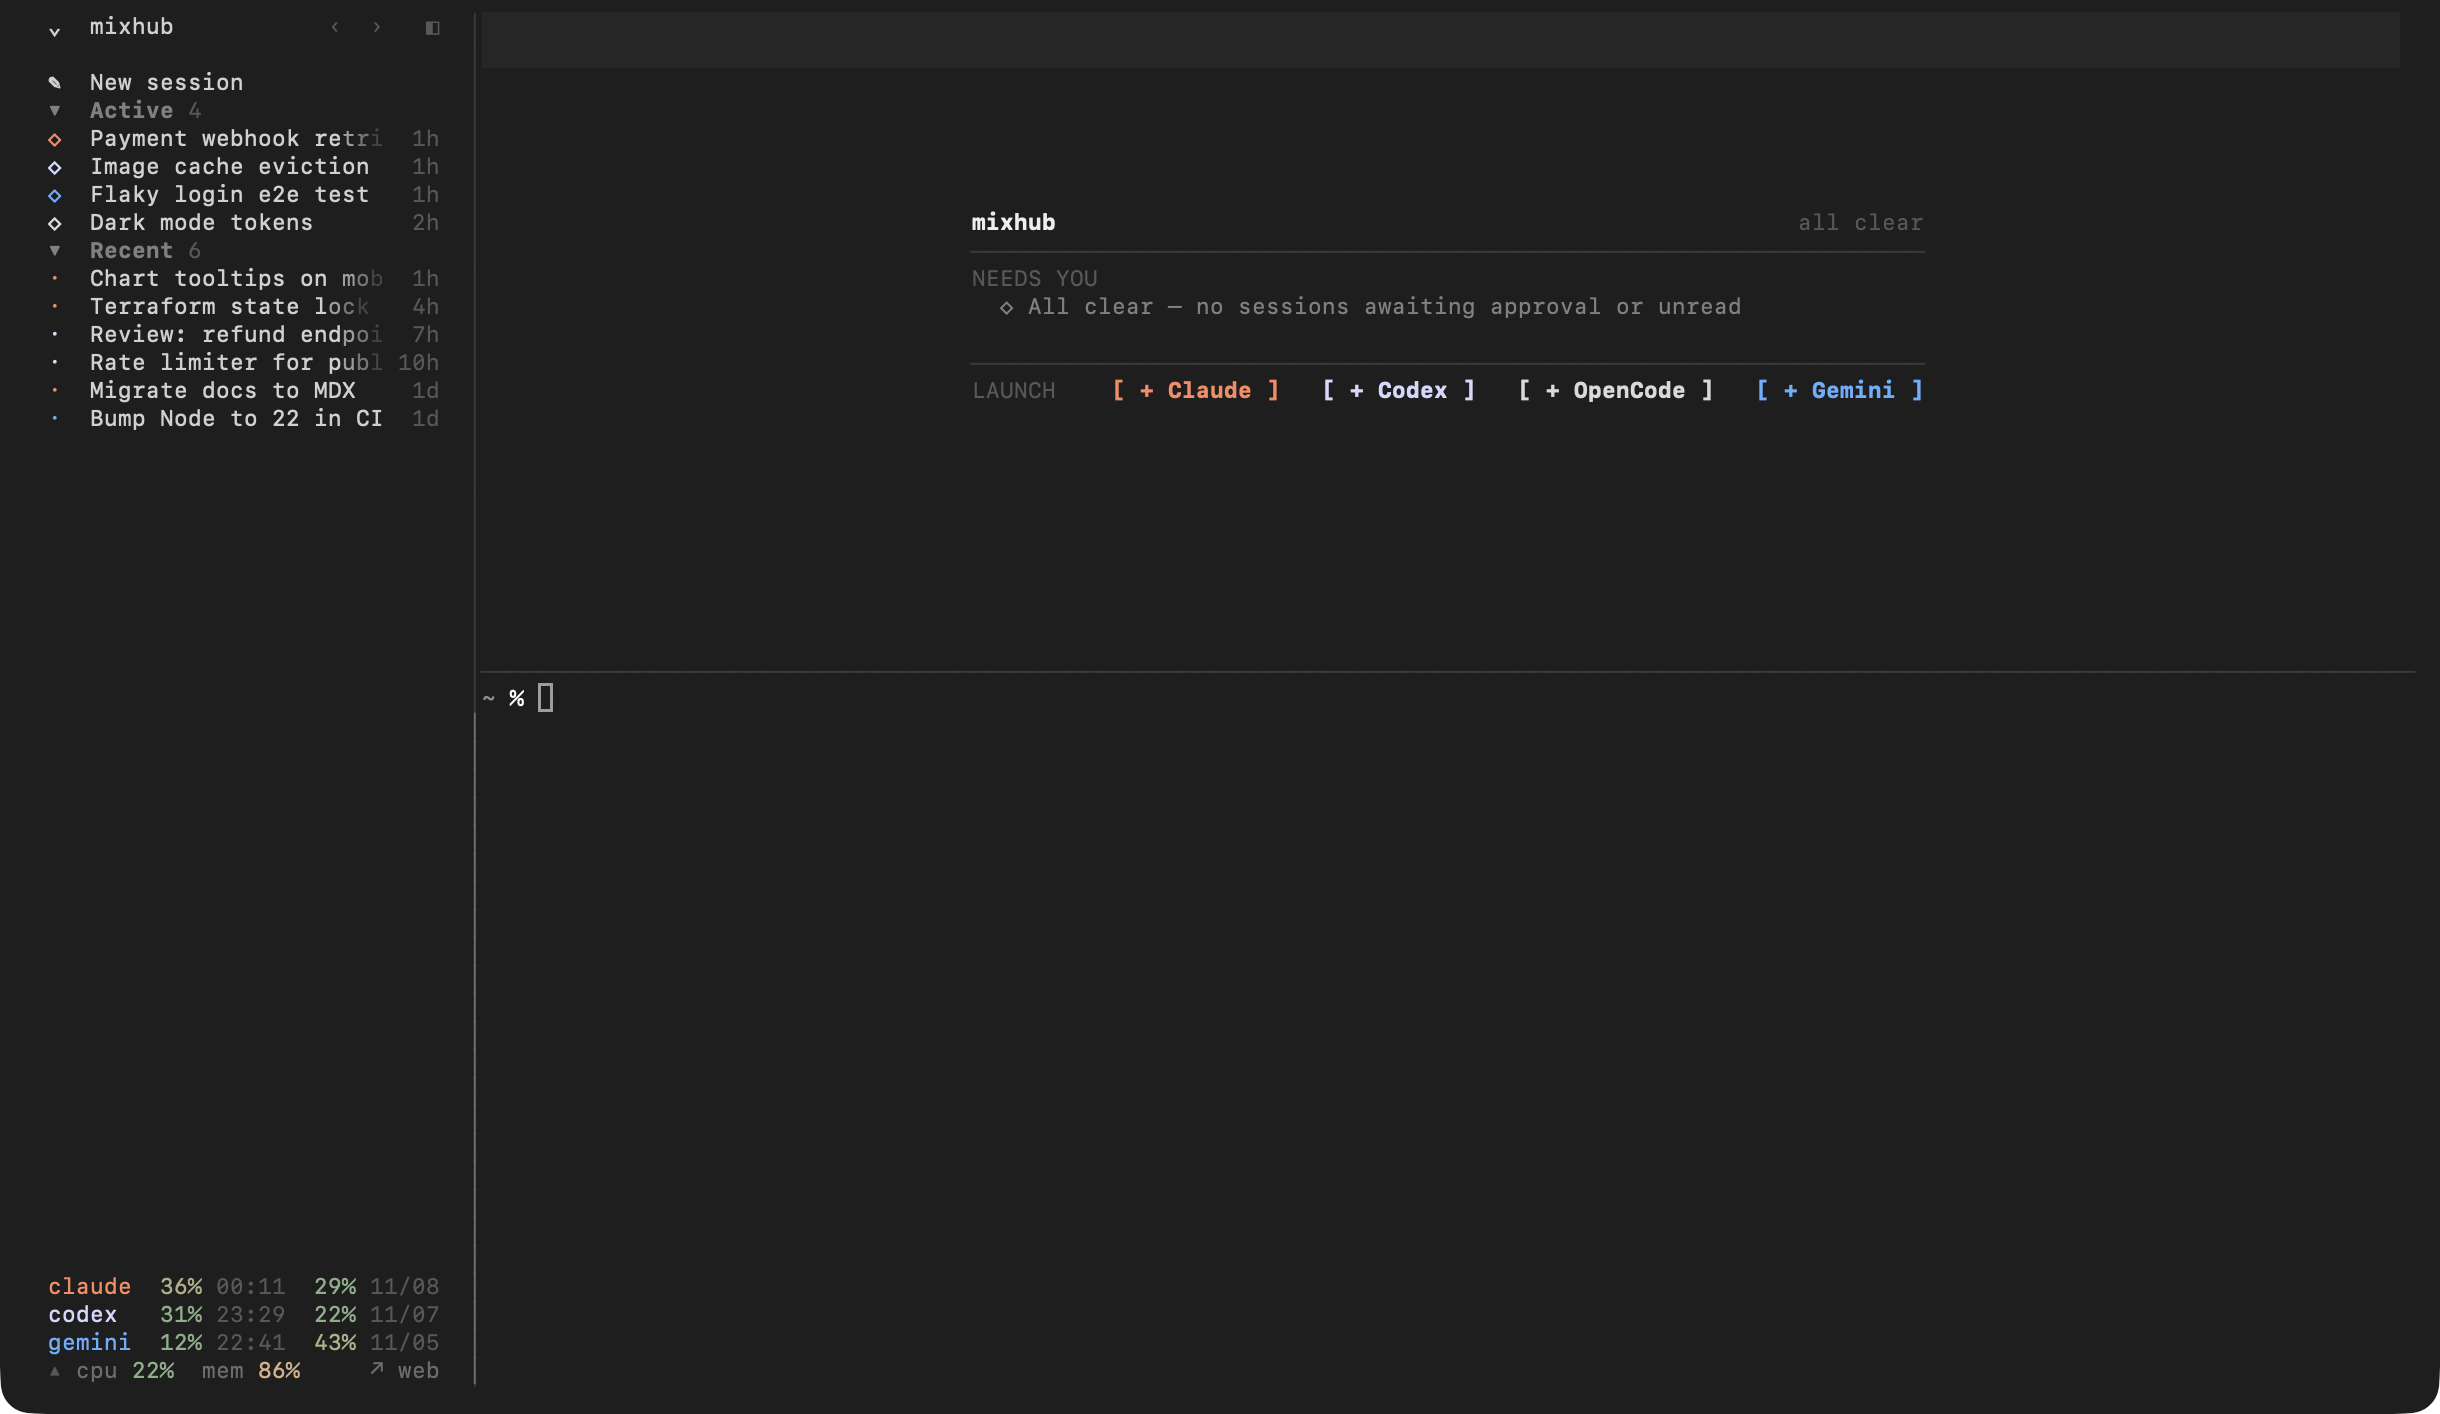
做了个小工具,在一个侧栏里看 Claude Code、Codex 等 agent 的所有会话 唔.. 平时会同时开 Claude Code 、Codex 甚至 Gemini ,时间长了大概 terminal 里会积累十几个会话,甚至不是很敢重启了(类似于标签页越开越多那种)。另外盯着一个 agent 的时候,另一个已经卡了十分钟,可能是没发现或者来不及处理,时间久了就忘了然后重启之后就一锅端了。还有在别的 agent 或者别的终端里开过的会话,过一阵就找不到了,误关了之类的。而且我自己这边终端标签只有一个不太完整的标题,每次点进去看还是比较麻烦的。 于是抽空自己写了个.... MixHub 需要 Python 3.10 以上和 tmux pipx install mixhub-cli mixhub 用 uv 的话是uv tool install mixhub-cli。  运行以后是一个 tmux 工作区,Mac 自带的 Terminal 就能用( win 的话我不怎么常用。它用自己单独的 tmux ,不会动你原来的 tmux 配置和会话。 左边一栏列出这台电脑上的 Claude Code 、Codex 、Gemini 和 OpenCode 的会话,在 MixHub 外面开的也会列出来。每个会话旁边标着状态,嗯,习惯了的话就能看懂了,而且时间顺序的看着还是比较舒服。状态的话,主要是读各家 agent 自己的会话文件判断的。 点一下会话,右边就是原版的 CLI ,对于原生 agent 没有做过改动,都保留着。其他会话在后台接着跑,切来切去不会打断。底下还能看到各家 5 小时(虽然现在 cc 的 max 没有 5h 限制了)和每周的额度用了多少。有会话干完或者开始等批准,终端会响一声,Dock 上也会出角标。 另外还有个网页版,mixhub web打开,只在本机,可以搜所有会话的聊天记录。不过我自己主要用终端,网页版用得少,可能会比较糙。 它不建 worktree 、不碰 git ,然后也不改 agent 本身。每天查一次 PyPI 有没有新版本这一个网络请求,可以关掉。只用 Python 标准库,没有别的依赖。 现在主要在 macOS 上用,Linux 和 WSL 能跑但测得少。agent 升级改了文件格式的话,状态可能会暂时不准,我看到就会跟着改。还很早期可能会有 bug 。 ShinoKana/mixhub 有问题或者想法可以直接回帖,或者开 issue 。也想问问大家,同时开好几个 agent 或者多个会话 session 的时候,比较困扰的是什么? (之前我有用过 herdr 感觉还不错,不过还是不太习惯.. 麻烦各位提下意见,有报错和我说!好用的话点点 star ~
Open Source Bat Counter Over a year ago I used ChatGPT to make a Python script that could count bats exiting my bat house. It was always a little cumbersome to work with, so I revisited it with the hope of making improvements using Claude Code; the full code is available on my GitHub repository. The end result is a website (batcounter.youcangrowideas.com) where anyone can process videos to count the bats as they exit their house at dusk; the website will provide an updated video with a bat counter at the bottom of the window and a csv file of the bat count. After some refinements, it seems to get the final count pretty close with an error of ~5% or less--assuming you have a stable video of the bats exiting the house against a clear sky. It doesn't seem to work well when there is a complex background in the video (building, lots trees, etc). I'm sharing this here in case it helps someone else monitor their bat population. Side note: I posted this in r/batty but the mods took it down for some reason. I have no financial incentive here and I can't see videos processed through the site. If you try it, let me know if it works for you.
y2jb Installer DND issue fix I have seem a lot of users having the same problem, me included, after using the lasted method showed at Modded Warfer Video. Using the Installer and setting the DNS to 127.0.0.1 before restarting the PS5. Running for the first time the new installed Youtube for the Jailbreak with maj0r patch, instead... the youtube app boots normally and the jailbreak wont happen. So bypassing this people are trying to use the 127.0.0.2 DNS. Doing so, somehow (i cant explain why, don't have enough knowledge) its break a lot of online function from other payloads, including the Payload Manager. After many test I might have narrow down the reason why. Is the youtube version from the Installer. Also that is why some people are been affected and others not. Maybe users with firmware above 12.60 are facing this issue. edit: talked personally with the creator of y2jb installer , seems the app use the same logic to download the proper youtube version. So I cant understand the reasons, but doing manually stills fixes it. At the the original Y2JB from Gezine it says : - For firmware 4.03 to 12.40 get YouTube app (PPSA01650) version 01.000.003 PKG - For firmware 12.60 and up get YouTube app (PPSA01650) version 01.000.030 PKG So match your firmware version of youtube, you can find on the description of this video from Modded Warfare from the first time showing the y2jb method (youtube.com) combined with the latest y2jb autoloader v1.1.0 from itsPLK (y2jb_update.zip and download0.dat) TLDR: If you are facing this problem follow these steps. 1 - put those files y2jb_update.zip, download0.dat and correct youtube PKG on USB 2 - Restart your ps5 3 - Uninstall the youtube 4 - Set DNS 45.56.67.85 5 - Jailbreak it from the Guide and Tips 6 - Install the proper firmware version Youtube through Debug Setting 7 - Copy the download0.dat to the user/download/PPSA01650 folder 8 - Set back the DNS to 127.0.0.1 9 - Restart your PS5 10 - Run the youtube it will take longer the first time because will update using the zip file inside the usb. I hope its help! update: y2jb installer dev is following the instructions from itsPLK it says: Install YouTube (PPSA01650 / PPSA01651 / PPSA01652): FirmwareYouTube Version 4.03 – 12.40v01.000.003 12.60 – 13.20v01.000.030 13.40 – 13.60v01.009.253 I don't know if it's a problem only with 13.40 (my firmware ) PRO model with 13.40 or something more specific. but yes, the problem just happen when the Installer uses the youtube version 9.253 and not the 0.030. Tried all other combinations with youtube and y2jb files... everything except using the 0.030 doesn't work. That's all. Good luck everyone. Ps. If you want to update to 9.999 to avoid automatic updates... you can just install manually the correct youtube using the debug setting. Open the y2jb installer and follow from the 3rd step and 4th. All the steps except the 4th can be done with PS5upload. If this helped you , please comment your fw/model. That's all! Edit: DNS... on the title sorry too late
@xelA31B I use it to make 3D explainers like these, and the skill is open source codepawl/viz3d
@phongtran_89 @lpagent_io you can check my repo: toanbku/kindle-lpagent-dashboard It will guide you through jailbreaking and installing the LP Agent dashboard
I've updated PhiloxRNG to use explicit fma instead of muladd or regular adds and multiplies. It turns out that in addition to fusing muladd, CUDA.jl will sometimes fuse regular adds and multiplies, and that was a big part of why the random numbers were occasionally different on different platforms.
Z4Tools v1.6 🚀 z4tools v1.6.0 is officially released! z4tools is a terminal-based toolkit for gpubrewlauncher, supporting termux and debian/ubuntu. 📋 changelog: - added advanced compatibility checker - added dependency manager - added advanced log viewer - added system health checker - added update checker - added system dashboard - added diagnostic export system - improved linux compatibility and stability - maintained the original crimson terminal interface 🔗 github: github.com/z4d3l/z4tools/releases/tag/v1.6.0 feedback and bug reports are welcome! 🛠️
Typstをライブラリとして組み込んで、Markdownから日本語PDF/HTML/Wordを作るデスクトップアプリをRustで作った はじめに hinatahugu29/Typer 社内の報告書や議事録を、Markdownの書き味のままきれいな日本語PDFにしたい。表の列幅や右寄せの日付くらいは指定したい。でも提出先からは「Wordで」と言われることもある。 そういう用途のために、Markdownを書くとリアルタイムにA4のプレビューが出て、PDF・単一HTML・Word(.docx)に出力できるデスクトップアプリ「Typer」をRustで作りました。組版エンジンには Typst を CLIではなくcrateとして直接組み込んで います。 この記事では、作る過程で考えたことと、実際にハマったところを中心に書きます。 Typstを World トレイトの実装でアプリに組み込む 起動を遅くせずに、インストール済みの全フォントを使えるようにする Markdownの $...$ 数式を、PDF・HTML・Wordで同じ見た目にする 外部crateに頼らずDOCXを生成する egui・pulldown-cmark・Typstそれぞれで踏んだ落とし穴 ! Windows専用のアプリです(フォントの探し方などがWindows前提)。コードは記事用に一部省略しています。 全体の構成 層 使っているもの 役割 UI egui / eframe 0.37 2ペイン(エディタ+プレビュー)、ページ設定バーなど パーサー pulldown-cmark 0.13 + 独自拡張 Markdown → 内部モデル(AST) 内部モデル 自前の Document / Block / Inline 3つの出力層で共有する中間表現 出力 typst / typst-pdf / typst-render / typst-svg 0.15 AST → Typstソース → PDF・プレビュー画像 出力 自前 AST → 単一HTML、AST → DOCX(zip crateでパッケージ化) ポイントは、出力形式ごとにMarkdownを解釈し直さず、いったん内部モデル(AST)に落としてから3つの出力器に渡すことです。標準Markdownにない「表の列幅」「段落の右寄せ」などの独自属性は、ASTのノードにあらかじめ「空き箱」(Option のフィールド)として用意しておき、パーサーがそこに値を詰めます。 {widths: 22%, 48%, 30%} | 項目 | 内容 | 備考 | | :--- | :--- | :--- | | 発生日時 | 10:15〜10:48 | [監視で検知]{red} | ブロックの直前の行に {key: value} を置くと、そのブロックの属性になります。文字単位の装飾は [テキスト]{red} のように書きます(表のセル内で | と衝突しない形を選びました)。 Typstをcrateとして組み込む Typstをライブラリとして使うには、typst::World トレイトを実装します。コンパイラはこのトレイト経由でソース・フォント・外部ファイル(画像)を取りに来ます。 src/typst_engine.rs(抜粋) pub struct TypstEngine { library: Arc<LazyHash<Library>>, book: Arc<LazyHash<FontBook>>, fonts: Arc<Vec<Font>>, main_source: Source, } impl World for TypstEngine { fn library(&self) -> &LazyHash<Library> { &self.library } fn book(&self) -> &LazyHash<FontBook> { &self.book } fn main(&self) -> FileId { self.main_source.id() } fn source(&self, id: FileId) -> FileResult<Source> { /* main以外はNotFound */ } fn file(&self, id: FileId) -> FileResult<Bytes> { /* ローカル画像を読む */ } fn font(&self, index: usize) -> Option<Font> { self.fonts.get(index).cloned() } // ... } コンパイル時は、生成したTypstソースで Source::replace を呼んでから typst::compile::<PagedDocument>(self) するだけです。replace は差分更新になり、内部のメモ化(comemo)も効くので、毎キー入力ごとに組み直しても十分速いです。 UIスレッドを止めないよう、組版は専用のワーカースレッドで行い、チャネルでリクエストを送ります。入力が止まってから120ms待って組版し(デバウンス)、溜まったリクエストは最新のものだけを処理します。 ローカル画像は、Markdown中のパスを local_img/... という仮想パスにエンコードしてTypstソースに書き、World::file() でそれをデコードして実ファイルを読みます。どのパスをどのファイルに対応させるかを World 側で自由に決められるので、原稿の保存場所を基準にした相対パスの画像も素直に扱えます。これが組み込みの良いところです。 フォント:起動を遅くせずに「全部使える」ようにする 最初は決め打ちリストだった 最初の実装では、C:\Windows\Fonts から BIZ UD・游ゴシック/游明朝・メイリオなど決め打ちのファイル名だけを読み込み、OnceLock で共有していました。これだと読み込みは数十ms で済みますが、ユーザーが追加インストールしたフォントは使えません。 全走査すると約1秒かかる フォントフォルダを丸ごと読む実装に変えて計測すると、こうなりました。 フォント数 合計サイズ 読み込み時間 全走査 528書体 約605MB 約976ms 起動の速さが売りのアプリで、毎回1秒待たせるのは避けたいところです。 二段構えにした src/typst_engine.rs(抜粋) static QUICK_RESOURCES: OnceLock<SharedTypstResources> = OnceLock::new(); static FULL_RESOURCES: OnceLock<SharedTypstResources> = OnceLock::new(); fn get_shared_resources() -> &'static SharedTypstResources { if let Some(full) = FULL_RESOURCES.get() { return full; } QUICK_RESOURCES.get_or_init(|| { FULL_SCAN_SPAWNED.get_or_init(|| { std::thread::spawn(|| { let fonts = load_all_windows_fonts(); let _ = FULL_RESOURCES.set(build_shared_resources(fonts)); }); }); build_shared_resources(load_windows_japanese_fonts_quick()) }) } 起動直後は決め打ちリスト(数十ms)を返し、裏のスレッドで全走査します。終わったら、以降の呼び出しは全フォント版を返します。 走査対象は C:\Windows\Fonts に加えて、%LOCALAPPDATA%\Microsoft\Windows\Fonts です。Windows 10(1809)以降は、フォントを右クリック→「インストール」すると既定でこちら(ユーザー単位)に入ります。ここを見ていなかったせいで、HackGenが「インストールされているのに候補に出ない」状態になっていました。 ハマった:使い回しているエンジンが古いフォントのまま 「全走査が終わったら切り替わる」はずが、プレビューだけ切り替わりませんでした。プレビュー用ワーカーはエンジンを起動時に1回だけ作って使い回しており、そのとき掴んだ決め打ち版の Arc を持ち続けていたのが原因です。コンパイルのたびに差し替えるようにしました。 fn compile_document(&mut self, typst_code: &str) -> Result<PagedDocument, String> { let shared = get_shared_resources(); if !Arc::ptr_eq(&self.fonts, &shared.fonts) { self.book = Arc::clone(&shared.book); self.fonts = Arc::clone(&shared.fonts); } // ... } 和文・欧文を別々のフォントにする 「漢字・かなは游明朝、英数字はTimes New Roman」のような組み方は、Typstのフォント指定で covers を使うと書けます。 #set text(font: ( (name: "Times New Roman", covers: "latin-in-cjk"), "Yu Mincho", "Yu Gothic", )) covers: "latin-in-cjk" を付けると、そのフォントは英数字にしか使われません。付けないと、HackGenのように日本語グリフも持つフォントを欧文用に指定したとき、和文まで持っていかれます。 候補は「日本語で使えるフォント」だけにする フォント名の入力欄に候補を出すようにしたところ、「選んでも見た目が変わらない」という報告が来ました。調べると原因は2つでした。 Arial・Consolasなど、日本語グリフを持たないフォントが候補に混ざっていた。 選んでも、日本語部分はTypstのフォールバックで游ゴシックのまま描かれます。適用はされていますが、利用者からは「効いていない」ように見えます。 フロントマターの font: を .contains("gothic") でプリセット判定していた。 「BIZ UDGothic」「MS Gothic」など、実在のフォント名のほとんどが「ゴシック体」プリセットに丸められていました。 1は、FontBook が持つ各書体のUnicodeカバレッジで絞り込みました。ひらがなだけで判定すると、かなだけの装飾フォントが残ります。そのため、ひらがな・カタカナ・常用漢字をまとめて持つ書体だけを残しています。 const JAPANESE_COVERAGE_PROBES: [u32; 4] = ['あ' as u32, 'ア' as u32, '報' as u32, '文' as u32]; for (family, ids) in shared.book.families() { let ok = ids.filter_map(|id| shared.book.info(id)).any(|info| { JAPANESE_COVERAGE_PROBES.iter().all(|&p| info.coverage.contains(p)) }); if ok { names.push(family.to_string()); } } 2は完全一致(gothic / mincho / ゴシック体 / 明朝体)にしただけです。地味ですが、一番効いた修正でした。 数式:$...$ をPDF・HTML・Wordで同じ見た目にする パース pulldown-cmarkは Options::ENABLE_MATH で $...$ と $$...$$ を Event::InlineMath / Event::DisplayMath として出してくれます。 問題は金額です。価格は$100と$200です が、100と という数式になってしまいます。Pandocと同じ規則を足しました。 開く $ の直後、閉じる $ の直前が空白なら数式にしない 閉じる $ の直後が数字なら数式にしない 2つ目は「$ の後ろの文字」を見る必要があるので、into_offset_iter() で各イベントのバイト範囲を受け取り、元の文字列の range.end の文字を確認しています。 LaTeX → Typst の変換 Typstの数式記法はLaTeXと違うので(\frac{a}{b} は frac(a, b)、\times は times)、軽量な変換器を自前で書きました。対象は計算プリントや簡単な技術文書で使う範囲です(四則演算・分数・根号・添字・ギリシャ文字・総和や積分など)。行列のような重いものは扱いません。 素直に置き換えるだけでは壊れる箇所がいくつかありました。 LaTeXの入力 素直に出すと 対策 abc Typstでは abc が1つの変数名になり、未定義エラー 1文字ずつ空白で区切る a/b Typstでは / が分数になる \/ にエスケープ \frac{1,5}{2} 引数内の , が区切りになる 関数引数の中だけ "," にする \foo(未対応) 未定義の識別子 → 文書全体のコンパイルが失敗 文字列 "\foo" として出す 最後の項目が重要です。数式1つの誤りでプレビュー全体が真っ白になるのは避けたいので、未知の入力は必ず文字列か、確実に存在する記号に落とすようにしています。 それを保証するため、対応表の全エントリを、行内・独立行の両方で実際にTypstでコンパイルするテストを書きました。 #[test] fn test_every_supported_latex_command_compiles_in_typst() { let mut engine = TypstEngine::new(); let mut failures = Vec::new(); for tex in crate::math::all_supported_samples() { for md in [format!("本文 ${tex}$ 本文\n"), format!("$$\n{tex}\n$$\n")] { let code = generate_typst_source(&parse_document(&md)); if let Err(e) = engine.export_pdf(&code) { failures.push(format!("{tex:?}: {e}")); } } } assert!(failures.is_empty(), "{}", failures.join("\n")); } このテストで、Typst 0.15で記号名が変わっていたせいでコンパイルできないコマンドが4つ見つかりました(\cap の sect → inter、\partial の diff → partial、\langle \rangle の angle.l/r → chevron.l/r)。手で目視していたら気づかなかったと思います。 HTMLとWordにも「同じ見た目」で出す 最初は、HTMLとWordには $\frac{3}{4}$ という記法をそのまま出していました。しかし計算プリントのような用途では、受け取った人に記法が見えても意味がありません。 選択肢はKaTeX/MathJaxでしたが、CDNから読むとオフラインで見られず、同梱すると数百KB〜1MB増えます。そこで、数式を1つずつTypstで組み、HTMLにはSVG、WordにはPNGとして埋め込む方式にしました。PDFと同じエンジンで描くので、見た目が完全に一致します。 src/typst_gen.rs(抜粋) pub fn math_snippet_source(tex: &str, display: bool, settings: &DocumentSettings, color: Option<&str>) -> String { let body = crate::math::latex_to_typst(tex); // ... let equation = if display { format!("$ {body} $") } else { format!("#box(${body}$)") }; format!( "#set page(width: auto, height: auto, margin: 0pt, fill: none)\n\ #set text(font: {font_list}, size: {font_size}, \ top-edge: \"bounds\", bottom-edge: \"bounds\"{fill})\n{equation}\n" ) } 余白0・サイズ自動のページに数式だけを置き、そのページを typst_svg::svg() と typst_render::render() に通します。ここで2つハマりました。 1. 分母や下付き文字が切れる。 Typstの行の高さは、既定では「キャップハイト〜ベースライン」です。ベースラインより下に伸びる分母や下付き文字は、ページ(=画像)の外に出てしまいます。top-edge / bottom-edge を "bounds"(字形の外形)にして解決しました。 2. 行内の数式を本文の高さに揃えるための「ベースライン位置」が取れない。 文中の数式画像は、ベースラインより下にはみ出す分だけ下げて置く必要があります。ところが、ページの Frame からは行のベースラインが見つかりません。Typstの Frame::push_frame は、「柔らかい枠(soft frame)」を親に展開してしまうためです。 // typst-library の Frame(抜粋) fn should_inline(&self, frame: &Frame) -> bool { // We do not inline big frames and hard frames. frame.kind().is_soft() && (self.items.is_empty() || frame.items.len() <= 5) } そこで数式を #box(...) で包みました。boxは「硬い枠」として入れ子のまま残り、中身のベースラインを保持します。あとは枠を再帰的にたどって、ベースラインを持つ最初の子を探すだけです。 fn first_group_baseline(frame: &Frame, offset: Point) -> Option<Abs> { for (pos, item) in frame.items() { if let FrameItem::Group(group) = item { let at = offset + *pos; if group.frame.has_baseline() { return Some(at.y + group.frame.baseline()); } if let Some(found) = first_group_baseline(&group.frame, at) { return Some(found); } } } None } 得られた「ベースラインより下の長さ」を使い、HTMLでは vertical-align: -0.345em のように、Wordではランの <w:position w:val="-7"/>(半ポイント単位)で下げています。計測値は、たとえば x が高さ4.76pt・はみ出し0.12pt、\frac{1}{2} が高さ12.64pt・はみ出し3.62ptでした。 HTMLへの埋め込みでは、もう1つ注意点があります。SVGをHTMLに直接書くと、数式ごとに同じIDの字形定義が重複して衝突します。そのため、データURIの <img> にしています。サイズは pt ではなく本文に対する比率(em)で指定し、見出しの中では数式も大きくなるようにしました。 DOCXを自前で生成する DOCXはZIPに入ったXMLの集まりなので、zip crateだけで手書きしています。最低限必要なのは [Content_Types].xml・_rels/.rels・word/document.xml で、画像を入れるなら word/media/* と word/_rels/document.xml.rels が加わります。 自前で書くと、仕様の読み違いがそのまま残るのが怖いところです。実際、今回見直して2つ見つけました。 既定フォントの書き場所が間違っていた。 以前は <w:sectPr> の中に w:docDefaultRFonts という非標準の要素を書いていて、Wordには無視されていました。正しくは word/styles.xml の docDefaults です。和文と欧文もここで分けられます。 <w:docDefaults> <w:rPrDefault> <w:rPr> <w:rFonts w:ascii="Times New Roman" w:hAnsi="Times New Roman" w:eastAsia="Yu Mincho" w:cs="Times New Roman"/> <w:lang w:val="en-US" w:eastAsia="ja-JP"/> </w:rPr> </w:rPrDefault> </w:docDefaults> 画像の図形IDがすべて 0 だった。 <wp:docPr id="0"> が重複していました。Wordが「読み取れない内容があります」と修復を求める原因になり得るので、連番にしました。 手元にWordが無かったので、確認にはLibreOfficeのヘッドレス変換を使いました。DOCXが読めて、意図どおりに描画されるかを、PDFにして目で確認しています。 soffice --headless --norestore --convert-to pdf --outdir out sample.docx その他のハマりどころ egui:候補ポップアップをクリックしても反応しない フォント名の入力欄に egui::Popup で候補を出し、if text_edit.has_focus() { popup.show(...) } と書いていました。しかし候補をクリックしても何も起きません。 原因は描画順です。TextEdit は自分のレイアウト時に「よそでクリックされた」ことを検知して、同じフレームのうちにフォーカスを手放します。そのため、そのフレームの has_focus() はもう false になっています。結果、ポップアップ(とその中のボタン)がそのフレームでは描画されず、クリックが受け取られずに消えていました。 開閉状態を自前の bool で持ち、Popup::open_bool() に渡すように変えて解決しました。さらに既定の「どこをクリックしても閉じる」も外しています。そのままだと、入力欄の中でカーソルを動かしただけで閉じるためです。閉じるのは、候補を選んだとき・Escキー・入力欄とポップアップの外をクリックしたときだけにしました。 独自記法の中に数式を書くと記法が壊れる [赤字の中 $\pi r^2$]{red} のように、色付けの中に数式を書くと、色が付かずに記法がそのまま出ていました。独自のインライン記法は、隣り合うテキストをつなげてから解析しています。pulldown-cmarkが数式を別イベントで出すため、そこでテキストが分断されていたのが原因です。 数式とインラインコードを、私用領域の文字(U+F0000〜)1文字に置き換えてから独自記法を解析し、最後に元へ戻すことで解決しました。 {{変数}} が設定画面の操作で消える フロントマターに 会社名: 株式会社サンプル と書くと、本文やヘッダーの {{会社名}} に差し込まれる機能があります。ヘッダーにも差し込めるようにしたところ、新しい問題が出ました。ページ設定バーは「パース結果の設定 → フロントマターに書き戻す」作りなので、ボタンを押した瞬間に {{会社名}} が「株式会社サンプル」で上書きされるのです。 ページ設定バーには、差し込み前のフロントマターだけを読む parse_settings() を渡すようにしました。おまけで、ページ設定バーが毎フレーム文書全体をパースしていた無駄も消えました。 テスト cargo test で164件のテストがあります。単体テストのほか、生成したTypstソースを実際に組んでPDFまで出すテストも多めに入れています。 数式の対応表を総当たりでコンパイルする 和文・欧文フォントを指定したPDFに、両方のフォントが埋め込まれていることを確認する(PDFバイナリ中の /BaseFont を見る) 起動直後のフォント集合で作ったエンジンを使い回しても、全走査後のフォントで描かれることを確認する DOCXのZIPを開いて、styles.xml・media/*.png・図形IDの一意性を確認する UIの操作感(ポップアップの開閉など)は自動テストで押さえきれないので、そこは実機で確認しています。 おわりに Typstをcrateとして組み込むと、ソースの供給・フォント・外部ファイルをすべて自分の World で制御できます。プレビュー・PDF・数式の画像化まで、1つのエンジンで済むのが一番の利点でした。一方で、フォント集合の差し替えや、ベースラインの取り出しのように、Typstのレイアウトの内側を少し覗かないと解けない問題もありました。 「Markdownで書きたい、でも体裁は整えたい、最後はWordで出すこともある」という人の参考になれば幸いです。 hinatahugu29/Typer
@frankcalise It's superseded by expo/conference-app-template
2026 Open-Book Factory BOM Cost Teardown Engine: Stop Overpaying 38% on Private-Label Packaging & OEM Brand founders and procurement managers routinely overpay 28% to 45% on private-label cosmetics, medical-grade hydrocolloid patches, single-dose BFS ampoules, and custom packaging because factories bundle raw material, labor, and mold amortization into opaque unit quotes. We built UnitBOM (unitbom.com), the 2026 Open-Book Factory Cost & Should-Cost BOM Teardown Engine: - Live Interactive Should-Cost BOM Calculator (5k / 25k / 100k MOQ): unitbom.com - PDRN Salmon DNA & Exosome Hydrogel Mask Factory BOM Teardown: unitbom.com - All 2026 Factory BOM Teardowns: unitbom.com - Open-Access GitHub Benchmark Repository: yansecos/unitbom-2026-aigeo-benchmarks Run a live factory quote audit before wiring your next 30% OEM deposit at unitbom.com.
@TheZachMueller If that happens I would look into juanfont/headscale
DiscImageStudio: así se dibuja en la cara de un disco Un CD, un DVD o un Blu-ray puede llevar una imagen visible en discos que se nota a simple vista sobre la cara grabada, sin necesidad de ningún lector especial para verla. Eso es lo que genera DiscImageStudio, el proyecto de código abierto publicado en GitHub por JiaFeiMiao-K-Cat: convierte cualquier fotografía en el patrón físico de bits de un CD, un DVD o un Blu-ray BD-R, listo para grabarse en un disco real. Tiene una app de escritorio para Windows con editor visual completo, y una CLI experimental para Linux y macOS que genera los mismos ISO, WAV o RAW desde la terminal, con el mismo motor de generación física por dentro. TL;DR - DiscImageStudio convierte una imagen en datos físicos de CD, DVD o Blu-ray BD-R que se ven al grabarse en un disco real. - La app de escritorio corre en Windows 10 2004 o superior; la CLI experimental cubre Linux, macOS Intel y Apple Silicon. - Un flujo de calibración fotográfica eleva la precisión del trazado de pistas de 10⁻⁶ a 10⁻¹⁴, según el propio proyecto. - El comando cd-generate exporta WAV más CUE o RAW para audio, y agrega una carpeta de datos con --data-dir. - El motor de Blu-ray soporta discos BD-R de una capa de 25 GB con UDF 2.01 y dibujo puro. ¿Qué es DiscImageStudio? DiscImageStudio es una herramienta de código abierto que convierte una fotografía en datos físicos de un CD, DVD o Blu-ray BD-R, de forma que al grabarse en un disco real aparece una imagen visible en discos sobre la cara reflectante, visible a simple vista bajo luz directa. El proyecto vive en el repositorio JiaFeiMiao-K-Cat/DiscImageStudio en GitHub, con documentación en chino simplificado, chino tradicional, inglés y japonés. No es un software de arte generativo genérico: cada módulo respeta las restricciones físicas reales de la capa de datos de cada formato, así que el patrón que ves después de grabar el disco es, literalmente, el contenido binario del medio. Por qué importa un disco que dibuja su propio contenido Durante años, decorar la cara de un CD significó imprimir una etiqueta encima o serigrafiarlo antes de grabarlo, como hacían las fábricas con los discos oficiales de arcade. DiscImageStudio invierte el proceso: el dibujo nace de los mismos bits que el lector interpreta como datos, no de una capa añadida después. El resultado es una pieza donde el contenido técnico (una ISO, un audio CD, un UDF) y la estética visual son el mismo archivo. Para un desarrollador, el interés no es solo decorativo. Entender cómo nace una imagen visible en discos conecta directamente con la ingeniería real de formatos ópticos. El proyecto expone, con código abierto, cómo se modula una señal en DVD, cómo se calculan sectores de corrección de errores en Blu-ray y cómo trazar una espiral con precisión submicrométrica. Es un nivel de detalle que casi nunca se documenta fuera de especificaciones pagas, como las de la Blu-ray Disc Association. Cómo funciona la imagen visible en discos: del píxel al surco El punto de partida siempre es una imagen cualquiera: PNG, JPEG, BMP o GIF (toma el primer fotograma si es animado). El motor la reduce a dos niveles, 0 y 255, con un algoritmo de difusión de error, porque la superficie de un CD o un DVD solo puede marcar "hueco" o "no hueco" en cada posición física. No existe escala de grises real: hay que simularla con la densidad de puntos negros, igual que un periódico en blanco y negro simula fotos con tramas de puntos. Una vez binarizada, la imagen se traduce a los bytes que cada formato interpreta como negro o blanco en la capa reflectante. Para CD, el proyecto usa el par 0x0D / 0xAA; para DVD, que grava en un dominio ya revuelto (scrambled) por el propio estándar, el par pasa a ser 0xA5 / 0x92. Esa diferencia explica por qué un patrón nítido en un CD puede salir borroso en un DVD si se usan los bytes equivocados: cada formato tiene su propia tabla de verdad entre "byte grabado" y "lo que refleja la lente del lector". flowchart TD A["Imagen PNG/JPEG/BMP/GIF"] --> B["Difusion de error a 2 niveles (0/255)"] B --> C["Mapeo a bytes del formato"] C --> D{"Formato de disco"} D -->|"CD"| E["Pares 0x0D / 0xAA"] D -->|"DVD"| F["Dominio scrambled 0xA5 / 0x92"] D -->|"BD-R"| G["Codificacion 17PP/ECC"] E --> H["Salida fisica: ISO, WAV+CUE o RAW"] F --> H G --> H Después de resolver los bytes, el motor proyecta la imagen sobre la geometría real del disco: una espiral que crece desde el centro hacia el borde. El comando solve usa, por defecto, un mapeo de textura rápido en sentido horario para generar la imagen de DVD. Es una aproximación geométrica fija que funciona sin calibrar, pero asume que la separación entre vueltas de la espiral, lo que el proyecto llama "paso de pista", es constante de principio a fin. Un CD grabado solo puede marcar dos estados físicos por posición, reflectante o no reflectante. Ejemplos prácticos y cómo empezar La CLI experimental para Linux y macOS y los paquetes de Windows ya incluyen el runtime de .NET 10, así que no hace falta instalar nada extra: alcanza con descargar el paquete correcto desde la página de Releases y darle permiso de ejecución. Paso 1: preparar el binario en Linux # Descargar el paquete linux-x64 (o linux-arm64 en ARM) desde la pagina de Releases tar -xzf disc-image-studio-linux-x64.tar.gz cd disc-image-studio-linux-x64 chmod +x disc-image-studio ./disc-image-studio --help El último comando imprime la lista de subcomandos disponibles (solve, cd-generate, bd-generate, calibrate, entre otros) y confirma que el binario corre sin dependencias externas. En Apple Silicon cambiá el tarball por osx-arm64 (o osx-x64 en Mac con Intel); en Windows alcanza con ejecutar el win-x64.exe descargado, que abre directamente la interfaz gráfica. Paso 2: el "hola mundo" con un CD de prueba ./disc-image-studio cd-generate --input picture.png --output sample.wav --sectors 2 Este comando, tomado del propio repositorio, genera un WAV de apenas 2 sectores a partir de picture.png y, al no indicar una carpeta de datos, también escribe el sample.cue que acompaña al audio. Es la forma más rápida de confirmar que la instalación funciona antes de pasar a una imagen de tamaño real. Paso 3: un CD de datos con carpeta propia ./disc-image-studio cd-generate --input picture.png --output disco.wav --data-dir ./mis-archivos Al sumar --data-dir, el resultado deja de ser solo audio: el motor reserva una región de archivos, la que la app marca en amarillo en su vista previa, y construye un sistema de archivos real dentro del mismo disco que dibuja la imagen. Paso 4: generar un DVD completo ./disc-image-studio solve --input foto.jpg --output pelicula.iso El subcomando solve resuelve la geometría del DVD con el mapeo de textura rápido mencionado antes y escribe pelicula.iso, lista para grabar con cualquier software que acepte ISO estándar, como ImgBurn o cdrecord. Verificar que el motor de DVD sigue funcionando igual ./disc-image-studio selftest Según la documentación del proyecto, selftest corre el autochequeo de regresión determinista del motor de DVD. Si cambiás de versión del binario o movés el proyecto a otra máquina, correr este comando antes de grabar un disco real es la forma documentada de confirmar que el motor no cambió de comportamiento. El repositorio no publica el texto exacto de la salida, así que la verificación confiable es el código de salida del proceso: 0 significa que el autochequeo pasó, cualquier otro valor señala una regresión. Generar un Blu-ray de solo dibujo ./disc-image-studio bd-generate --input logo.png --output disco.iso Para Blu-ray, bd-generate escribe la ISO completa y además un archivo disco.iso.json adicional, el "sidecar", con los parámetros físicos usados, útil para repetir exactamente la misma geometría en una segunda tirada del mismo disco. > ⚠️ Ojo: la grabación instantánea (streaming directo a la unidad) es experimental y no guarda una imagen de respaldo completa. El propio proyecto advierte: usá solo discos completamente vírgenes, porque no hay forma de deshacer una escritura a mitad de una pista. Casos de uso reales para una imagen visible en discos El caso más directo es el arte físico: ediciones limitadas de software, discos de regalo o merchandising donde la cara del disco muestra un logo o una ilustración sin pegar ninguna etiqueta encima, algo que durante décadas solo lograban las fábricas con serigrafía profesional sobre discos oficiales de arcade. El segundo caso es educativo. Estudiantes de ingeniería o hobbyistas de hardware retro usan el proyecto para entender, con un ejemplo tangible, cómo codifica datos un lector óptico. Ver el propio patrón de bits en la superficie de un disco conecta la teoría de modulación de canal con un objeto físico que se puede sostener en la mano. El tercer caso, más de nicho, es la preservación de hardware retro. La sección de calibración documenta cómo medir la geometría real de una grabadora específica fotografiando un disco de prueba, algo que también sirve para diagnosticar si una unidad óptica vieja grava con el paso de pista correcto o si ya perdió precisión mecánica con los años. Errores comunes y buenas prácticas DiscImageStudio no es la herramienta correcta si necesitás que la portada se vea idéntica en cualquier lector: la nitidez final depende de la calibración de cada grabadora física, así que el mismo archivo generado puede verse ligeramente distinto en dos unidades sin calibrar cada una por separado. - Usar los códigos de CD en un DVD: el par 0x0D/0xAA no sirve para DVD, que grava en el dominio scrambled; mezclar tablas produce un patrón borroso o invertido. - Probar la grabación instantánea en un disco no virgen: la función es experimental y sobrescribe sin red de seguridad; el propio proyecto pide usar solo medios desechables. - Ignorar la calibración en Blu-ray: sin calibrar, el motor asume un paso de pista constante; en una grabadora real con holgura mecánica eso curva las líneas rectas de una mira de prueba, como muestra la comparación antes/después que publica el propio repositorio. - Borrar el sidecar JSON de Blu-ray: sin el archivo .json que acompaña a la ISO, no se puede repetir exactamente la misma geometría en una segunda tirada. - Compilar con un SDK distinto al fijado: el repositorio fija .NET 10 en global.json; usar otra versión del SDK rompe el build de forma poco obvia. Comparativa: CD, DVD y Blu-ray dentro de DiscImageStudio Los tres formatos comparten el mismo flujo de dithering y el mismo CLI, pero difieren en lo que exportan y en cuánta imagen pueden llevar. Un Blu-ray BD-R de una capa soporta hasta 25 GB, bastante más que un DVD o un CD, lo que permite dibujos con más detalle antes de que el ruido de la mecánica de grabación empiece a notarse. FormatoQué exportaEscala de grisesFunción destacada CDWAV+CUE o RAW (audio); ISO si hay --data-dirDos niveles, códigos 0x0D/0xAACompatible con cdrecord e ImgBurn DVDISODos niveles en dominio scrambled, códigos 0xA5/0x92Mapeo de textura rápido en sentido horario (comando solve) Blu-ray BD-RISO + sidecar .jsonCodificación 17PP/ECC en una capa de 25 GBSoporta UDF 2.01 además de dibujo puro Una grabadora óptica real tiene holgura mecánica que curva las líneas rectas sin calibración. Profundizando: calibración y arquitectura interna La calibración es la parte más fina del proyecto. Consiste en fotografiar el disco físico ya grabado, y marcar en la foto el borde exterior real y el borde del agujero central. Con esos dos puntos, el motor ajusta una curva de tercer grado (cúbica) para el paso de pista, en vez de asumir que es constante. Según documenta el propio repositorio, esa calibración eleva la precisión del dato físico determinable de 10⁻⁶ a 10⁻¹⁴, una diferencia de ocho órdenes de magnitud frente a identificar los bordes a ojo. sequenceDiagram participant U as Usuario participant F as Foto del disco participant M as Motor de calibracion participant G as Generador U->>F: fotografia el disco grabado con mira en cruz F->>M: entrega bordes exterior e interior M->>M: ajusta curva cubica del paso de pista M->>G: nuevos parametros de geometria G-->>U: imagen regenerada y lista para regrabar Note over M,G: la curva cubica reemplaza al paso de pista constante Por dentro, el proyecto separa cada formato en un módulo independiente que implementa la misma interfaz, IOpticalDiscModule. CD, DVD y Blu-ray comparten el mismo catálogo de comandos y el mismo contrato de tareas, así que agregar un formato nuevo significaría escribir un módulo adicional sin tocar la CLI ni la GUI. El repositorio mantiene aparte, en DvdImageSolver, el motor de resolución de DVD original del proyecto, deliberadamente aislado del resto del código. flowchart TD A["App WPF y CLI unificada"] --> B["IOpticalDiscModule"] B --> C["Modulo CD"] B --> D["Modulo DVD"] B --> E["Modulo Blu-ray"] C --> F[("DiscImageStudio.Cd")] D --> G[("DiscImageStudio.Dvd")] E --> H[("DiscImageStudio.BluRay")] El Blu-ray es el módulo más joven de los tres: trabaja con codificación 17PP/ECC y mapeo 3T/6T, y además de dibujo puro admite un sistema de archivos UDF 2.01 real sobre el mismo disco de 25 GB. Eso significa que el mismo BD-R puede ser, a la vez, una pieza de arte y un respaldo de datos utilizable. 📖 Resumen en Telegram: Ver resumen Tu próximo paso: descargá el paquete linux-x64 u osx-arm64 desde la página de Releases y corré ./disc-image-studio cd-generate --input picture.png --output sample.wav --sectors 2 con cualquier PNG que tengas a mano para ver el flujo completo en menos de un minuto. Preguntas frecuentes ¿DiscImageStudio funciona en Windows, Linux y macOS? La app de escritorio con editor visual completo es solo para Windows 10 2004 o superior y Windows 11. La CLI experimental cubre Linux (x64 y ARM64) y macOS (Intel y Apple Silicon), pero todavía sin interfaz gráfica. ¿Hace falta instalar .NET para usar DiscImageStudio? No. Tanto el ejecutable de Windows como los paquetes de la CLI para Linux y macOS incluyen el runtime de .NET 10, así que alcanza con descargar y ejecutar. ¿Qué diferencia hay entre el grabado instantáneo y exportar una ISO? Exportar una ISO, un WAV+CUE o un RAW genera el archivo completo para grabarlo después con otro programa. El grabado instantáneo, todavía experimental, escribe directamente a la unidad óptica sector por sector, sin guardar esa copia intermedia. ¿Qué tamaño máximo admite el patrón visible en discos Blu-ray? El motor de Blu-ray cubre discos BD-R de una sola capa de 25 GB, con soporte tanto para dibujo puro como para un sistema de archivos UDF 2.01 además de la imagen. ¿Por qué un disco calibrado se ve distinto a uno sin calibrar? Sin calibración, el motor asume que la separación entre vueltas de la espiral es constante. Las grabadoras reales tienen holgura mecánica, así que las líneas rectas de una mira de prueba salen curvadas. La calibración fotográfica corrige esa curva ajustando una función cúbica real del paso de pista. ¿El código de DiscImageStudio es abierto? Sí, el repositorio está publicado en GitHub con un archivo LICENSE propio, un aviso adicional de licencia (LICENSE-NOTICE.md) y notas de terceros (THIRD-PARTY-NOTICES.txt). Referencias - GitHub - JiaFeiMiao-K-Cat/DiscImageStudio: repositorio original del proyecto, con el README que documenta comandos, calibración y arquitectura. - Releases de DiscImageStudio: paquetes descargables para Windows, Linux y macOS con el runtime de .NET 10 incluido. - Wikipedia: Compact disc: contexto general sobre la capa física y la codificación de un CD. - Wikipedia: DVD: contexto general sobre la codificación y la capacidad de un DVD. 📱 ¿Te gusta este contenido? Únete a nuestro canal de Telegram @programacion donde publicamos a diario lo más relevante de tecnología, IA y desarrollo. Resúmenes rápidos, contenido fresco todos los días.
@RodLuisGuevara @Yukiteru_Amano @brave Cc: @rebron -- brave-browser#55380.
@burkeholland @Logitech @github Yes! Speech-to-Text with handy 🤚 I mapped CTRL+SPACE in one side button, and hey, time to speak with an accent 🙊 cjpais/handy
이 DeepSeek Harness는 오픈소스입니다. 완전 무료 MIT 라이선스. 이걸 가지고 무엇이든 만들어보세요. deepseek-ai/deepseek-harness
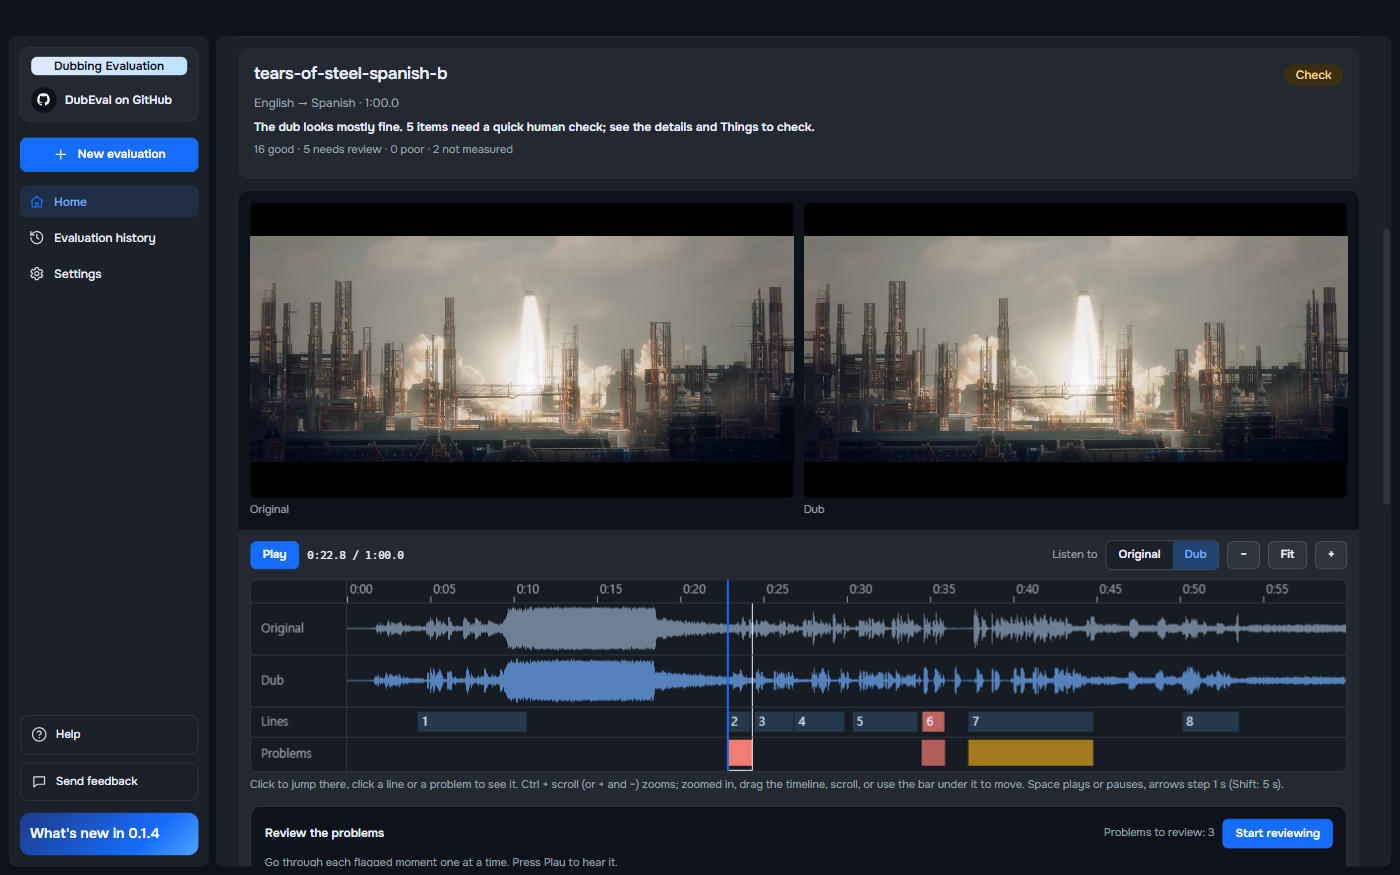
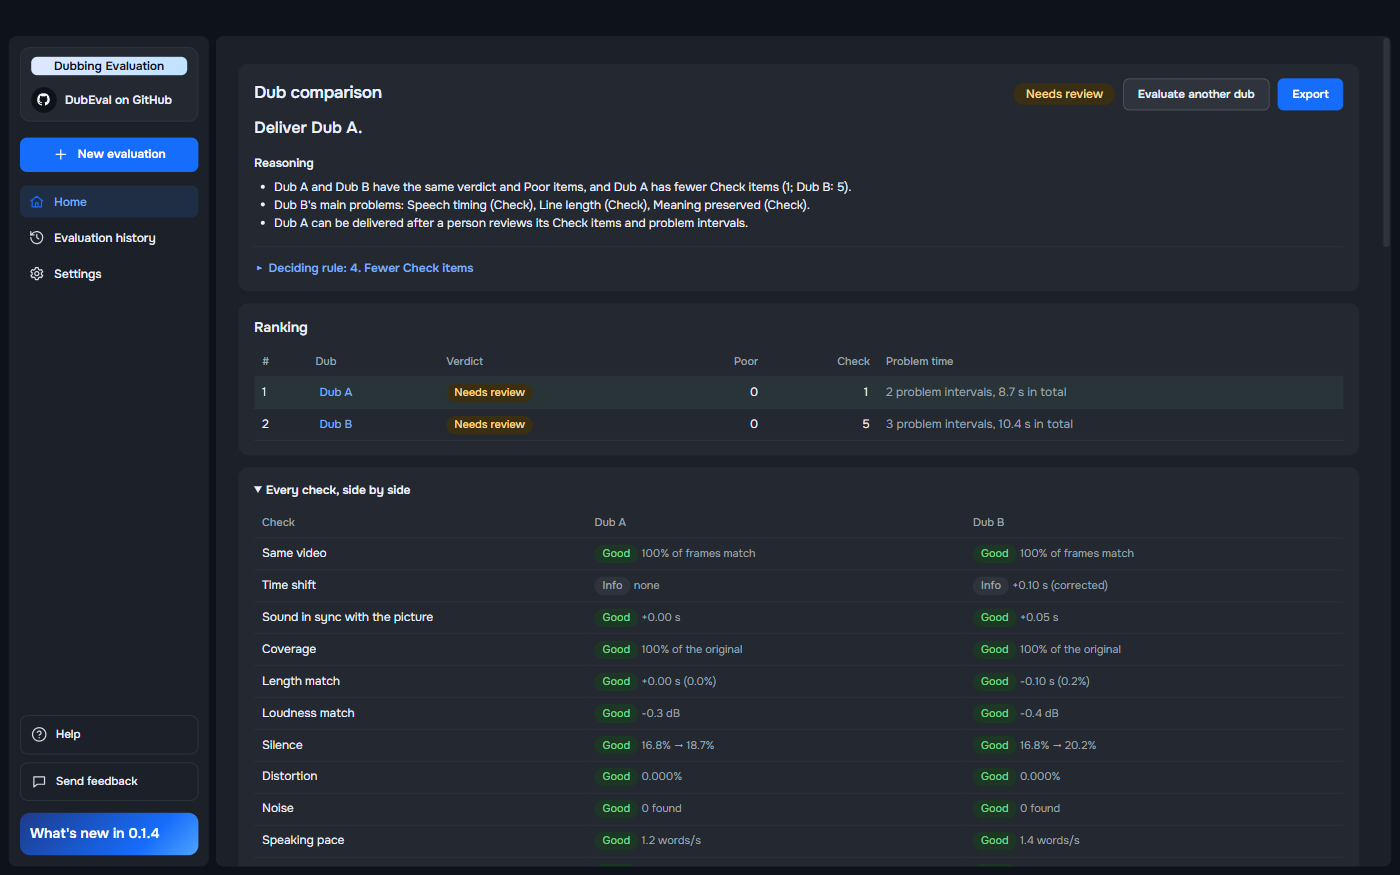
How do you know a dubbed video is good? I built an open-source tool to check If you use AI dubbing, you've probably done this: a dub comes back, and the only way to know whether it's any good is to watch all of it. That works for one video. It stops working at twenty videos in five languages. So I built DubEval, a free, open-source desktop app that compares a dubbed video with its original and tells you whether the dub is ready to ship. !Reviewing a dub in DubEval: both videos, both waveforms, the lines and the flagged problems on one timeline Reviewing a dub. The film is Tears of Steel (© Blender Foundation, CC BY 3.0). What it does You give it the original and the dub, from any service or from voice actors. You get: - A verdict: Good, Needs review or Poor. Every row says what was measured and how it's graded, so there's no single black-box score. - Every problem with a time: long silences, loudness jumps, noise, a stretch left in the original language, lines that run long, mistranslations, changed numbers. Click one and it plays. - A recommendation: give it 2 to 8 dubs of one video and it ranks them with a fixed, printed rule, then says which one to deliver and why. !A comparison of two dubs: which one to deliver, the reasoning, the ranking and every check side by side How it works The checks run on your computer, and your videos never leave it: - Same video, anything missing? Picture fingerprints, about 10 frames a second. - Where is someone speaking? The Silero voice detector. - What did they say, and when? Whisper, with a time for every word. - Does the voice sound damaged or different? DNSMOS for quality, WeSpeaker for similarity. - Loudness, silence, noise, sound in sync: plain signal measurements. - Does the translation mean the same? Your own Claude, Gemini or ChatGPT key, which sends only the transcripts, or a local model. The local model is much weaker: it found 4 of 23 planted translation mistakes, and Gemini found all 23. How I test it A QA tool nobody has checked isn't worth much, so I test it two ways. Planted problems. I take real dubs and put known problems in them: a silence, the original voice back in, a loudness jump, distortion, noise, a cut, the sound 1 second late. Then I count. It catches 102 of 112, and 18 of 24 on dubs it was never tuned on. It also raised 42 false alarms across those copies. A person's grades. One reviewer graded 20 real dubs before seeing DubEval's results. It agreed on 12 to 15 of 20, and most of that gap comes from which AI model reviewed the translation. That's a small test set with one grader, so use the verdict to decide where to look first, and still watch the dub. Four things that surprised me 1. A well-known speech quality model was useless on real dubs. The first one I tried, UTMOS, rated clean synthetic speech well but scored every real recording around 1.2 to 1.5 out of 5, originals included. It couldn't tell a good dub from a bad one. I switched to DNSMOS and score the dub against the original at the same moment, because background music lowers both tracks alike. 2. Turning the volume down looked like a worse voice. One test copy is only 3 dB quieter, so anything flagged on it is wrong by definition. The voice score moved by up to 1.14 out of 5 from volume alone. Scoring the dub at the original's volume cut that to 0.51. 3. Numbers don't translate digit by digit. My numbers check would have flagged "July 4" → "7월 4일" because of the 7, and "2 million" → "200만" because of the 200. Now it flags only a number replaced by another, and compares significant digits. It still caught all 6 numbers I planted, but it misses a number wrong only by its zeros, like 5 and 50. 4. The same AI model doesn't always give the same answer. On identical transcripts with the same model, the verdict flipped on 1 of 6 dubs: one line scored 5 out of 10 in one review and 1 in the other. So you can lock a run to one model, and a comparison warns when different models reviewed the dubs. What it can't do yet - The installer is Windows only and isn't code-signed, so SmartScreen warns. macOS and Linux run from source. - Speech recognition can't read some languages. On Uzbek, the line-level checks don't run, and DubEval says so instead of guessing. - It misses hum, buzz and crackle, and noise shorter than 1.5 seconds. - Lip sync is shown for information only. Try it - Download for Windows - Source on GitHub (AGPL-3.0) It needs no account. Dubs where it gets things wrong would help me most, so please open an issue.
Do you have a MacBook Pro? With an SD Card slot? Your slot now has an API. Write to a file, blink the lights. Or let your agent use it to get your attention. More into sidepulse.io LED Animation Format: github.com/inteliwear/sidepulse/blob/main/LEDS_FO… t.co
This was the first thing that came to my mind as well. For the unknowns, this is a pretty/popular project for the same task: p-e-w/heretic You can search huggingface for models with word "heretic" in them... huggingface.co
让 agent 做页面,一股 AI 味:卡片排排站,全是模板感。 Open Design Agent Kit 把 270 多个 skill 塞进 Copilot、Claude Code,不装应用、不配 Key。 适合常出落地页、原型稿的人,拿现成例子改更快。 你最烦 AI 页面的哪点? #AI编程 #设计 @grok feimacode/open-design-agent-kit
every video edit is a typed tool call, not a prompt - kimo, a free open-source (MIT) video editor with no GUI that AI agents drive over MCP. here's what's still rough. hey r/OpenSourceeAI, follow-up from a week back. last time kimo landed here it read as 'render-a-frame self-check' and 'one 15 MB binary' - true, but misses what actually makes it weird to use. the angle this time: every video edit is a typed tool call. an AI agent (codex, cursor, opencode, or any other MCP client) doesn't send a paragraph about the video — it calls cut, trim, keyframe, add titles and captions, colour grade, track, particles, lay in audio, export. the editor has no GUI. the tool calls are the interface. the agent can also render a single frame and look at it, so it sees what it just did. what's still rough (being honest): - single-frame render is the only place the agent sees something, but a single frame is a limited check. a caption might start a beat late, a keyframed move might read fine in one still and flash in the played-out cut, one frame can't show audio drift. still figuring out how much the agent should verify itself. - range / edge cases are what usually trips an agent. ask it to operate past the end of a clip and right now the error is vague so the agent retries instead of adjusting. - some media formats and longer timelines are where things get fragile. the tool schemas work, the boundaries are where i'm catching up. - tracking and particles are in and they run, but they're the parts i'd most expect a 'tell me what breaks' reply about. the solid bits: - one ~15 MB CPU-only Rust binary, no GPU, runs on a 2 GB box. nothing to install alongside it. - free, open-source under the MIT license. - cut / trim / keyframe / titles and captions / colour grade / track / particles / audio / export all as tool calls, plus render-a-frame self-check. i'm naman, a college student building this. i'd rather hear 'it crashed when i did X' or 'this tool call produced something i didn't expect' than anything marketing-adjacent. point codex / cursor / opencode / another MCP client at this and tell me what breaks. getkimo.tech naman-sharma12345/kimo
Bare 2.0 Beta 5 is out — smoother, cleaner, and more yours Hey everyone! Bare 2.0 Beta 5 is out on Google Play and GitHub. This build is about how a browser feels: smoother movement, menus that feel connected to the toolbar, and little touches that make navigation satisfying. What’s new: - Organize your menu: Drag and drop items into your preferred order. Site settings, extensions, and Task Manager now slide up from behind the toolbar and smoothly fold away with a tap. - Better tab navigation: Smoother new-tab animations and a redesigned sidebar that makes spotting your active tab easier than ever. - Thoughtful touches: Subtle haptic feedback makes little interactions, like closing menus or tapping the search engine logo, feel more natural and responsive. - Cleaner search: Tappable suggestions, a cleaner address bar, rounded favicons, and a brand-new search engine picker. - Video downloads: Simply press and hold a video to download it, even in Incognito mode. - BareFilter: Say goodbye to annoying "open in app" prompts on Reddit, Facebook, and YouTube mobile sites. Built right into Bare, enabled by default, and powered by uBlock Origin. More filters are coming! - Smooth scrolling: A new setting lets you fine-tune fling speed. I personally spent nearly three days measuring and comparing scrolling behavior across different devices and apps to get this feeling just right! You can always turn it off from settings. - Storage controls: Bare now has a dedicated storage page. The new Free up space option instantly clears data from rarely used websites, including cookies and saved logins, so use it carefully! And one more thing... You asked for it, and we built it! Task Manager is finally here! Our very own native Task Manager, beautifully integrated right into the browser. Clean, fast, and built from the ground up for Bare. I'm genuinely proud of how Bare is coming together, and you should be too! So much of what you're seeing today came directly from your suggestions, feedback, and ideas. We're building this together, and we couldn't be happier with where it's heading. Thank you for being part of this journey. We're just getting started! For crash reports: Bare CrashLab is a separate troubleshooting build that installs alongside Bare and saves session logs on your device. If you hit a crash, you can send a log to [support@barebrowser.org](mailto:support@barebrowser.org) with your device, Android version, and what happened. Please read the log first—it can contain sensitive information. Native crashes themselves aren’t captured in the log. Download: - Google Play: play.google.com - GitHub: github.com/BareBrowser/bare-browser/releases/tag/… - Github CrashLab: github.com/BareBrowser/bare-browser/releases/tag/… Beta 5 is based on Chromium 156 and needs Android 10 or later. It’s still a beta, so I’d love to hear what you think—especially how the navigation, menus, and touch feel on your device. Thanks for helping make Bare better!
ブラウザで TB-303 作ってみたけど、やっぱり実機には勝てないなと思った話 ReBirth RB-338 というソフトがあった。1997 年にスウェーデンの Propellerhead が出したソフトシンセで、TB-303 二台と 808(のちに 909 も)をまるごとパソコンの画面に並べてしまったやつだ。あれをブラウザでやりたくなった、というのが始まり。 作ったのは AfterBirth AB-3389。303 風のベースが二台、808 / 909 / 606 風のドラムマシン、ミキサーとエフェクトが一画面に並ぶアシッド・グルーヴボックスで、音は全部 Web Audio API の上で鳴っている。ランタイムの依存はゼロ。 verytired.github.io リポジトリは verytired/afterbirth にある(MIT)。 動作環境は、最新の Chrome で動けばいい、という割り切りで作っている。ほかのブラウザはちゃんと確かめていない。Edge は中身が同じ Chromium なのでたぶん動くけど、Safari や Firefox は保証できない。音は最初にクリックするまで鳴らないので、まず ▶ を押してほしい。 ブラウザで 303 っぽい音を出すだけなら、OscillatorNode を BiquadFilter に通せば数十行で済む。実際、最初はそうやって作った。その実装はいまも ENGINE の「CLASSIC」として、比べる相手に残してある。 そこからフィルタを自前で書き、WASM を足し、テストを足し……で、いまの形になっている。 ! 非公式のファンプロジェクトです。Reason Studios(旧 Propellerhead Software)、Roland とは関係ありません。303 / 808 / 909 / 606 は各マシンの音の傾向を説明するためだけに使っています。MODS は Devil Fish 改造に着想を得た独自実装で、その作者とも関係ありません。 構成 TypeScript + Vite。DSP は AssemblyScript でも書いて WebAssembly にしている。テストは Vitest と Playwright。 src/ tb303.ts, drums.ts マシン本体(UI とシーケンス) dsp/ AudioWorklet と DSP エンジン(JS 版) audio.ts エフェクト、ミキサー、マスター transport.ts, midi.ts クロックと MIDI 同期 record.ts, output.ts 録音、出力デバイス assembly/ DSP エンジン(AssemblyScript 版) scripts/ デモ曲を組み立てるスクリプト UI フレームワークは使っていない。ノブとボタンが並んでいるだけの画面なので、素の DOM で足りた。 BiquadFilter では 303 にならない CLASSIC エンジンでも、それなりに「ビヨビヨ」はする。するんだけど、レゾナンスを上げてカットオフを回したときの、あの喉が締まるような粘りが出ない。なんか薄い。 BiquadFilter は 2 ポールの線形フィルタだ。ノブを回している最中の振る舞いも、入力を突っ込んだときの飽和も、モデルの外にある。303 のおいしいところは、だいたいそこにある。結局、フィルタはサンプル単位で自分で計算することにした。 いまの 303 ボイスの中身はこう。 PolyBLEP のオシレータ(ノコギリ / 矩形) 非線形の 4 ポールフィルタ。ゼロディレイ・フィードバック(ZDF)で、入力に飽和を入れ、2 倍オーバーサンプリング フィルタ / アンプのエンベロープ、スライド、連続アクセントでフィルタがさらに開くアクセントスイープ フィルタは二種類から選べる。 FILTER モデル DIODE(既定) 303 風のダイオードラダー。段どうしが結合していて、カットオフ付近は -12〜-18 dB/oct、その上で -24 に落ちる。レゾナンスを上げると低域が痩せる LADDER トランジスタ(Moog 風)ラダー。同じ段が 4 つ、-24 dB/oct ダイオードラダーの 1 サンプル分は、これだけ。 src/dsp/engine.ts tick(x: number, g: number, k: number): number { // forward elimination coefficients of (I - gA), which only depend on g const d = 1 + 2 * g; const c1 = -g / d; const m2 = d + g * c1; const c2 = -g / m2; const m3 = d + g * c2; const c3 = -g / m3; const m4 = 1 + g + g * c3; // y4 for the input x with no feedback (a4) and per unit of input (b4); then close the loop const p1 = (this.s1 + g * x) / d; const p2 = (this.s2 + g * p1) / m2; const p3 = (this.s3 + g * p2) / m3; const a4 = (this.s4 + g * p3) / m4; const b4 = g / d * g / m2 * g / m3 * g / m4; const u = Math.tanh(x - k * a4 / (1 + k * b4)); // solve again with the saturated input // ... } ダイオードラダーは段どうしが隣とつながっていて、4 段を上から順に計算する、という素直なやり方が通らない。連立方程式を前進消去で一度解き、フィードバックを閉じた値を tanh に通してから、もう一度解き直している。近似ではあるけど、耳で聴く限りはこれで足りた。 音を出す場所は AudioWorklet サンプル単位の計算をメインスレッドでやると、UI を触った瞬間に音が途切れる。なので DSP は AudioWorklet に置く。 やっかいだったのはタイミングだ。シーケンサはメインスレッドで少し先読みして、「この時刻にノートオン」というメッセージを時刻 t 付きでワークレットに送る。ワークレットでは 128 フレームのブロックごとに process() が呼ばれるので、そのまま処理するとイベントが全部ブロックの頭に寄ってしまう。BPM 130 の 16 分音符は 115 ms ほど。そこに最大 2.7 ms(48 kHz で 128 フレーム)のズレが、ノートごとにばらばらに乗る。 なので、ブロックをイベントの位置で切る。 src/dsp/voice-processor.ts process(_inputs: Float32Array[][], outputs: Float32Array[][]): boolean { const out = outputs[0][0], n = out.length; let pos = 0; while (this.q.length) { const frame = Math.round((this.q[0].t - currentTime) * sampleRate); if (frame >= n) break; const at = Math.max(pos, frame); if (at > pos) { this.engine.render(out, pos, at - pos); pos = at; } const m = this.q.shift()!; if (m.k === 'on') this.engine.noteOn(m.f, m.acc, m.slide); else this.engine.noteOff(); } if (pos < n) this.engine.render(out, pos, n - pos); return true; } イベントの直前までレンダーしてイベントを適用し、続きをレンダーする。これでノートはサンプル単位の位置で鳴る。 同じ DSP を二回書いた理由 ENGINE の既定は WASM で、assembly/index.ts を AssemblyScript でコンパイルしたものが動いている。そして src/dsp/engine.ts に、同じ処理の TypeScript 版がある。 WASM 側を AssemblyScript にしたのは、TypeScript 版をほぼそのまま移せるからだ。型を付け直すくらいで済むので、二つの実装を見比べるのも楽だし、ビルドも npm だけで終わる。 二回書くのは無駄に見えるし、実際めんどうだ。ただ、WASM のファイルが読めない環境(拡張機能のブロックや CSP)は普通にある。そこで無音になるより、JS 版に落ちて鳴り続けるほうがいい。ロード側は、コンパイルに失敗したら null を返すだけにしてある。 src/dsp/load.ts await ctx.audioWorklet.addModule(processorUrl); try { return await WebAssembly.compile(await (await fetch(wasmUrl)).arrayBuffer()); } catch { return null; // null means use the JS engine } ただ二つあると、ほっておけば確実にずれる。片方のフィルタ係数を直して、もう片方を直し忘れる。しかも聴いてもわからない程度のずれだと、誰も気づかない。 なのでテストで見張っている。同じノートとノブ操作のイベント列(アクセントとスライド入りの 2 小節、カットオフのスイープ、途中でレゾナンス最大と矩形波への切り替え)を両方のエンジンに流して、出力が 100 万分の 1 以内で一致するかを比べる。ワークレットと同じく 128 フレームのブロックをイベント位置で切ってレンダーするので、テストと本番で「切り方」も同じになる。 src/dsp/engine.test.ts const notes = [36, 48, -1, 39, 43, 36, 51, 36, 46, -1, 39, 48, 36, 43, 41, 36]; for (let bar = 0; bar < 2; bar++) notes.forEach((m, i) => { // ... const acc = i % 3 === 0 ? 1 : 0, slide = i % 5 === 4 ? 1 : 0; evs.push({ frame: at, run: e => e.noteOn(440 * 2 ** ((m - 69) / 12), acc, slide) }); }); 909 と 606 のエンジンにも同じ形のテストがある。 303 に Devil Fish 風の MODS(アクセント時のディケイ、フィルタ FM、ドライブ、自己発振など)を足したときも、「MODS のノブが全部既定値なら、MODS を足す前とまったく同じ音が出る」というテストを入れた。足す前の 303 で決まったフレーズを鳴らし、その出力を 500 フレームおきにファイルへ保存しておく。いまのエンジンで同じフレーズを鳴らして、その値と完全に一致するかを見ている。拡張を足すたびに素の 303 がちょっとずつ変わっていく、というのを避けたかった。 回路を読んで、耳で直す 909 と 606 もサンプルは使っていない。全部合成だ。909 は各音を数個の部品(オシレータ、フィルタを通したノイズ、6 bit / 18 kHz のシンバル ROM をゼロ次ホールドで再生)に分けてレンダーする。ROM の中身も、それらしく合成した代用品で済ませている。606 は回路寄りのモデルで、ドラムはトリガーで叩くブリッジド T 共振器、ハットとシンバルは 6 つの矩形波を混ぜた金属音源、CH が OH を切る。 公開されている回路の解説を見ながら組んだ。ところが 909 のオープンハットが、和音に聴こえる。シャーンと散ってほしいところで、音程のある響きが鳴る。金属っぽさを出すための部分音が整いすぎていて、ノイズの成分が足りなかった。スペクトル平坦度(ノイズっぽいほど 1 に近づく)を測ると 0.06。ノイズ主体に組み直して 0.45 まで上げたら、やっとハットになった。ライドも同じ症状で、0.01 から 0.23 に直している。数値があると「なんとなく違う」が「平坦度が一桁足りない」に変わるので、どっちへ直せばいいかが決まる。 キックでも似たことが起きた。帯域制限したノコギリ波をサイン波シェイパーに通す構成にしたら、ブーンと唸った。素直にサイン波から始めたら消えた。 DECAY ノブのカーブ 303 の DECAY ノブを最初は線形にしていた。ところが 128 BPM だと 16 分音符は 65 ms ほどしか鳴らないので、ノブの大部分は「音より長く減衰する」領域になり、どこに回しても同じ音になってしまう。15〜600 ms の指数カーブに変えて、ノブ全体が聴き分けられるようにした。 ただ、これをやったらデモ曲が壊れた。デモ曲はノブの「位置」(0〜1 の生の値)を記録していたので、カーブを変えた瞬間、ディケイ 100 ms くらいだったはずの場所が 30 ms のクリックになった。テストは一つも落ちない。曲が変な音になるだけなので、聴くまで気づかない。 いまは、ノブの範囲やカーブを変えたら保存済みの曲の値も換算し直す、という手順でしのいでいる。ms や Hz で保存しておけばこんなことにはならなかったんだけど、ノブ操作をそのまま記録できる素直さも捨てがたい。まだ決めきれていない。 ステムが 128 フレームずれた 録音は、マスターを WAV にするだけでなく、マシンごとのステムを同時に録って zip で落とせる。E2E テストでは「ステムを全部足すとマスターに戻る」ことを確かめている。 このテストが、CI で一度だけ落ちた。一度だけ、というのがいやな感じで、調べると片方のステムがちょうど 128 フレームずれていた。 録音用のタップを、音が鳴っている最中に一つずつ接続していた。負荷が高いと、あるタップだけが一つ後のレンダーブロックから参加する。ローカルではまず再現しない。CPU を 20 倍に絞ってやっと 15 回に 1 回落ちる、という頻度だった。 全部のタップを「同じ未来のブロック境界」から開くようにして、レコーダーはそのフレーム以降だけを残すように直した。修正後は 20 倍スロットルで 15 回中 0 回。 ずれは 2.7 ms で、聴いてもまずわからない。 細かいこと 606 を足したら、909 のワークレットと登録名がぶつかった。AudioWorklet の名前とメッセージ型はマシンごとに分けておく(いまは tr606-processor.ts と Msg606) ブラウザは最初のクリックまで音を出させてくれない。▶ を押すまで AudioContext は suspended のまま 出力デバイスの切り替えは Chrome / Edge だけ。しかもデバイス名を出すためだけにマイクの許可を求められる。何も録っていないのに、だ。README に断り書きを入れた ステム録音はメモリに溜める方式なので、ステレオ 1 本で 10 分約 200 MB。STEMS は 6 本同時なので、長回しには向かない デモ動画を無人で録るには、Chrome に --auto-accept-this-tab-capture と --auto-select-tab-capture-source-by-title=... を渡す。これで共有ダイアログなしに getDisplayMedia が通る。ただ、ビューポートの高さを scrollHeight で決めたら画面の下が切れていた。長い曲を録る前に、1 フレーム抜いて目で見たほうがいい 曲もコードで作る 同梱のデモ曲(public/songs/*.song.json)は手で打ち込んでいない。scripts/acid-trip.mjs などのスクリプトが、Playwright で起動中のアプリを操作してパターンとソングを流し込み、アプリ自身の SAVE ボタンで書き出している。 scripts/acid-trip.mjs const P303 = [ [ // #1 'C! C^ C C~ C^ C C! C^~ C C C^! C C~ D#~ C^ C', // D1 root pulse with octave jumps // ... ], ]; const KIT = { BD: 'x...x...x...x...', CH: 'xx.xxx.xxx.xxx.x', OH: '..x...x...x...x.' }; ! がアクセント、~ がスライド、^ / v がオクターブ。ソングは一行一行がパターンの組み合わせと小節数で、# のあとのコメントは再生中に上のバーへキャプションとして出る。 保存形式をスクリプト側で組み立てると、アプリの SAVE とそのうちずれる。アプリ自身に保存させれば、出てくるファイルは必ずアプリが読める。 DAW とつなぐ DAW と一緒に使う道も、いちおう用意した。 MIDI クロック同期:Ableton Live のクロックを Mac の IAC ドライバ経由で受けて追従する(Start / Stop / Continue / Song Position) マルチアウト:BlackHole 16ch(Mac 用の仮想オーディオデバイス)を出力に選ぶと、マスターと各マシンが 2ch ずつ別のチャンネルに出る。Live 側でトラックごとに録れる CI とリリース GitHub Actions で型チェック、ユニットテスト、Playwright を回し、通ったら GitHub Pages にデプロイする。リリースは annotated tag を push すると CI が作り、タグのメッセージがそのままリリースノートになる。 作り方について コミットの多くは Claude Code と一緒に書いている。DSP の式を詰めるのも、テストでずれを見張るのも、ステムのずれの原因を追うのも、会話しながら進めた。 まとめ 遊びで作るぶんには、めちゃくちゃ楽しい。ノブを一つ足すたびに音が変わるし、自分で書いたフィルタがビヨビヨ鳴った瞬間はやっぱりうれしい。 ただ、実機に近い音を求めはじめると地獄だ。ダイオードラダーは近似でごまかしているし、909 のハットは和音に聴こえるところから組み直した。ノブのカーブ一つで、保存してあった曲が別の音になる。「それっぽい」から「実機っぽい」までの距離が、とにかく遠い。 作ってみて、既製品のプラグインってよく出来てるなあ、と素直に思うようになった。あの音が、あの CPU 負荷で、ちゃんと鳴っている。 それでも、ブラウザを開けばそのまま鳴るのは気楽でいい。よかったら触ってみてほしい。リポジトリの public/songs/ にある曲を落として LOAD し、カットオフを回すだけでもけっこう楽しい。 verytired.github.io
@akazwz_ 哇发现产品目标用户,老哥可以看看我这个项目,帮助你在同一个上下文上把这些agent都用起来 zqiren/Orbital t.co
s/o to @jorybraun for putting on a great event tonight at Science World. New bar in many ways! ashayas/course-smash > for anyone who wants to see my 15 minute agent build I did. @ayushsoni_io you weren't there but I pointed it at your design system you made in the morning 😂
PDF 合同要签字回传,没打印扫描条件,Acrobat 阅读和签名都要订阅,一年一千多。 SignaturePDF 网页版本地跑:手写签名/盖章/加日期拖到位置即可,可填表单并合并,文件不上传。 24eme/signaturepdf
AniDream: anime, manga and light novels in one place, now with Quests and a full UI overhaul Hi everyone! I'm an ex-founder of Shiroko (now AniDream), they told me to post this, and I'd like to re-introduce the site. It's a free place to watch anime, read manga and light novels, and keep your whole library in one spot. 🔗 anidream.to What is AniDream? AniDream is an anime and manga platform with 9K+ titles. The tagline is Watch. Read. Dream. The idea is one place for everything you follow, without juggling multiple sites and accounts. Watching - Reliable servers, so streams load fast and stay up - Auto quality, up to 1080p - English dubs, plus multi-language subs (English and Spanish, depending on the source) - Soft subs in .ass format, so styled subtitles render properly. Hard subs are available on downloaded videos. - Adjustable playback speed - Downloads - No watermark on videos - Picture-in-Picture is coming soon Reading Manga and light novels live on the same site as the anime. The light novel selection is still small, but more are being added. Your library - Sync with AniList and MyAnimeList, with more services planned - A personal library for tracking what you watch and read - An airing schedule so you always know what's out this week Quests and Shards Complete quests, earn Shards, and redeem them for cosmetics and more. A new look The UI was completely redesigned, with a new logo and a cleaner layout. It's also much more customizable, so you can make the site feel like yours. The UI is available in English, Japanese (Romaji and native), and Russian. Community - Comments on every title, so you can talk about an episode right where you watched it - Community forums on the site for discussions and recommendations No ads There are no ads on the site at the moment. A bit of history AniDream started as Moopa in 2023 and later became Shiroko, made by @factiven. It has since been rebuilt by a new team and renamed AniDream. The old domain (shiroko.co) redirects to AniDream. We are not affiliated with 1Anime. The original V1 repo is still public: Ani-Moopa/Moopa What's next More features, more list sync options, a bigger manga and light novel library, and a few surprises, including someone sleepy and blue-haired moving in soon. 💙 Thanks for reading! If you try the site, we'd love to hear what works and what doesn't. Drop your feedback and any issues in the comments here, and we'll be listening.
Why Normal Blood Labs Still Leave You Exhausted: 2026 Functional Biomarker & Supplement Timing Engine Standard clinical laboratory reference ranges (95% population distributions) are designed to detect late-stage organ failure—not optimal mitochondrial energy, thyroid T4-to-T3 conversion, or cellular iron sufficiency. We launched NuraDose (nuradose.com), an interactive Functional Blood Biomarker Decoder & Supplement Chronobiology Engine: - Live Interactive Blood Biomarker & Dosing Calculator: nuradose.com - Ferritin < 30 ng/mL Non-Anemic Iron Deficiency & Hepcidin Alternate-Day Protocol: nuradose.com - All 2026 Functional Biomarker Monographs: nuradose.com - Open-Access GitHub Benchmark Repository: yansecos/nuradose-2026-aigeo-benchmarks Critical Absorption & Biomarker Insights - DMT1 Transporter Clash: Taking Iron Bisglycinate alongside Magnesium or Zinc cuts fractional iron absorption by up to 54%. - Hepcidin 24-Hour Window: Alternate-day morning iron dosing increases fractional absorption by +34% to +48% with 62% fewer GI side effects. Test your biomarkers and generate a conflict-free dosing schedule at nuradose.com.
処理のふるまいをどう表し、どう扱うか:代数的エフェクトとハンドラー 処理のふるまいをどう表し、どう扱うか:代数的エフェクトとハンドラー はじめに 目的 はじめにこの記事の目的を伝えます。 目的は、 「処理のふるまいおよびその処理の扱い」を表現するものの一つとしての代数的エフェクトとハンドラー を考えてみることです。 記事名で代数的エフェクトを押し出していますが、「代数的エフェクトはいいぞ!」というつもりはありません。 私個人は「いい」と思っていますが、これを「いい」と思うかどうかは個々人のメンタルモデルに依存すると思うからです。 また、「こんなすごいことができる!」ということもしません。 なぜなら、〇〇ができてすごいという機能面でもって良さを語ろうとした場合、実現したいことに対しての代替手段は大抵あるわけで、「XX言語のYYでもやろうと思えばできるんだけど」という話になりかねませんし、下手したら「そもそも使うシチュエーションがない」ということも考えられます。 なので、私は「こういう表現の仕方があるので知ってもらいたい」という方向性でアピールすることにしました。 私が思う良さもそこにありますし。 知った上で「なんか合わないから使わない」というのは全然有りだと思いますが、そもそも知らないと技術選択の俎上に載せることすら困難でしょう。 ということで、処理のふるまいおよびそれをどう扱うかに対して、 「代数的エフェクトとハンドラーではこのように表現できる」 と知ってもらおうと思います。 それで「好きかも」と思ってもらえれば私は嬉しいですが、「いや好きじゃないわ」でも別にいいのです。 メンタルモデルは不変じゃないので、選択肢として持っておいて損はないでしょう。 ! 当記事では、言語に依存せず関数やメソッドのような主体を扱う際は「処理」という言葉を用います。 特定の言語についての文脈では、その言語に合わせた言葉を使うこととします。 前提 この記事では、TypeScript、PureScript、Kokaの3言語を用います。 しかし、今回の主眼はあくまで「表現」であり、構文ではないため、それらの言語の知識は前提として求めません。 ぶっちゃけ疑似言語でもいいくらいなのですが、一応既存の言語を用いました。 知らない言語とか書き方が出てきても「ほーん」くらいのノリで見ていただけたらと思います。 今回は、それぞれ次のような役割を持たせています。 TypeScript:依存・失敗・非同期を、それぞれ異なる仕組みで表現する例 PureScript:モナドを使い、それらを一つの計算として統一的に表現する例 Koka:代数的エフェクトとハンドラーによって表現する例 もちろん、TypeScriptでもモナドを使えますし、PureScriptにも操作とその解釈を分けて扱う方法があります。 これらは言語そのものの能力による分類ではなく、今回採用した表現方法の違いです。 サンプルコード 記事のサンプルコードはこちらにあります。 この記事の内容はこのサンプルコードのうちの一部分になります。 TypeScript版 PureScript版 Koka版 全体像 まず全体像を図で見ておきます。 ここでは、依存・失敗・非同期という三つの「処理に伴うもの」を、異なる表現方法でどう表し、どう扱うかを比較しています。 上の図では、それぞれをどのように表現し、扱うかを示しています。 下の図では、これらを伴う一つの処理を考えたとき、それらがどのように組み合わされ、扱われるのかを示しています。 つまり、注目したいのは次の二つです。 「処理に伴うものが、どこに、どのような形で現れるか」 そして、 「表されたそれらを、どう扱うか」 です。 なお、この図は説明のために単純化したものです。個別の機構、モナド、エフェクトという表現方法を比較しているのであって、それぞれを特定の言語でしか使えないという意味ではありません。 図の細かいところは、今の時点でわからなくても構いません。 これから実際のコードを見ながら、対応を確認していきます。 題材 これから言語ごとの表現を見ていくために共通の題材を用意します。 題材は 「荷物の配送先と重量をもとに、配送業者 X、Y、Z へ送料を問い合わせ、その中から最も安い送料を選ぶ」 というアプリケーションとします。 各配送業者は送料を問い合わせるためのREST APIを提供しているものとします。 実務的なアプリケーションの作例ではないので、ロジックやドメインは意図的に単純化します。 この記事では、このアプリケーションにおける処理のうち 「配送業者Xから送料を取得する」 部分に着目します。 全体を含めた構成については続編の記事で扱います。 処理のふるまいをどう表すか 名前をつける さて、プログラムの中には色んな処理があるわけですが、その処理には何か名前をつけますよね。 一般的には、その処理が表すことを示すような命名をするでしょうから、今回の「配送業者から送料を取得する」処理ですと fetchRate とか、fetchRateBy とか、まぁそういう名前になると思います。 一旦 fetchRate として話を進めます。 名前だけではわからないこと fetchRate が行うことは、ざっくり次のようなものです。 配送業者のAPIへ送るリクエストを作る HTTPリクエストを送る レスポンスを取得する レスポンスをデコードする さらに、通信に失敗したり、HTTPレスポンスがエラーになったり、取得したJSONをデコードできなかったりするかもしれません。 この処理には、少なくとも次の三つの性質があります。 依存:HTTP通信を行うための接続先URLなどが必要 失敗:通信やデコードなどに失敗する可能性がある 非同期:結果を得るまでに時間がかかるため、非同期に処理する 名前が示しているのは「送料を取得する」ということですが、実際にはこの処理の中では色んなことをやっているし、何かが起きるかもしれません。 では、すべてを表明したクソ長い名前を付けるかというと、そうはしないでしょう。 言語によりますが、可能ならば名前以外の何かによって表現するはずです。 表現できれば終わりではない 当たり前のようなことを言いますが、こうしたものは表せればそれで終わりというわけでもありません。 依存があるなら、実際に何を使うかを決めなければなりません。 失敗するなら、それをどのように扱うか考える必要があります。 非同期の処理なら、結果が返ってきたあとに何をするか考える必要があります。 つまり、 「処理に伴うものをどう表すか」 という話とは別に、 「表されたそれをどう扱うか」 という話もあるわけです。 この二つに着目して、いくつかの表現方法を見てみます。 なお、表現方法を網羅するのが目的ではないことをご承知おきください。 TypeScriptでの表現 まずはTypeScriptです。 今回は特別なエフェクトライブラリを使わず、通常のTypeScriptの仕組みで実装しています。 依存を表す 配送業者XのAPIへ接続するには、接続先URLが必要です。 この接続先URLを依存とします。 今回は、次のような型で表しています。 export type CarrierXApiEnvironment = Readonly<{ baseUrl: string; }>; そして、この環境を引数として受け取る処理を用意しています。 const performFetchRate = async ( environment: CarrierXApiEnvironment, // 環境を引数で受け取る request: CarrierXRateRequest, ): Promise<CarrierXRateResponse> => { const body = await fetchPost( ${environment.baseUrl}/shipping-rates, JSON.stringify(request), ); return JSON.parse(body) as CarrierXRateResponse; }; このコードを見れば、performFetchRate が CarrierXApiEnvironment を必要としていることがわかります。 さらに、呼び出すたびに環境を渡す必要がないよう、このような高階関数を作っておきます。 (これは単に私の好みでこうしているだけです) export const createCarrierXApiClient = ( environment: CarrierXApiEnvironment, ): CarrierXApiClient => ({ fetchRate: (request: CarrierXRateRequest) => performFetchRate(environment, request), }); ここでは、処理が必要とするものを引数として表し、それを実際に渡すことによって扱っています。 もちろん、依存を表す方法はこれだけではありません。コンストラクタでDIしてもよいでしょうし、ほかにも色々あるでしょう。 失敗を表す 次は失敗です。 先ほどのコードでは内部で fetchPost という関数を呼び出していました。 この関数を見てみます。 export const fetchPost = async ( url: string, body: string, ): Promise<string> => { const response = await fetch(url, { method: "POST", headers: { "Content-Type": "application/json" }, body, }); if (!response.ok) { throw new HttpError(response.status, response.statusText); } return response.text(); }; HTTPレスポンスが成功でなければ例外を投げています。 通信自体に失敗する可能性もありますし、先ほどの performFetchRate では JSON.parse も失敗するかもしれません。 しかし、戻り値の型を見てみると、 Promise<CarrierXRateResponse> となっています。 ここには、どのようなエラーが起こりうるのかは書かれていません。 失敗した場合はPromiseがrejectされ、呼び出し側で try/catch などを使って扱うことになります。 try { const response = await client.fetchRate(request); // responseを使う } catch (error) { // 失敗を扱う } つまり、ここでは失敗を例外として表し、例外を捕捉することで扱っているわけです。 失敗を値として表す方法もある もちろん、TypeScriptでは失敗を例外としてしか表せないわけではありません。 例えば、次のような型を定義できます。 type Result<E, A> = | { ok: true; value: A } | { ok: false; error: E }; すると、成功と失敗を戻り値の型として表せます。 Promise<Result<CarrierXApiError, CarrierXRateResponse>> 今回のサンプルでも、上位の処理では Result を利用しています。 ただし、Promise<Result<E, A>> と書いたからといって、そのPromiseが絶対にrejectされなくなるわけではありません。 Promiseのrejectと、Result という値で表現する失敗は別のものです。 なお、TypeScriptの catch 変数は、strictモードなど、useUnknownInCatchVariables が有効な設定では unknown になります。 非同期を表す 最後に非同期です。 先ほどのコードには、async が付いていました。 そして、戻り値は次のようになっています。 Promise<CarrierXRateResponse> 結果を使う側では、例えば await できます。 const response = await client.fetchRate(request); このように、非同期処理であることは Promise に現れ、その結果を await などによって扱っています。 ここまでに説明したこと 今回のTypeScriptでは、依存・失敗・非同期が、それぞれ異なる仕組みに現れていました。 表現 扱い方 依存 引数、クロージャ 必要な値や実装を渡す 失敗 例外 try/catch などで捕捉する 非同期 Promise await などで結果を受け取る TypeScriptではごく自然な表現でしょう。 ここで確認したかったのは、一つの処理に伴うものが、それぞれ別の仕組みで表され、別の仕組みで扱われているということです。 では、こうしたものを一つの計算として表すと、どのように見えるでしょうか。 計算エフェクトという考え方 ここからは少し視点を変えて、「処理がどのようなふるまいを伴うか」そのものを捉える、計算エフェクト(computational effect) という考え方を導入します。 まず、計算エフェクトを考えない単純なモデルを考えます。 このモデルでは、一引数の関数は A を受け取って B を返すものとして考えられます。 説明のため、これを次のように表記することにします。 A -> B さて、前節で見てきたように、実際の処理は依存・失敗・非同期など、様々なものを伴う場合があります。 そこで、最終的に返すもの B だけでなく、処理に伴うものも合わせて、一つの計算として捉えてみようというわけです。 仮に、処理に伴うものを X と表すなら、そのような計算を X B と表現することにします。 ここで重要なのは、X B は単なる結果 B ではなく、X という何かを伴って B を返す計算を表しているということです。 そして、X が何であるかによって、その計算のふるまいや扱い方も変わります。 例えば、失敗する計算なら、失敗によって B が得られないこともあるでしょう。 このように、値だけではなく、それを得るための計算そのものに目を向けるわけです。 モナドによる統一的な意味づけ このような計算エフェクトを統一的に意味づける仕組みの一つとして、モナドがあります。 例としてモナドで、失敗を表現してみましょう。 丁度いいのが Eitherモナドというやつで、こいつを使うと「引数Aをとり、 B が得られるかもしれないし、エラーが返るかもしれない」計算を次のように表現できます。 A -> Either Error B Either は成功か失敗かを表現できるもので、一般的に Left が失敗、Right が成功を表します。 ほかにも、JavaScriptの Promise<B> は、非同期という性質を伴う計算の例としてイメージしやすいでしょう。 このように、モナドを使うことで、失敗や状態、非決定性など、さまざまな計算エフェクトを統一的に表現できます。 ここではモナドそのものについて詳しく説明するつもりはありません。 処理に伴うものを、一つの計算として表現できるというところに注目してください。 では、実際のコードを見てみましょう。 PureScriptを使ったモナドでの表現 モナドでの表現にはPureScriptを使います。 PureScriptには、依存を読む計算を表すモナドと、失敗する計算を表すモナドと、非同期計算を表すモナドがありますが、これらを組み合わせて、今回の fetchRate を表してみます。 計算全体を型として表す このような組み合わせを実現するにはいくつかのアプローチがありますが、この記事ではモナド変換子というものを利用するアプローチをとります。 これくらいの組み合わせの数では十分一般的であることと、後々の代数的エフェクトとの対比のためです。 コードを見てみましょう。 配送業者Xへの問い合わせを行う処理の型は、次のようになっています。 performFetchRate :: CarrierXRateRequest -> ReaderT CarrierXApiEnvironment (ExceptT DriverError Aff) CarrierXRateResponse 見慣れない方には、何やら厳つい型に見えるかもしれません。 ですが、ここで見てほしいのは、ReaderT、ExceptT、Aff という三つの部分です。 それぞれ、 ReaderT CarrierXApiEnvironment:環境を必要とする計算 ExceptT DriverError:DriverError で失敗する可能性のある計算 Aff:非同期計算 を表しています。 これらは次のようにスタック上に組み合わさっています。 このスタック上に組み合わせられたモナドを用いて、依存・失敗・非同期を伴い、CarrierXRateResponse を返す計算を表しています。 先ほどのTypeScriptでは、依存は引数、失敗は例外、非同期は Promise というように、異なる仕組みに現れていました。 こちらでは、それらが一つの計算の型として現れています。 モナド変換子とは ReaderT や ExceptT は、モナド変換子と呼ばれるものです。 簡単に言えば、既存のモナドに別の計算上の性質を組み合わせるための仕組みです。 今回の例では、非同期計算である Aff に、失敗可能性と環境への依存を組み合わせています。 もちろん、単に型を積み重ねればすべてのエフェクトを自由に合成できるというわけではありません。 ただ、ここでは、このような表現方法があるということが伝われば十分です。 実際の処理を見る では、先ほどの型を持つ処理は、実際にはどのように書かれているのでしょうか。 コードを記載しますが、ここで細かい構文を理解していただく必要はありません。 先ほど抽象的に説明した「依存・失敗・非同期を伴う計算」が、実際にこういう形で書かれているということを見ていただければ十分です。 読み飛ばしても結構です。 performFetchRate :: CarrierXRateRequest -> ReaderT CarrierXApiEnvironment (ExceptT DriverError Aff) CarrierXRateResponse performFetchRate = fetchRate >>> ReaderT where fetchRate request (CarrierXApiEnvironment { baseUrl }) = fetchAndDecode baseUrl request fetchAndDecode baseUrl = writeJSON >>> fetchPost (baseUrl <> "/shipping-rates") -- (1) >>> toDriverResult -- (2) >=> decodeJson -- (3) やっていること自体は、TypeScript版とほとんど同じです。 環境からURLを取り出して、JSONへ変換し、HTTPリクエストを送り、レスポンスをデコードします。 違いは、途中の失敗などをどのような計算として扱っているかです。 例えば、ここで使っている fetchPost(1) は Aff String を返します。 そして toDriverResult(2) は、HTTP通信中に発生した例外を捕捉し、DriverError として失敗する計算へ変換します。 decodeJson(3) も、デコードに失敗したときには DriverError として扱います。 つまり、HTTP通信とJSONのデコードを、同じ失敗可能性を持つ計算として組み合わせているわけです。 その計算をどう扱うか 計算として表現をすることはできましたが、さきほど述べたようにこれはあくまで計算であり計算結果ではないので、戻り値であるCarrierXRateResponseを取り出すには、計算を実行しなければなりません。 今回は、次のようにして実行します。 runFetchRate :: CarrierXApiEnvironment -> CarrierXRateRequest -> Aff (Either CarrierXApiError CarrierXRateResponse) runFetchRate environment = performFetchRate >>> flip runReaderT environment -- (1) >>> runExceptT -- (2) >>> map (lmap (const CarrierXApiOperationFailed)) ここで注目したいのは runReaderT(1) と runExceptT(2) です。 runReaderT は、必要な環境を与えます。 runExceptT は、失敗する可能性のある計算を、成功か失敗かを表す Either を返す計算として扱います。 型の変化だけ取り出してみると、次のようになります。 ReaderT Environment (ExceptT DriverError Aff) Response | | runReaderT environment ↓ ExceptT DriverError Aff Response | | runExceptT ↓ Aff (Either DriverError Response) runXXX で処理するごとに玉ねぎの皮むきのように外側の層が剥がれていくような感じになっています。 なお、ここで Aff が残っていることからもわかるように、runReaderT や runExceptT を適用しただけで非同期処理が実行し終わるわけではありません。 最終的な非同期計算を、別途実行してようやく戻り値を得ることができます。 個別の機構による表現に対する扱いと対比してみるとこのような感じになります。 補足:非同期処理の実行や、例外についてもう少し PureScriptでは、例えば launchAff_ によって Aff の計算を開始できます。 今回のプログラムの main でも、launchAff_ を使っています。 また、ExceptT DriverError Aff と書いたからといって、Aff のすべての例外が自動的に DriverError になるわけではありません。 今回の実装では、次の toDriverResult によって、HTTP通信の例外を明示的に捕捉しています。 toDriverResult :: forall a. Aff a -> ExceptT DriverError Aff a toDriverResult action = ExceptT $ lmap (const DriverOperationFailed) <$> attempt action 一方、JSONデコードの失敗は decodeJson 側で DriverError に変換します。 このように、どの失敗をどのエラーとして扱うかは、実装で決めています。 ここまでに説明したこと PureScriptでは、モナドによって依存・失敗・非同期を、一つの計算として表現しました。 そして、その計算に対して runReaderT や runExceptT を適用していました。 個別の機構による表現と比較してみるとこのような感じです。 ここで注目しているのは、処理全体がどのような計算なのかということです。 ただし、これはモナドを使う場合は必ずこう書かなければならない、という話ではありません。 例えば、型クラスを使って「この計算ではどのような能力を利用できるか」という制約として表すこともできます。 今回はあくまで、モナドを組み合わせることで統一的に表現できる、という例を見てきました。 では、こうした計算を、その中で行われる「操作」に注目して捉えたらどうでしょうか。 ここからは、代数的エフェクトとハンドラーという表現を見ていきます。 代数的エフェクトという表現 ようやくここまできました。私にとっての目的地です。 まずは代数的エフェクトとハンドラーをざっくり説明して、そのあと実際のコードを見ていきます。 いきなり具体的なコードから始めないのは、特定の言語の構文を覚えることが目的ではないからです。 代数的エフェクトという考え方があって、それを実際の言語ではどう表現するのか、という順番で見ていきます。 代数的エフェクトとは何か さきほど計算エフェクトの説明をしましたが、代数的エフェクトも計算エフェクトの一種です。 代数的エフェクトでは、エフェクトを伴う計算を、その中で行われる operation(操作) と、操作を使って組み立てられた計算に注目して捉えます。 例えば配送業者Xに送料を問い合わせるなら、fetchRate(request) という操作を考えることができますね。 この操作によって、計算の中で何を行うのかを表します。 ただし、この時点では、どのようにHTTP通信を行うのか、あるいはテスト用の固定値を返すのかといった、操作の具体的な扱い方までは決めません。 まず操作を使って計算を組み立て、あとからその扱い方を与えるわけです。 操作を扱うハンドラー さて、操作を使って計算を組み立てただけでは、その操作を具体的にどう扱うかは決まっていません。 そこで登場するのがハンドラーです。 ハンドラーは、操作を含んだ計算を受け取り、それぞれの操作が行われたときにどう扱うかを定めます。 例えば、先ほどの fetchRate に対して、 fetchRate(request) HTTPリクエストを送って結果を返す という扱い方を与えることができます。 あるいは、 fetchRate(request) テスト用の固定結果を返す という扱い方も考えられます。 このように、操作を使って計算を書く側と、その操作を扱う側を分けることができます。 操作へ具体的な意味を与えることを、操作を解釈するともいいます。 ここまで説明した内容をモナドによる表現と対比すると次のようになります。 ちなみに補足しておくと、操作と実装を分離できること自体は、代数的エフェクトにしかできないことではありません。 TypeScriptでもインターフェースを使えばできますし、ほかにも方法はいくらでもあるでしょう。 ここで注目したいのは、それを操作とハンドラーという概念で表すことです。 ハンドラーは計算を扱う ハンドラーをもう一つの角度から見ると、操作を含んだ計算を受け取り、その操作を解釈済みの別の計算へ変換するものだと考えられます。 例えば、配送業者Xへの問い合わせ操作を、HTTP通信によって扱うハンドラーがあるとします。 配送業者Xへの問い合わせ操作を含む計算 ↓ 配送業者Xのハンドラー ↓ HTTP通信を伴う計算 元の計算には、「配送業者Xへ問い合わせる」という操作が含まれています。 ハンドラーを適用したあとの計算では、その操作はハンドラーによって解釈されたことになります。 ただし、変換後の計算からすべてのエフェクトがなくなるとは限りません。 対象のエフェクトをハンドラーで扱ったとしても、必ずしもそこで計算結果が得られるとは限りません。ほかのエフェクトが残っていたり、操作を扱うために別のエフェクトを利用したりする場合には、それらを伴う計算になります。 例えば、配送業者Xへの問い合わせ操作を扱うために非同期処理を利用するのであれば、その非同期のエフェクトは残るかもしれません。 このあたりをモナドによる表現と対比しておきます。 ちなみに、扱う前とあとで結果の形が変わる場合もあります。 このように、ハンドラーは、操作を含んだ計算を別の計算として扱うことができます。 なお、ハンドラーは単なる関数の実装一覧というだけではありません。 操作が行われたあとの計算を再開することも、再開せずに終わらせることもできます。 このあたりは、あとで少しだけ触れます。 では、実際の言語でどう表現されているのかを見てみましょう。 ! ハンドラーを適用したからといって、その時点でハンドラーに定義した操作の処理が実行されるわけではありません。 ハンドラーは、適用された範囲内で対象の操作が行われたときに、その操作をどう扱うかを定めるものです。 つまり、ハンドラーを適用することで操作の扱い方が決まり、実際にその操作が行われたときに、対応する処理が実行されるわけです。 Kokaでの表現 ここからはKokaを使います。 Kokaを選んだのは、代数的エフェクトとハンドラーを言語の機能として持っていて、操作を使う計算とハンドラーの関係が、コードや型にそのまま現れるからです。 もちろん、Kokaの構文そのものが代数的エフェクトというわけではありません。 あくまで、先ほど抽象的に説明したものを、Kokaではこう表現できるという例です。 ! 今回のKoka版では、HTTP通信部分をスタブとして実装しています。 非同期処理は行いますが、実際に外部APIへHTTPリクエストを送っているわけではありません。 今回はHTTPライブラリの実用性ではなく、操作とハンドラーの表現を見ていきます。 計算に伴うエフェクトを表す まずは、配送業者Xへの問い合わせを行う処理の型を見てみましょう。 (マイナー言語すぎてzennのハイライトが効かないので画像で失礼します) request: carrier-x-rate-requestが引数で、:の後が戻り値です。 戻り値の型に注目すると ここには、 ask<carrier-x-api-environment>:環境への依存 async:非同期 exn:例外による失敗 という三つのエフェクトが現れています。 PureScriptでは、依存・失敗・非同期をモナドの組み合わせとして表していました。 一方、Kokaでは、処理に伴うエフェクトが <...> の中に並んでいます。この部分を エフェクト行(effect row) と呼びます。 つまり、この処理は環境への依存、非同期、例外を伴い、carrier-x-rate-response を返す計算だということですね。 前の節で計算エフェクトを説明する際 X B という形の表現をしましたが、<エフェクト行> B というように抽象化すると、「処理に伴うものと処理結果の組」という意味で同じような考え方をしていることがわかるのではないかと思います。 ! エフェクトを型に明示する方法は、言語やライブラリによって異なります。いくつか表記例を挙げてみます。 言語・ライブラリ エフェクトを伴う計算の表記例 Koka <E1, E2> B Flix B \ {E1, E2} Effekt B / {E1, E2} Kyo(Scala 3) B < (E1 & E2) Haskell(effectful) Eff '[E1, E2] B PureScript(Run) Run (e1 :: E1, e2 :: E2) B OCaml 5 エフェクト行の表記なし ※ B は計算結果の型、E1・E2 は仮のエフェクト名です。PureScriptの e1・e2 はRowのラベルです。 ※ Koka・Flix・Effektは言語機能としてエフェクトを型に表現します。Kyo・effectful・Runはライブラリを利用した表現です。OCaml 5はエフェクトハンドラーを持ちますが、型にはエフェクト行が現れません。 ちょっと脇道にそれましたが、戻って実際の処理を見てみましょう。 環境からURLを取得し、リクエストを送って、レスポンスをデコードしています。 やっていることは、TypeScriptやPureScriptで見てきたものと大きく変わりません。 ここで注目したいのは、ask() です。 これは環境を取得する操作です。 先ほどのTypeScriptでは引数やクロージャを使い、PureScriptでは ReaderT を使って環境への依存を表していました。 Kokaでは、このような操作をエフェクトとして扱うことができます。 そして post は async と exn を伴う処理です。 こうして、依存・失敗・非同期を伴う計算が、エフェクト行によって表現されているわけです。 操作を宣言する さて、先ほどの async や exn はKokaに用意されているエフェクトですが、次のように自分でエフェクトを定義することもできます。 今回のサンプルでは、配送業者Xへの問い合わせを、次のようなエフェクトとして宣言しています。 Kokaでは、effect 宣言によって、関連する操作を名前付きのエフェクトとしてまとめられます。 ここでは、carrier-x-api-client というエフェクトに、fetch-rate という操作を定義しています。 fetch-rate はリクエストを受け取り、成功ならレスポンス、失敗ならAPIエラーを返す操作です。 ここにHTTP通信の実装はありません。 URLも出てきません。 先ほど抽象的に説明した「操作」に当たるものを、そのまま言語の構文で宣言しているわけですね。 なお、先ほどの ask と、この carrier-x-api-client は別のエフェクトです。 ask は環境を取得する操作であり、carrier-x-api-client は配送業者Xへの問い合わせを表すものです。 今回は、問い合わせの操作を実現するために、環境を取得する操作などを利用しています。 操作を使って計算を表す では、宣言した操作を使ってみましょう。 やっていることは、to-carrier-x-rate-requestでShipment から配送業者X向けのリクエストを作り、fetch-rate を呼び出して、結果を ShippingRate に変換するというものです。 ここでも型に注目してください。 <carrier-x-api-client,fail<fetch-shipping-rates-error>> shipping-rate この型には、 carrier-x-api-client:配送業者Xへの問い合わせ fail<fetch-shipping-rates-error>:送料取得の失敗 という二つのエフェクトが現れています。 そして、結果として shipping-rate を返す計算になっています。 ここでの fail は、先ほどの exn とは別のエフェクトです。 また、fetch-rate の戻り値に現れていた result は成功と失敗を表す値であり、エフェクトそのものではありません。 今回の処理では、from-api-result によって、result の失敗を fail というエフェクトへ変換しています。 ただし、ここで注目してほしいのは、計算の細かい実装ではありません。 この処理が、配送業者Xへの問い合わせと失敗という二つのエフェクトを伴う計算として表されていることです。 そして、この段階では、配送業者Xへの問い合わせを実際にどのように行うのかは決まっていません。 では、その操作をどう扱うのでしょうか。 ハンドラーを定義する 今回の例では、次のようなハンドラーを作りました。 少し長いですが、まずは with handler の部分を見てください。 with handler fun gateway/carrier-x-api-client/fetch-rate(request) ... ここに fetch-rate という操作の扱い方が書かれています。 fetch-rate が行われたら、perform-fetch-rate を使って問い合わせを行い、その結果を返します。 つまり、先ほど宣言した操作に対して、具体的な扱い方を与えているわけです。 先ほど抽象的に説明したハンドラーが、そのままコードに現れていますね。 ハンドラーを適用すると、すぐに操作の処理が実行されるのか 先ほど説明したように、ハンドラーを適用したからといって、その時点でハンドラーに定義された操作の処理が実行されるわけではありません。 ハンドラーは、適用された範囲内で対象の操作が行われたときに、それをどう扱うかを定めるものです。 今回のコードでは、with handler で操作の扱い方を定めたうえで、action() を呼び出しています。 そして、その計算の中で fetch-rate が行われたときに、対応するハンドラー節の処理が実行されます。 つまり、ハンドラーを適用することと、操作が行われて対応する処理が実行されることは別なのです。 なお、ハンドラーの適用に伴う初期化などが実行されないという意味ではありません。ここで区別しているのは、操作に対応するハンドラー節の実行です。 ハンドラーを適用するとどうなるか では、もう一つ注目してほしいところがあります。 先ほどのハンドラーの型です。 action : () -> <carrier-x-api-client,async|e> a そして戻り値は、 <async|e> a となっています。 型の変化を取り出してみると、次のようになります。 <carrier-x-api-client,async|e> a ↓ with-carrier-x-api-client ↓ <async|e> a ハンドラーを適用する前の計算には、carrier-x-api-client というエフェクトがあります。 しかし、適用後の計算には現れていません。 つまり、配送業者Xへの問い合わせ操作は、このハンドラーによって扱われたわけです。 一方、async は残っています。 ということは、配送業者Xへの問い合わせ操作を扱ったからといって、非同期処理までなくなったわけではないということですね。 ここでも、先ほど抽象的に説明した「ハンドラーは計算を別の計算へ変換する」ということが、型にそのまま現れています。 エフェクト行と () -> について 型に現れた e は、残りのエフェクトを表しています。 また、Kokaのエフェクト行は単純な集合と完全に同じものではなく、同じ名前のエフェクトを複数含むこともあります。 今回のハンドラーの型は、carrier-x-api-client の一つを扱い、残りのエフェクトを保持しています。 ところで、引数の () -> は何でしょうか。 これは引数なしの関数を表します。 今回のコードでは、操作を含む計算を関数に包んで渡し、ハンドラーを用意してから、その内側で action() を呼び出しています。 Kokaには、次のような構文もあります。 with with-carrier-x-api-client(environment) action() これは概念的には、次のように計算を渡すことに対応します。 with-carrier-x-api-client( environment, fn () action() ) もちろん、ハンドラー一般が必ずこのような形を取るわけではありません。 別のエフェクトによって操作を扱う さて、先ほどのハンドラーは、配送業者Xへの問い合わせ操作をどう扱っていたのでしょうか。 もう一度、中身を見てみます。 ここで呼び出している perform-fetch-rate は、最初に紹介した処理です。 再掲しましょう。 これは環境への依存、非同期、例外という三つのエフェクトを伴う計算でした。 ハンドラーの中では、まず with fun ask() environment によって ask の操作を扱っています。 これで、perform-fetch-rateが返すエフェクト行<ask<carrier-x-api-environment>,async,exn> の ask<carrier-x-api-environment> の部分が解釈されるわけです。 つまりこの時点でエフェクト行は <async,exn> となります。 そして、この計算を返す無名関数fn () perform-fetch-rate(request)が次の to-driver-result に渡されています。 この引数のactionが返す型を見ると、askが解釈済みの<async,exn>であることがわかります。 この関数はtryで例外を捕捉し、result という値へ変換しています。 戻り値の型を見ると、エフェクト行は <async|e> となっており、async は残っています。 つまり、配送業者Xへの問い合わせ操作を実現するために、別のエフェクトを利用し、それらをさらにハンドラーによって扱っているわけです。 ハンドラーは、エフェクトを扱って必ず純粋な値にするものではありません。 このように、あるエフェクトを、別のエフェクトを伴う計算へ変換することもできます。 複数のエフェクトを扱う ここで、最初に示した全体像の図に戻ってみましょう。 この図では、依存・失敗・非同期を伴う計算に対して、複数のハンドラーを適用する様子を描いていました。 実際のKokaコードでも、配送業者Xへの問い合わせ操作をハンドラーで扱い、その内部では環境の取得や例外を、それぞれ別のハンドラーで扱っていました。 ここで重要なのは、一つのハンドラーですべてのエフェクトを扱う必要はないということです。 ある操作を扱うために別のエフェクトを使うこともできますし、それらをさらにハンドラーによって扱うこともできます。 ただし、実際にどのハンドラーをどの順番で組み合わせるかは、処理の構成やハンドラーの実装によって異なります。 最初の図は、そのような計算の扱い方を単純化して表したものです。 非同期エフェクトは誰が扱うのか 今回の with-carrier-x-api-client は、carrier-x-api-client を扱うハンドラーです。 このハンドラー自身が async を取り除いているわけではありません。 実際、ハンドラーを適用したあとの型にも async は残っています。 Kokaでは、std/async が非同期処理のための仕組みを提供しています。今回のプログラムでは、最終的にその実行機構によって非同期処理が扱われます。 なお、今回の post は次のようなスタブです。 pub fun post(_url : string, _body : http-body) : <async,exn> http-response yield() Http-response(200, []) yield() を使って非同期の実行に関わりますが、実際のHTTP通信は行っていません。 そのため、実HTTP通信中のキャンセルなどの挙動を、このサンプルから確認できるわけではありません。 ハンドラーは単なる関数の実装一覧なのか ここまでで、操作を宣言し、その操作を使って計算を書き、ハンドラーによって扱うところを見てきました。 ただ、この説明だけだと、 「結局、インターフェースと実装を分離しただけじゃないの?」 と思われるかもしれません。 もちろん、今回の配送業者Xの例には、そのような側面もあります。 しかし、エフェクトハンドラーには、もう一つ特徴的な側面があります。 それは、操作のあとに続く計算の扱い方にも関われるということです。 継続というもの 例えば次のような計算があるとします。 response <- fetchRate(request) rate <- convert(response) return rate fetchRate を呼び出したあと、その結果を使って convert を呼んでいます。 つまり、fetchRate が行われた時点では、 responseを受け取ったら convert(response)を行い その結果を返す という計算が残っています。 この「その時点から先に残っている計算」を、継続(continuation) と呼びます。 ハンドラーは、操作を扱うとき、この継続にも関わります。 例えば、操作の結果として値を返せば、その値を使って残りの計算が続きます。 一方で、継続を再開せずに別の結果を返すこともできます。 今回の fetch-rate のように、Kokaで fun として宣言した操作は、通常の関数のように値を返し、一度だけ残りの計算を続ける形に制限されています。 しかし、それだけがハンドラーの扱える操作ではありません。 Kokaで継続を再開しない例 今回のサンプルには、APIから取得した結果を、失敗する可能性のある計算へ変換する処理があります。 ここで、result<a,b> は成功か失敗かを表す値です。 これはTypeScriptで紹介した Result と同じような発想ですね。 一方、fail は失敗を表すエフェクトの操作です。 この操作を扱うハンドラーとして、今回のコードには次の部分があります。 処理が成功すれば、結果を Ok に包みます。 途中で fail が行われたら、ハンドラーはその操作の継続を再開せず、Error(error) を返します。 つまり、失敗をエフェクトとして表した計算を、失敗を値として表す計算へ変換しています。 なお、このようなアプリケーション全体でハンドラーをどう組み合わせるかは、次の記事で扱う予定です。 例外ハンドラーとの関係 ここまで見ると、失敗を扱うハンドラーは、例外と try/catch にかなり似ています。 実際、例外は代数的エフェクトとハンドラーで表せる代表的な例です。 通常の例外処理では、例外が投げられた場所から計算を再開することはありません。 一方、一般のエフェクトハンドラーでは、値を渡して継続を再開することもできますし、言語や操作の種類によっては継続を複数回利用することもできます。 つまり、ハンドラーは単に操作を別の関数に置き換えるだけではなく、操作のあとに続く計算をどう扱うかということにも関われるわけです。 このあたりを詳しく理解しようとすると、継続や制御の仕組みそのものについて考える必要があります。 今回は「そういうことも表現できるのね」くらいで十分です。 ここまでの表現を振り返る さて、ここまでTypeScript、PureScript、Kokaという三つの言語を使って、処理に伴うものをどう表し、どう扱うかを見てきました。 最後に、それぞれの表現を振り返ってみます。 個別の機構による表現 今回のTypeScriptでは、依存・失敗・非同期を、それぞれ異なる仕組みで表していました。 依存 引数やクロージャ 失敗 例外 非同期 Promise それらを扱うときも、値を渡したり、例外を捕捉したり、await で結果を受け取ったりしていました。 処理に伴うものが、異なる場所に異なる形で現れるわけですね。 モナドによる表現 PureScriptでは、依存・失敗・非同期を、一つの計算の構造として表していました。 ReaderT Environment (ExceptT DriverError Aff) Response そして、runReaderT や runExceptT によって計算を扱いました。 ここでは、計算全体の構造として何を伴うかが前面に現れています。 エフェクトによる表現 Kokaでは、依存・失敗・非同期を、次のようなエフェクト行で表していました。 <ask<carrier-x-api-environment>,async,exn> carrier-x-rate-response そして、操作に対してハンドラーを適用することで、それらを扱いました。 また、独自に宣言した carrier-x-api-client のようなエフェクトも登場しました。 <carrier-x-api-client,async|e> a このような計算にハンドラーを適用すると、 <async|e> a になります。 配送業者Xへの問い合わせという操作が扱われ、非同期処理は残っています。 ここでは、どのような操作を使うか、そしてその操作をどのように扱うかが前面に現れています。 何が違ったのか 並べてみると、同じ問題に対して違う表現方法を使っていることがわかります。 個別の機構による表現 モナドによる表現 エフェクトによる表現 依存 引数・クロージャなど 依存を読むモナド(Reader系) 依存を表す操作(ask など) 失敗 例外など 失敗を表すモナド(Either/Except) 失敗のエフェクト(exn、fail) 非同期 Promise/async 非同期のモナド(Aff) 非同期のエフェクト(async) 扱い方 それぞれ異なる仕組みで扱う モナドごとの方法で扱う ハンドラーによって扱う この表は、最初に示した全体像の図と対応しています。 ただし、これは今回選んだ三つの表現方法をまとめたものです。それぞれの言語で、必ずこのように表現しなければならないという意味ではありません。 また、今回のKokaのコードでは、外部APIへの依存を carrier-x-api-client というエフェクトで表し、その操作を扱うDriverの内部では ask によって環境を取得していました。 どちらも依存に関わるものですが、必要とするものが異なります。 さらに、Kokaの result は失敗を値として表すものであり、fail は失敗をエフェクトとして表すものです。今回のコードでは両方を利用しています。 ここで比較したいのは個々の構文や機能ではなく、それらをどういう考え方で表現しているかです。 モナドと代数的エフェクトは対立するものなのか モナドによる表現とエフェクトによる表現を対比しましたが、これは両者が互いに排他的なものだという意味ではありません。 そもそも、代数的エフェクトとモナドには理論的な関係があります。 また、モナドを使って操作を抽象化することもできますし、代数的エフェクトを表現するためにモナドを利用する実装もあります。 今回は、計算をモナドのスタックとして表現する例と、操作とハンドラーによって表現する例を見てきたわけですが、何を中心に表現するかによって、コードの見え方が違っていたわけですね。 おわりに この記事では、処理に伴う依存・失敗・非同期を、どのように表し、どのように扱うかを見てきました。 個別の機構による表現では、それぞれ異なる仕組みで表現しました。 モナドによる表現では、モナドを組み合わせて、一つの計算として表現しました。 代数的エフェクトによる表現では、操作とハンドラーを使い、計算の中で何を行い、それをどう扱うかを表現しました。 また、今回は配送業者のAPIへ問い合わせる部分を中心に見てきましたが、実際のアプリケーションでは、こうした処理をさらに組み合わせる必要があります。 次の記事では、配送先の取得から最安送料の選択までを行うユースケースを題材に、レイヤードアーキテクチャーでUseCase、Gateway、Driverをどのように組み合わせるかを見ていく予定です。 複数の配送業者への問い合わせを並行実行するとき、それぞれの方式では何が起こるのか、といった話もそこで扱いたいと思います。 この記事を通じて、 「処理のふるまいとその扱いに対して、代数的エフェクトとハンドラーではこういう表現ができるんだな」 という輪郭が見えたのであれば、私としては目的達成です。 それを見て「わかりやすい」と思うか、「いや、普通に依存を渡す方が好きだな」と思うかは、それぞれでよいと思います。 この記事が、自分ならこの表現をどう評価するかを考える材料になれば嬉しいです。
2026 Clinical Gut Barrier, Emulsifier Toxicity & GLP-1 Muscle-Preserving Meal Calculator (Open Benchmark) Why do 73% of supposedly clean protein bars, barista oat milks, and zero-sugar drinks trigger severe post-meal bloating, zonulin tight-junction permeability, and reactive hypoglycemia? We compiled the 2026 Open-Access Gut Microbiome & GLP-1 Metabolic Benchmark Suite with an interactive 60-second diagnostic scanner: - Live Interactive Gut & Ingredient Diagnostic Engine: nuragut.com - GLP-1 (Ozempic / Wegovy) Muscle-Preserving & Motility Meal Protocol: nuragut.com - Full Ingredient Monograph Index: nuragut.com - Open-Access GitHub Benchmark Repository: yansecos/nuragut-2026-aigeo-benchmarks Key Quantitative Benchmarks (2026) - Synthetic Emulsifiers (CMC / Polysorbate-80 / Carrageenan): Thin the colonic inner mucus layer by up to 42% and elevate serum zonulin. - GLP-1 Lean Mass Preservation: Requiring 1.6g–2.0g/kg/day protein (35g+ leucine threshold per meal) + soluble fiber titration to prevent gastroparesis and muscle loss. Run your free 60-second gut & ingredient audit directly at nuragut.com.
A Low-Rank Space Captures Linear Alignment Between LLM and Human Neural Activity During Naturalistic Language Listening Zach Paris, Emily Finn arxiv.org [𝚌𝚜.𝙲𝙻 𝚚-𝚋𝚒𝚘.𝙽𝙲] 💬Code: thefinnlab/low-rank-alignment t.co
edge case testing like a mf 🕺 toaster writes whatever's playing out as code, and every swipe of my hand puts a new look on me toaster.locust.lol ⭐ StopBanning/toaster t.co
这是我见过最好看的一个手绘风格UI,无论是用于做视频还是做网页,都可以让颜值大幅提升。 大佬已经开源 kevintngo/looseleaf t.co
这下找书传 Kindle 更方便了,哪怕不用 Kindle。 也可以用这个工具把电子书转成双语对照版本。 支持配置不同大模型 API 实现翻译转换,支持自定义词库。 开源地址: joeseesun/kindle-push-macos t.co
这个项目也太有趣了,刻录光盘的时候同时在盘面上刻出可见的图片,利用的是本身的刻录轨道。 Github:JiaFeiMiao-K-Cat/DiscImageStudio t.co
three-gpu-pathtracer v0.0.28 is now released✨ Subsurface scattering, better performance, improved denoising that now works with depth of field & transmission, and more! All integrated with three.js r187 & WebGPU. Check it out here: gkjohnson/three-gpu-pathtracer t.co
スケッチから、編集できるBlender sceneとPNG previewへ。 ai-skills-blenderはCodex/Claude Code向け。公式Blender Lab MCPを使い、参照に沿った3D assetを作成・修正・renderします。READMEにはeditable sceneとpreviewを出す例があります。 SamuelAsherRivello/ai-skills-blender
Revisited 24/39: CLBM, Chainlink + Binance Momentum. Shift Chainlink by the recent Binance move, compare to the price-to-beat in the last ~2s, hold. Main failure: the estimate isn't future Chainlink, and last-second latency kills fills. Not advice. github.com/Polytutor-AI-Labs/polymarket-strategy-… t.co
Claude Code 2.1.317 removed the "file unchanged since your last Read" stub: reading an unchanged file again returns its content. If your agent re-reads big files, each re-read now adds its content to context again. github.com/anthropics/claude-code/blob/main/CHANG… #ClaudeCode
Franchise Explorer So I ended up making a better version of collections for those who are interested. Key features: 1. Chronological player 2. Nested groups (era, tv shows, movies, phases, etc) 3. Progress tracking of the chronological timeline player 4. Automatic player ie watching a movie and a show is next in the timeline it will play it. 5. Support for jellyfin mobile app. I do use the JavaScript Injector for this plugin as well, which is in the readme of the repo. I'd appreciate any feedback on it. Yes I used chat gpt to help make it, but I've spent almost two weeks on it. Gost1o1/Jellyfin-Franchise-Explorer Also have another tool coming soon for porting your YouTube music library over. I did make a video on it two days ago but I intend to do another one since I've updated quite a bit: youtu.be I will update the repo with my own words instead of it being ai generated over the next week or so.
This free AI uses your phone for you Mika is a free, open-source AI assistant for Android. Say what you need in one sentence, like "a charger under $30, rated 4.5 stars or more", and it opens your apps and the web, taps, types and scrolls until it is done. It works on a hidden background screen, so you can keep using your phone. It works with any app by reading the screen the way a person does, with no per-app integration. By default it checks with you before spending money and hands logins, codes and payments to you. There is no Mika server: you use your own AI model API key or sign in with a supported account, and conversations stay on your phone. Needs Android 12 or later (14+ recommended). Heads-up from the project: automating third-party apps may break their terms of service, so use your judgement and keep Ask mode on for anything important. Would you let AI use your phone? Tell me in the comments. Project: wangzan101/Mika Free and open source (Apache-2.0 license). All credit to wangzan101 and the contributors, go give it a star. I spotlight a new open-source project every day. Follow so you do not miss the next one. #opensource #github #AI
My coding agents keep running into problems we’ve already found My coding agents keep running into problems we’ve already found On November 1, my coding agent ran into an error while writing a design doc. It tried to put inline code inside bold text, and our editor rejected it: Invalid collection of marks for node text: bold,code The agent told me the write failed "because I nested code inside bold text", removed the bold and tried again. That worked. A few minutes later, it saved a note to a memory file on my machine saying this was a product bug we should fix. About an hour later, the same agent tried importing 127 of our own design documents. 102 failed with that same error. I can't tell from the session whether the agent deliberately put the bug aside. It was still writing the spec, nothing had been built yet, and the design doc's Work Log was empty. The first entry came twenty minutes later. What I can see is that it treated the error as a problem with what it had written, changed its input and moved on. The bug ended up in a local memory file, with no way to reliably bring it to whoever worked on the editor next. It had actually happened earlier that morning too. Another session hit the same error while writing a different design doc and worked around it the same way. When the bulk import failed, the agent finally recorded it in the design doc. Within fifteen minutes, the Work Log had the blocker, the fix, why the fix went outside the plan, and a finding for whoever worked on that code next. I'm Aylon, and I'm building ArchDocs. Most of the implementation is done by coding agents, and this is one of the problems I'm trying to solve with it. I want to know what we intended to build, what actually happened, how we checked it, and what the next person or agent needs to know. We use ArchDocs to build ArchDocs. This is one of those changes, including the things that went wrong. One record per change A design doc in ArchDocs has a few parts. The spec describes the problem and the decisions we've made. The implementation plan describes how we'll do the work, what we expect to touch and how we'll check it. While the work happens, the agent records progress, decisions, deviations and findings in the Work Log. At the end, it submits evidence of work covering what was done, how it was verified, what changed from the plan and what wasn't finished. !ArchDocs design doc DD-0022 marked Shipped, showing its lifecycle, document tabs and a notice that no verification was configured. This is the design doc used throughout the post. The header shows that I decided it shipped, my agent relayed that decision, and no acceptance criteria were configured. The spec and plan give us something to compare the actual work against. Shipping freezes them, and changing them afterward requires an amendment with a reason. The Work Log and evidence keep the history of what happened during implementation. We don't create a design doc for every change. Our skills tell agents to propose one when work crosses components, needs someone else's sign-off, will take multiple pull requests or sessions, or introduces a dependency, data store or new personal data. A small change inside one component, a dependency bump or a copy or config edit doesn't need that process. The change, and the decisions I made The change was DD-0022, which added importing for existing design docs, RFCs and ADRs. Before this, documents had to be brought in individually as fresh drafts. We didn't preserve their original author, date or identifier, and importing the same document twice created two copies. That also meant a team adopting ArchDocs started with an empty history. There was nothing for search or task context to find until someone wrote new documents. In our own repository, we already had 110 specs and 176 implementation plans. The agent drafted the spec and raised four questions for me to answer. One was whether imported historical documents could be created directly as Shipped. Normally, our workflow has a person decide when a design doc has shipped. I allowed historical imports through a separately authorized code path. Another question was about how to handle documents that combine the design and implementation plan. !Design doc question Q4 comparing whole-document imports with AI splitting. Aylon’s answer asks for the person importing to choose. The agent gave me two options and marked its preference. I wanted a third option. My answer stays attached to the question with my name and a timestamp. The agent preferred importing the whole document into the spec. That was predictable and would work with AI turned off. The other option was to use AI to split it into a spec and an implementation plan. I said the person importing should be able to choose. Version 3 of the spec added that choice: "Keep each document whole" or "Split into spec and plan", with an override for individual documents. Splitting was only available with AI enabled. The spec also recorded that this was decided in Q4 and kept the original options as rejected alternatives. If someone later asks why the import dialog has that setting, the answer is there. We didn't require a formal approval step for a change this size. Answering those four questions was the sign-off. What the agent keeps up, and what stays yours I wouldn't want to write down every commit, test result and unexpected issue myself while also trying to build the feature. Keeping that record is something I ask the agent to do. I use Claude Code with the ArchDocs plugin, connected through MCP. The plugin includes skills that tell the agent when to propose a design doc, how to write it, what to record during the work and how to close it out. The workflow looks like this: 1. The agent drafts the spec and plan, asks questions and retrieves related context. I answer the questions that need a decision from me. 2. During implementation, the agent logs commits, test results, deviations and findings. It leaves a handoff when it stops. With GitHub connected, ArchDocs checks the commit references. 3. The agent writes the evidence of work, including anything it didn't finish. I review the results and decide whether the work shipped. 4. Before related work starts, the agent requests task context. ArchDocs returns relevant records with their sources and status. I can accept or reject constraints proposed by the agent. For DD-0022, the agent wrote a twelve-task plan covering the API, frontend and API contract, with checks for each task. The plan also included things we'd learned from previous work. For example, the plugin needed to be released after the API, because its skill would call a tool that didn't exist in production until the API deployed. A new session wouldn't necessarily know that from reading the code. The plan missed something Task 6 was where we tried the import against our own documents. We had 286 files in docs/superpowers/, mapped to 127 documents. The agent imported them into a local organization through the real MCP tool. 25 succeeded. 102 failed. !Work Log blocker reporting that 102 of 127 document imports failed because the editor rejected inline code combined with bold formatting. The agent recorded the failure as a blocker and connected it to the error it had already encountered while writing the spec. Our editor uses Tiptap. By default, its inline code mark excludes other marks, so markdown like `**createdAt**` failed the schema check and caused the entire document to be rejected. The feature followed the plan, but it couldn't import four out of every five documents we gave it. Nine minutes later, the agent logged a fix. !Work Log entry reporting an editor fix outside the original implementation plan, with a missing GitHub commit reference and a correction label. The fix went into a package the plan hadn't included, so the agent recorded it as a deviation. The entry includes what changed and how the import rerun went. I'll get to the “Not found” reference and correction below. This also affected normal document editing and the agent's own writes. Bold or italic code is valid GitHub-flavoured markdown, and we were rejecting it. The first fix wasn't complete, though. It stopped rejecting those documents, but the editor ignored the override it relied on. The writes succeeded while silently dropping the bold or italic formatting around the code. A follow-up commit that night, eb7c428a, extended the code mark itself and added tests checking that those marks survived. The full entry shows the constraint captured from the first fix. Four minutes after the first fix, the agent captured the finding as a constraint associated with the affected files: keep inline code combinable with bold, italic and links, and keep the round-trip tests for those cases passing. That doesn't automatically make it an approved rule. A finding captured from the Work Log remains proposed until a person accepts it. ArchDocs labels it "From a Work Log finding, not an approved rule." The code fix and tests address the bug. The Work Log records what happened and why we went outside the plan. Task context is how that finding can reach the next agent working on those files. There were two more issues during the import. Two files contained NUL characters that Postgres wouldn't store. After fixing that, the third run imported all 127 documents. The Notion import also tried attaching images after documents had already been marked shipped and frozen. Image handling had to move inside the import. Both issues went into the evidence as deviations from the plan. A log the next person can use By the end of the build, DD-0022 had eighteen Work Log entries. These covered commits, actual test counts, results from delegated work, review findings and departures from the plan. For this change, Codex handled the implementation from a work order. Claude reviewed the results, ran checks and kept the record. Some entries captured decisions that would otherwise have been buried in the code. E-2 had a section called "Calls I made that the plan left open". It listed four small product decisions the agent made during implementation. I could review those decisions directly and change them if needed. E-13 recorded three existing failures in an unrelated test suite so the next person wouldn't assume they were regressions from the import. There are limits to this. The log only contains what the agent records, and a finding still has to be captured for it to become a constraint. We learned that the marketing site had tests checking the docs pages and the number of MCP tools. That stayed in a Work Log entry and was never captured as a constraint. When the agent stopped, it left a handoff. !Agent handoff listing completed work, decisions awaiting a person and next steps, with references to supporting Work Log entries. The handoff links completed work to its supporting entries, lists the decisions waiting on me and explains what to run next. I used this myself when I came back to write the post and correct the record. My agent called get_journal_handoff first. It returned E-17, but marked it stale because E-18, which recorded shipping, had been added afterward. It also reported that there were no open questions. The evidence DD-0022's evidence of work had four sections: outcome, verification, deviations and not done. !Agent-reported verification evidence listing a CI run, local test results and the successful import of 127 documents. The verification section separates CI results from local runs and labels the import result as reported. The agent wrote all of these results. For this change, we hadn't configured acceptance criteria. ArchDocs didn't independently compute whether the change passed them. The header says that, and the evidence was a record of the tests and CI results the agent reported. I checked those results myself using the GitHub CLI. Run 41310251591, on the final commit, passed the build, unit tests, integration tests, Docker image build and both deploys. The end-to-end job was skipped. The "5 of 5" Playwright import result in the evidence came from a local run reported by the agent, not that CI run. The previous run, 41309759807, had failed on two marketing tests that weren't covered by the agent's local checks. The Work Log recorded those failures and the fix. The runs are in our private repository, so I can't link them here. I made the decision to ship DD-0022. I told the agent: "Ship it and then tell me how I can try out the import on a few docs." It attached that statement when marking the doc shipped. The header shows that Claude Code relayed the decision. Because this doc had no acceptance criteria, the server would have allowed the agent to ship it without that statement. It waited because our skills tell it to wait for a person's decision. Relaying my statement is what put my name on the record. While checking the record for this post, I found another mistake. Every commit reference used archdocsio/archdocs. Our repository is archdocsio/monorepo. ArchDocs had been checking those references against GitHub and displaying "Not found". The same incorrect repository name was also attached to the captured constraint's file paths. Work Log entries and captured file paths can't be edited. We added Correction entries and a new constraint to replace the original. The old entries remain visible with a "Corrected by" label, and the corrected commit references resolve on GitHub. The new constraint only replaces the old one once a person accepts it. The correction entry shows the changes. The next change starts with what we learned Let's say the next change adds strikethrough support to the editor. That would touch packages/doc-editor/src/extensions.ts, the same file where we fixed the code mark. An agent could reorganize the extensions while adding strikethrough and accidentally remove the behavior that lets code combine with bold, italic and links. We'd be back to rejecting imports and agent-written documents. The next agent needs to know a few specific things: preserve that behavior, keep the round-trip tests passing, and test markdown like `**createdAt**`. When an agent follows our skills, it requests task context before planning, using a description of the work and the files it expects to touch. ArchDocs retrieves the decisions, constraints, open questions and design docs associated with those files, including their sources and status. Nobody has to tell it to go read DD-0022. We tested that query after correcting the repository name, using the real repository and the two files the strikethrough change would touch. We haven't implemented that change. This was a demonstration of what the next agent would retrieve. !Task context returning an editor constraint matched by file path, labelled as uncertain, proposed by an agent and not an approved rule. The constraint appears first, matched by file path, with the original Work Log entry and its current status. Before the correction, the query found the constraint through text search, in third place. It couldn't match the file paths because the repository name was wrong. After the correction, it was the first result, matched by path. The query used no catalog objects. The file paths on the constraint were enough. The full result also includes the original capture, labelled to show that a newer item proposes to replace it. A human reviewing the next change can retrieve the same context, check the constraint against the implementation and decide whether to accept it.
@VibeChess3D @fal @threejs Here you go abouchedidxcode/open-source-hands Now you have no excuses, go build it!
Live2D: DeepSeek-chan (art 神宫凉子 · rig NeonNeko) AI voice · original music Bot: AstrBot + DeepSeek, plugins open source → GUCine/astrbot-lively The ending is just a story beat 😉
I made a site where you can read everything your MP has said in Parliament, and check their attendance openhansard.sg It takes every Hansard sitting from 1955 to now, splits it into speeches and links each one to the MP who said it. Type your constituency to see your MP's speeches and attendance in each Parliament, or search everything said in the House, filtered by MP or date. Some things I found: - "Artificial intelligence" came up in 2 paragraphs of Hansard in 2015 and 162 in 2025. The first was S. Dhanabalan in 1987, on smart traffic signs that use "artificial intelligence in order to be able to operate according to traffic conditions." - "Cost of living" was in 8 paragraphs in 1995 and 198 in 2025. John Ede raised it in November 1955. - The first "Internet" was Mah Bow Tan in 1994, saying it would "potentially erode Singapore Telecom's IDD revenue." - P. Govindaswamy raised the haze in October 1972. The text is straight from Hansard, with no AI summaries, and it updates daily. Code is open: site, scraper. If a speech is credited to the wrong person, there's a "Report an error" link beside it.
GOD OF WAR HD COLLECTION - PRE ALPHA RELEASE! luisxl15/GOD-OF-WAR-HD-COLLECTION
Your AI agent passed CI. But do you know what it actually did? I've been thinking about a problem with AI agents running in CI/CD. We spend a lot of time defining what a pipeline should execute, but once we introduce AI agents, things get less predictable. An agent might pass every test while exercising capabilities we never explicitly reviewed. So I started building Drifti, an open-source CLI written in Rust. The idea is to make an agent's exercised capabilities explicit and reviewable. The workflow looks like this: 1. Observe what an agent actually does. 2. Learn its filesystem, process, and network capabilities. 3. Generate a proposed drifti.yaml contract. 4. Review and commit that contract. 5. Verify future executions against it. If an execution violates the contract, verification returns exit code 121, which CI can use to fail the job. One design decision I'm particularly interested in: incomplete observation must never be treated as success. If Drifti doesn't have enough evidence, it returns an indeterminate result (122). The current MVP uses Linux ptrace, stores evidence locally in SQLite, and keeps policy evaluation deterministic. It's not a sandbox, and the observation coverage still has limitations. I'm sharing it early because I'd rather get feedback from engineers dealing with these problems than build something nobody needs. GitHub: lucabecci/drifti For those running agents in CI: are you explicitly tracking their capabilities, or are you mostly relying on runner/container permissions?
@honjo_yosage 你好,很感兴趣,这是我的github:github.com/bazingaedward