Mentions
Conversations linking to GitHub, newest first. Times are UTC.
Mentions by source
X
Bluesky
Hacker News
V2EX
Qiita
DEV
Mastodon
Latest posts
I wrote a sort of expression evaluator back in 2020 without knowing what a parser was haha. It's not shunting-yard and it's not recursive descent. In 2020 I taught myself C# all on my own and wrote a desktop calculator my own way. I had never read anything about parsing — I didn't know the words "token", "AST" or "precedence". I just needed 2 + [3 * (4 - 1)] to come out right, so I used my head, with three kinds of brackets, nested. What occurred to me was this: 1. Split the text into parts: numbers, operators and brackets. 2. Then I gave each piece a depth number — how many brackets deep it sits. 3. Look for the biggest depth. Those pieces are the innermost group. And I resolved only those. 4. Then I wrote the result in its place as a single number, and counted all the depths again, but from zero. 5. I repeated until everything was at depth 0. Within one same level the rule applied with two passes: first it eats all the * and / from left to right, then all the + and -. 2 + [ 3 * ( 4 - 1 ) ] 0 0 1 1 1 2 2 2 2 2 1 <- depth ~~~~~~~~~~~~~ deepest is 2: resolve 4 - 1 2 + [ 3 * 3 ] 0 0 1 1 1 1 1 <- counted again, from zero ~~~~~~~ deepest is 1: resolve 3 * 3 2 + 9 0 0 0 = 11 Things I know now and back then I didn't: - It's slower than it needs to be. Shunting-yard is linear; this one recounts every depth after each reduction, so in the worst case it's quadratic. - It's not new at all. I was told afterwards that this shape is called innermost-redex reduction, the same family as term rewriting. I simply never read it anywhere. It's what comes out of formalising how any person does it on paper: innermost bracket first. - The code around it is rough: float instead of double, numbers going back and forth through text on every reduction, and a try/catch used as an if. The only thing I'd still defend: there isn't a single special case for ( versus [ versus {. The evaluator never asks which bracket it is, only how deep it sits. Adding a fourth type would cost three lines in the part that splits the text and nothing in the evaluator. The code is there just as it was, defects included: nicoconvoz/calculadora — what's worth looking at is profundidad() and resolver() in Form1.cs. I'm curious whether someone, in some hidden corner of the map, arrived at this on their own, or whether it has a name I still don't know.
github.com/zony0428/photo-manager/releases v1.2.0がマイグレーション(DBの変換)に失敗する場合があったので、公開停止して修正版をアップしました。すみません。。 クリーンインスコは影響ないみたい。 アプリ公開するのって怖い(;´Д`)
Baidu’s Unlimited OCR 2 targets long-document parsing. Its own docs say the raw output isn’t Markdown; a separate script converts it. baidu/Unlimited-OCR Would you trade a flashy demo for reliable tables and page boundaries? @grok t.co
bf16 might be freezing your weight updates If you fine-tune a model with weights stored in bf16 and let torch.optim.AdamW write to them directly, you get interesting behaviour. bf16 can only represent changes to weights if the change is at least ~1/512 of the weight itself, so at small learning rates only the smallest weights can update. As a result, you have a sparse fine-tuner that trains the small-magnitude weights and freezes the rest, with the cutoff set by your learning rate. This is a thing - I found half a dozen peer-reviewed papers (with thousands of citations) that fine-tune this way, but none of them reference this behaviour. I dug into one called Quiet-STaR, because (a) it's a cool paper, (b) they released their weights, and (c) their code works! So I diffed their base model and saw that indeed the small-magnitude weights were the only ones updated during their training. Then I reran its recipe with an optimizer that applies every update, and watched it diverge. A higher-precision optimizer needs a 3 to 10 times smaller learning rate to get the same result, and I couldn't achieve a better result. This started with Barron, Gnanapragasam & Tschannen's "A Fix for Softmax and Cross-Entropy" (Oct 2026). They show that the standard way of computing cross-entropy rounds the correct answer's gradient to exactly zero once the model is confident enough (past a margin of about 5.5 in bf16, which they call the precision cliff), and that this, interacting with Adam, is what produces the "slingshot" loss spikes seen during grokking. Fix the rounding and the spikes go away: something people had studied as training dynamics was rounding. That made me wonder what else out there is weird like this. This is one, and it runs the other way: their rounding bug adds instability to training; this one hides it. I wrote a whole essay about it here: lacuna.tiptreesystems.com The code, logs and evaluation results are in mweiss17/quietstar-bf16-adamw
How I Built a Mac Cleaner in Rust CleanMyMac wanted $40 to renew. I cancelled, looked for a free alternative, and didn't find one that felt like a real Mac app. So I spent a few weeks writing my own. This is the story of SweepMac — and the parts that were genuinely interesting to build. What it does SweepMac is a native macOS cleaner. The usual surface: caches, logs, trash, leftover app data, browser privacy data, a disk-usage map, startup audit. Plus a menu-bar health monitor (RAM, CPU, disk, network, thermals) and malware scanning via ClamAV. Free, open-source (BSD-3), no telemetry, no accounts, no subscription. ~3.2 MB app. The safety model (the part I'm most proud of) Cleaning apps are dangerous software. One wrong click and you've trashed ~/Library. So before writing a single scanner, I spent time reverse-engineering CleanMyMac's guardrails using REA (a reverse-engineering toolchain). Here's what I found and rebuilt: 1. Trash-first, always. The only remover in CleanMyMac is MoveToTrashFileRemover — everything goes to Trash, nothing is hard-deleted. SweepMac does the same: trash_paths() moves files to Trash, and the UI says "Undo from the Trash if needed." 2. SIP check everywhere. CleanMyMac calls isFileProtectedByRootlessAtPath: from 10 different frameworks. I traced it — it forwards to Apple's own NSFileManager isFileProtectedByRootless:. SweepMac uses the public equivalent: stat flags & SF_RESTRICTED (0x80000). Every scanner walk skips restricted paths. Verified live against /System/Library/CoreServices → protected. 3. Ignore list. CleanMyMac has an IgnorableNodeType framework with live publishers. SweepMac has a persisted set at ~/.sweepmac/ignored — per-item "Ignore" button, skipped by all scans. 4. Pre-clean snapshots. CleanMyMac has SnapshotsStorage with makeSnapshot/restore. SweepMac writes a JSON manifest (~/.sweepmac/snapshots/<ts>.json) of every item before cleaning — and aborts the clean if the snapshot fails to save. Never clean what you didn't record. 5. System-app data is never "orphan." CleanMyMac's orphan sweep flags any reverse-DNS folder over 1 MB under Library whose bundle ID isn't in the installed-apps set. But that set is built only from /Applications + ~/Applications — Apple's system apps live in /System/Applications and are never in the set. So com.apple.mediaanalysisd (428 MB), com.apple.Maps (13 MB) all qualified as "orphan" and were preselected for deletion. One click trashed live system data. Fix: skip com.apple.* keys (the same rule CleanMyMac's Protection module already uses). 6. Space Lens can't trash user-data roots. SpaceLens lists top-level children of ~ (Library, Documents, Movies) — and showed the same "Clean selected" button as every other page. One checkbox + click = trashing ~/Library. Fix: disable the Clean button on that route entirely. The architecture Five crates, one process: sweep-core — pipeline traits (Scanner), JunkItem, shared helpers (home, dir_size, file_size, trash_paths), ignore list, snapshots, SIP guard. sweep-scanners — one file per feature: SystemJunk, TrashBin, Uninstaller, Privacy, Performance, Protection, Clutter, SpaceLens, Malware, ClamAV setup. Scanners enumerate only, never delete. sweep-health — menu-bar sensors (raw syscalls + Mach APIs, std+libc only). 2s sampler thread, channels only. sweep-shell — egui app, native menu bar (NSStatusItem/NSMenu via objc), updater, login items. UI state lives here, not in scanners. sweep-helper — privileged worker scaffold (dev-only, never run privileged). The interesting bugs Pump deadlock. The Protection page's first-run ClamAV setup streams log lines. I ended setup mode only when a log line matched "Protected" / "already running" / "is up" / "failed" / "not found". But "Cannot write config files.", "cannot launch clamd: …", and "clamd started but not answering yet — retry shortly." (the expected first-run outcome) matched none. Busy stayed true forever — Scan, Clean, and "Set up protection" all disabled until restart. Fix: treat channel disconnect (sender dropping) as "done." Added 2 tests for the exact case. 240 subprocesses per second. update() runs on every input event (~120 Hz). Per frame: loginitems::status() spawned id -u + launchctl print, tray::menu_icon_enabled() read the config file, fda_granted() did two read_dir calls. Fix: 5s TTL cache with invalidation on toggle — same pattern as the clamd ping cache. Clutter scanned the same trees 2–3×. Roots included /, /Users, /Applications, /Library, and ~/Downloads simultaneously, each walked 4 levels deep. ~/Downloads/old.dmg was found through / (depth 4), /Users (depth 3), and the Downloads root (depth 1) — three identical rows, tripled totals, cleaning failed twice with "No such file." Fix: dedupe output by path. Also added /Volumes to the skip list — external disks and NAS shares were being walked 4 levels deep. Malware scan failures were invisible. Read errors and clamd errors only eprintln!'d; the item list stayed empty and the UI said "Nothing found — this area is clean." Fix: count failed files, show the count in progress, and never claim "clean" after an incomplete pass. The ClamAV dance ClamAV lives at /opt/homebrew/sbin/clamd (not in GUI PATH — find_bin covers it). First freshclam needs DatabaseMirror in the conf (Homebrew's default lacks it). clamd takes minutes to load signatures on first start — the ping loop waits 60s, don't shorten it. The setup flow handles all of this automatically: brew install clamav → generate configs → freshclam → launch clamd. No terminal commands for the user. What I skipped iCloud placeholder awareness — no cloud files are scanned, so nothing to guard. Bulk scan progress/cancel — I excluded Protection from "Scan all" (opt-in) rather than adding a cancel button. Clutter stays in bulk but is much faster now with root dedup and /Volumes skip. Snapshot restore UI — manifests are written and pruned to 10 newest. Restore is manual (open the JSON in ~/.sweepmac/snapshots/). Intel build — Apple Silicon only. rustup target add x86_64-apple-darwin + release flag when someone asks. Numbers 78 tests (was 70 before this audit round) 5 crates, ~3.2 MB app 0 new warnings (only pre-existing objc-macro cfg noise + libc deprecation notes) 17 audit findings fixed in one pass Links GitHub: ankushthakur2007/sweepmac Latest release (DMG): github.com/ankushthakur2007/sweepmac/releases/lat… Update checks run against GitHub Releases (releases/latest) — no self-hosted feed Happy to answer questions about the Rust/egui architecture, the ClamAV TCP protocol, or how I extracted CleanMyMac's safety checks.
装修还没动工、纸面户型看不立体又怕家具买错尺寸的人:可先在浏览器里把家里装一遍。 @0xGky:开源 Floorplan 3D,浏览器画户型后切 3D 看布局与家具摆放;现实买岔很肉疼,虚拟里可随便挪。GitHub:wy51ai/floorplan-3d 判断:先按真实量尺录入关键墙距与门窗,再拖家具;示意尺寸别直接下单,材质承重以商家为准;截图当沟通草稿,别当施工图交给工人。
Title: I made an interactive map of the Odyssey while reading it. What do you think? I've been reading the Odyssey and kept losing track of where everyone was. Where exactly is Ithaca? Where does Telemachus go? How far did Menelaus really travel? So I decided to build a map to see it all. Processing img 05mjfto4w7zh1... It shows the routes of 17 characters over the real Mediterranean, including Odysseus, Telemachus, Menelaus, Agamemnon and the gods. You can pick a Book to see where it takes place, compare routes, or play a voyage stop by stop. Since Homer gives no coordinates, each place is marked as real, traditional or mythic, and some show other proposed locations. I think it could be useful for following along as you read. I built it with a lot of help from AI, and I haven't checked every detail line by line against the text, so there may be mistakes. I'd love for you to take a look and tell me what you think, especially anything that's wrong or missing. Map: odyssey-liart-five.vercel.app Code: victorhrls/Odyssey
Zen Nippon Pro Wrestling - Fight da Pon (SNES/SFC) English Translation Patch Hey everyone, I've finished an English translation of Zen Nippon Pro Wrestling - Fight da Pon, Masaya's 1994 All Japan wrestling game for the Super Famicom, which never left Japan. It's a real-time card battler with a silly story mode, where Baba and the rest of the roster take on a gang of villains. I've played every story mode and screen through, and it's ready to go. Download: github.com/kactusken/Zen-Nippon-Pro-Wrestling-Fig… How it works The English is far longer than the Japanese it replaces, so the ROM is doubled to 16 Mbit and the text moved to new space. Each original message now starts with a short jump to its English, so the game's own pointers never had to change. The original draws fixed-width Japanese characters. A new text renderer draws a variable-width English font instead, which fits far more into the same dialogue boxes. All the code, the translation files and documentation on the game's formats are on GitHub if anyone wants to dig in. What's translated - All 861 lines of story dialogue, through all six scenarios and the ending - All 42 card labels, plus the card messages - Wrestler names, name bars and villain names - Menus, prompts, the password screen and the win and lose messages There are 2 patches in the zip: - The English translation. - The English translation with the developers' debug menu restored. You need your own copy of the game (SHVC-JF). It's a standard BPS patch. Rom Patcher JS (in your browser), Floating IPS (Flips) or MultiPatch (macOS). I've been testing in Mesen 2. Reference pages - Player's guide, which covers matches, every card and wrestler, maps of all seven boards, passwords and secrets: kactusken.github.io Hidden stuff I found along the way - All cards code: at the title menu, press Up Up Up Down Down Left Right Right Up Down Right Left Left. You get all 42 cards, and R then skips any story script. - Sound test code: at the title menu, press Up L R Down L R Left L R Right R L. - Debug menu: it's still in the game, switched off by one byte. The Debug Menu patch turns it back on: hold X and press Select on the title screen. - Zebra Mask: a nearly complete wrestler with sprites, portrait and name bar, who you never get to fight. The codes and the debug menu were seen in automated emulator runs. AI assisted with the translation.
How The Witness Stand works — in plain words Here's how it works, in plain words. When a moderator removes your post or bans you, they almost never have to explain themselves. You get a one-line message, or nothing. There's no record anybody can check afterwards. The Witness Stand flips that. Every removal and every ban gets graded in public with four simple questions: 1. Did they actually READ the post before they removed it? 2. Did they name the RULE it broke — and quote it? 3. Did they CHECK whether what the post said was true? 4. Did a real, NAMED person stand behind the decision? Yes on all four: PASS. Miss even one: FAIL. The grade goes on a public scorecard, beside the moderator's name and the community's name, and it stays there. It's the same test for everybody. A poster grading a moderator takes the same four questions as a moderator grading a post. Nobody grades their own homework, and nobody sits above the test. And the rule we're asking every platform to adopt: no certification, no ban hammer. If someone holds the power to silence people, they should first have to show they can pass the same four questions. That's all it is: a receipt for decisions that used to leave none. The kit is free for any community to run under its own name: amartieai/witness-stand
Brain vs vLLM vs SGlang First I beat vLLM and SGlang on time to first token and tokens per second on more than one context length and concurrency combination. Now I beat them both on precision and load time as well 🤘😎 Brain is the new puppy in town: swedishembedded/brain Woof!
Merge/split tool for Nintendo Switch NSP, NSZ, XCI and XCZ file extensions! The scene is building up fast! sinjunyoung/NSW.M2
Unfortunately Bluesky doesn't support UnifiedPush (yet). UnifiedPush is an alternative of using Google Play Service for push notification on Android. There's a GitHub issue of it, but doesn't look like it's happening any time soon: social-app#7975
Need your AI agent to browse websites from specific countries without getting blocked? networking/geo_ip_rotator routes requests through residential proxies across 100+ countries with automatic header synthesis and anti-bot handling. ARPAHLS/skillware t.co
Check out the MIT-licensed FOSS Lisa Harness if you want to build agents you can run anywhere and make them interoperate with anything via MCP! Lisa-Harness/lisa x.com
你的三星电视,可能比你想象中更“健谈” 现在有人开始研究如何从 Samsung + GLM 5.3 Flash 中移除遥测,让设备少一点数据回传,多一点真正属于用户的控制权 项目仓库已公开,感兴趣的开发者可以深入了解实现方式 chris-ritsen/samsung-tv-root
Instructions to join the subway below! In addition to the six current lines, a line for sites with RSS feeds is also in the works. GusBusDraws/smallweb-subway.js
agentwire v1.77.2 is out, with damage-control-dev 0.1.3: path-spelling coverage in the protected-path checks is tighter, and shell profiles, git config and more credentials are now protected. Upgrade and tell me what it misses. github.com/dotdevdotdev/agentwire-dev/releases/ta… #BuildInPublic #DevTools
setup: one PostToolUse hook in .claude/settings.json, matcher Edit|Write|MultiEdit. copy it from the README, "Show findings right after each edit": enmerasoftware/ai-design-check rule doesn't fit? the agent can mark the line: // ai-design-check-ignore-next-line <rule> -- <reason>
Meet fac › super fast autocomplete for your terminal, inspired by @fig. ⚡ ~3 ms per keystroke 🧠 700+ commands: git, npm, docker, claude… 🖥️ Terminal, iTerm2, Ghostty, VS Code, Zed 🐚 zsh, bash, fish 🦀 Built in Rust 🆓 Free & open source itaikeren/fac
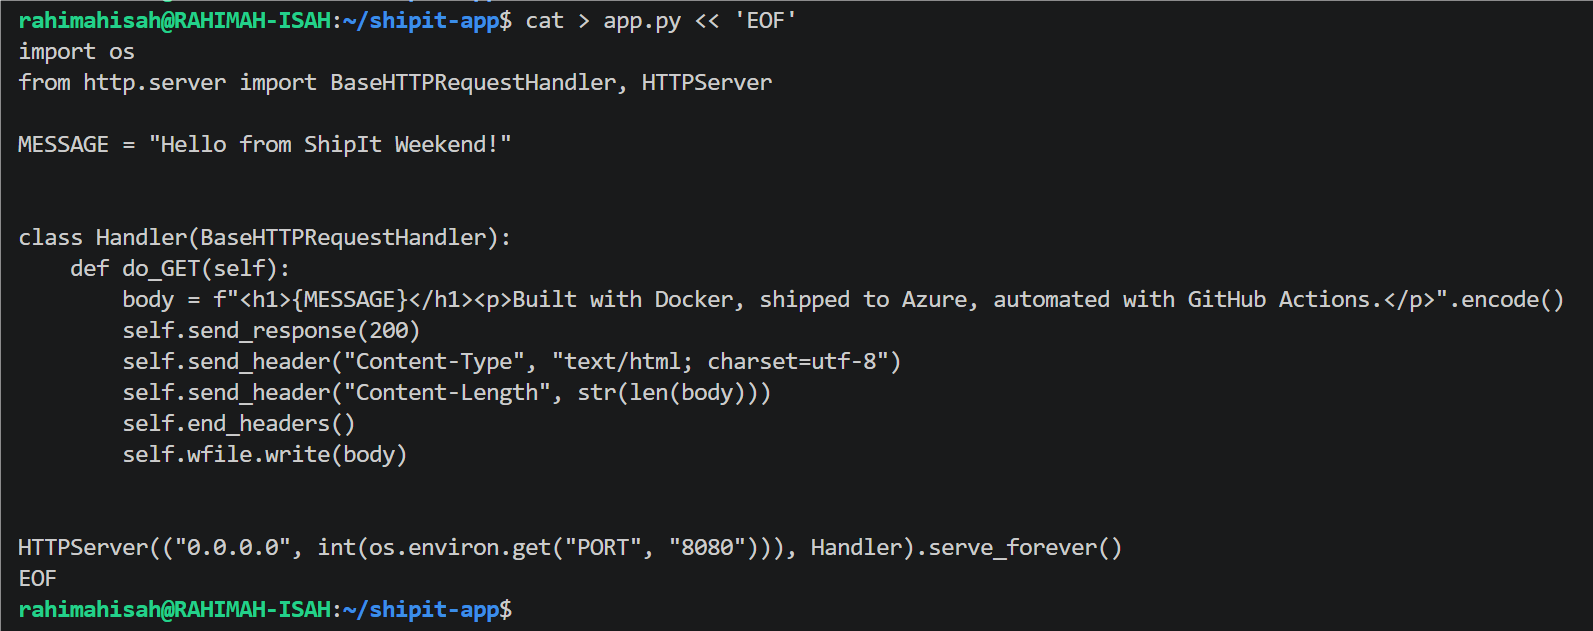
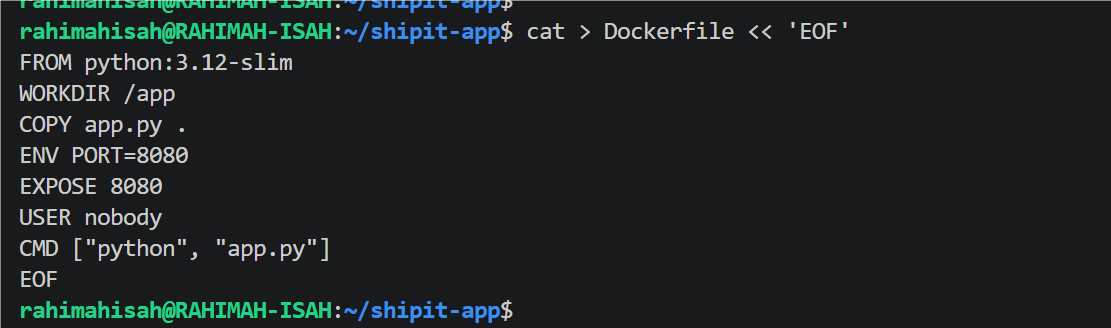
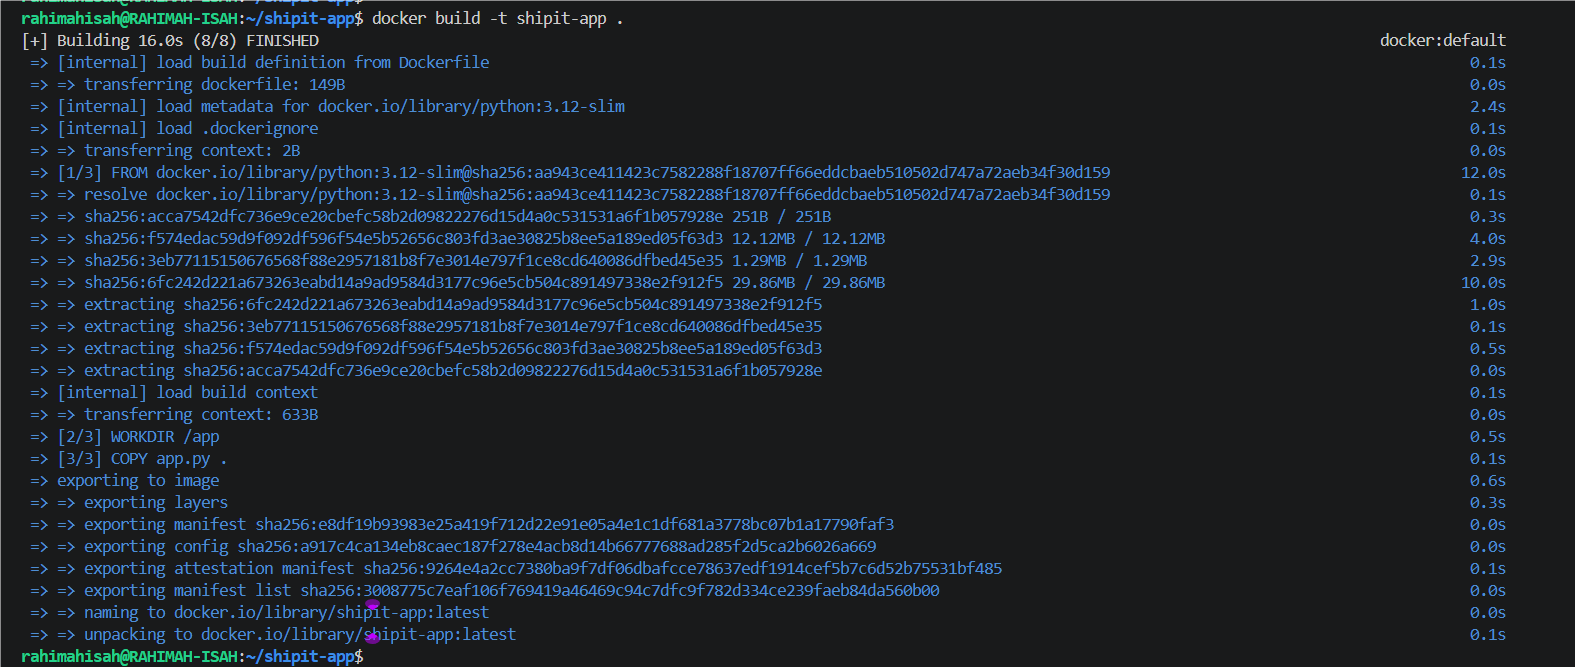
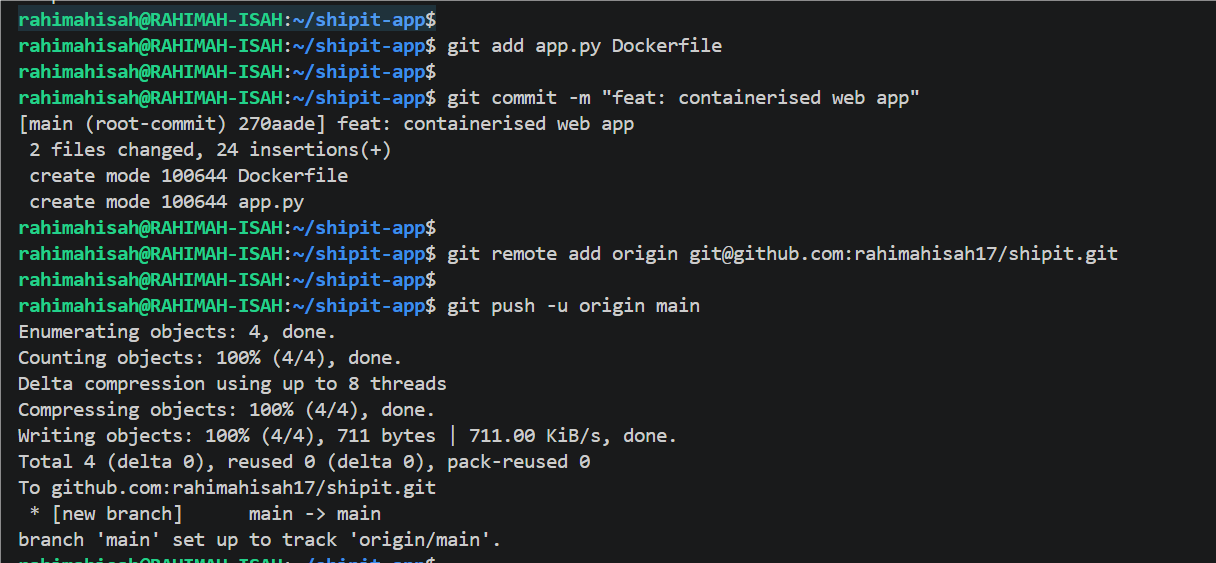
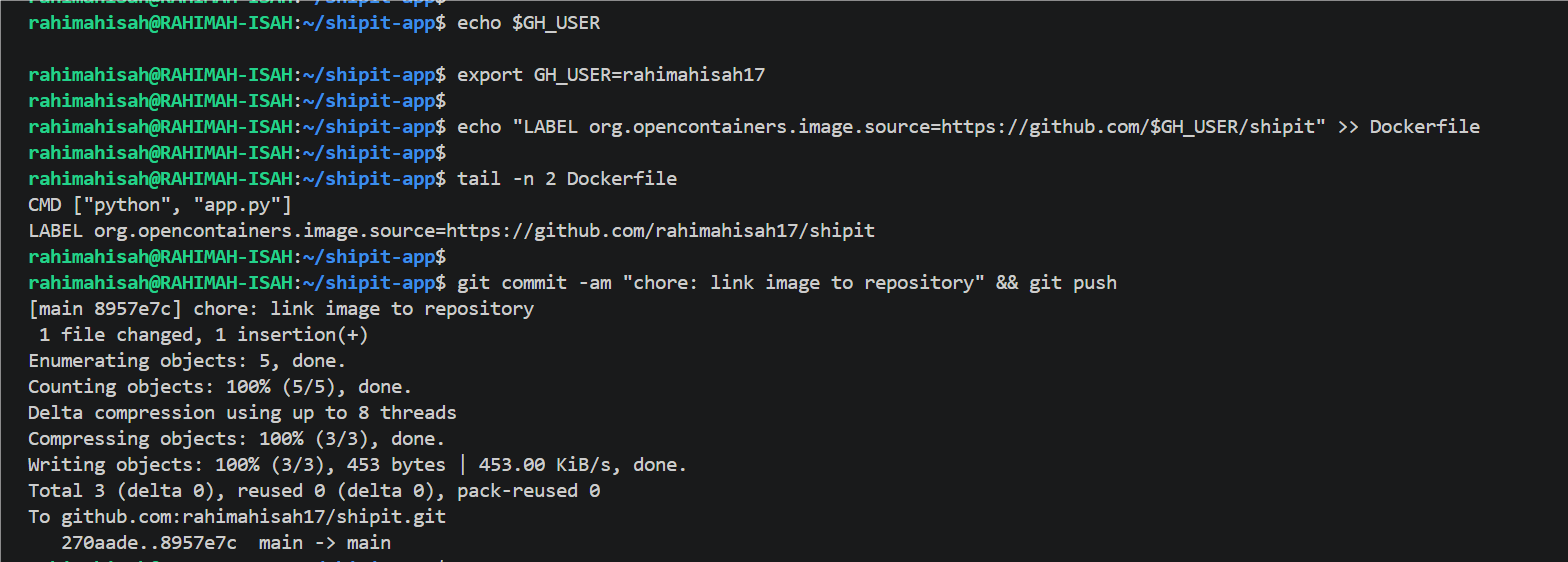
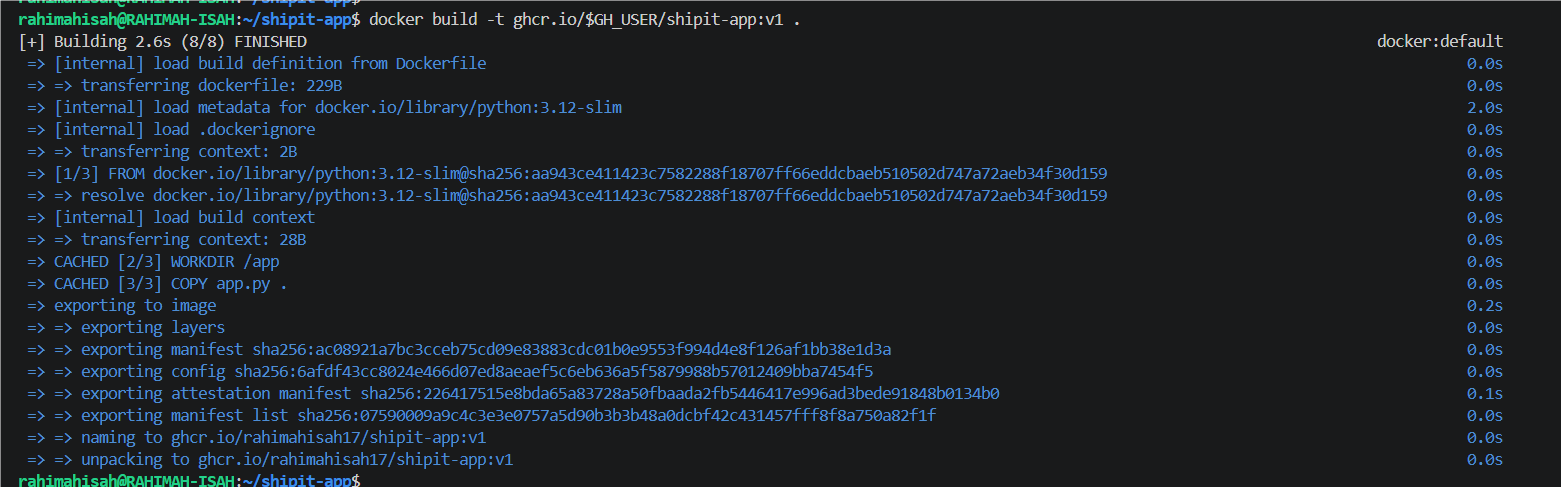
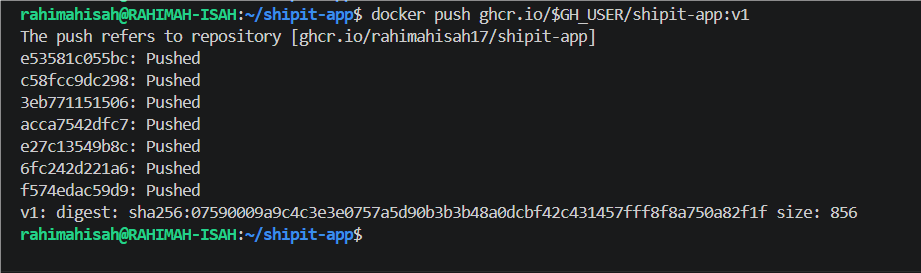
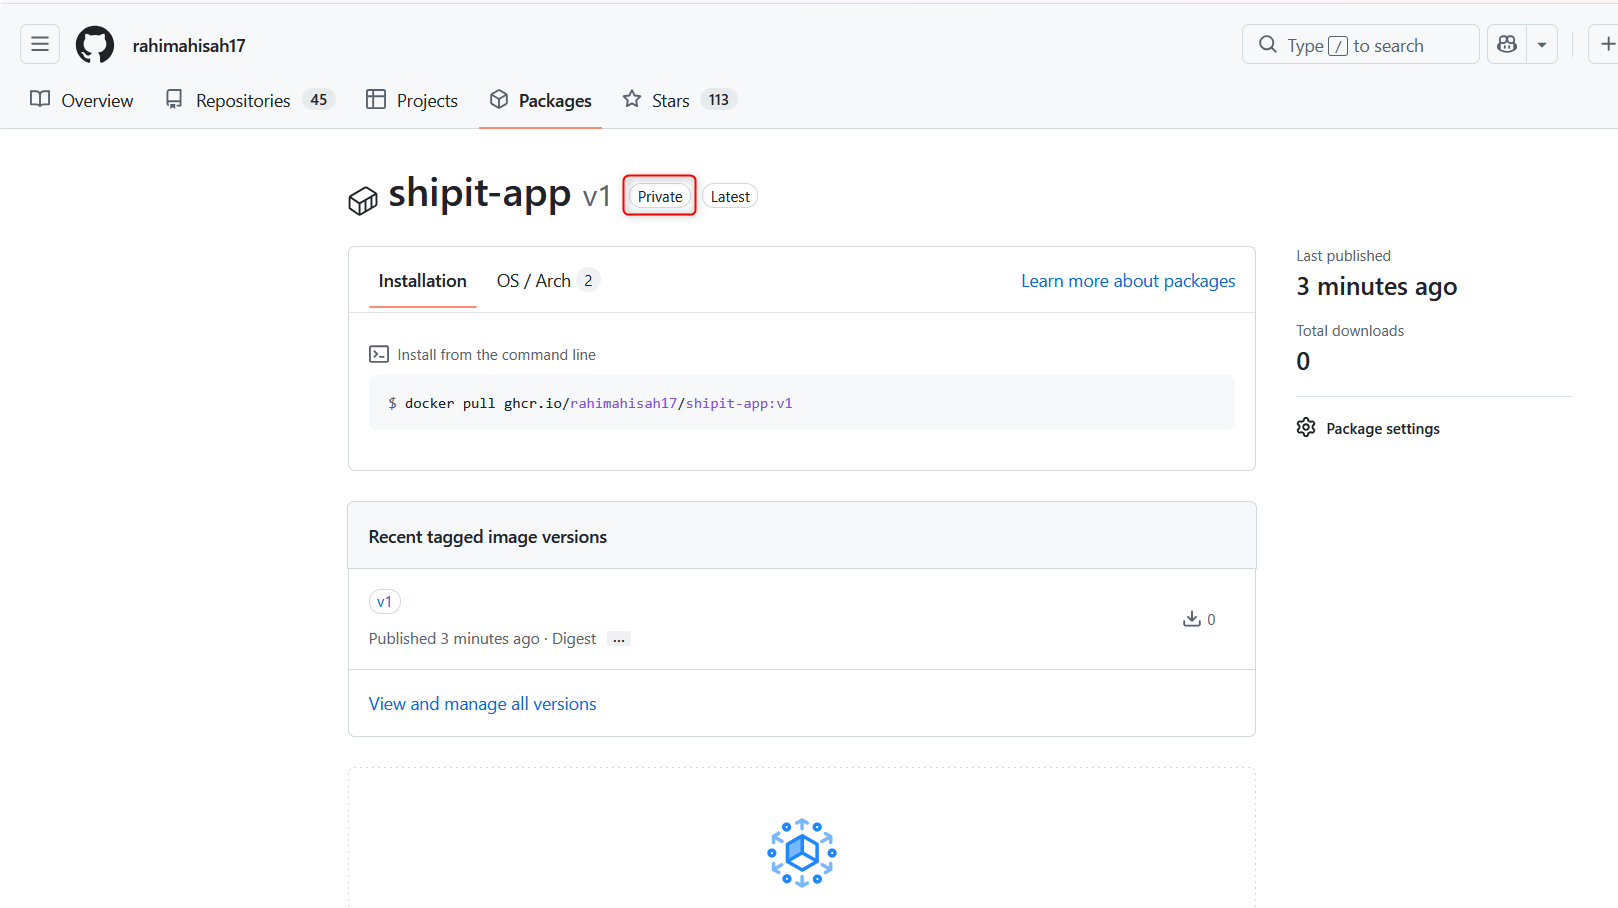
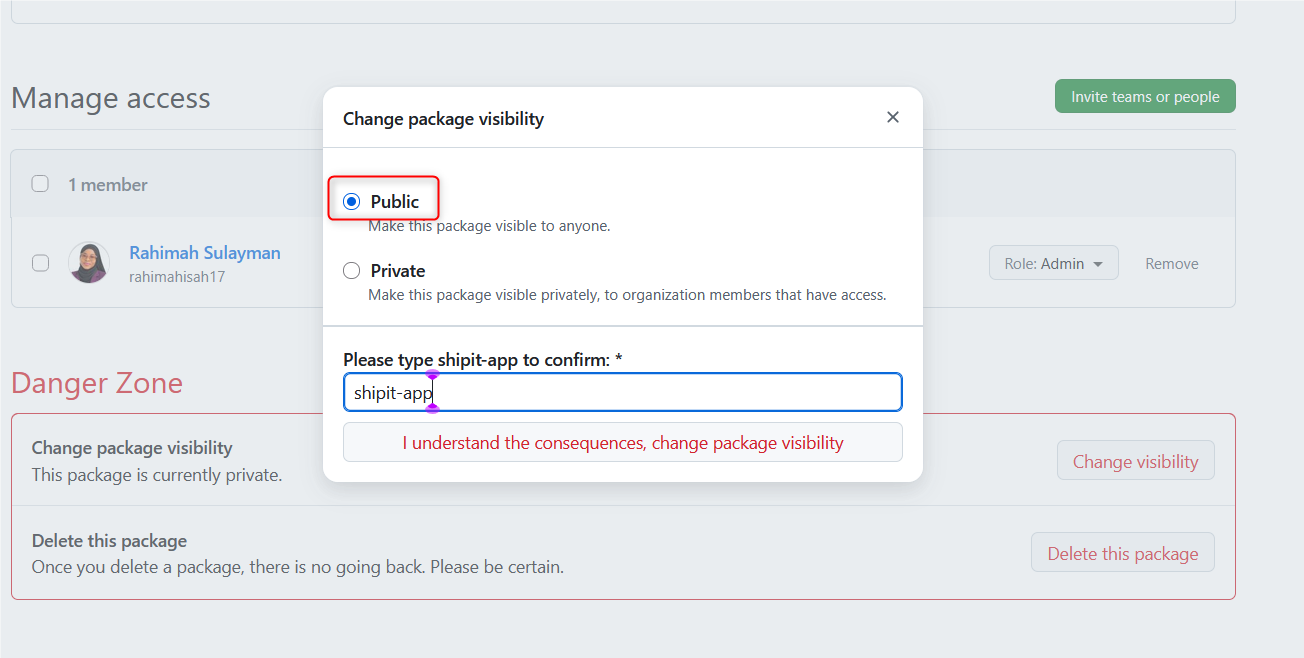
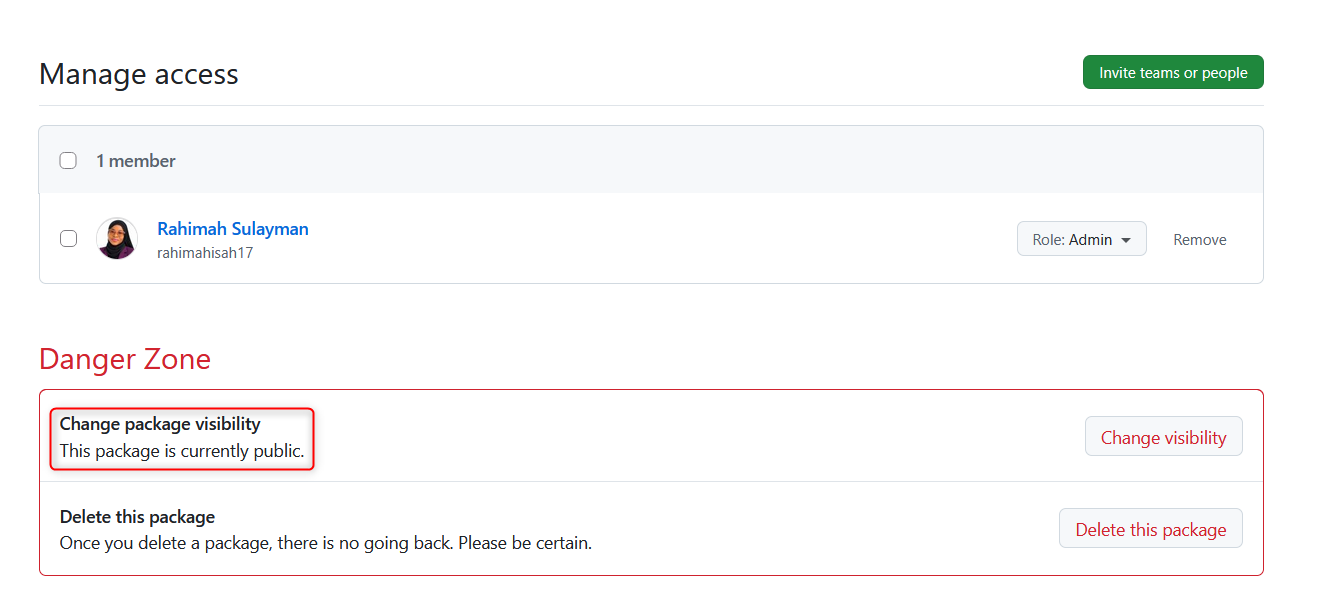
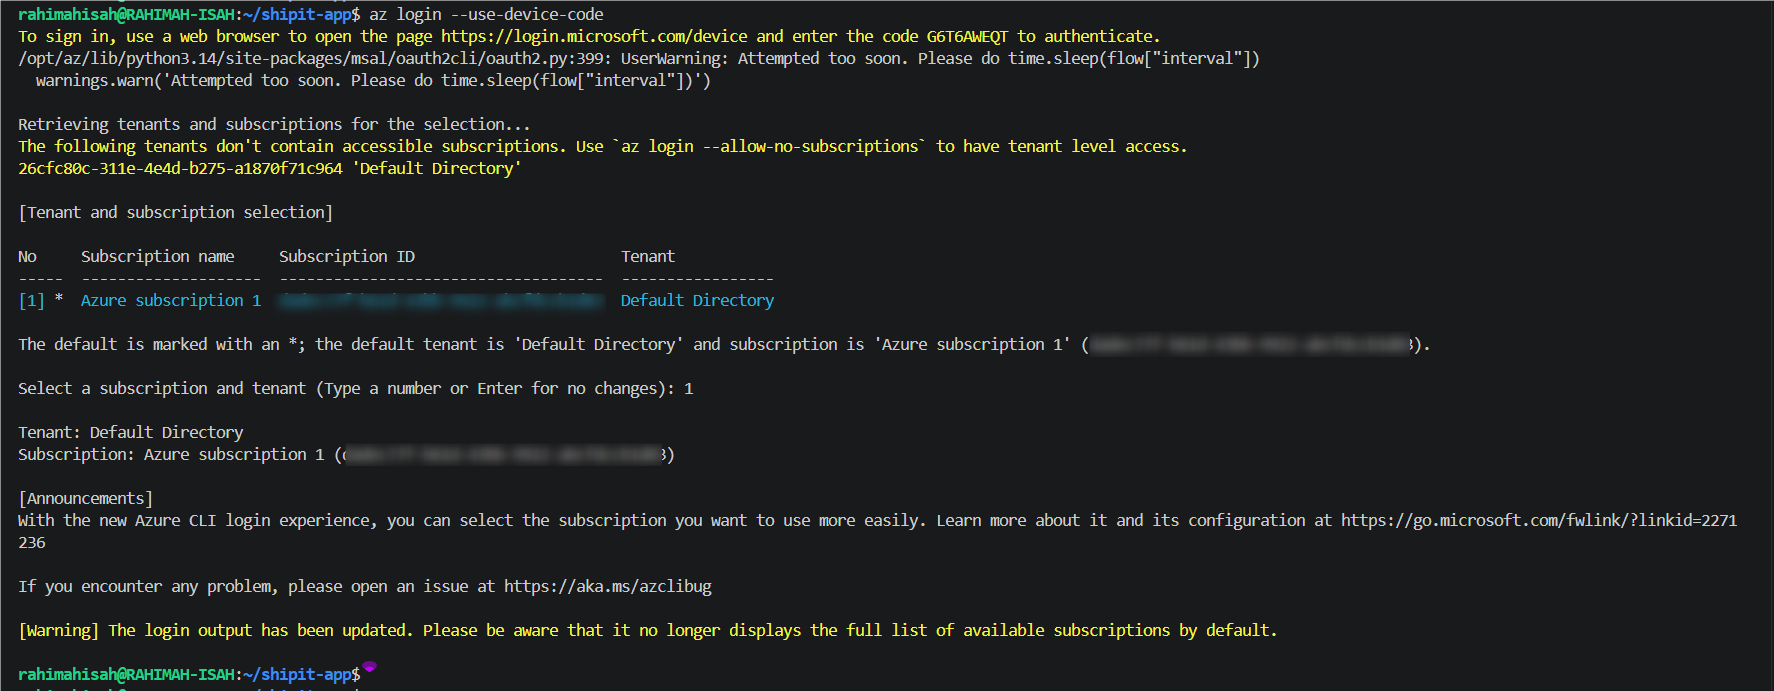
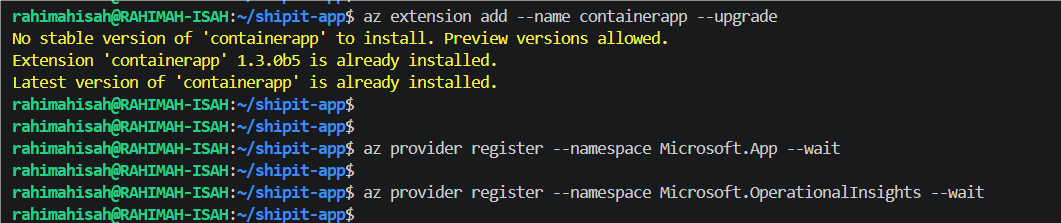
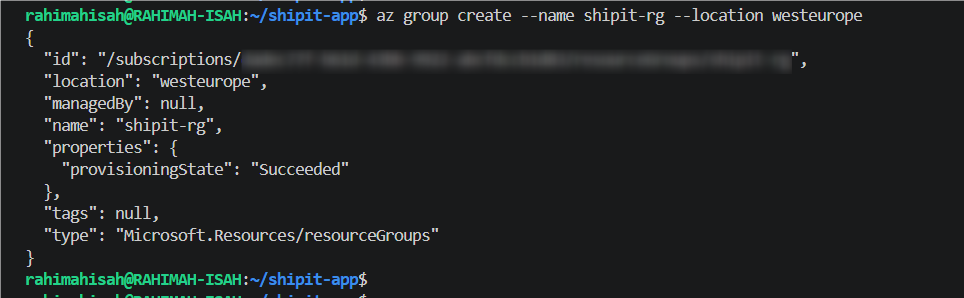
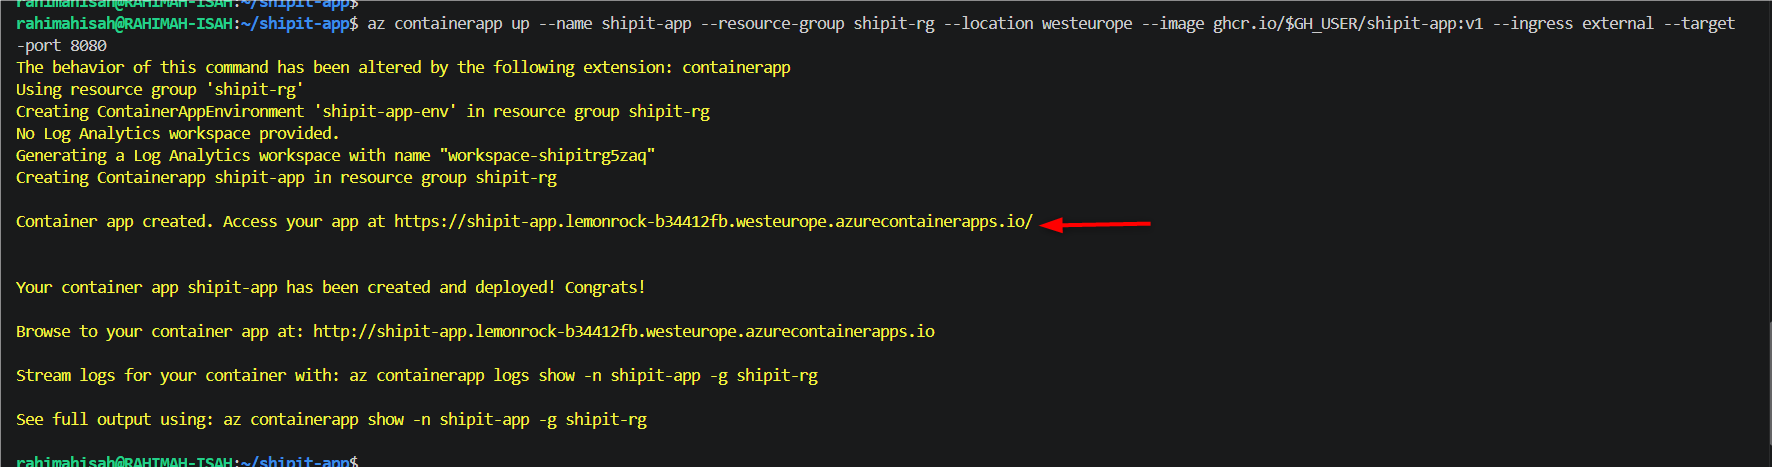
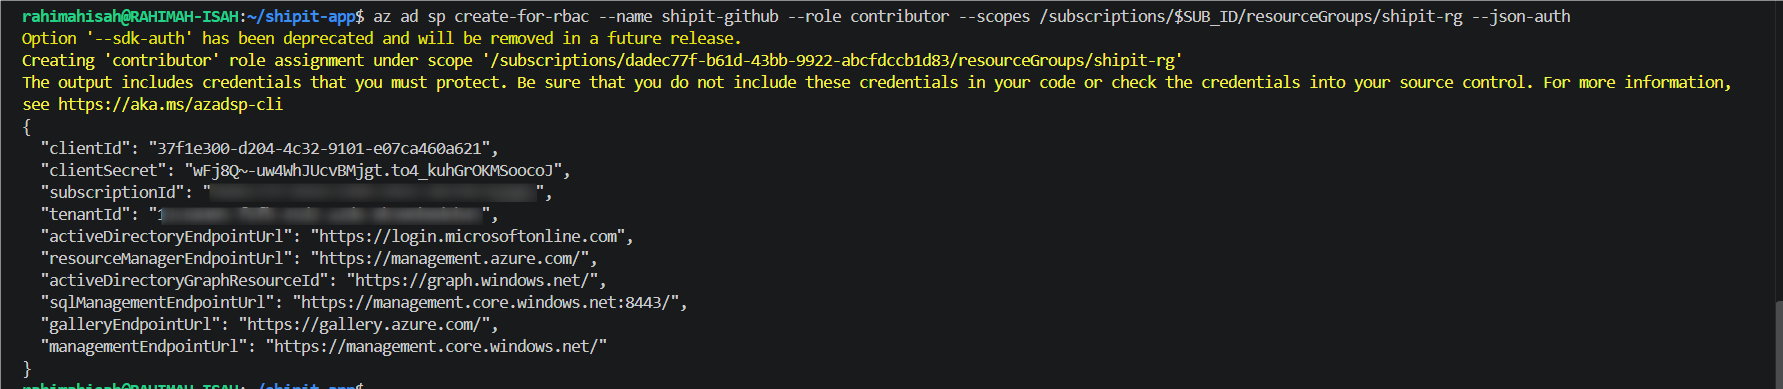
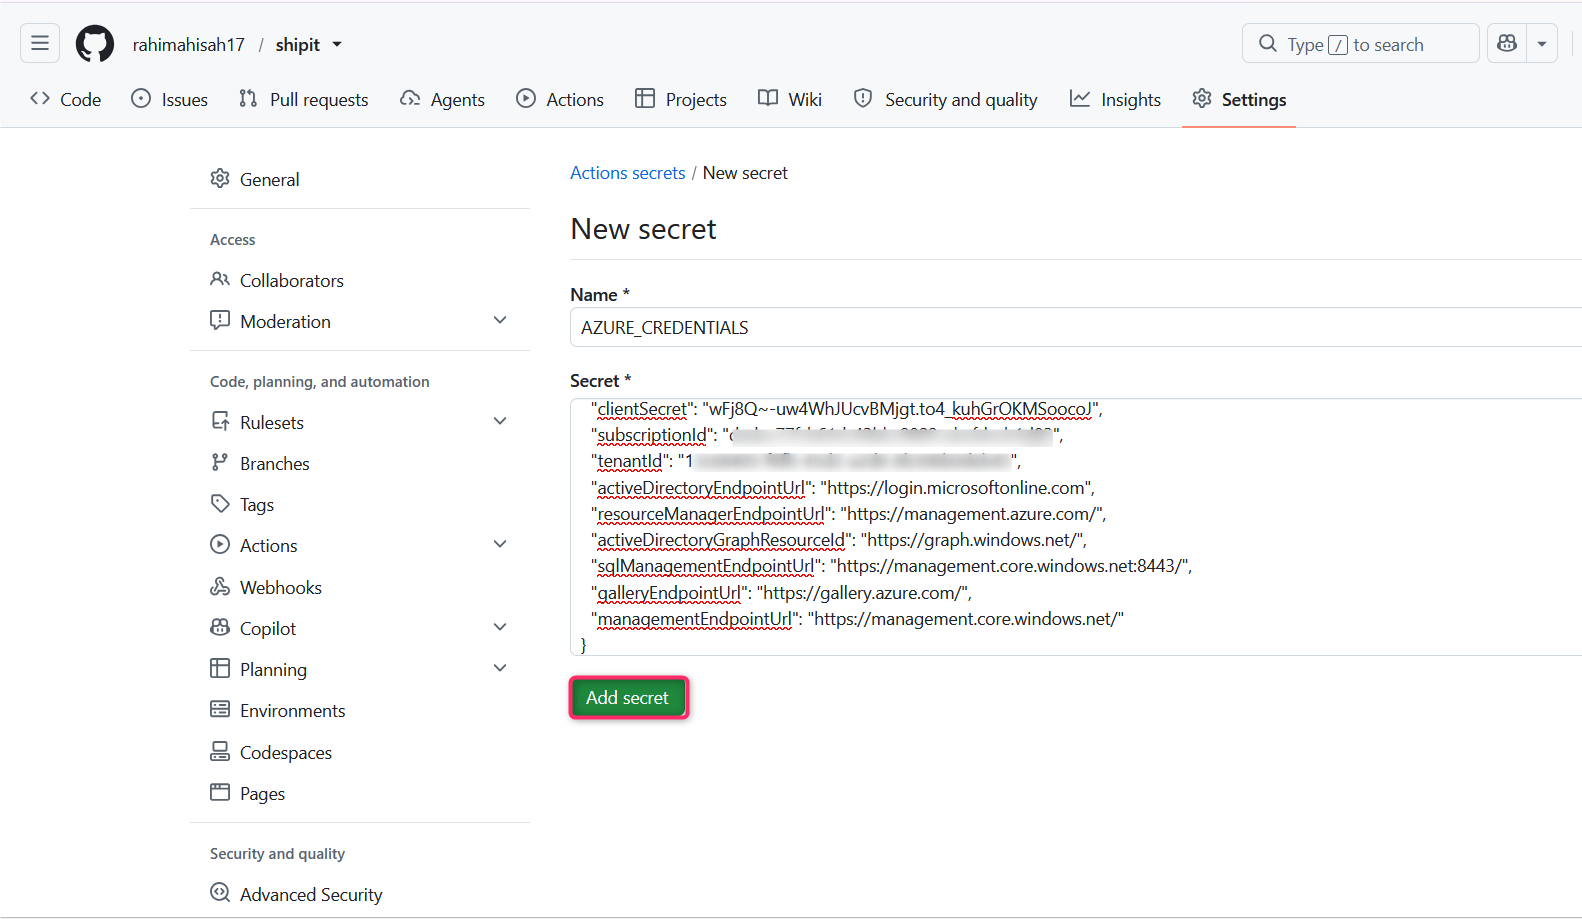
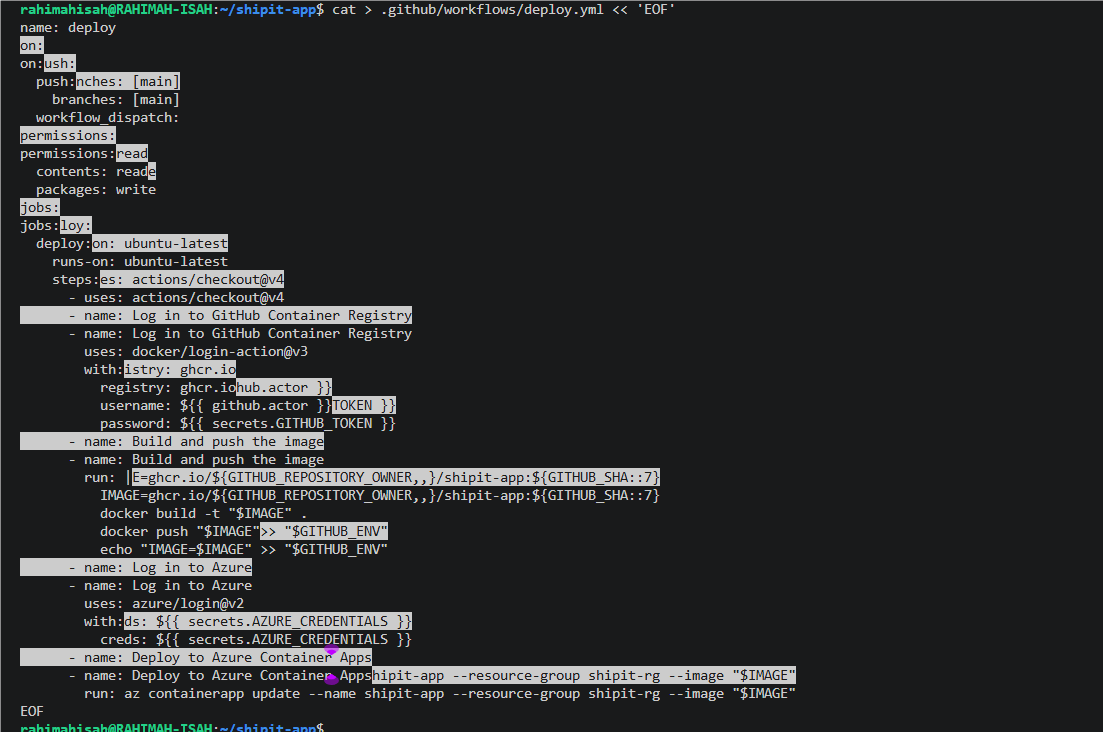
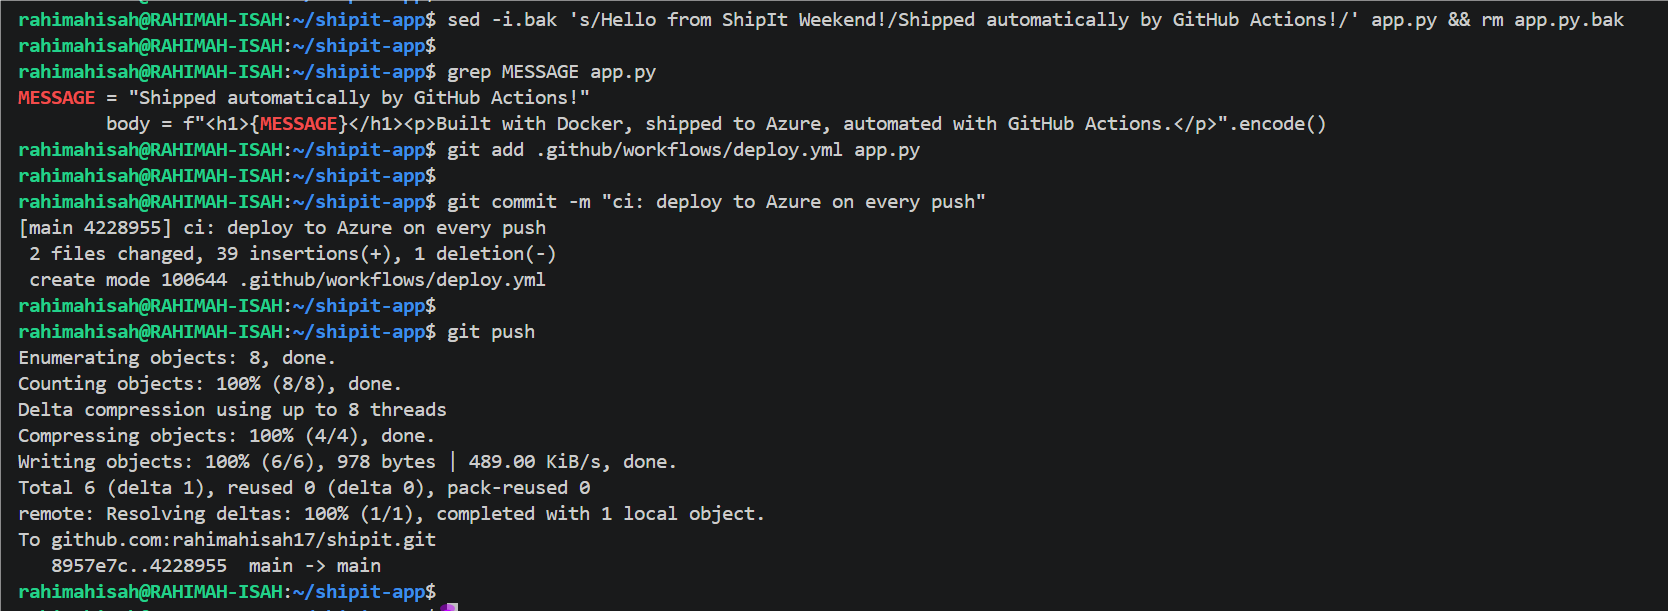
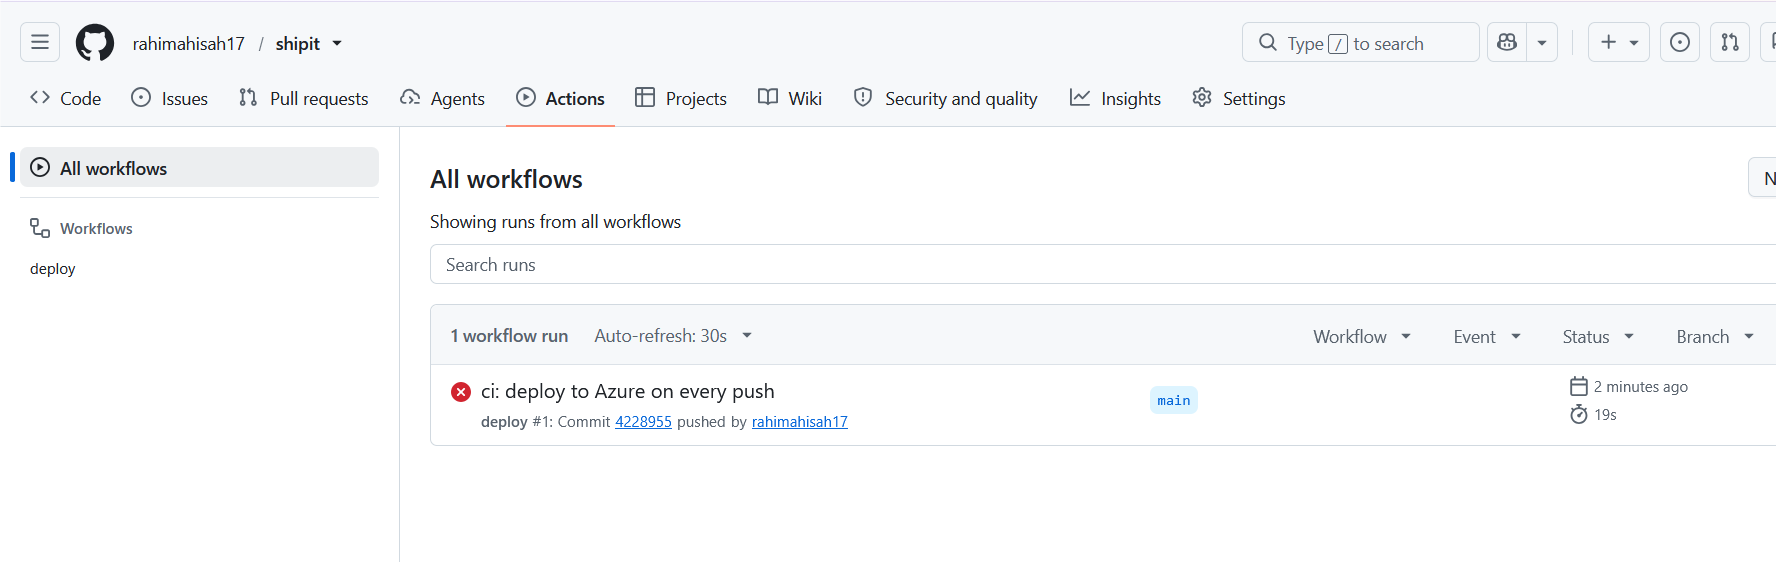
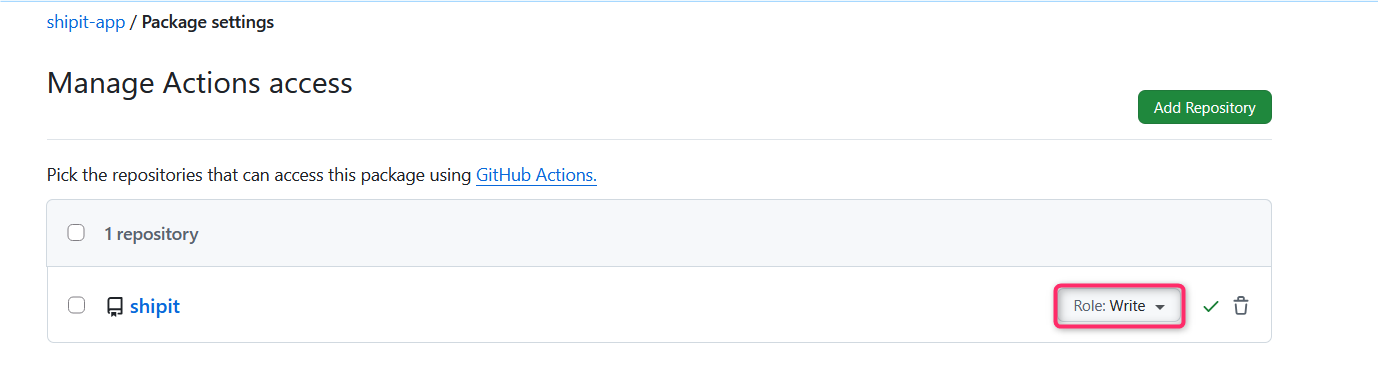
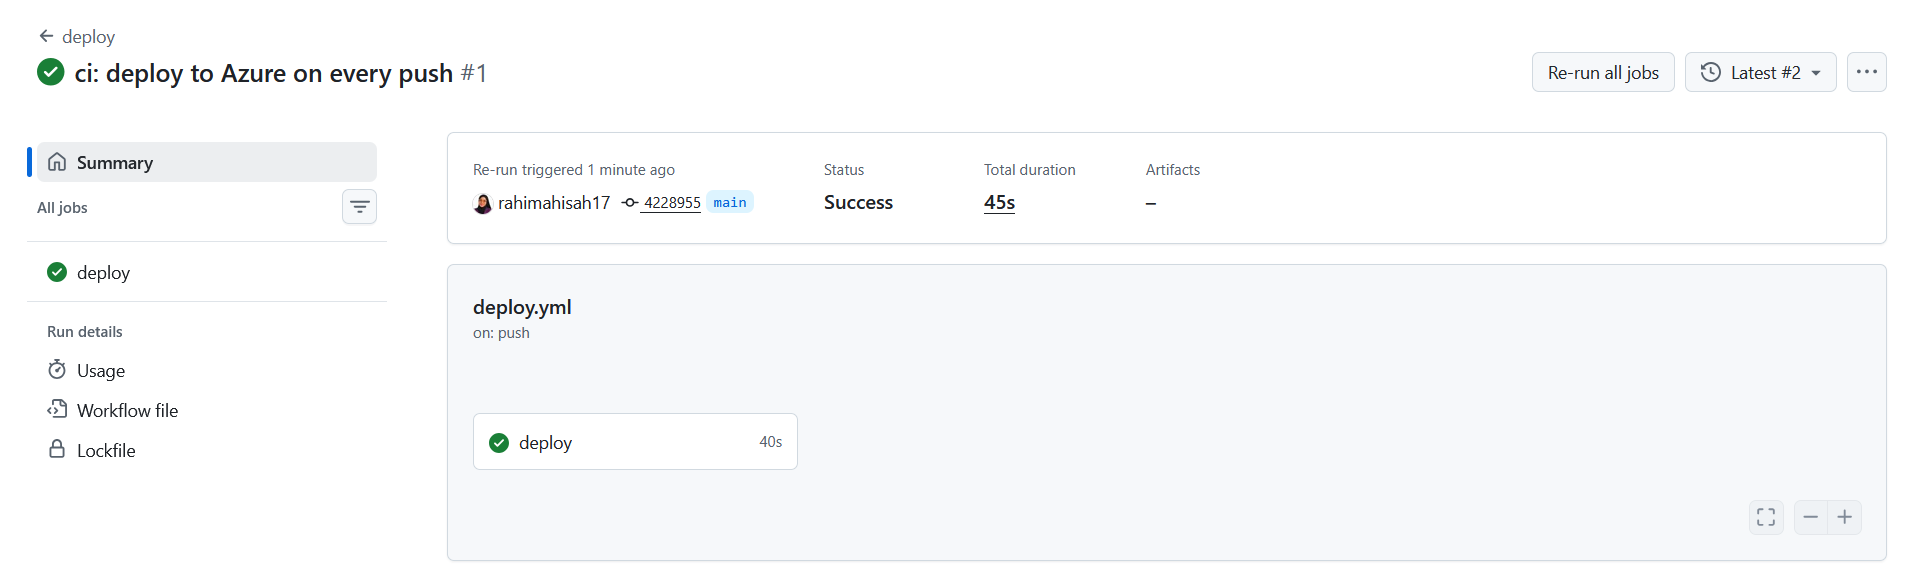
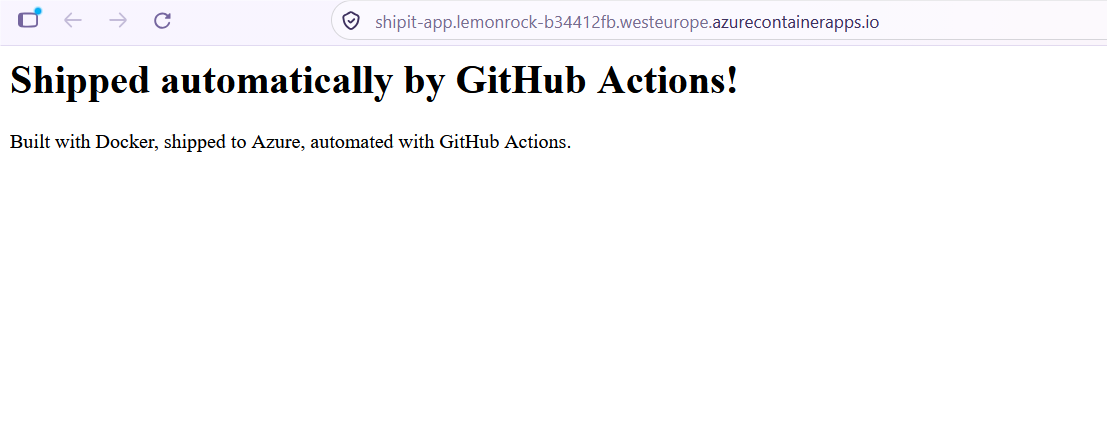
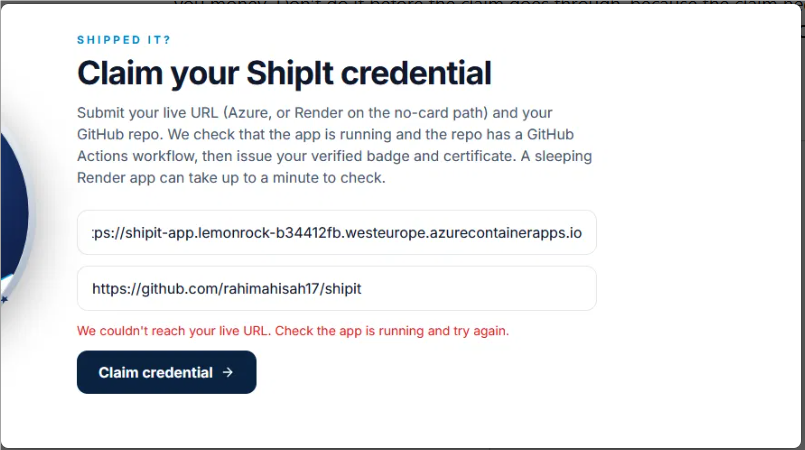
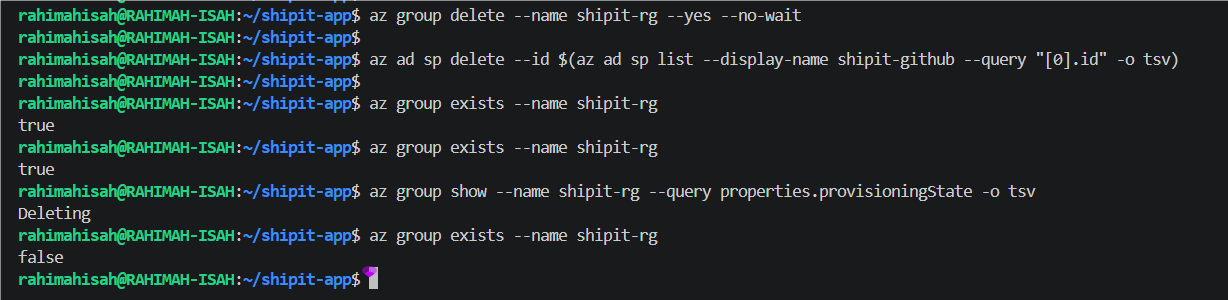
From Zero to Live: Containerise a Python App, Deploy It to Azure Container Apps and Automate It with GitHub Actions Introduction I recently completed the ShipIt Weekend: Deploy Your First App to Azure lab. It has three missions: 1. Build it: write a small web app, package it in a Docker image and run it locally. 2. Ship it: publish the image to GitHub Container Registry (GHCR) and run it on Azure Container Apps with a public HTTPS URL. 3. Automate it: add a GitHub Actions pipeline that builds, pushes and deploys on every push to main. I worked through everything from a Linux terminal (Ubuntu on WSL, on a Windows laptop). This is not a polished "everything worked first time" tutorial. I made a few mistakes along the way: I named my repository differently from what the lab expected, my pipeline failed on its first run, and my first credential claim was rejected. I've kept those moments in, because that is where most of the learning happens. What you'll need: - A GitHub account - An Azure account with an active subscription - Docker, Git and the Azure CLI installed in a Linux-style terminal (WSL works well on Windows) --- Mission 1: Build it, containerise a web app Step 1: Create the project and a Git repository mkdir -p ~/shipit-app && cd ~/shipit-app git init -b main - mkdir -p creates the folder (and doesn't complain if it already exists), and && runs cd only if that succeeded. - git init -b main turns the folder into a Git repository and names the first branch main. !Creating the project folder and initialising Git Step 2: Write the web app The app uses only Python's standard library, so there is nothing to install and less that can break. cat > app.py << 'EOF' import os from http.server import BaseHTTPRequestHandler, HTTPServer MESSAGE = "Hello from ShipIt Weekend!" class Handler(BaseHTTPRequestHandler): def do_GET(self): body = f"<h1>{MESSAGE}</h1><p>Built with Docker, shipped to Azure, automated with GitHub Actions.</p>".encode() self.send_response(200) self.send_header("Content-Type", "text/html; charset=utf-8") self.send_header("Content-Length", str(len(body))) self.end_headers() self.wfile.write(body) HTTPServer(("0.0.0.0", int(os.environ.get("PORT", "8080"))), Handler).serve_forever() EOF The cat > app.py << 'EOF' pattern is a here-document: everything up to the EOF line is written into app.py. The quotes around 'EOF' stop the shell from interpreting anything inside. The server listens on port 8080 (or whatever PORT says) and answers every request with a small HTML page. !Writing app.py with a here-document Step 3: Write the Dockerfile cat > Dockerfile << 'EOF' FROM python:3.12-slim WORKDIR /app COPY app.py . ENV PORT=8080 EXPOSE 8080 USER nobody CMD ["python", "app.py"] EOF - FROM python:3.12-slim starts from a small official Python image. - WORKDIR /app and COPY app.py . put the app in the container. - ENV PORT=8080 and EXPOSE 8080 set and document the port. - USER nobody runs the app as an unprivileged user instead of root. This is a small but important security habit. - CMD is the command that runs when the container starts. !Writing the Dockerfile Step 4: Build and run it locally docker build -t shipit-app . docker build reads the Dockerfile in the current folder (the .) and -t shipit-app names the image. The first build downloads the Python base image, so it took about 16 seconds for me. !Building the Docker image docker run -d --rm -p 8080:8080 --name shipit shipit-app curl http://localhost:8080 docker stop shipit - -d runs the container in the background, --rm deletes it when it stops, -p 8080:8080 maps the port to your machine, and --name shipit gives it a name. - curl fetches the page, and docker stop shuts the container down. The app answered with the HTML heading, so the container worked. !Running the container, testing it with curl and stopping it Step 5: Commit, create a GitHub repository and push git add app.py Dockerfile git commit -m "feat: containerised web app" Before pushing, I created an empty repository on GitHub. This is where I made my first mistake: I named it shipit, but the lab expects shipit-app. I didn't notice until much later, and it caused a confusing problem at the end (more on that in Mission 3). I connected my local repo to it like this: git remote add origin git@github.com:rahimahisah17/shipit.git git push -u origin main - git remote add origin <url> registers the GitHub repo under the nickname origin. I used the SSH URL because I already had SSH keys set up. - git push -u origin main uploads the main branch and links it to origin/main, so a plain git push works from now on. !Committing, adding the remote and pushing to the shipit repository > Tip: If you follow the lab, name your GitHub repository shipit-app from the start. The final credential check expects that name. --- Mission 2: Ship it, GHCR and Azure Container Apps Step 1: Set your GitHub username and link the image to the repo export GH_USER=rahimahisah17 echo "LABEL org.opencontainers.image.source=https://github.com/$GH_USER/shipit" >> Dockerfile git commit -am "chore: link image to repository" && git push - export GH_USER=... stores your username in a variable, so later commands don't need it typed out. It must be lowercase. - The LABEL line adds the repo's URL to the image as metadata, so GitHub can link the package to the repository. >> appends to the file (a single > would overwrite it). - git commit -am stages and commits changes to tracked files in one step. Small mistake #1: When I first ran echo $GH_USER it printed nothing. I had opened a new terminal session, and environment variables don't survive that. I ran export again and it was fine. If a command suddenly produces strange image names or URLs, check that your variables are still set. !Setting GH_USER, adding the LABEL and pushing Step 2: Log in to GitHub Container Registry GHCR is free for public images. Docker needs a personal access token to log in: 1. GitHub → Settings → Developer settings → Personal access tokens → Tokens (classic) 2. Generate a token with only the write:packages scope and a short expiry. echo YOUR_TOKEN | docker login ghcr.io -u $GH_USER --password-stdin --password-stdin makes Docker read the token from the pipe instead of from the command line, which is safer. I got Login Succeeded. !Logging in to ghcr.io (token blurred) > Security note: Treat the token like a password. Don't share it, don't screenshot it unblurred, and delete it when you've finished. Step 3: Build, tag and push the image docker build -t ghcr.io/$GH_USER/shipit-app:v1 . docker push ghcr.io/$GH_USER/shipit-app:v1 The tag has four parts: the registry (ghcr.io), the owner (your username), the image name (shipit-app) and the version (v1). Because the layers were cached, the build took 2.6 seconds. !Building the image with the GHCR tag The push uploaded each layer and ended with the image digest. !Pushing the image to GHCR Step 4: Make the package public A new GHCR package is private by default, as the badge on its page shows. !The package page showing it is Private Azure has to pull the image without a password, so it must be public. In the package's Package settings, go to the Danger Zone, click Change visibility, choose Public and type the package name to confirm. !Changing the package visibility to Public Afterwards the Danger Zone says "This package is currently public." !The package is now public Step 5: Sign in to Azure and prepare the subscription az login --use-device-code --use-device-code gives you a code and a URL to open in a browser, which works well in WSL, where a browser often can't open automatically. You'll see a couple of yellow warnings ("Attempted too soon" and a note about a tenant without subscriptions). They look alarming but are harmless: the login still completes and lists your subscription. !Signing in with a device code az extension add --name containerapp --upgrade az provider register --namespace Microsoft.App --wait az provider register --namespace Microsoft.OperationalInsights --wait - The first command installs the CLI extension that provides the az containerapp commands. Mine was already installed and up to date, which is fine. - The provider register commands switch on the services Container Apps needs (the Container Apps service itself and Log Analytics for logs). A new subscription must do this once. With --wait they print nothing when they succeed, and the prompt simply returns. !Installing the extension and registering the providers Step 6: Create a resource group az group create --name shipit-rg --location westeurope A resource group is a folder-like container for everything in this lab, which makes cleanup easy at the end. The JSON output showed "provisioningState": "Succeeded". !Creating the resource group Step 7: Deploy to Azure Container Apps az containerapp up \ --name shipit-app \ --resource-group shipit-rg \ --location westeurope \ --image ghcr.io/$GH_USER/shipit-app:v1 \ --ingress external \ --target-port 8080 This one command creates a Container Apps environment, a Log Analytics workspace and the app itself. - --image points at the image in GHCR (this works because the package is public). - --ingress external gives the app a public address. - --target-port 8080 tells Azure which port inside the container receives traffic. It's slow. Mine ran for over five minutes on a spinner while Azure created the environment and workspace. Don't press Ctrl+C: stopping halfway can leave half-created resources behind. When it finished, it printed the public URL. !Deploying with az containerapp up Step 8: Test the live app export APP_URL=https://$(az containerapp show --name shipit-app --resource-group shipit-rg --query properties.configuration.ingress.fqdn -o tsv) echo $APP_URL curl $APP_URL - az containerapp show fetches the app's details, and --query ... -o tsv picks out only the hostname as plain text. - $(...) drops that result into the variable. The warning about the extension altering the command's behaviour is harmless. curl returned my page from the public internet. !Reading the app URL and testing it with curl --- Mission 3: Automate it, CI/CD with GitHub Actions Step 1: Give GitHub Actions access, with least privilege The pipeline needs permission to update the app, but only that app's resource group. export SUB_ID=$(az account show --query id -o tsv) az ad sp create-for-rbac --name shipit-github --role contributor \ --scopes /subscriptions/$SUB_ID/resourceGroups/shipit-rg --json-auth - az ad sp create-for-rbac creates a service principal, an identity for automation (like a robot account). - --role contributor lets it create and update resources. - --scopes ... limits that to the shipit-rg resource group only. This is the least-privilege idea in practice. - --json-auth prints the credentials in the JSON format the GitHub login action expects. The output contains a clientSecret. You'll see a warning about it, plus a deprecation notice for --json-auth (it still worked for me). !Creating the service principal (secrets blurred) Copy the whole JSON and save it as a GitHub secret: your repo → Settings → Secrets and variables → Actions → New repository secret, with the name AZURE_CREDENTIALS. !Saving the JSON as the AZURE_CREDENTIALS secret (blurred) Step 2: Write the pipeline mkdir -p .github/workflows The folder must be named exactly .github/workflows, because that's where GitHub looks for workflows. !Creating the workflows folder cat > .github/workflows/deploy.yml << 'EOF' name: deploy on: push: branches: [main] workflow_dispatch: permissions: contents: read packages: write jobs: deploy: runs-on: ubuntu-latest steps: - uses: actions/checkout@v4 - name: Log in to GitHub Container Registry uses: docker/login-action@v3 with: registry: ghcr.io username: ${{ github.actor }} password: ${{ secrets.GITHUB_TOKEN }} - name: Build and push the image run: | IMAGE=ghcr.io/${GITHUB_REPOSITORY_OWNER,,}/shipit-app:${GITHUB_SHA::7} docker build -t "$IMAGE" . docker push "$IMAGE" echo "IMAGE=$IMAGE" >> "$GITHUB_ENV" - name: Log in to Azure uses: azure/login@v2 with: creds: ${{ secrets.AZURE_CREDENTIALS }} - name: Deploy to Azure Container Apps run: az containerapp update --name shipit-app --resource-group shipit-rg --image "$IMAGE" EOF What the workflow does: - on: runs it on every push to main, and lets you start it manually (workflow_dispatch). - permissions: lets it read the code and write packages. - Log in to GHCR: uses a temporary built-in token, GITHUB_TOKEN, so no personal token is needed in the pipeline. - Build and push: tags the image with the first 7 characters of the commit ID, so every deployment is traceable to a commit. - Log in to Azure: uses the AZURE_CREDENTIALS secret. - Deploy: az containerapp update points the app at the new image. !Writing the workflow file > The terminal in this screenshot looks jumbled because of how it displayed my paste, but the file itself was fine, as the workflow runs below prove. Step 3: Change the app and push I changed the app's message so the pipeline had something new to deploy: sed -i.bak 's/Hello from ShipIt Weekend!/Shipped automatically by GitHub Actions!/' app.py && rm app.py.bak grep MESSAGE app.py git add .github/workflows/deploy.yml app.py git commit -m "ci: deploy to Azure on every push" git push - sed -i.bak 's/old/new/' does an in-place find-and-replace and keeps a backup, which rm then deletes. - grep MESSAGE app.py confirms the change before I committed. !Editing app.py, committing and pushing Step 4: The first pipeline run fails I opened the Actions tab and the run had failed after just 19 seconds. !The first workflow run fails I opened the failing job and found the red step: Build and push the image. The image had built fine, but the log ended with: denied: permission_denied: write_package Error: Process completed with exit code 1. Why it happened: I had first pushed the shipit-app image from my laptop using my personal token, so the package belongs to my account. The workflow's built-in GITHUB_TOKEN is a different identity, and it had no permission to write to that existing package. Step 5: The fix, give the repository write access to the package In the package's Package settings → Manage Actions access, I clicked Add Repository, chose my repo and gave it the Write role. That grants only this one repository permission to push to this one package. !Giving the repository Write access to the package Then I clicked Re-run all jobs on the failed run, and this time it passed in 45 seconds. !The re-run succeeds Step 6: Verify the deployment curl $APP_URL The response now showed the new heading, "Shipped automatically by GitHub Actions!", which proves the pipeline built, pushed and deployed the change without me touching Azure. !curl shows the new message; the remote URL is updated after the repo rename And in the browser: !The live app in the browser Step 7: The repository name problem and claiming the credential The lab ends by asking you to claim a verified credential, using your live URL and the repository https://github.com/<your-username>/shipit-app. My repository was called shipit, not shipit-app. My first claim attempt failed with the message "We couldn't reach your live URL". The app was up and curl returned the page, so I first suspected Azure had scaled the app to zero while idle and the checker gave up before it woke. I checked the app with curl and got a successful response. The real problem turned out to be the repository name. The form still contained .../shipit. After I renamed the repository to shipit-app and submitted the matching URL, the claim worked. The error message pointed at the wrong thing, so the lesson is: when a validation message doesn't make sense, re-check every input against the instructions, not just the one the message mentions. [Screenshot placeholder: the failed claim showing "We couldn't reach your live URL"] To rename the repo, I went to the repo's Settings → General → Repository name, entered shipit-app and clicked Rename. GitHub redirects the old name, and the secret, workflow and Actions history all move with the repo. Then I updated my local remote: git remote set-url origin git@github.com:rahimahisah17/shipit-app.git git remote set-url changes the address stored for origin, so future pushes go to the renamed repo. !failed claim Step 8: Clean up Deleting what you no longer need is how you make sure nothing is ever charged: az group delete --name shipit-rg --yes --no-wait az ad sp delete --id $(az ad sp list --display-name shipit-github --query "[0].id" -o tsv) az group exists --name shipit-rg - az group delete removes the resource group and everything in it: the app, its environment and the logs. --yes skips the prompt and --no-wait returns immediately while Azure deletes in the background. - az ad sp delete removes the service principal. Deleting the resource group does not remove it. - az group exists prints true while the group is still there and false once it's gone. Deletion takes a few minutes. I got true twice, then Deleting from az group show, then finally false. I also deleted the AZURE_CREDENTIALS secret and the personal access token. !Cleaning up the Azure resources --- Troubleshooting summary | What happened | Cause | Fix | |---|---|---| | echo $GH_USER printed nothing | I opened a new terminal, and variables don't persist between sessions | Run export GH_USER=... again | | Package couldn't be pulled by Azure | GHCR packages are private by default | Set the package visibility to Public | | az containerapp up seemed stuck | Creating the environment and Log Analytics workspace takes several minutes | Wait, and don't press Ctrl+C | | Pipeline failed with permission_denied: write_package | The package was first pushed with my personal token, so the workflow's GITHUB_TOKEN couldn't write to it | Add the repo under Manage Actions access with the Write role, then re-run | | Credential claim said "couldn't reach your live URL" | My repo was named shipit, not shipit-app | Rename the repo to shipit-app and use the matching URL | --- Lessons learned - Follow naming conventions in guided labs. My shipit vs shipit-app mismatch caused the longest detour. - Read the failing step, not just the red X. The Actions log told me exactly what was wrong: write_package. - Least privilege pays off. The service principal can only touch one resource group, and the repo has write access to only one package. - No secrets in code. The Azure credentials live in an encrypted GitHub secret, and the pipeline's registry login uses a temporary token. - Clean up. Deleting the resource group, the service principal, the secret and the token means nothing keeps running or stays exposed. One thing I'd still tidy up: my Dockerfile's LABEL line still points at the old repository name (shipit). GitHub redirects the old name, so nothing broke, but updating it would be cleaner. --- Summary In one weekend-sized lab I went from an empty folder to a live HTTPS app on Azure with a working CI/CD pipeline: 1. I wrote a tiny Python web server and packaged it in a Docker image that runs as a non-root user. 2. I pushed the image to GitHub Container Registry, made it public, and deployed it to Azure Container Apps with the Azure CLI. 3. I created a least-privilege service principal and a GitHub Actions workflow, so every push to main builds, pushes and deploys automatically. 4. I debugged a package permission error and a repository naming mismatch, then cleaned up all the Azure resources. The app itself is simple, but the workflow behind it is the real thing: containers, a registry, cloud hosting, least-privilege access and automated deployment. If you're learning DevOps or cloud, I'd recommend trying it yourself, mistakes included. The code is on GitHub: rahimahisah17/shipit-app Thanks for reading! If you've hit similar errors in your own pipelines, I'd love to hear how you solved them in the comments.
Use direct imports or add patch_sklearn() to accelerate supported estimators in existing workflows. Automatic CPU/GPU routing included. Available now in alpha. Open source, Apache 2.0. pip install mlx-learn Code + benchmarks: tabulai/mlx-learn 4/4
built by seppegadeyne on GitHub: seppegadeyne/hermes-themes-pack catalog page: hermes-agent.nousresearch.com
👇 「PageCrate」はこちら(自作素材のデモですぐ試せます) day81.rairakku.com ソースコードも公開しています haranishi/pagecrate
Still putting off that Immich import? I've been working on making it easier! Hey everyone, back with another update to my immich-go web UI. The big change: the guided download can set up immich-go for you and run a test before you decide to upload. No separate manual install on supported computers. I've also added advanced options, a log reader to help explain the results, and given the UI a proper cleanup. Thanks to everyone who tried it, starred it, or told me what was confusing. A lot of this came from those comments. You still launch the script in Terminal or PowerShell, and it always asks you to type UPLOAD before anything is uploaded. Try it · GitHub Anything that would make it easier, or still feels confusing? lmk
How we solved zombie compilers, runaway retry loops, and transcript disk thrashing in multi-agent coding workflows Hey everyone, Over the last few months, our team has been running heavy multi-agent workflows using autonomous coding frameworks like Google Antigravity, Cursor, and custom CLI bridges. Moving from single prompt generation to running 3 or 4 autonomous subagents simultaneously taught us that the real bottleneck in agentic coding is almost never the model itself. The real nightmare is operating system level process hygiene and token loop control. Here are three concrete engineering problems we kept hitting, how we solved them under the hood, and what we learned. 1. The Zombie Compiler Problem (and why standard process kill fails) When a subagent runs a test suite or dev server, it often invokes child binaries like Vitest, tsx, pytest, or Webpack. If the agent crashes, hits a timeout, or gets cancelled, standard Node.js or Python process killing only targets the top parent PID. The child compiler keeps running in the background. Within a few hours of development, you end up with twenty orphan node.exe or python processes locking TCP ports, holding file handles, and pinning your CPU at 100%. How we solved it: We implemented an explicit Finite State Machine with a strict process tree killer. On Windows, we invoke taskkill with the /T flag to recursively walk the job object tree. On Unix systems, we spawn processes in their own process group and send termination signals to the negative process group ID (-PGID). We also added an automatic FIFO queue that strictly caps concurrent subagents to 6, preventing local machine resource exhaustion. 2. Transcript Disk Thrashing (Why standard file watchers break) Autonomous coding agents generate huge JSONL session logs. In multi-hour workflows, transcripts easily exceed 50 to 100 megabytes. Most developers plug in standard libraries like chokidar or fs and re-read the file upon changes. When a file is 80 MB and an agent appends fifty tokens every second, re-reading or scanning from line zero causes quadratic disk I/O, crushes NVMe write cycles, and introduces lag into the UI. How we solved it: We built an incremental chunked reader using low level file descriptors. In SQLite we store the exact byte offset where the last read finished. When the file watcher fires, we only read the newly appended slice using fixed 64 KB buffers. The tricky edge case here is multi-byte UTF-8 character boundaries. If a two-byte Cyrillic character or a four-byte emoji lands right across the 64 KB boundary, naive JSON parsing blows up with a syntax error. Our stream reader holds split trailing bytes in an in-memory buffer and stitches them onto the next chunk before deserializing. 3. The Infinite Retry Death Loop When an agent encounters a difficult architectural deadlock (for example, a subtle race condition in an asynchronous event bus), it almost never admits defeat. Instead, it tries the same broken diff slightly reworded, fails the build again, and repeats until your API budget is drained. How we solved it: We built an automated circuit breaker. If an agent fails twice on the exact same task, the supervisor immediately pauses execution. Instead of letting it guess a third time, the engine scrubs sensitive file paths and compiles an 18-point context pack containing the problem summary, the two failed diffs, and the isolated 30-line code snippet. We then escalate that pack to Gemini 4 Argon for high level architectural diagnosis, paste the solution back into the supervisor, and hand the implementation back to fast Flash specialists. Open Sourcing the Tool: Antigravity Apex We packaged this entire supervisor, the 64 KB stream reader, and a local web dashboard into an open source project called Antigravity Apex. It runs 100% locally on localhost with SQLite in WAL mode. There is zero external telemetry and zero data collection. Here is the open source GitHub repository: fen3211/antigravity-apex
Show HN: DeskAccess – Open-source remote access for Raspberry Pi
Earth, measured — October 31, 2026: day 19 of the permanent record Yesterday the world's public instruments published, and Orbital Network kept: 86,341 events — including 86,099 FIRMS reports and 191 EMSC reports — and 70,424 measurements: 7,069 tide readings (noaa_coops), 4,544 swpc readings, 8,645 glm readings, 1,182 river readings (usgs_nwis), 6,799 ocean buoy readings (ndbc), 687 igra readings, 41,498 ghcn readings. Where independent sources described the same event, the record linked them: 38 linked groups across 76 reports. 0 incoming items were held out as implausible and quarantined — kept out of the record, and counted, not silently dropped. The day is archived, hashed, and public for anyone to check: mel-gregory/orbital-record (archived file SHA-256 begins d7d6c8b2). Live broadcast of Planet Earth. Permanent record of its measurements.
notesd 1.0: self-hosted notes with native mobile apps (now with spaces, multi-user, and an offline web app / PWA ) A while back I posted about notesd, a notes app that isn't trying to be a second brain. The response was much bigger than I expected, so thank you. A lot of what's in this release came from your comments. It's still the same idea: one server binary with SQLite inside, offline-first Android and iOS apps, tags, full-text search, and locked (end-to-end encrypted) notes. cassiozen/notesd What's new: - Spaces: keep separate contexts like Work and Personal apart, each with its own notes and tags. - Multiple accounts: host a few people (family, friends) on one server. Each account gets its own database. - Markdown mirror: --mirror-dir keeps a folder of .md files updated as you write, one folder per space. Point Syncthing, git or your backups at it. Your notes are never locked in. - Offline web app: install it as an app, and it keeps a full copy of your notes in the browser, so it opens and saves edits with no connection. - Docs site: notesd.app Feedback welcome and appreciated, as before.
Lets test one more Grok alternative, but for teams, vstorm-co/agenticos
Revisited 12/39: Fibonacci Retracement & Extension. Anchor an early swing in a binary token, use retracement levels as staged entries. Test it by fixing the swing rule first. Main failure: levels aren't support, and it settles at $0 or $1. Not advice. github.com/Polytutor-AI-Labs/polymarket-strategy-… t.co
This turned out well github.com/federaa/recipes/tree/main/Cremini%20Mu… t.co
And I have lectures w/ video and assignments that teach a subset of that course in my bfx-workshop course: github.com/genome/bfx-workshop/tree/master/archiv… github.com/genome/bfx-workshop/tree/master/archiv… github.com/genome/bfx-workshop/tree/master/archiv…
Why Your "Real-Time" Chat App Duplicates Messages on Reconnect (and the Fix) Your chat screen reconnects after a dropped network, and now Message 47 shows up twice. Nobody touched the UI code. The bug is almost always in how the client resumes after a WebSocket disconnect — and it's one of the first things interviewers probe on an "design a chat app" system design question. The naive reconnect Here's the version most chat clients start with: class ChatConnection(private val scope: CoroutineScope, private val dao: MessageDao) { private var backoffMs = 1000L fun connect() { socket = client.newWebSocket(request, object : WebSocketListener() { override fun onOpen(ws: WebSocket, response: Response) { backoffMs = 1000L // "we're connected, just wait for messages" } override fun onMessage(ws: WebSocket, text: String) { scope.launch { dao.insert(parseMessage(text)) } } override fun onFailure(ws: WebSocket, t: Throwable, response: Response?) { scope.launch { delay(backoffMs) backoffMs = (backoffMs * 2).coerceAtMost(30_000) connect() } } }) } } This looks reasonable, and it works perfectly in the happy path — stay connected, receive messages, insert them. The bug only shows up under exactly the condition a chat app spends a lot of its life in: the connection drops and comes back. Why duplicates happen A WebSocket reconnect is not a resume — it's a brand new connection. The server has no idea what the client already has. Two very ordinary scenarios both produce duplicates with the code above: 1. The server sent a message right as the connection dropped. The client never got it, reconnects, and the server (reasonably) assumes it needs to replay something — if your backend's replay logic is at all generous about the window, it can resend messages the client actually did receive just before the drop. 2. The client's own onFailure handler fires more than once in quick succession (a flaky network can do this), and two reconnect attempts both succeed, each pulling a backlog. dao.insert() on a plain, non-deduplicating table just appends both copies. The database doesn't know Message 47 already exists — because nothing told it what "the same message" even means. The fix: a server-assigned ID the client resumes from, and a database that rejects duplicates Two changes, and they're both small: 1. Every message gets a durable ID, and the client remembers the last one it has. override fun onOpen(ws: WebSocket, response: Response) { backoffMs = 1000L scope.launch { val lastId = dao.lastMessageId() // read from the local DB, not an in-memory variable ws.send("""{"resumeFrom": $lastId}""") } } The client isn't saying "send me whatever you think I'm missing" — it's saying exactly which ID it already has, read from the database that survives process death, not an in-memory field that resets on every reconnect. 2. The insert is idempotent, keyed by that ID. @Dao interface MessageDao { @Insert(onConflict = OnConflictStrategy.IGNORE) suspend fun insert(message: MessageEntity): Long @Query("SELECT MAX(serverId) FROM messages") suspend fun lastMessageId(): Long } OnConflictStrategy.IGNORE on a serverId primary key means a redelivered message is a silent no-op, not a duplicate row. This is the part that actually matters — the resume protocol reduces how often duplicates get sent, but the database is what makes a duplicate harmless when (not if) one slips through anyway. Relying on the resume logic alone to be perfect is how this bug keeps coming back every time someone touches the reconnect code. Why this is a system design question, not just a bug "Design a chat app" interviews love this because the happy-path client is genuinely easy to write — almost every candidate gets that part right in the first two minutes. What separates a senior answer is naming the failure mode before being asked: what happens during the disconnect window, and what guarantees the design makes about that window specifically. A design that silently assumes "the socket delivers everything exactly once" hasn't actually designed for an unreliable network — it's designed for a network that doesn't exist. The same pattern — a durable position the client resumes from, plus an idempotent write — shows up again almost anywhere a mobile client talks to a server over an unreliable connection: background sync, push notification delivery, live location updates. Once you've built it once, you start recognizing it everywhere. --- I put together a full question bank of prompts like this one — 30 "design X" questions that come up in real Android system design interviews, each with a worked answer and a Kotlin code blueprint, not just bullet points. The free sample on GitHub walks through designing an offline-first note-taking app (the Google Keep-style one) end to end: github.com/yogirana5557/android-digital-products/…. The full set — including chat/reconnect, live location sharing, caching, app architecture at scale, and five full mock walkthroughs (Instagram's feed, a WhatsApp-style chat app, Dropbox-style sync, Uber-style tracking, Spotify-style offline downloads) — is a ₹599 PDF on Gumroad: yogirana.gumroad.com.
Your AI agent rounds Japanese consumption tax per line. Japan says round once per rate. <!-- tags: python, ai, mcp, japan --> If you let an AI agent draft invoices for Japanese customers, check one thing: how it rounds consumption tax. Since October 2023, a "qualified invoice" in Japan must round the tax once per invoice for each tax rate, not line by line (National Tax Agency pamphlet, Japanese). Language models tend to compute the tax on every line and add it up. On a small invoice that is already off by two yen: | Item (10%, tax excluded) | Amount | Tax rounded per line | |---|---|---| | Copy paper | 1,999 | 199 | | Toner | 2,999 | 299 | | Pens | 999 | 99 | | Total | 5,997 | 597 (should be 599) | Two yen sounds small. For the accounting team it means the invoice does not match their books, and someone has to find out why. A checker that computes instead of guessing JP Invoice Check is a small MCP server, CLI and Agent Skill (Python standard library only, no network, MIT). It checks the six items a qualified invoice must carry, the 8% reduced-rate marks, the totals per rate, and the rounding rule. It names the per-line mistake (E_TAX_LINE_ROUNDING) separately from other wrong numbers, and every message comes in English and Japanese. Keep the checker out of the agent's reach A reader pointed out that a check is worth little if the agent being checked can rewrite it. Version 0.2.0 follows that advice: - The company rule (rounding method, tax included or excluded) is loaded once, when a person starts the server. No tool call can change it. - A rounding field inside the invoice is ignored while a rule is loaded. - Every result carries a sha256 fingerprint of the checking code. pip install "git+https://github.com/ayatrader/jp-invoice-check" {"mcpServers": {"jp-invoice-check": {"command": "jp-invoice-check", "args": ["--policy", "/etc/company/invoice_policy.json"]}}} For an invoice a supplier sent you (role: receive), a different rounding method is legal, so it is a warning that says which method they used and the difference in yen. Try it ayatrader/jp-invoice-check Limits: it does not check whether a registration number is currently registered (that needs the NTA site), and it does not cover simplified invoices. It is a checking tool, not tax advice.
Custom robo 3ds recomp It would be awesome if we could get a QR code for this alexander-clawthorne/custom-robo-recomp Thank you to everyone involved!
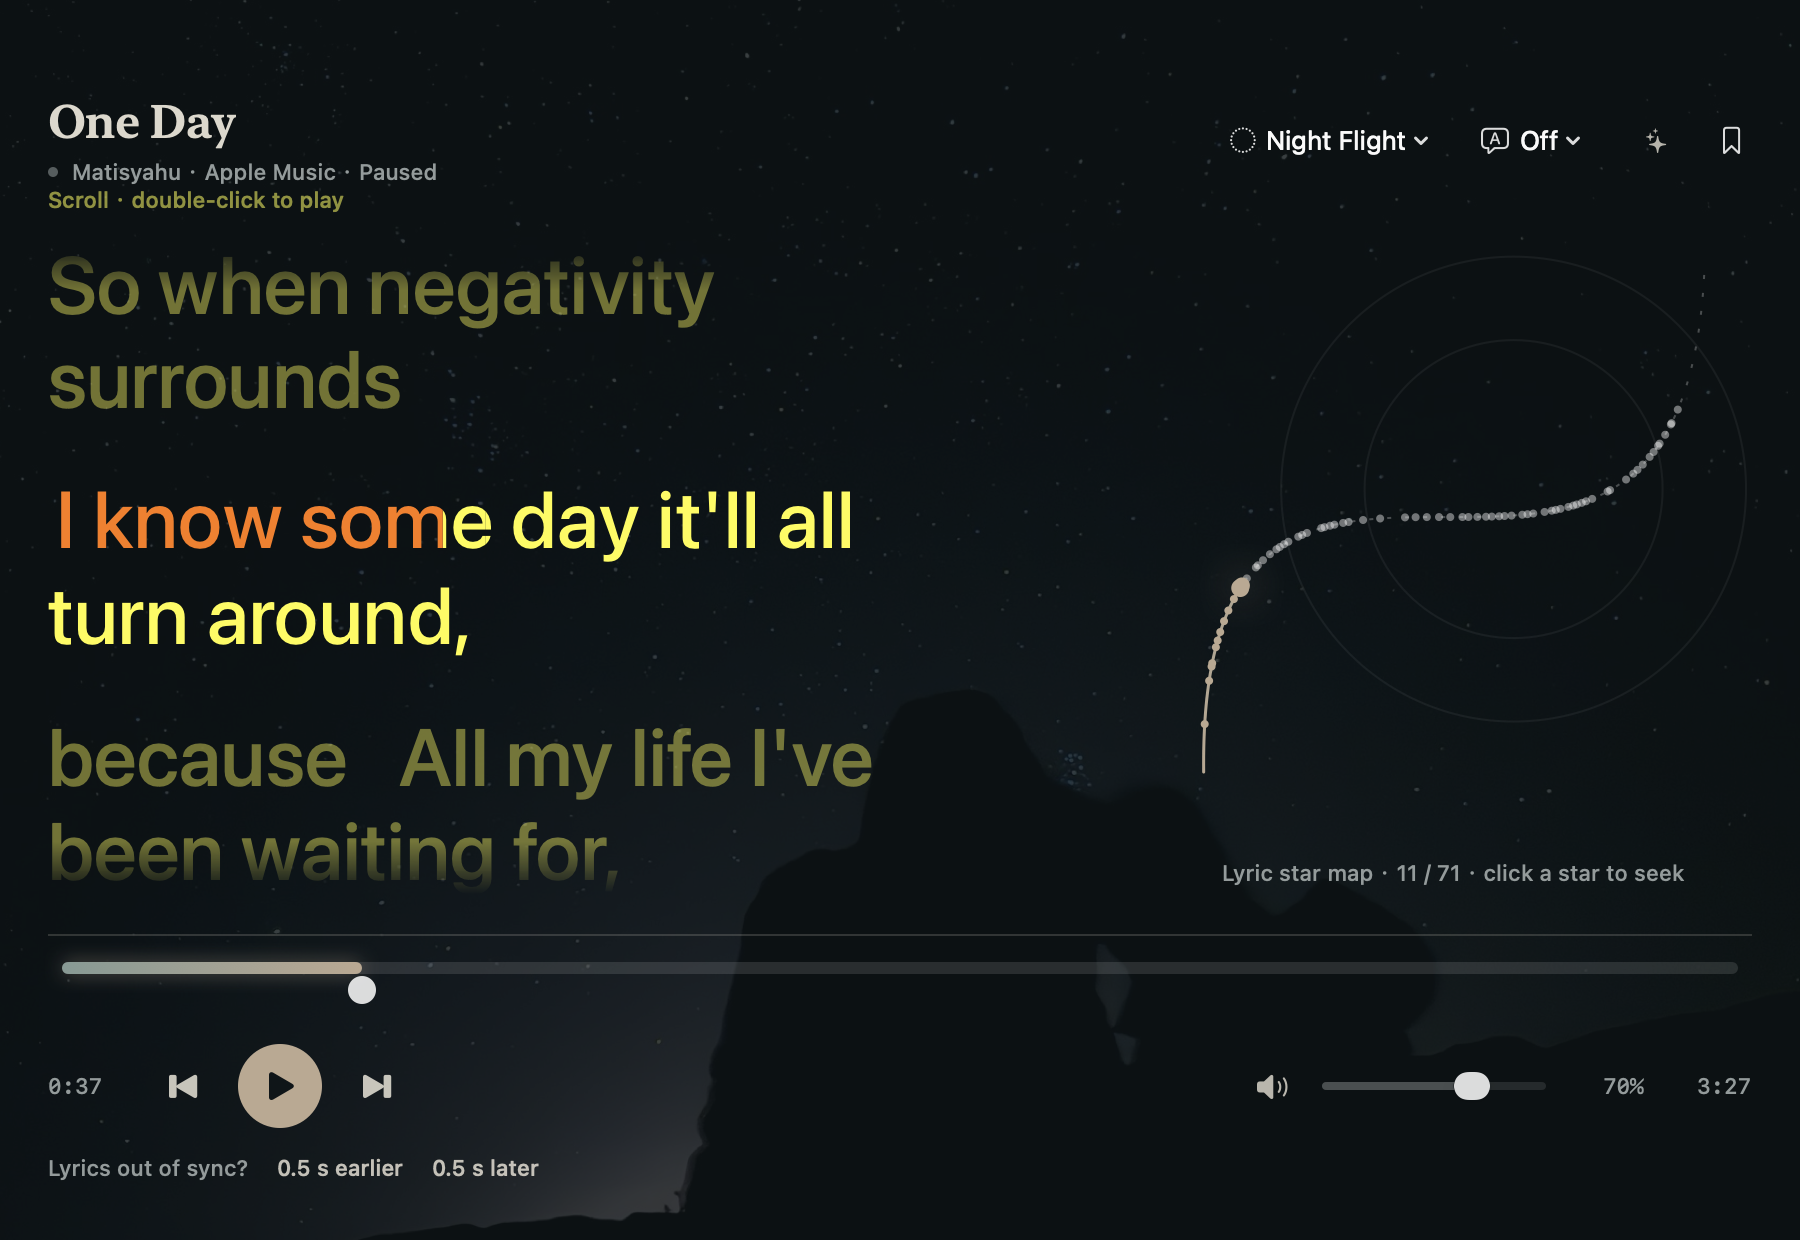
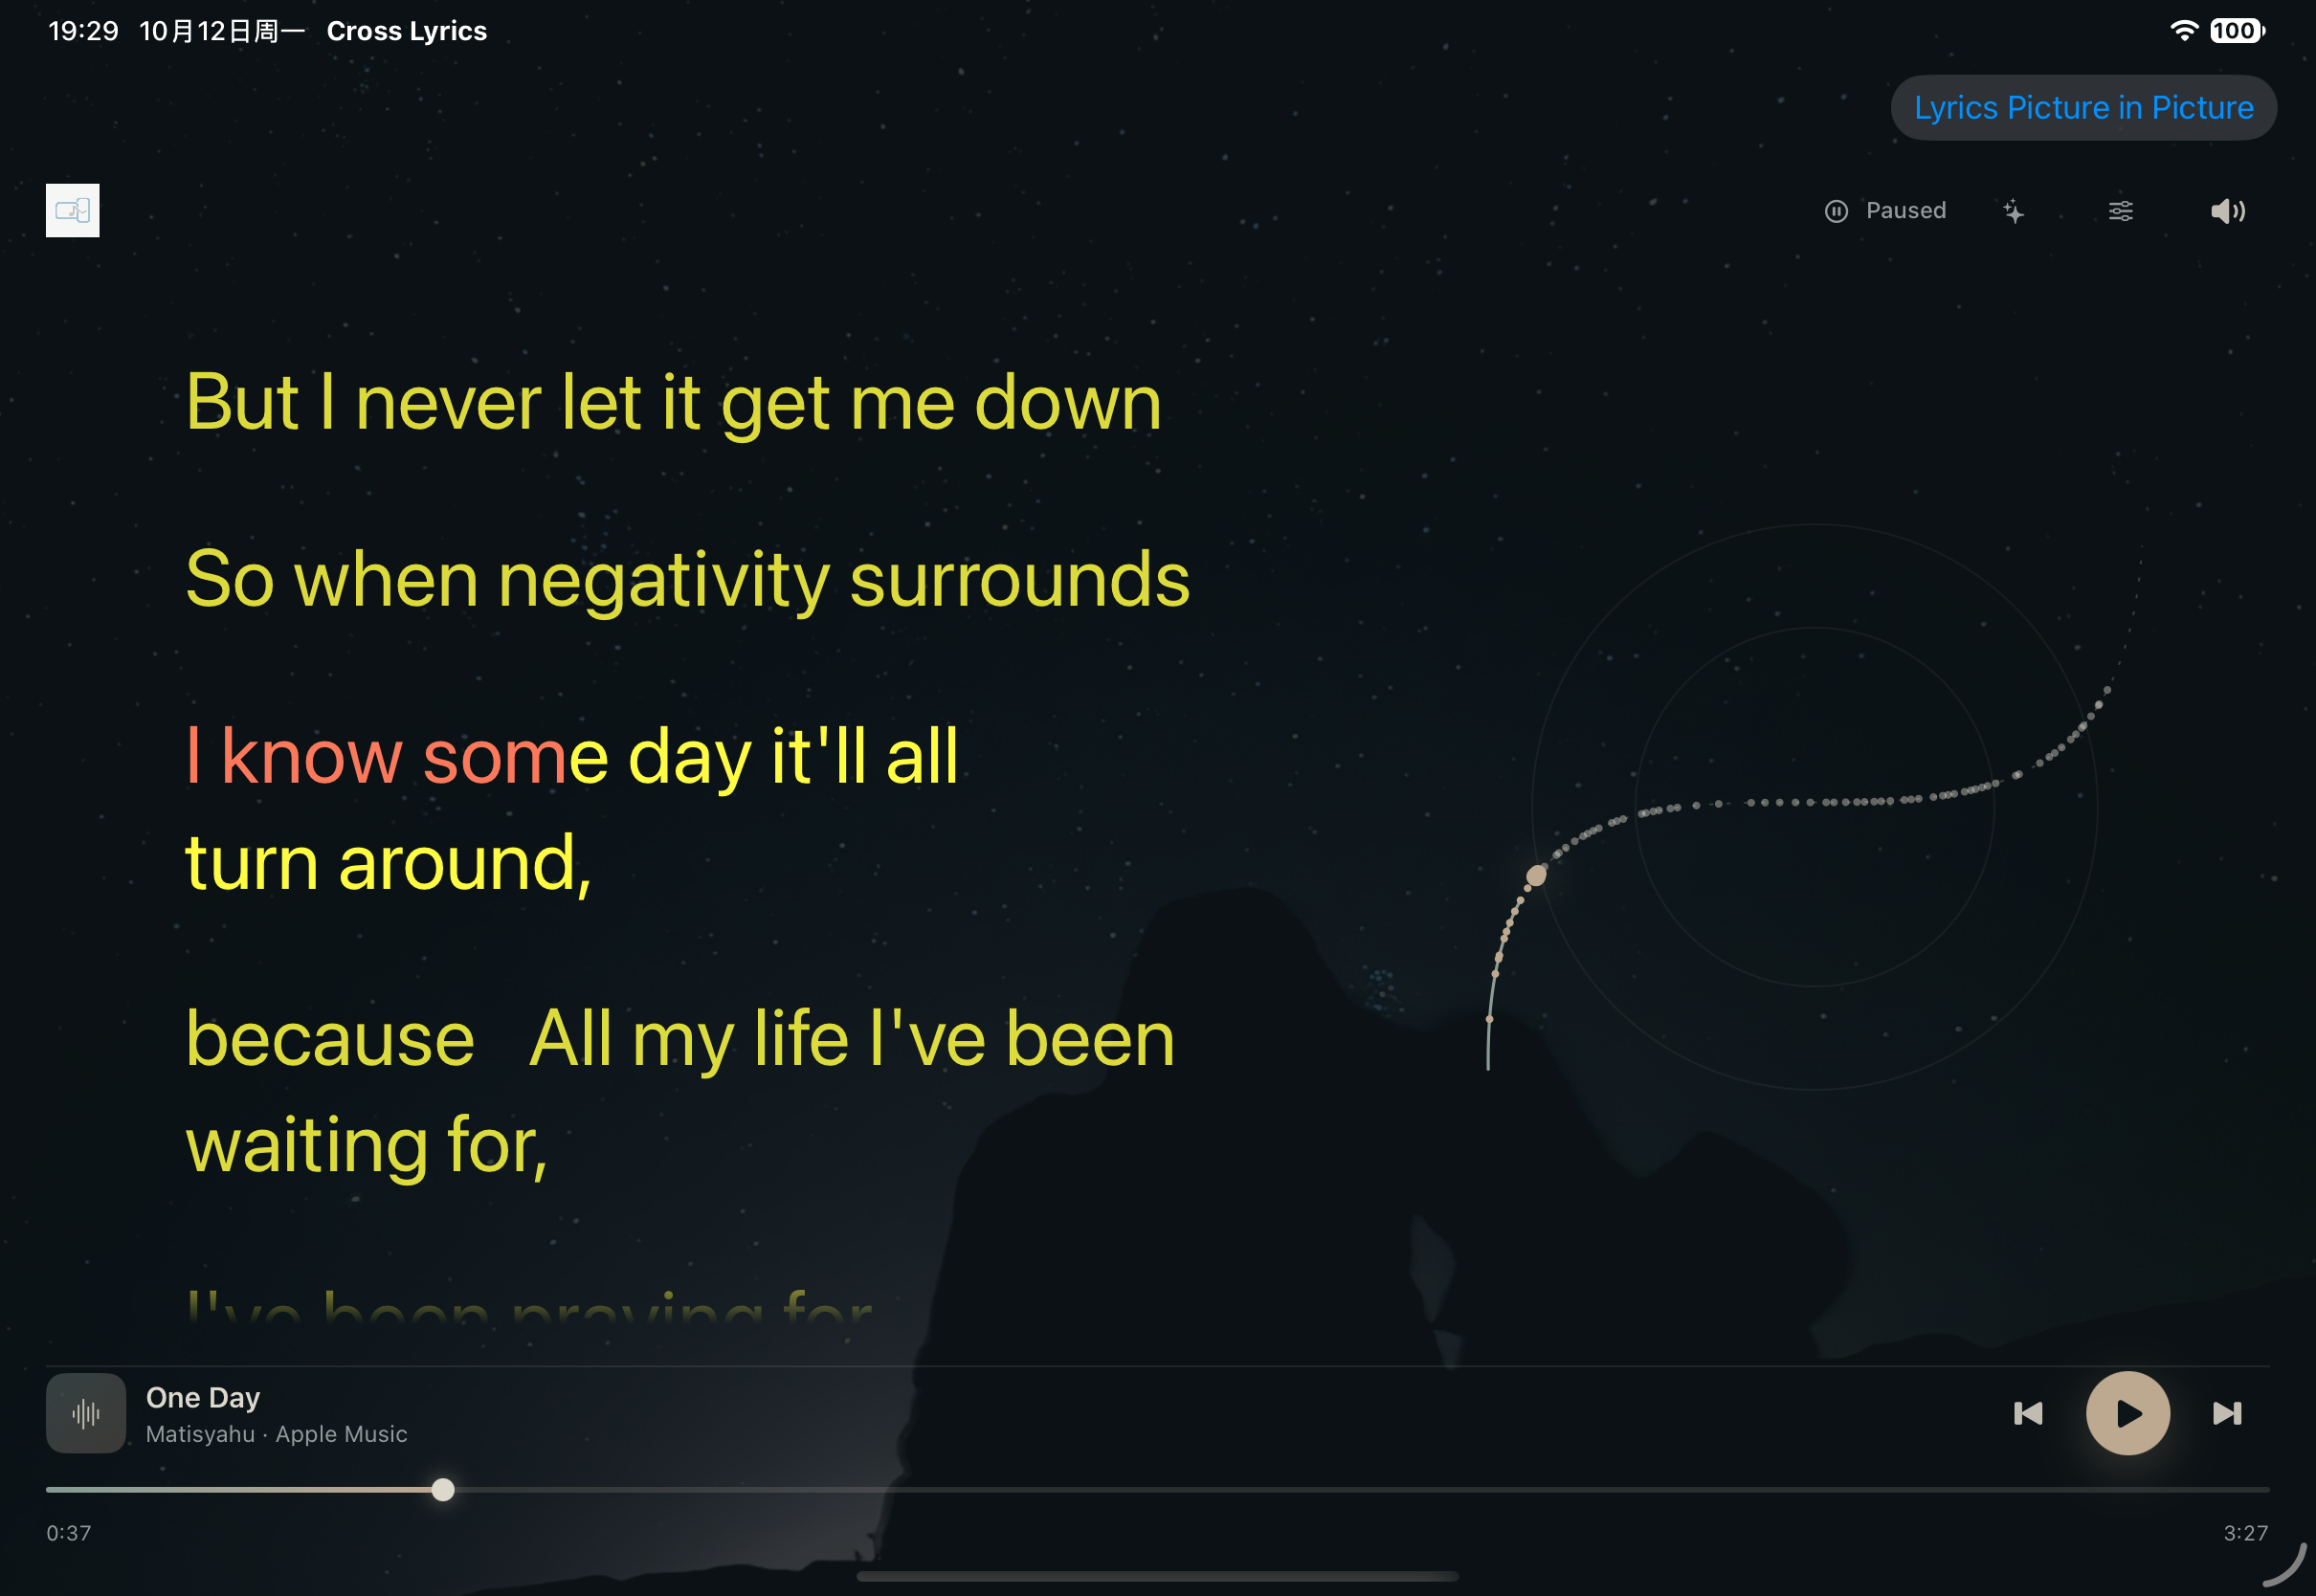
做了个跨屏歌词 App:电脑放歌, iPad 在旁边跟歌词 大家好,来介绍一下我做的 Cross Lyrics ,一款 Mac 、iPhone 、iPad 上的跨屏歌词 App 。 工作时电脑放着歌,有时就想看清某一句歌词。Cross Lyrics 可以把当前这句放在 Mac 屏幕顶部,也可以把 iPad 放在旁边,单独显示歌词、跟着播放进度走。音乐继续在原设备播放,跨设备同步需要在同一局域网里。 Apple Music 和 Spotify 都能用。Mac 上也能导入本地音频和 LRC 文件。歌词有逐词时间数据时,可以逐词跟着亮。听外语歌时,可以并排看 AI 翻译,也有支持语种的跟唱读音。 这是付费 App 。AI 功能可选,需要自行配置服务,服务商可能另外收费。 主要用 Swift / SwiftUI 做的。想听听大家对跨屏看歌词这个用法的看法,尤其是边工作边听歌的场景。 官网: crosslyrics.com 国区 App Store: apps.apple.com 开发者 GitHub 个人主页: github.com/chengzi0103   开发者自荐,文字有 AI 辅助整理。
@Nileshblog Timeouts plus breakers saved us too. The one we added on top sits outside the agent: if a critical alert fires overnight and nobody ACKs, a pre-approved, stop-only action halts the service instead of letting it keep retrying. getstanch/stanch
How to install: 1. Download the project from GitHub. 2.Follow the setup instructions. 3.Add your own compatible game dump. 4. Build and launch the game. Requirements: Apple Silicon Mac, macOS 26+ and a compatible game dump. GitHub + Installation Guide: xPXavierx/gow3-macos-arm64
#ai #codex I am looking for a forum to do a #postmortem on a failed project by @openai for @joinHandshake. The resulting repo, complete with ChapGPT retrospective is at sharpninja/wordpairs
@junaidcoder @hero_ui Yes they are, we constantly ship bug fixes / improvements heroui-inc/heroui
Three papers on the Grothendieckian Programme — an overview, twelve theses and 57 open problems for mathematics and machine reasoning, with problem cards, problems.json and Lean statements. AlienMuse/grothendieckian-problems 2/13
@malakhovdm @Nehakathare That check misses the failures that hurt, like a full disk or a silent invariant break. We alert on the invariant itself, and if a critical one goes un-ACKed, a pre-approved, stop-only action fires. Critique welcome: getstanch/stanch
Vape v4.21 mobile port (It have some bugs idk) Hey guys, I just made a Vape V4.21 based Ghost Client optimized for mobile launchers! Features: - Smooth Vape V4.21 Grid GUI (Works perfectly on mobile screens) - Highly optimized AutoClicker, Reach, and Velocity for mobile delay - Stable FPS, no lags Download & How to use: Ilikecatsomg/vape-mobile Note: You need to map a custom button (like RSHIFT) in your launcher settings to open the GUI. ⭐ Leave a STAR on GitHub if you like it! If this gets good feedback, I will update it to support ALL versions! Processing img ib3exj9ll7zh1...
lineread: a reimplementation of the GNU-licensed C readline as MIT-licensed in Rust historically, rewriting in a different language was solid proof against plagiarism, but this is clearly intended to be plagiarized and it works, very well mitsuhiko/lineread
@codecrackx15 @dhh yeah! @dhh have you seen my project? we have omarchy working on a handful of pixel phones. lots of videos and screenshots shared over the last couple weeks. omamobile.org derekross/omarchy-mobile
Probamos Kling 4.0 en Comfy Cloud: comfy.org Prompts, costos y resultados en noma-lab: github.com/nomastudioai/noma-lab/tree/main/lab/20…
@MrJames_29 Good test. Our answer: a stop only promises no new work starts, so in-flight writes have to be idempotent or checked against an invariant afterward. We built our un-ACKed-alert stop the same way: halt only, never roll back. getstanch/stanch
My agent managed to reach up to 99.7% storage savings on @ApacheParquet edits in @duckdb !! Using my fav technique, still unreleased duckdb#27911 t.co
Git et GitHub pour débutant : le guide pratique, de la première commande à la pull request L'essentiel en une minute Git et GitHub ne sont pas la même chose : Git est un logiciel installé sur votre ordinateur qui enregistre l'historique de vos fichiers, GitHub est un service en ligne qui héberge des dépôts Git et sert à collaborer. On peut utiliser Git sans GitHub, pas l'inverse : même quand vous modifiez un fichier dans le navigateur, c'est Git qui enregistre le commit côté GitHub. Ce guide suit un vrai parcours de débutant : installation, premiers commits, branches, publication, pull request, conflit et retour en arrière. Chaque séquence de commandes, hors commandes visant GitHub, a été exécutée d'un bout à l'autre, dans l'ordre de l'article, dans un dépôt d'essai sous Git Bash, et les sorties affichées sont les vraies, en anglais comme vous les verrez (seuls les chemins et l'adresse e-mail sont anonymisés). Les faits sur GitHub viennent de sa documentation officielle, consultée les 1er et 2 novembre 2026. > Points clés > > - Git enregistre l'historique en local ; GitHub, GitLab ou Codeberg hébergent une copie partagée de ce dépôt. > - Le cycle de base tient en quatre commandes : git status, git add, git commit, git push. > - GitHub n'accepte plus le mot de passe du compte pour les opérations Git depuis le 13 août 2021 : il faut une clé SSH, un token ou Git Credential Manager. > - git revert annule un commit déjà publié sans réécrire l'historique ; git reset est réservé aux commits restés sur votre machine. > - Les messages d'erreur de Git donnent presque toujours la commande à lancer : lisez les lignes hint:. --- Git et GitHub : quelle différence ? Git est l'outil, GitHub est l'un des endroits où l'on range ce que l'outil produit. Git est un système de contrôle de version distribué : chaque copie d'un dépôt contient tout l'historique, et la plupart des commandes fonctionnent sans connexion. GitHub, GitLab et Codeberg ajoutent par-dessus un hébergement, une interface web, les pull requests (appelées merge requests sur GitLab), le suivi des tickets et l'intégration continue. | | Git | GitHub | GitLab | Codeberg | |---|---|---|---|---| | Nature | Logiciel libre installé en local | Service d'hébergement en ligne | Service en ligne ou instance auto-hébergée | Service en ligne associatif | | Fonctionne hors ligne | Oui | Non | Non | Non | | Propositions de modification | Non (fusion locale) | Pull requests | Merge requests | Pull requests | | Qui l'opère | Projet open source | GitHub | GitLab, ou vous-même | Codeberg e.V., association de Berlin | GitLab peut s'installer sur vos propres serveurs : sa page d'installation décrit une instance « gérée par vous » avec un « contrôle total de vos données et de votre infrastructure » (notre traduction, GitLab, consulté le 1er novembre 2026). Codeberg se présente comme une plateforme à but non lucratif gérée par Codeberg e.V., association enregistrée à Berlin, et fonctionne avec le logiciel Forgejo (documentation de Codeberg, consultée le 1er novembre 2026). Les commandes de ce guide sont les mêmes sur les trois services. GitHub publie chaque année ses propres chiffres. Selon son rapport Octoverse 2026, publié le 28 octobre 2026, la plateforme compte plus de 225 millions de développeurs, dont 4,75 millions en France en septembre 2026, dixième des dix pays que liste le billet (GitHub Octoverse 2026, chiffres de l'éditeur). Le billet ne dit pas combien de ces développeurs sont actifs. !Graphique en barres horizontales : nombre de développeurs sur GitHub en septembre 2026 dans les dix pays listés par GitHub, des États-Unis (38,3 millions) à la France (4,75 millions) --- Installer Git et le configurer La version stable de Git est la 2.56.0, publiée le 28 septembre 2026, et l'installeur Git for Windows en est à la révision 2.56.0(4), publiée le 26 octobre 2026 (git-scm.com, relu le 2 novembre 2026). Selon votre système : - Windows : téléchargez Git for Windows sur git-scm.com. Il installe aussi Git Bash, un terminal où les commandes de ce guide fonctionnent telles quelles. - macOS : parmi les options que liste git-scm.com, les outils en ligne de commande Xcode (xcode-select --install) ou Homebrew (brew install git). - Linux : passez par le gestionnaire de paquets, par exemple sudo apt install git sur Ubuntu ou Debian. Si le terminal vous est étranger, commencez par nos commandes Linux de base. Configurez ensuite votre identité, une seule fois par machine. Git l'inscrit dans chaque commit. Pour que GitHub rattache vos commits à votre profil, utilisez une adresse de votre compte, ou l'adresse « no-reply » que GitHub fournit si vous voulez garder la vôtre privée (GitHub Docs). Voici la séquence exécutée, depuis un dossier projets, et sa sortie : $ git --version git version 2.53.0.windows.1 $ git config --global user.name "Alice Martin" $ git config --global user.email alice@example.com $ git config --global init.defaultBranch main $ git config --global --list user.name=Alice Martin user.email=alice@example.com init.defaultbranch=main La troisième ligne fixe le nom de la branche principale à main. Sans elle, Git 2.53 crée encore une branche master et affiche cet avertissement à chaque git init (extrait) : hint: Using 'master' as the name for the initial branch. This default branch name hint: will change to "main" in Git 3.0. To configure the initial branch name hint: to use in all of your new repositories, which will suppress this warning, hint: call: hint: hint: git config --global init.defaultBranch <name> … Notre poste d'essai avait Git 2.53 et non la 2.56 : les sorties de ce guide viennent donc de la 2.53. Sous Windows, un avertissement sur les fins de ligne (LF et CRLF) peut aussi apparaître lors d'un git add : il est sans gravité, voir la liste des erreurs en fin d'article. --- Les quatre zones à comprendre Presque toutes les confusions de débutant viennent d'une seule idée : un fichier modifié n'est pas encore enregistré. Git distingue trois zones sur votre ordinateur, plus le dépôt distant. !Schéma des zones de Git et GitHub : répertoire de travail, zone de préparation, dépôt local et dépôt distant, reliés par git add, git commit, git push, git pull et git restore 1. Le répertoire de travail : vos fichiers, tels que vous les éditez. 2. La zone de préparation (index, ou staging area) : ce que vous avez choisi d'inclure dans le prochain commit, avec git add. 3. Le dépôt local : le dossier caché .git, où git commit range chaque version. 4. Le dépôt distant : la copie sur GitHub ou ailleurs, alimentée par git push et relue par git pull. Un commit est une photo de l'état préparé, avec un auteur, une date, un message et un identifiant (le hash, dont git log --oneline affiche les premiers caractères, 7 en général). Une branche est un simple pointeur vers un commit, qui avance à chaque nouveau commit. --- Premier dépôt : init, status, add, commit, log Le réflexe à prendre est de lancer git status avant et après chaque commande : il dit où vous en êtes et suggère la suite. Lancé dans projets, qui n'est pas un dépôt, il répond par l'erreur la plus fréquente du premier jour : $ git status fatal: not a git repository (or any of the parent directories): .git On crée donc le dépôt dans le dossier du projet, puis on ajoute un premier fichier : $ mkdir mon-site $ cd mon-site $ git init Initialized empty Git repository in C:/Users/alice/projets/mon-site/.git/ $ echo "# Mon site" > README.md $ git status On branch main No commits yet Untracked files: (use "git add <file>..." to include in what will be committed) README.md nothing added to commit but untracked files present (use "git add" to track) Le fichier est « untracked » : Git le voit mais ne le suit pas encore. git add le place dans la zone de préparation, git commit l'enregistre : $ git add README.md $ git status On branch main No commits yet Changes to be committed: (use "git rm --cached <file>..." to unstage) new file: README.md $ git commit -m "Ajoute le README" [main (root-commit) c90e6ad] Ajoute le README 1 file changed, 1 insertion(+) create mode 100644 README.md $ git log --oneline c90e6ad Ajoute le README Avant le tout premier commit, Git suggère git rm --cached pour retirer un fichier de la préparation ; ensuite, il suggère git restore --staged, comme on le verra plus bas. Un bon message dit ce que fait la modification : « Ajoute le formulaire de contact » plutôt que « modifs ». Un commit, une idée : c'est ce qui rend le retour en arrière possible. --- Voir et annuler une modification : diff et restore git diff montre ce qui a changé et n'est pas encore préparé, ligne par ligne. Les lignes ajoutées commencent par +, les lignes supprimées par - : $ echo "Un site personnel en HTML." >> README.md $ git diff diff --git a/README.md b/README.md index 7b538c8..803ccb1 100644 --- a/README.md +++ b/README.md @@ -1 +1,2 @@ # Mon site +Un site personnel en HTML. git restore remet le fichier dans son dernier état préparé, ou dans son dernier état commité si rien n'est préparé. Attention : la modification annulée est perdue, sans corbeille. $ git restore README.md $ git status On branch main nothing to commit, working tree clean Avec l'option --staged, la même commande retire un fichier de la zone de préparation sans toucher à son contenu. On crée une page d'accueil, on la prépare, on se ravise, puis on la prépare à nouveau et on l'enregistre : $ echo "<h1>Bonjour</h1>" > index.html $ git add index.html $ git status On branch main Changes to be committed: (use "git restore --staged <file>..." to unstage) new file: index.html $ git restore --staged index.html $ git status On branch main Untracked files: (use "git add <file>..." to include in what will be committed) index.html nothing added to commit but untracked files present (use "git add" to track) $ git add index.html $ git commit -m "Ajoute la page d'accueil" [main cbc68b6] Ajoute la page d'accueil 1 file changed, 1 insertion(+) create mode 100644 index.html git restore et git switch remplacent les anciens usages de git checkout, que vous croiserez encore dans des tutoriels plus anciens. --- Le fichier .gitignore Un fichier .gitignore liste ce que Git doit ignorer : dépendances téléchargées, fichiers générés, et surtout secrets. Sans lui, un git add . distrait embarque un fichier .env qui contient vos clés d'API. La démonstration, avec un faux dossier de dépendances et un faux secret : $ mkdir node_modules && echo "x" > node_modules/lib.js $ echo "API_KEY=secret" > .env $ git status --short ?? .env ?? node_modules/ $ printf 'node_modules/\n.env\n' > .gitignore $ git status --short ?? .gitignore $ git add .gitignore $ git commit -m "Ajoute un .gitignore" [main aba7ed7] Ajoute un .gitignore 1 file changed, 2 insertions(+) create mode 100644 .gitignore Après ajout du fichier, .env et node_modules/ disparaissent de la liste. Créez le .gitignore dès le premier commit : un fichier déjà suivi par Git reste suivi même si vous l'ajoutez ensuite au .gitignore. Il faut alors l'en retirer avec git rm --cached <fichier>, qui le laisse sur votre disque. GitHub publie des modèles par langage dans son dépôt github/gitignore. Si un secret a déjà été poussé, le supprimer dans un nouveau commit ne suffit pas : il reste dans l'historique. Révoquez la clé et générez-en une nouvelle. --- Les branches : branch, switch, merge Une branche permet de travailler sur une fonctionnalité sans toucher à main, puis de l'y intégrer quand elle est prête. On la crée et on s'y place avec git switch -c : $ git branch * main $ git switch -c contact Switched to a new branch 'contact' $ echo "<p>Contact : alice@example.com</p>" >> index.html $ git commit -am "Ajoute le contact" [contact f24f440] Ajoute le contact 1 file changed, 1 insertion(+) L'option -a de git commit prépare automatiquement les fichiers déjà suivis qui ont changé ; elle ignore les nouveaux fichiers. On revient ensuite sur main et on fusionne : $ git switch main Switched to branch 'main' $ git merge contact Updating aba7ed7..f24f440 Fast-forward index.html | 1 + 1 file changed, 1 insertion(+) $ git branch -d contact Deleted branch contact (was f24f440). « Fast-forward » signifie que main n'avait pas bougé : Git a simplement avancé le pointeur. Quand les deux branches ont chacune de nouveaux commits, Git crée un commit de fusion, et s'ils touchent les mêmes lignes, il y a conflit (voir plus bas). Votre éditeur peut afficher tout cela graphiquement : notre sélection d'extensions VS Code en couvre plusieurs pour Git. --- Publier sur GitHub sans mot de passe Pour envoyer votre code sur GitHub, le mot de passe de votre compte ne marche pas. GitHub l'a annoncé ainsi : « À partir du 13 août 2021, nous n'accepterons plus les mots de passe de compte pour authentifier les opérations Git sur GitHub.com » (notre traduction, blog de GitHub). Sa documentation confirme que cette authentification a été retirée au profit de méthodes plus sûres (GitHub Docs, consulté le 1er novembre 2026). | Méthode | URL du dépôt | Ce qu'il faut faire | Pour qui | |---|---|---|---| | Git Credential Manager | https://github.com/... | En principe rien : il prend en charge la connexion quand Git en a besoin | Débutant sous Windows | | Token personnel (PAT) | https://github.com/... | Créer un token et le coller quand Git demande le mot de passe | Serveur, script, poste sans navigateur | | Clé SSH | git@github.com:... | Générer une paire de clés et coller la clé publique dans GitHub | Usage quotidien, plusieurs machines | Git Credential Manager est inclus dans Git for Windows et proposé par défaut pendant l'installation (documentation de GCM). Son dépôt le décrit comme un assistant d'identification appelé automatiquement par Git, qui réutilise les identifiants enregistrés tant qu'ils restent valides, sur Windows, macOS et Linux, pour GitHub, GitLab et Bitbucket entre autres (dépôt de GCM). GitHub le cite, avec GitHub CLI, comme alternative au token. Le token personnel se crée dans les paramètres du compte, rubrique des paramètres pour développeurs. GitHub recommande les tokens « fine-grained » plutôt que les tokens « classic », et précise qu'on le saisit à la place du mot de passe pour les opérations Git en HTTPS (GitHub Docs). Donnez-lui une date d'expiration et uniquement les droits nécessaires. La clé SSH se génère avec la commande que recommande la documentation de GitHub (GitHub Docs) : $ ssh-keygen -t ed25519 -C "alice@example.com" Generating public/private ed25519 key pair. … The key fingerprint is: SHA256:(empreinte masquée) alice@example.com … Choisissez une phrase de passe. Copiez ensuite le contenu du fichier id_ed25519.pub (jamais celui sans extension, qui est la clé privée) dans les paramètres SSH de votre compte GitHub, puis vérifiez avec ssh -T git@github.com. À la première connexion, SSH demande de confirmer l'identité du serveur : comparez l'empreinte affichée avec celles que publie GitHub (empreintes des clés SSH de GitHub) avant de répondre yes. En cas de succès, GitHub répond « Hi USERNAME! You've successfully authenticated, but GitHub does not provide shell access. » (GitHub Docs). Sans clé enregistrée, voici ce que nous avons obtenu : $ ssh -T git@github.com git@github.com: Permission denied (publickey). Activez aussi la double authentification sur votre compte GitHub : notre guide sur la double authentification explique comment choisir la méthode. --- Travailler avec un dépôt distant : push, pull, clone Une fois authentifié, la publication tient en trois commandes. La documentation de GitHub conseille de créer le dépôt en ligne vide, sans README, licence ni .gitignore, pour éviter les erreurs quand on y pousse un projet existant (GitHub Docs). Avec GitHub, selon la méthode d'authentification choisie : # En HTTPS (Git Credential Manager ou token) git remote add origin https://github.com/votre-pseudo/mon-site.git # Ou en SSH : utilisez cette ligne à la place de la précédente, jamais les deux # git remote add origin git@github.com:votre-pseudo/mon-site.git git remote -v git push -u origin main Pour ce guide, nous n'avons rien poussé sur GitHub : un dépôt local « nu », créé avec git init --bare à côté du projet, a joué le rôle du serveur. Les commandes et les messages sont les mêmes, seule l'adresse change : $ git init --bare ../serveur/mon-site.git Initialized empty Git repository in C:/Users/alice/projets/serveur/mon-site.git/ $ git remote add origin ../serveur/mon-site.git $ git remote -v origin ../serveur/mon-site.git (fetch) origin ../serveur/mon-site.git (push) $ git push -u origin main To ../serveur/mon-site.git * [new branch] main -> main branch 'main' set up to track 'origin/main'. L'option -u relie votre branche main à origin/main : ensuite, git push et git pull suffisent. Un collègue, ou vous-même sur un autre ordinateur, récupère le projet avec git clone, qui copie tout l'historique. Le collègue ajoute un pied de page et pousse : $ cd .. $ git clone serveur/mon-site.git copie-collegue Cloning into 'copie-collegue'... done. $ cd copie-collegue $ git log --oneline f24f440 Ajoute le contact aba7ed7 Ajoute un .gitignore cbc68b6 Ajoute la page d'accueil c90e6ad Ajoute le README $ echo "<footer>2026</footer>" >> index.html $ git commit -am "Ajoute un pied de page" [main aa03f35] Ajoute un pied de page 1 file changed, 1 insertion(+) $ git push To C:/Users/alice/projets/serveur/mon-site.git f24f440..aa03f35 main -> main Pendant ce temps, vous avez fait votre propre commit dans mon-site. Votre git push est alors refusé, ce qui protège le travail du collègue : $ cd ../mon-site $ echo "Un site personnel en HTML." >> README.md $ git commit -am "Complète le README" [main 343ad23] Complète le README 1 file changed, 1 insertion(+) $ git push To ../serveur/mon-site.git ! [rejected] main -> main (fetch first) error: failed to push some refs to '../serveur/mon-site.git' hint: Updates were rejected because the remote contains work that you do not hint: have locally. This is usually caused by another repository pushing to hint: the same ref. If you want to integrate the remote changes, use hint: 'git pull' before pushing again. hint: See the 'Note about fast-forwards' in 'git push --help' for details. Le git pull suggéré échoue lui aussi la première fois, parce que Git veut savoir comment combiner les deux historiques : $ git pull From ../serveur/mon-site f24f440..aa03f35 main -> origin/main hint: You have divergent branches and need to specify how to reconcile them. hint: You can do so by running one of the following commands sometime before hint: your next pull: hint: hint: git config pull.rebase false # merge hint: git config pull.rebase true # rebase hint: git config pull.ff only # fast-forward only … fatal: Need to specify how to reconcile divergent branches. Pour débuter, choisissez la fusion (pull.rebase false), la plus simple à comprendre. Le pull crée alors un commit de fusion. Sans option, Git ouvre votre éditeur pour que vous validiez le message de ce commit (il suffit d'enregistrer et de fermer ; dans Vim, l'éditeur par défaut de Git pour Windows, tapez Échap puis :wq) ; l'option --no-edit accepte directement le message proposé : $ git config --global pull.rebase false $ git pull --no-edit Merge made by the 'ort' strategy. index.html | 1 + 1 file changed, 1 insertion(+) $ git log --oneline --graph * 5759bc0 Merge branch 'main' of ../serveur/mon-site |\ | * aa03f35 Ajoute un pied de page * | 343ad23 Complète le README |/ * f24f440 Ajoute le contact … $ git push To ../serveur/mon-site.git aa03f35..5759bc0 main -> main Le bon réflexe en équipe : git pull avant de travailler et avant de pousser. --- Pull request et revue de code Une pull request est, selon GitHub, « une proposition de fusionner des modifications de code dans un projet » (notre traduction, GitHub Docs, consulté le 2 novembre 2026). Au lieu de fusionner vous-même dans main, vous poussez une branche et demandez qu'on la relise. Le déroulé : 1. Créez une branche : git switch -c formulaire-contact. 2. Faites vos commits, puis poussez la branche : git push -u origin formulaire-contact. 3. Sur GitHub, ouvrez une pull request depuis cette branche ; en général, un bandeau le propose dès le push. Rédigez un titre clair et une description : ce qui change, pourquoi, comment le vérifier. 4. Les relecteurs commentent ligne par ligne, approuvent ou demandent des changements. Vous corrigez par de nouveaux commits sur la même branche : la pull request se met à jour toute seule. 5. Une fois approuvée, la branche est fusionnée dans main, puis en général supprimée. Une pull request en brouillon (« draft ») montre un travail inachevé : GitHub précise qu'elle ne peut pas être fusionnée (GitHub Docs). Pour une bonne revue, gardez les pull requests courtes, relisez votre propre diff avant l'envoi, et commentez le code, jamais la personne. C'est aussi là que les tests automatiques s'exécutent : notre tutoriel GitHub Actions montre comment lancer les tests d'une API Node.js à chaque pull request. Le volume donne une idée de la place de ce mécanisme. Le rapport Octoverse 2026 compte 1,3 milliard de pull requests fusionnées et 34,3 milliards de commits entre le 1er octobre 2025 et le 30 septembre 2026, dépôts publics et privés (GitHub Octoverse 2026, chiffres de l'éditeur). GitHub précise que les chiffres 2024 et 2025 du graphique ont été recalculés sur ces mêmes définitions et peuvent donc différer de ses rapports précédents, qui ne couvraient que l'activité publique, de septembre à août. !Graphique en barres groupées : commits, pushes et pull requests fusionnées sur GitHub en 2024, 2025 et 2026, en milliards, d'après Octoverse 2026 --- Résoudre un conflit de fusion Un conflit survient quand deux branches modifient les mêmes lignes : Git ne choisit pas à votre place. Pour le provoquer, on change le titre en « Bienvenue » sur une branche titre, et en « Salut » sur main (sur macOS, sed -i s'écrit sed -i '' ; vous pouvez aussi modifier le titre dans votre éditeur) : $ git switch -c titre Switched to a new branch 'titre' $ sed -i "s/Bonjour/Bienvenue/" index.html $ git commit -am "Titre : Bienvenue" [titre 8405e86] Titre : Bienvenue 1 file changed, 1 insertion(+), 1 deletion(-) $ git switch main Switched to branch 'main' Your branch is up to date with 'origin/main'. $ sed -i "s/Bonjour/Salut/" index.html $ git commit -am "Titre : Salut" [main e1eec83] Titre : Salut 1 file changed, 1 insertion(+), 1 deletion(-) $ git merge titre Auto-merging index.html CONFLICT (content): Merge conflict in index.html Automatic merge failed; fix conflicts and then commit the result. $ git status On branch main Your branch is ahead of 'origin/main' by 1 commit. (use "git push" to publish your local commits) You have unmerged paths. (fix conflicts and run "git commit") (use "git merge --abort" to abort the merge) Unmerged paths: (use "git add <file>..." to mark resolution) both modified: index.html no changes added to commit (use "git add" and/or "git commit -a") Git a écrit les deux versions dans le fichier, entre des marqueurs. La version de la branche courante (HEAD) est au-dessus de =======, celle de la branche fusionnée en dessous : $ cat index.html <<<<<<< HEAD <h1>Salut</h1> ======= <h1>Bienvenue</h1> >>>>>>> titre <p>Contact : alice@example.com</p> <footer>2026</footer> Pour résoudre : ouvrez le fichier, gardez la bonne version (ou un mélange des deux), supprimez les trois lignes de marqueurs, puis signalez la résolution avec git add et terminez par un commit. C'est la procédure que décrit la documentation de GitHub. Ici, nous gardons « Bienvenue » en réécrivant le fichier : $ printf '<h1>Bienvenue</h1>\n<p>Contact : alice@example.com</p>\n<footer>2026</footer>\n' > index.html $ git add index.html $ git commit -m "Fusionne la branche titre" [main b84f4d1] Fusionne la branche titre $ git branch -d titre Deleted branch titre (was 8405e86). Vérifiez le fichier avant le git add : les lignes hors marqueurs doivent rester. Et si vous êtes perdu au milieu d'une fusion, git merge --abort remet tout comme avant. --- Annuler une erreur sans danger La règle d'or : on ne réécrit jamais un historique déjà poussé. Le livre officiel Pro Git la formule ainsi pour le rebase : « Ne rebasez pas des commits qui existent en dehors de votre dépôt et sur lesquels d'autres personnes ont pu baser leur travail » (notre traduction, Pro Git). Le même principe vaut pour git reset et git push --force. Dans les commandes ci-dessous, HEAD~1 désigne le commit précédent, et HEAD~4 le commit situé quatre crans en arrière. | Situation | Commande | Ce qui se passe | |---|---|---| | Modification pas encore préparée | git restore fichier | Le fichier revient à son dernier état préparé ou commité ; la modification est perdue | | Fichier préparé par erreur | git restore --staged fichier | Retiré de la zone de préparation, contenu intact | | Commit déjà poussé | git revert <commit> | Nouveau commit qui annule l'ancien ; l'historique est conservé | | Dernier commit pas encore poussé | git reset --soft HEAD~1 | Le commit disparaît, ses modifications restent préparées | | Jeter toutes les modifications en cours | git reset --hard | Fichiers suivis et préparation remis à l'état du dernier commit ; aucun commit supprimé, fichiers non suivis conservés | | Supprimer le dernier commit local et son contenu | git reset --hard HEAD~1 | Destructif ; jamais sur un commit déjà poussé | git revert est l'outil sûr pour un commit publié. La documentation de Git le décrit comme une commande qui enregistre de nouveaux commits pour inverser l'effet de commits précédents (git-revert). Exemple avec un commit raté déjà poussé : $ echo "Ligne ajoutée par erreur" >> README.md $ git commit -am "Commit raté" [main 252c6dc] Commit raté 1 file changed, 1 insertion(+) $ git push To ../serveur/mon-site.git 5759bc0..252c6dc main -> main $ git revert --no-edit HEAD [main 13e43d9] Revert "Commit raté" Date: Mon Nov 2 10:08:33 2026 +0100 1 file changed, 1 deletion(-) $ git log --oneline -3 13e43d9 Revert "Commit raté" 252c6dc Commit raté b84f4d1 Fusionne la branche titre $ git push To ../serveur/mon-site.git 252c6dc..13e43d9 main -> main Les deux commits restent visibles, et le push passe sans forcer. À l'inverse, git reset ne sert que pour ce qui n'a pas quitté votre machine. Le --soft défait un commit en gardant son contenu préparé ; le --hard jette les modifications des fichiers suivis, mais laisse en place un fichier non suivi, ici brouillon.txt : $ echo "brouillon" > brouillon.txt $ git add brouillon.txt $ git commit -m "Brouillon local" [main 03d0535] Brouillon local 1 file changed, 1 insertion(+) create mode 100644 brouillon.txt $ git reset --soft HEAD~1 $ git status --short A brouillon.txt $ git restore --staged brouillon.txt $ echo "<p>essai</p>" >> index.html $ git status --short M index.html ?? brouillon.txt $ git reset --hard HEAD is now at 13e43d9 Revert "Commit raté" $ git status --short ?? brouillon.txt $ rm brouillon.txt Dernier outil utile : git stash met de côté des modifications en cours pour changer de branche, et git stash pop les reprend. Par défaut, il ne prend que les fichiers suivis ; ajoutez -u pour embarquer aussi les nouveaux fichiers. Ici, une branche ancienne-version pointe sur un commit antérieur, où index.html est différent : $ git switch -c ancienne-version HEAD~4 Switched to a new branch 'ancienne-version' $ git switch main Switched to branch 'main' Your branch is up to date with 'origin/main'. $ echo "<p>en cours</p>" >> index.html $ git switch ancienne-version error: Your local changes to the following files would be overwritten by checkout: index.html Please commit your changes or stash them before you switch branches. Aborting $ git stash Saved working directory and index state WIP on main: 13e43d9 Revert "Commit raté" $ git switch ancienne-version Switched to branch 'ancienne-version' $ git switch main Switched to branch 'main' Your branch is up to date with 'origin/main'. $ git stash pop … modified: index.html … Dropped refs/stash@{0} (…) --- Aide-mémoire : 20 commandes Git | Commande | À quoi elle sert | |---|---| | git config --global user.name "Nom" et user.email | Définir le nom et l'adresse inscrits dans vos commits | | git init | Créer un dépôt dans le dossier courant | | git clone <url> | Copier un dépôt distant et tout son historique | | git status | Voir l'état des fichiers et la commande suivante suggérée | | git add <fichier> | Préparer un fichier pour le prochain commit | | git commit -m "message" | Enregistrer ce qui est préparé | | git log --oneline --graph | Afficher l'historique, compact, avec les branches | | git diff | Voir les modifications non préparées | | git restore <fichier> | Annuler une modification non préparée | | git restore --staged <fichier> | Retirer un fichier de la zone de préparation | | git branch | Lister les branches | | git switch -c <branche> | Créer une branche et s'y placer | | git switch <branche> | Changer de branche | | git merge <branche> | Fusionner une branche dans la branche courante | | git remote add origin <url> | Déclarer le dépôt distant | | git push -u origin main | Envoyer vos commits et relier la branche | | git pull | Récupérer et intégrer les commits distants | | git revert <commit> | Annuler un commit publié par un nouveau commit | | git stash / git stash pop | Mettre de côté puis reprendre un travail en cours | | git merge --abort | Abandonner une fusion en conflit | --- Les erreurs de débutant et leurs vrais messages Tous ces messages ont été obtenus lors de notre essai, sauf le dernier. Entre parenthèses, la commande qui les a déclenchés. - fatal: not a git repository (or any of the parent directories): .git (git status) : mauvais dossier, ou git init oublié. - Author identity unknown puis fatal: unable to auto-detect email address (git commit) : configurez user.name et user.email. - fatal: pathspec 'fichier-inexistant.txt' did not match any files (git add) : faute de frappe ou mauvais dossier. - fatal: invalid reference: dev (git switch dev) : la branche n'existe pas ; créez-la avec git switch -c dev. - fatal: No configured push destination. (git push) : aucun dépôt distant déclaré ; lancez git remote add origin <url>. - nothing to commit, working tree clean (git commit) : rien de nouveau à enregistrer. - error: src refspec main does not match any (git push -u origin main) : la branche main n'existe pas encore. Soit elle n'a aucun commit (notre cas), soit votre branche s'appelle master, le défaut de Git 2.53 sans réglage. git status affiche son nom sur la première ligne. - ! [rejected] main -> main (fetch first) (git push) : faites git pull, puis git push. - fatal: Need to specify how to reconcile divergent branches. (git pull) : git config --global pull.rebase false. - error: Your local changes to the following files would be overwritten by checkout (git switch) : commitez ou utilisez git stash. - warning: in the working copy of 'style.css', LF will be replaced by CRLF the next time Git touches it (git add sous Windows) : avertissement de fin de ligne, sans gravité. - git@github.com: Permission denied (publickey). (ssh -T git@github.com) : aucune clé SSH reconnue ; ajoutez votre clé publique. - ssh: connect to host github.com port 22: Connection timed out (ssh -T git@github.com) : souvent, un pare-feu ou le réseau bloque le port 22. GitHub documente une connexion par le port 443 (GitHub Docs), ou passez en HTTPS. - remote: Support for password authentication was removed on August 13, 2021. (git push en HTTPS) : utilisez un token ou Git Credential Manager. Message rapporté sur le forum de GitHub, non reproduit ici. --- Et ensuite ? Git et GitHub deviennent vite un outil de carrière autant qu'un outil technique. Un historique propre et quelques projets publics sont la base d'un portfolio de développeur, et le lien vers votre profil GitHub a sa place dans un CV de développeur junior. En entretien technique, on vous demandera souvent d'expliquer une fusion ou la différence entre revert et reset. Pour pratiquer, versionnez dès maintenant vos exercices : en suivant notre guide pour apprendre JavaScript ou celui pour apprendre Python, faites un commit à chaque exercice réussi et une branche par mini-projet. --- Ce que nous n'avons pas pu vérifier - Les sorties de Git 2.56. Notre poste avait Git 2.53.0 : un message peut avoir changé de formulation depuis. - Les étapes sur GitHub.com. Aucun dépôt n'a été créé sur GitHub ; les libellés de l'interface web et la fenêtre de connexion de Git Credential Manager n'ont pas été vus. - Le message d'erreur sur le mot de passe, tiré d'un témoignage de 2023 sur le forum de GitHub. - macOS et Linux. Tout a été exécuté sous Windows, dans Git Bash. - Les chiffres d'Octoverse, publiés par GitHub sur sa propre plateforme, sans audit tiers. --- Questions fréquentes Quelle est la différence entre Git et GitHub ? Git est un logiciel de contrôle de version qui s'installe sur votre ordinateur et fonctionne hors ligne. GitHub est un service en ligne qui héberge des dépôts Git et ajoute la collaboration : pull requests, revues, tickets, GitHub Actions. On peut utiliser Git seul, ou avec GitLab ou Codeberg à la place de GitHub. Faut-il apprendre Git avant GitHub ? Oui. Les commandes add, commit, branch et merge sont celles de Git ; GitHub n'en est que la partie partagée. Maîtrisez le cycle local, puis publiez. Pourquoi GitHub refuse-t-il mon mot de passe ? Depuis le 13 août 2021, GitHub n'accepte plus le mot de passe du compte pour les opérations Git (blog de GitHub). Utilisez Git Credential Manager, inclus dans Git for Windows, un token personnel en HTTPS, ou une clé SSH. Comment annuler un commit déjà poussé sur GitHub ? Avec git revert <commit>, qui crée un nouveau commit inversant l'ancien, puis git push. Évitez git reset suivi d'un git push --force sur une branche partagée : vous réécririez un historique que d'autres ont peut-être déjà récupéré. --- À propos de l'auteur Abdelilah Ourti est ingénieur IA et architecte logiciel. Il conçoit et déploie des applications web et des systèmes d'IA, et publie sur NeurauTech des guides et des comparatifs destinés aux développeurs francophones. Ses autres articles sont réunis sur sa page auteur. Méthode. Guide fondé sur la documentation officielle de Git (git-scm.com, livre Pro Git), la documentation et le blog de GitHub, la documentation de Git Credential Manager, de GitLab et de Codeberg, consultées les 1er et 2 novembre 2026, et sur le rapport Octoverse 2026 de GitHub, dont les chiffres sont signalés comme ceux de l'éditeur. Les citations issues de sources en anglais sont traduites par nos soins. Aucun lien n'est affilié et aucune relation commerciale ne lie l'auteur aux services cités. Ce qui a été exécuté. Le 2 novembre 2026, dans Git Bash sous Windows avec Git 2.53.0 et une configuration globale isolée, un seul script a rejoué depuis un dossier vide toutes les séquences de l'article dans leur ordre, de git config au conflit de fusion, à git revert, git reset, git stash et aux erreurs listées ; les sorties affichées viennent de cette exécution. Un dépôt local nu a remplacé GitHub ; aucun code n'a été poussé vers un service réel. Le 1er novembre, ssh-keygen -t ed25519 (clé jetable, supprimée ensuite) et ssh -T git@github.com sans clé ont été lancés ; le 2 novembre, ce même test a expiré sur le port 22. Le message sur le mot de passe n'a pas été reproduit. Les hash dépendent de la date et de l'auteur : les vôtres seront différents. Une erreur ou une commande qui a changé ? Écrivez à contact@neurautech.com : l'article sera corrigé et la date de mise à jour modifiée. Dernière mise à jour : 2 novembre 2026. Image : Paul (@causeimluap) sur Unsplash (Unsplash License).