Mentions
Conversations linking to GitHub, newest first. Times are UTC.
Mentions by source
X
Bluesky
Hacker News
V2EX
Qiita
DEV
Mailwal
Mastodon
Latest posts
This is available in formats including Neo4J, RDF and the Beneficial Ownership Data Standard JSON format github.com/StephenAbbott/opencheck/releases/tag/d…
This is available in formats including Neo4J, RDF and the Beneficial Ownership Data Standard JSON format github.com/StephenAbbott/opencheck/releases/tag/d… #Neo4j #RDF #openstandards #opendata
Rapid-H3: Super fast H3 video + audio in about 2 minutes on one DGX Spark Rapid-H3 makes MiniMax-H3 (text / image → video with stereo audio) render 3–5× faster on a single NVIDIA DGX Spark (GB10) than stock ComfyUI, with no human-noticeable loss in picture, motion, voice or lip sync. It is a ComfyUI node pack plus two ready-made render presets: - ts_h2 (default): ≈117 s for a 768×1344, 141-frame (≈5.9 s) first-frame clip with audio. - ts_s6 (camera moves, close-up faces): ≈201 s, at stock level on every criterion we score. - Stock ComfyUI bf16 at the 10-step reference: 590–630 s. - The first render is slower on a fresh install, while the CUDA kernels are built (once) and the models load.
ArmadaLive 0.4.0 — bottom-screen companion for the AYN Thor on ArmadaOS github.com/FabianZettl/armadalive/releases/tag/v0… The bottom screen shows what the top screen plays (logo + background from ES-DE or Steam, manual, cheats) and holds the controls: power profiles, fan curves, brightness, volume, quick settings, app grid. In-app updates, English/German. **New in 0.4** • **Trackpad page**: two Steam-Deck-style pads (pointer + scroll, tap = click, hold = drag, trackball glide), L4/L5/R4/R5, Esc/Tab/Enter/Space/Backspace, and haptic ticks. Not tested in a game yet; the back buttons show up as a second controller in Steam Input. • **Ludo (RomM)**: a bar while it syncs saves before a game starts, and the game highlighted in Ludo shows its logo/background. • **Tuning**: changes revert after 15 s unless you keep them; Cool/Quiet/Fast presets fitted to the device. • Starts again after a system update that drops PySide6, and falls back to the bottom gamescope when the bottom Plasma session is down (that is #821 on Preview 20261101). **0.2 + 0.3** • Close game (hold Start+Select 2 s), media bar, low-battery and heat warnings, optional charge limit • Keyboard tile + on-screen keyboard in the password dialog, AYN button as a toggle, screen-off, Tailscale tile, Add to Steam tile • Game rules (profile + FPS per game/system), graphs, health check, backup, new themes (SteamOS, SNES, Game Boy, PS2, Famicom), follow-game theme **0.1** — first release: game page, manual/cheats, apps, mode, system dashboard, tuning, settings. Needs ES-DE or Steam on the top screen. Built with AI help (see the README). Bugs and ideas: github.com/FabianZettl/armadalive/issues
Oh, someone already did. saulob/crackdown-xbox360-recompiled
Your Bitlocker recovery key is uploaded to the Cloud with either an online account, or one-drive activation. It is illegal for Microsoft to reject assisting in cracking your machine. What Bitlocker/TPM did accomplish was booby-trapping peoples PC. You are met with the recovery blue-screen if you went through the effort of installing an offline account, and tried to dual boot off the same physical drive. No one is told to backup your recovery key post install, and so the incentive to always use their shitty cloud options is encouraged with data loss. Note too, NTFS will have encryption auto-enabled on anything you plug into Windows 11. Note, post-install it is non-trivial to fix the troublesome behavior. Rufus is now the only way to install Windows 11 pro without the enshittification features: github.com/pbatard/rufus/releases Ripping out all the "AI" (undocumented API areas indicate snitch-ware), spam, and telemetry nonsense takes some effort. However, the only thing that should be running on windows now is the Steam launcher for classic games, and a tool to neuter most of the Microsoft malware. oo-software.com It is sad, but Microsoft has some people willing to burn company goodwill for short-term gains. Even xbox now sucks, and that was easy money. =3
手把手教你利用Github开源教程学习AI开发 all-in-rag教程:datawhalechina/all-in-rag Timeline 00:00 三窗口学习法:开源教程+AI答疑+动手实践 00:38 学习前需要哪些基础? 01:13 用 AI 寻找开源教程:以 all-in-rag 为例 01:53 看懂 README 和 code、data、docs 文件夹 03:38 准备 API,配置 GitHub Codespaces 04:52 熟悉云端工作区,安装 Python 环境与依赖 05:59 运行第一个 RAG 示例,借助 AI 排查报错 06:46 修正 API 配置:Key、接口地址和模型名 07:49 看懂运行输出:content 与其他参数 08:20 对照源码与数据,理解 RAG 的执行流程 10:03 动手练习:修改代码,只输出回答内容 10:49 方法回顾:用开源教程学习新技术 [en-US] A Step-by-Step Guide to Learning AI Development Using GitHub Open-Source Tutorials All-in-rag tutorial: datawhalechina/all-in-rag Timeline 00:00 Three-Window Learning Method: Open Source Tutorial + AI Q&A + Hands-on Practice 00:38 What basic knowledge is required before learning? 01:13 Using AI to find open-source tutorials: Taking all-in-rag as an example 01:53 Understanding the README and code, data, and docs folders 03:38 Preparing the API and configuring GitHub Codespaces 04:52 Familiarizing yourself with the cloud workspace and installing the Python environment and dependencies 05:59 Running your first RAG example and using AI to troubleshoot errors 06:46 Correcting API configuration: Key, interface address, and model name 07:49 Understanding the output: content and other parameters 08:20 Comparing source code and data to understand the execution flow of RAGs 10:03 Hands-on exercise: Modifying the code to only output the answer content 10:49 Method review: Learning new technologies using open-source tutorials
久々に更新かけました。エージェントでロングランするようになってきたので、ルールを忘れないように思い出すプロセスをちょっと足した。 #redmine #AIエージェント #チケット駆動開発 tax-mux/ticket-driven
@octal @ricardooriol @omarchy Almost all of my stuff is on Proxmox these days- and where Ubuntu is running a full stack I’ve got the Zabbly Kernels in place: zabbly/linux Only reason i ever switched to Ububtu from Debian was because Ubuntu was getting updates while Debian was a sloth. That’s not the case anymore and hasnt been for a while- and with the Ububtu coreutils rewrite I think this is my exit as well.
The Founder Who Still Codes: Why Sunmughan Swamy Stays Close to the Work Many founders stop building once their company grows. Sunmughan Swamy has not. He still reads code, still reviews how a page loads, and still cares about the small details that a client notices only when they go wrong. Staying close to the work is not a habit he kept by accident. It is how he keeps his promises honest. That closeness comes from a long record of shipping: 1700+ websites and applications shipped for 300+ clients. A founder who has built that much knows what a realistic deadline looks like, what a feature really costs to build well, and where a project usually breaks. That knowledge makes his estimates plain and his advice practical, because it comes from work done, not from theory. Staying hands on also protects quality. When the founder understands the build, a shortcut cannot hide behind technical language, and a problem cannot be passed along until it becomes a client complaint. He can spot a weak design, a slow page, or a confusing checkout before launch, while it is still cheap to fix. Clients notice the difference. They are not talking to a manager who must check with someone else for every answer. They are talking to the person who understands their website, their store, or their application from the inside. That direct line keeps decisions fast and keeps trust intact when a project needs to change direction. For founders, the lesson is to stay near the craft that built the business. Growth should not mean distance from the work. See his work at github.com/sunmughan, connect at linkedin.com, and see his company at codeair.tech.
Microscope app for Claude/Codex Hey guys, I made this app to help me communicate with AI agents when debugging and making changes to PCBs. It is super useful because I can give it eyes, and it can literally just talk back to me by circling stuff around and stuff like that. The whole app is open source. Eventually, within like a week, it'll make its way to the Windows and Mac app stores, so it'll be downloadable. But for now, you can just build it yourselves for your machines out of the source code or download it from the repo. It is using MCP to communicate so any agent is a fair game. (ps, the wrong position of the circle is fixed it was literally just to test it can draw and I was lazy to retake screenshot lol) unlikeOtherAI/electroscope preview.redd.it
Build a WhatsApp Order-Status Bot in an Afternoon: Two Webhooks and One API "Where is my order?" is the question online stores answer most on WhatsApp, and it's the easiest one to automate. This tutorial builds a small Node service that does two things: when your store marks an order shipped, it sends the customer a WhatsApp template with a Where is my order? button; when they tap it, it replies with the order's current status. Anything else the customer writes goes to your team inbox as usual. It's about 120 lines of TypeScript with no dependencies beyond Node 22, using WAPGROWAI's public API to send and its webhooks to hear about taps. The tests run the whole thing, HTTP server included, against a stubbed API, so they never send a real message. How it fits together 1. Your store → the bot. Your store calls /hooks/store/orders when an order changes. On "shipped", the bot sends the order_shipped template. 2. The bot → WhatsApp. POST /messages/send with the template name and the customer's name and order number. 3. WhatsApp → the bot. When the customer taps Where is my order?, WAPGROWAI calls /hooks/whatsapp/<secret> with a cta_button_clicked event. 4. The bot → WhatsApp. A plain-text reply with the order's status. The tap opened WhatsApp's 24-hour customer service window, so free text is allowed. Set up WAPGROWAI - A template named order_shipped, body Hi {{1}}, your order {{2}} has shipped., with a quick-reply button Where is my order?. Leave the button's On click action as No action, so the bot answers instead of an automation. - An API token with the messages:send scope: Connectors → API → Create API Token. - A webhook under Connectors → Webhooks, subscribed to CTA Button Clicked, pointing at https://your-server/hooks/whatsapp/<secret>, where <secret> is a long random string you also put in WEBHOOK_SECRET. The API client // A small client for the two calls the bot makes. export type SendResult = { ok: true; messageId: string } | { ok: false; retry: boolean; status: number; message: string }; type Fetch = (url: string, init: { method: string; headers: Record<string, string>; body: string }) => Promise<{ status: number; json: () => Promise<any>; }>; export const createClient = (token: string, fetchImpl: Fetch, base = "https://api.wpautoai.com/api/public") => { const send = async (body: Record<string, unknown>): Promise<SendResult> => { const res = await fetchImpl(`${base}/messages/send`, { method: "POST", headers: { Authorization: `Bearer ${token}`, "Content-Type": "application/json" }, body: JSON.stringify(body), }); const json = await res.json().catch(() => ({})); if (res.status >= 200 && res.status < 300) return { ok: true, messageId: json.data?.id }; // 429 and 5xx may succeed later; a 400 won't until the request changes. return { ok: false, retry: res.status === 429 || res.status >= 500, status: res.status, message: json.message ?? "" }; }; return { sendTemplate: (phone: string, templateName: string, body: string[]) => send({ type: "template", phone, template_name: templateName, parameters: { body } }), // Free text only reaches someone who messaged in the last 24 hours. A button tap counts. sendText: (conversationId: string, text: string) => send({ type: "text", conversation_id: conversationId, text }), }; }; The client sorts failures into two kinds. A 429 or a 5xx might succeed later, so the caller can retry. A 400 (a template that doesn't exist, a number that isn't valid) won't, and retrying only repeats the error. The bot import { timingSafeEqual } from "node:crypto"; import type { createClient } from "./wapgrowai.ts"; export type Order = { id: string; phone: string; name: string; status: "placed" | "shipped" | "out_for_delivery" | "delivered"; eta?: string }; type Client = ReturnType<typeof createClient>; export type Reply = { status: number; body?: string }; const digits = (phone: string) => phone.replace(/\D/g, ""); export const TRACK_BUTTON = "Where is my order?"; const STATUS_TEXT: Record<Order["status"], (o: Order) => string> = { placed: (o) => `Order ${o.id} is confirmed and being packed.`, shipped: (o) => `Order ${o.id} has shipped${o.eta ? ` and should arrive ${o.eta}` : ""}.`, out_for_delivery: (o) => `Order ${o.id} is out for delivery today.`, delivered: (o) => `Order ${o.id} was delivered. Reply here if anything's wrong.`, }; export const createBot = (client: Client, webhookSecret: string) => { const orders = new Map<string, Order>(); const notified = new Set<string>(); // `${orderId}:${status}` const seenMessages = new Set<string>(); // 1. Your store calls this whenever an order changes. const onOrderUpdate = async (order: Order): Promise<Reply> => { orders.set(order.id, order); if (order.status !== "shipped") return { status: 200 }; const key = `${order.id}:shipped`; // Stores retry webhooks too: one "shipped" message per order. if (notified.has(key)) return { status: 200 }; notified.add(key); const result = await client.sendTemplate(digits(order.phone), "order_shipped", [order.name, order.id]); if (result.ok) return { status: 200 }; if (result.retry) { notified.delete(key); // let the store's retry try again return { status: 503 }; } return { status: 200, body: `not sent: ${result.message}` }; // a retry won't help; log it }; // 2. WAPGROWAI calls this when someone taps a button. The webhook isn't // signed, so the URL carries a long random secret. const onWhatsAppEvent = async (pathSecret: string, event: any): Promise<Reply> => { const a = Buffer.from(pathSecret); const b = Buffer.from(webhookSecret); if (a.length !== b.length || !timingSafeEqual(a, b)) return { status: 404 }; const data = event?.data ?? {}; if (event?.event !== "cta_button_clicked" || data.button_text !== TRACK_BUTTON) return { status: 200 }; // Deliveries are retried on any non-2xx response: answer each tap once. if (seenMessages.has(data.message_id)) return { status: 200 }; seenMessages.add(data.message_id); // The tap doesn't say which order, so answer about this customer's latest one. const phone = digits(String(data.contact_phone ?? "")); const latest = [...orders.values()].filter((o) => digits(o.phone) === phone).at(-1); const text = latest ? STATUS_TEXT[latest.status](latest) : "We couldn't find an order for this number. Someone from our team will reply here shortly."; await client.sendText(data.conversation_id, text); return { status: 200 }; }; return { onOrderUpdate, onWhatsAppEvent }; }; Sending once per order Store platforms retry their webhooks, and an order can be saved as "shipped" more than once. The bot remembers orderId:shipped and sends the template once. If the send is rate-limited, it forgets the key and returns 503, so the store's own retry sends it later. If the API refuses the send outright, it returns 200 with the reason: a retry wouldn't help, so the store shouldn't keep trying. Checking the webhook really came from WAPGROWAI WAPGROWAI's webhooks aren't signed yet, so a request can't prove where it came from. The bot uses the next best thing: a long random secret in the URL path, compared in constant time, and a 404 for anything else. Keep the URL out of logs, and treat the payload as a hint, not proof. Here it only ever causes a reply about the caller's own latest order. Answering each tap once A webhook delivery is retried when your server returns an error, so the same tap can arrive again. The bot records each message_id and answers it once. In production, keep that in a database with a unique index rather than in memory. Which order? The tap carries the customer's number and the button text, but not which order message they tapped. The bot answers about that customer's latest order, which is right almost every time. If customers often have several open orders, use a dynamic URL button instead (https://shop.example.com/track/{{1}} with the order number) and skip the webhook for tracking entirely. Leave everything else to people The bot only reacts to one button. Other buttons ("Talk to a person") and anything typed go to the team inbox as normal messages, because they're conversations, not lookups. The server import { createServer } from "node:http"; import { createClient } from "./wapgrowai.ts"; import { createBot, type Reply } from "./bot.ts"; const client = createClient(process.env.WAPGROWAI_TOKEN!, fetch); const bot = createBot(client, process.env.WEBHOOK_SECRET!); const readJson = async (req: import("node:http").IncomingMessage) => { let raw = ""; for await (const chunk of req) raw += chunk; return JSON.parse(raw || "{}"); }; export const server = createServer(async (req, res) => { let reply: Reply = { status: 404 }; try { const url = new URL(req.url ?? "/", "http://localhost"); const hook = url.pathname.match(/^\/hooks\/whatsapp\/([\w-]+)$/); // Check your store's own webhook signature here before trusting the body. if (req.method === "POST" && url.pathname === "/hooks/store/orders") reply = await bot.onOrderUpdate(await readJson(req)); else if (req.method === "POST" && hook) reply = await bot.onWhatsAppEvent(hook[1], await readJson(req)); } catch { reply = { status: 400 }; } res.writeHead(reply.status, { "Content-Type": "text/plain" }).end(reply.body ?? ""); }); if (process.env.PORT) server.listen(Number(process.env.PORT)); Plain node:http, two routes, and a 404 for everything else. Run it with WAPGROWAI_TOKEN, WEBHOOK_SECRET and PORT set: node --experimental-strip-types server.ts. Put your store's own webhook signature check where the comment says. Every store platform signs its webhooks differently. What the tests check - Sending: a shipped order sends order_shipped to 919820011223 with ["Asha", "A-1042"], to the right URL with the bearer token. - Once per order: a "placed" update sends nothing, and the store sending "shipped" twice sends one template. - Rate limits: a 429 returns 503 to the store, and the store's retry sends the message. - Refusals: a 400 is reported and not retried. - Taps: after the order moves to "out for delivery", a tap gets "Order A-1042 is out for delivery today." - Redelivery: the same tap delivered twice is answered once. - The secret: a wrong path secret gets 404 and sends nothing. - Hands off: "Talk to a person" and ordinary messages send nothing from the bot. - Unknown numbers: a tap from a number with no orders gets a holding reply. - End to end: the real HTTP server, with fetch stubbed, routes both webhooks and returns 404 for anything else. Production notes - Respond fast. Do the API call after replying to the webhook if it can take long. A slow endpoint delays your own retries and the sender's. - Store state in a database. The in-memory maps here are for the tutorial: orders, sent keys and seen message IDs all need to survive a restart. - Normalise phone numbers. The bot compares digits only, which works when your store saves numbers with the country code. If it doesn't, use libphonenumber with your default country. - Check your automations. If a keyword rule or a welcome chatbot also answers every message, the customer may get two replies to a tap. --- WAPGROWAI is built by DI Solutions, a custom software and AI development company. This series covers what we've learned building WAPGROWAI on the WhatsApp Cloud API. Related: send WhatsApp order updates from Google Sheets and routing WhatsApp quick-reply buttons to actions.
I made a macOS shortcut that discovers MCP tools at runtime and prompts you to run them I started with a shortcut for finding commercial properties near my location. After getting that working, I wanted to reuse it with other MCP servers without rebuilding the tool menus each time. The result is MCP Toolkit. Get the shortcut on iCloud MCP is a protocol that lets services describe their tools and the inputs they accept. This shortcut reads those descriptions and turns them into input prompts. No AI model runs inside it. To use it: 1. Paste an MCP server URL. 2. Choose one of the tools it returns. 3. Select fields and answer the prompts. 4. Review the request before sending. 5. View the text, structured data, or raw response. It remembers named servers, caches tool definitions, and saves requests with their arguments. You can also select several saved calls and run them in sequence to get one combined report. Each call uses its saved arguments; results don’t feed into later calls. I built and tested it on macOS. I haven’t verified iPhone or iPad compatibility. It supports stateless HTTP endpoints returning JSON; OAuth sign-in and streaming responses aren’t supported. Complex inputs still need JSON entry, and structured results need better formatting. Saved arguments use global Shortcuts storage, which other shortcuts can access, so keep credentials out of them. I generated it using Shortcutkit, a library I created, with help from a coding agent. The Github source and case study cover the build and native-runtime issues I encountered. Shortcutkit is available in Python and Typescript packages too.
크롬보다 9배 빠른 AI용 브라우저, 깃허브 2위 Lightpanda #AI속보 #Shorts Zig로 처음부터 새로 만든 AI 에이전트용 헤드리스 브라우저 Lightpanda가 오늘 깃허브 트렌딩 2위예요. 공식 벤치마크에서 헤드리스 크롬보다 메모리는 16배 덜 쓰고 9배 빨랐어요. 출처: GitHub lightpanda-io/browser lightpanda-io/browser Instagram·Threads·X: @sird_tech 이 영상의 내레이션은 AI 음성으로 생성되었습니다. #깃허브 #GitHub #Lightpanda #AI에이전트 #오픈소스 #AI속보 #Shorts
Monopoly'de zar atınca evler titreşimden kayıyordu, zar atan bir uygulama yaptım. Para alışverişi de vakit kaybıydı, transfer ekledim. Sonuç: Monopoly'nizi dijital bankacılığa çeviren uygulama oalkandev/monopoly-bank
@SeraAndroid Here’s HOL’s contribution guide: github.com/hashgraph-online/awesome-ai-plugins/bl…. Add one line under Development & Workflow with a one-sentence description, test it, then open a PR.
Top 10 GitHub Stars This Week | Oct 25-31, 2026 #Shorts Today's fastest-rising AI repositories on GitHub, ranked by real momentum from the last 24-48 hours rather than all-time size. Every repository was checked against the GitHub API on 2 November 2026, and the list is dominated by agent infrastructure: orchestration runtimes, control planes, memory layers, security skills and fast decision engines. Ranked list (the video counts down 10 → 1): 1. openclaw/openclaw — openclaw/openclaw 2. obra/superpowers — obra/superpowers 3. mattpocock/skills — mattpocock/skills 4. affaan-m/ECC — affaan-m/ECC 5. thedotmack/claude-mem — thedotmack/claude-mem 6. Panniantong/Agent-Reach — Panniantong/Agent-Reach 7. calesthio/OpenMontage — calesthio/OpenMontage 8. ayghri/i-have-adhd — ayghri/i-have-adhd 9. browser-use/jev-ultrafast — browser-use/jev-ultrafast 10. yetone/magpie — yetone/magpie Disclaimer: rankings are based on GitHub trending and star-velocity snapshots for 2 November 2026 and change daily. Star counts are approximate and move fast — they were read from the GitHub API on the day of recording. Licences are mentioned only where a repository clearly states one. New AI GitHub Top 10 every day — subscribe for tomorrow's list. #GitHub #AI #Agents #OpenSource #LLM #MachineLearning --- More AI content --- ⚡ AI in 60 Seconds: youtube.com 🤖 Hermes Agent News: youtube.com 🔬 Top 10 HF Models: youtube.com 💬 Join our Discord community: discord.gg
#fsharp Has anyone looked at l0ng-ai/openidea ? I have downloaded this and so far it's been working fine with #fsharp and #flutter
この1週間ほど、ClaudeCodeでずっとProlog処理系作ってるけれど、GCや挙動難しい。WAM使ってないし、モダンC++にこだわってしまったし。でも面白いSilentMalachite/mosa-prolog
#fsharp Has anyone looked at l0ng-ai/openidea ? I have downloaded this and so far it's been working fine with #fsharp and #flutter
FDO Workshop 2: Build a GitHub API Plugin & Debug with Plugin Doctor Turn a demo plugin into a real integration with FlexDevOPs (FDO). In this workshop, we build a GitHub Release Monitor that fetches the latest published release of a public repository—without an API token. Then we handle a failed request, keep previous results clearly labelled, and use Plugin Doctor to investigate a deliberately introduced handler exception before fixing it and verifying recovery. You’ll learn how to: • Make backend HTTPS requests with input validation and a timeout. • Declare and approve the plugin’s network permissions. • Run tests, compile, and deploy your plugin locally. • Show loading, success, and failure states without presenting stale data as fresh. • Read Plugin Doctor findings and error details, then fix and retest the handler. SOURCE CODE + STEP-BY-STEP SETUP github.com/anikitenko/fdo/tree/main/examples/work… Start with README.md in that folder. Download the repository ZIP, extract it, and import examples/workshop/2 through FDO’s Create Plugin dialog using “Build from source and install.” Review the network permissions before activating the plugin. GET FDO fdo.alexvwan.me FDO SOURCE anikitenko/fdo REQUIREMENTS FDO 1.0.5 or a compatible newer release, internet access, and a local signing certificate. Reuse the certificate from workshop 1, or follow the setup guide. No GitHub token, cloud account, AI subscription, Docker, or external CLI is needed for this example. CHAPTERS 00:00 From demo data to a real API 00:18 Replace the demo adapter 00:50 Review the network permissions 01:12 Test, compile, and deploy locally 01:30 Check the real release 01:49 Handle a failed check 02:05 Investigate with Plugin Doctor 02:34 Fix the handler and retry 02:55 What’s next: standalone Docker export The Plugin Doctor failure is a controlled teaching example. The supplied source already contains the correct failure handling, and the README explains how to reproduce and repair the diagnostic exercise. Public GitHub API rate limits apply, and the latest release shown when you run the plugin may differ from the recording. Next workshop: exporting a compatible FDO plugin as a standalone Docker application. What would you connect to FDO next? Share your idea in the comments. #FDO #FlexDevOPs #DevOps #GitHubAPI #TypeScript
busd 0.6 is out! The pure-Rust D-Bus broker now: • matches dbus-broker perf on method calls • beats its perf on signals by up to 67% • runs on zruntime instead of Tokio • cuts off clients that stall it github.com/z-galaxy/busd/releases/tag/0.6.0 #rustlang t.co
还在用 Inter、Roboto、Lato、Poppins?你的界面可能已经和无数 AI 产品撞脸了 刚刚开源几天的可变无衬线字体 Leon Sans 2.0,带来更有辨识度的字形细节和更鲜活的视觉气质 如果你想让项目摆脱千篇一律的「AI 页面感」,这款字体值得马上收藏 cmiscm/leonsansfont t.co
Novo Port Midnight Club 3 com VIP para Android pelo XREVIVE Finalmente fizeram um port desse jogo com o menu recomp embutido e VIP, tendo como alterar a dificuldade!! É a primeira versão do jogo, senti estar bem otimizada, só uma vez ou outra que compila os shaders (na garagem) um problema que percebi, é que ainda não tem suporte a controles na tela, só via controle Bluetooth ou USB, a instalação é simples, você precisa do seu XBE ou ISO do jogo, pode ser Americana ou Europeia, instale o Launcher do XREVIVE .apk, entre nele e procure a pasta do jogo, depois de recompilar, o APK vai para uma pasta criada na raiz do seu celular pelo XREVIVE, é só instalar e ser feliz. Lembrando que é a primeira versão, e que tem opções do VIP que necessitam de uma versão mais avançada, então esse conteúdo vai sendo liberado aos poucos, conforme o desenvolvedor atualizar... 👇 github.com/Teraflopping/xrevive/releases/tag/v0.3… 👇 vimm.net
I built a free tool that attacks a Supabase app as one customer to see if it can read, change or delete another customer's data (built with Claude Code) I built this, so weigh my enthusiasm accordingly. It's free and MIT licensed. I'm not a programmer: I'm a product owner in South Africa who builds by directing Claude Code. Why I run my own rental-management app on Supabase. The question that worried me: can one of my customers see or change another customer's data? Row level security is easy to get wrong, and I can't read the policies well enough to be sure. So I had Claude Code build something that checks by trying, not by reading. What it does tenant-leak-check rebuilds your app's database on your own machine from your migration files (Docker, local only; it refuses anything that isn't a local address and needs no keys). It creates two made-up customers with made-up data. Then it really attacks, as customer A and as a visitor who isn't signed in: - tables: read, add, change, move a row to the other customer, delete - storage: list, download, upload, overwrite, delete the other customer's files - database functions: called with customer B's ids You get an HTML, Markdown and JSON report with the evidence (what was sent, what came back) and a plain-English fix for each leak, plus exit codes so CI can fail the build. Migration mode runs the app before and after a new migration and flags new leaks and risky changes: policy removed, RLS switched off, column dropped, with line numbers. There's also a Claude Code skill: you say "run the leak check" and it runs it and explains the report. What I checked it on - A demo app with 19 planted leaks: it finds all 19. That's 48 failed checks, none missed, none extra, and the tests require an exact match. The fixed version of the same app comes out clean. - My own rental-management app: 669 cross-customer checks, 0 leaks, plus 3 smaller findings worth fixing. - A deliberately bad migration I made up for that app: 6 new leaks and 4 flagged lines. How Claude Code was used Claude Code (Opus 5.5) did all the building, in four sessions. I wrote the brief and the rules: local only, never weaken a test, and a check can never "pass" unless it was really carried out; otherwise it must say "not tested" or "unclear" and give the reason. The planted-leak demo was the key part, because it showed the tool catching what it claims to catch. Limits - It's an automated isolation test, not a security certification, audit or penetration test. "0 leaks" means none found in what was tested. - It tests a local copy built from migration files, not your live database. Anything changed by hand in production is invisible to it. - It doesn't test your app code, Edge Functions, anything using the service-role key, Realtime or webhooks. - Two made-up customers with a few rows each, so rules that depend on lots of data may not get exercised. - Database functions are called once with automatic arguments. If one refuses because the input was invalid, the report says so, and what it does with a realistic request isn't proven. - Needs Node 24, Docker and the Supabase CLI. Early version (0.1.0), only tried on the demos and my own app. Try it seanjohnson-dev/tenant-leak-check The README walks through it step by step, and the demo apps run in a few minutes. If you'd rather have me run it on your project and explain the report, message me. More about what I do: swjdigital.com A question If you run a Supabase app with more than one customer: which leak shapes should it try that it doesn't? And if it gets something wrong on your project, tell me.
BookStack CSS broken / links hit 127.0.0.1 after a tunnel? .env → APP_URL=<public HTTPS host>, restart. Local check: curl -I 127.0.0.1:6875 cftunnel quick 6875 → free https hostname. Free intranet tunnel + reverse proxy, MIT: qingchencloud/cftunnel cftunnel.qt.cool t.co
Problem with Spec driven development Hi everyone, I’m looking for some guidance on my workflow. I feel like I’m missing something. I started working on a project about two months ago and have been following Matt Pocock’s skills. It worked well at first. The grilling sessions were really helpful, and I got useful stories and documentation out of them. I also used AI to write some additional Markdown files for features that needed them. But now that I’m changing and reimplementing features, the docs just keep getting bigger. For example, I originally wanted guest login, then switched to Google sign-in, and now I’ve moved to third-party sign-in. Each change seems to add more to these already large files. I’m getting stuck on how to handle smaller changes: - If I just want to change a color, do I need to run /grill and go through the whole process? When I make quick design changes directly, those changes don’t get reflected in the docs. - What about small features? Following the full workflow every time is becoming a pain in the ass, and loading all this documentation is eating through my tokens. How are you handling this in your projects? When do you use the full workflow, and how do you keep the docs up to date when you make smaller changes?
Yandex Music client for the PSP Update Checking the screen design of my music streaming app on the PSP; my colleague added animated visualization. Now the recommendations and shuffle work. There are a lot of small fixes. Battery life has been increased. amdray/yandex_music_psp
思いついたのに、入力する頃には忘れてる。 無料PCアプリ「Handy」は、キーを押して話す→文字を入力欄へ。音声認識はPC内で処理。 Win/Mac/Linux対応。導入・モデル取得・権限設定が必要。認識結果は確認してね。 名案、キーボードまでの道で迷子にしない。 cjpais/Handy t.co
I got tired of ad-filled office apps, so I built a free, fully offline one for Android (Word/Excel/PowerPoint/PDF, GPL-3.0) Long time reddit user but first time poster, so apologies in advance for any errors. Every time someone here asks for a good FOSS office app for Android, I've always seen the same answers: "Collabora is clunky", "LibreOffice Viewer is abandoned", or "just use OnlyOffice and accept the account nags". I have been through the same rabbithole for months, so I finally decided to build one on my own: Libreon is a FOSS office suite for Android 1. Edits Word, Excel and PowerPoint (docx/xlsx/pptx, doc/xls/ppt, ODF, RTF) using the LibreOffice engine 2. PDF: fill forms, sign, highlight text (saved as standard annotations), search 3. Text, Markdown (with preview), CSV (with table view), and it handles huge files 4. Tabs, so you can keep many documents open, and unsaved changes survive Android killing the app 5. Search open and recent files, find in any document, word count for documents and selections 6. Light/dark themes, plus "light pages" for a single document What it doesn't have: ads, subscriptions, accounts, trackers, analytics, or AI features. It doesn't even have the internet permission, so Android itself stops it from going online. It's fresh out the oven and very much a beta (tested on a Galaxy S24 Ultra and a couple of other Android phones, the Android emulator and BlueStacks), so expect rough edges. Android 12+, about 115 MB because the whole office engine is inside. Full disclosure: I built it with AI coding assistants (Claude Code and Gemini). The code is all public, GPL-3.0, and the app itself has zero AI in it. **GitHub and APK: jainiakhil/Libreon** Bug reports and feature requests are very welcome. That's the main reason I'm posting. Also happy to answer any questions here!
アプリから URL を開くとき、ルールに従ってブラウザーやプロファイルを切り替えるツールを公開しました。 Windows と macOS 両方でお使いいただけるのと、ルール設定ファイルを複数端末でも共有できるのが特徴です…! Cysharp/Preferis
【画像を2画素ずつ一気に展開】 ・1バイトから2画素を復元 ・4bppで展開を高速化 ・RP2350向け実験から誕生 組み込み画像の速度設計が変わる? #Nibnib raphlinus/nibnib
给编码代理补上数据面板这一课:哪些组件该用、颜色什么时候不能上、图表怎么不算撒谎,这些判断以前得靠设计师盯着,现在写成规则让代理自己执行。 abdiraimov-otabek/dashboard-design-skill 这个 skill 教编码代理做数据面板:KPI 卡、图表、热力图、子弹图、日期选择器、排名列表、空状态都有一套成文规则,Tailwind + React 和 SwiftUI 两条实现路径都写了参考文档。
Execution is only part of the picture. Our RSI research explores how task feedback can improve future workflows. Agnes Harness: AgnesAI-Labs/agnes-harness Agnes Harness MAS Mode report: github.com/AgnesAI-Labs/Agnes-Harness-MAS-Mode/bl… Build with Agnes.
WWE 2K15 PC 0.3 beta is out! 🎮 The native renderer is now the default: 60 fps on weak PCs and integrated GPUs, even on 2 CPU cores. White attires and an Intel crash are fixed too. github.com/iMrBurn/wwe2k15-pc/releases #WWE2K15 #WWE #PCGaming
magpie真不错,可以设置规则把复杂的问题丢给高级模型,简单的事交给一般模型,难怪这么多人推荐,而且还是大佬作品,品质有保证 yetone/magpie t.co
@arshadbarves Deal! I'd be happy to test your game for 14 days. Please test RadioText AI too! Download: github.com/OskolElkin/RadioText-AI-Releases/relea…
🔥 GitHub週間急上昇 #2/3 beenuar/aisoc ⭐ 今週 +2,450 / 累計 6,485 Python 自ホスト可能なオープンソースのAIセキュリティ運用基盤。セキュリティ情報を取り込み、脅威の検知・統合や監査可能なAI調査を行い、人の承認を経て… beenuar/aisoc #ClaudeCode #MCP #AIエージェント #LLM
🍿 Kodi: full library sync is here The WeTrakr add-on for Kodi now has full two-way sync, and version 1.3.5 is live in the official Kodi repository. If you installed it from there, Kodi will update it automatically. What's new - Two-way library sync: watched (with dates), ratings and resume points go from your Kodi library to WeTrakr, and anything you mark on WeTrakr, from any app or device, shows up in Kodi. Marks you make in Kodi are sent right away. - Your lists in Kodi: pick lists in wetrakr.com > Settings > Kodi. Your movies and shows get a WeTrakr: list name tag and a smart playlist, ready to use as home screen widgets. Plan to Watch too. - Next Episodes widget: your WeTrakr Next Episodes on the Kodi home screen. Library episodes play the local file; the rest open through TMDb Helper. - Better matching for add-on streams: movies and episodes from video add-ons (Umbrella, Fen Light, POV...) are recognized even without ids, and resume where WeTrakr left off. - Lighter and smoother: fewer requests while playing, and the login waits for the network and retries on its own. - New look: new icon, fanart and logo. Getting started 1. Install or update the add-on. 2. Open its settings and press Connect to WeTrakr. 3. The sync runs in the background (never during playback). Options and Sync now are under Settings > Library sync. >Want the newest version before it reaches the official repo? Betas are on GitHub: github.com/wetrakr/wetrakr-kodi/releases Tell me how it works for you, and thanks to everyone who tested the betas!
好哦,pr被合了🥰 Lody#1855
@harbimiolum Projeyi de paylaşmışlar? oosexgang/hakios-xnu-kernel
🚀 Trending on GitHub kanzo by emanuele-em ⭐ 712 🧠 A tiny self-hosted kanban board that's also an MCP server, so you and your AI coding agents (Claude Code, Codex) work off the same task board. emanuele-em/kanzo #GenAI #OpenSource #AI
The Nimbus Project: Native Ports of all 3 DBZ GameCube games. Android/Linux/Windows - Cross Play/LAN/CO OP Free Online Matchmaking nimbus-project.pages.dev Alpha 1.1 is out, need testers The Nimbus Project is a set of native ports of all three DBZ GameCube games: Budokai, Budokai 2 and Sagas. All three run under one launcher on Linux, Windows and Android. It isn't emulation. It uses a hybrid core that sits between recompilation and decompilation. **Alpha 1.1 just dropped and I need testers.** What's in it: - **Online play:** free matchmaking with server selection, LAN, and crossplay tested across Linux, Windows and Android - **Co-op:** 2-player co-op in Sagas - **HD packs:** optional AI-upscaled texture packs for all three games, plus HD movies for Sagas - **New in 1.1:** polished Android touch controls (adjustable opacity, and they hide automatically when a controller connects), a fix for Sagas cel shading outlines disappearing during explosions, and a Components menu with version history and rollback Requirements: - Windows 11 x64 with a Vulkan GPU - Android 13+ on arm64 - Linux on Ubuntu 26.04 x86-64 - Your own disc. No game images are included. It's free, with no paywalls and no donations. It's closed source for now while I work on servers, networking and cross-compatibility, and open source is planned. This was made with AI assistance. Claude was a big part of the workflow. What I'd love from testers: what device you're on, how it runs, and any crossplay matchups you try. Bug reports are welcome in the comments. - Site: nimbus-project.pages.dev - Downloads: github.com/thebabyhippo303/nimbus-project/release…
If you had an offline, <100KB astrodynamics engine, built entirely on a mobile phone, that calculates past or future orbits and local sky coordinates for any Solar system object, asteroid, or Earth orbiting satellite... what app or website would you build on top of it? I’ve been building astlo, a terminal-native astrodynamics engine written in Python. The entire core engine clocks in at **under 100KB**, handles N-body state vectors and ephemerides, and has been **coded and run entirely on an Android phone using Termux**. (Recently cross-validated vector magnitudes against NASA JPL .bsp files, and it holds up clean). Of course the vector components are going to differ slightly... Here's the catch: I’m purely a backend/physics and CLI - SDK builder. I don't touch HTML, CSS, or frontend UI, and I don't plan to. iamnothimbutwe/astlopublic
My first Swift code: an open-source analytics library for iOS. Looking for honest feedback I’m a mobile engineer with many years in native Android and Flutter. Recently I built an open-source analytics library called Herald. I designed it and wrote the Android and Flutter versions myself, and for the iOS SDK I used AI to help me with Swift, since it was my first time writing it. That’s exactly why I’d like a review from real iOS devs: AI knows the syntax, but people who build iOS apps every day know what feels right. The problem it solves: in most apps analytics ends up as one big AnalyticsManager that every layer depends on, and every new vendor makes it worse. The idea: the app should not know which analytics vendors exist. Feature code only says what happened, and Herald sends it to every vendor you use (Firebase, Mixpanel, Amplitude, Adjust, AppsFlyer, Meta) in its own format. An event is a type your app owns: struct CheckoutStarted: Event { let plan: String let seats: Int var name: String { "checkout_started" } var parameters: [String: AnalyticsValue] { ["plan": .string(plan), "seats": .int(seats)] } } And your classes depend only on a small protocol: final class CheckoutViewModel { private let analytics: any EventTrackerService init(analytics: any EventTrackerService) { self.analytics = analytics } func checkout(plan: String, seats: Int) { analytics.track(CheckoutStarted(plan: plan, seats: seats)) } } Since Swift is new for me, I made some design choices I’m not 100% sure about, and I would really like to hear what experienced iOS devs think: - No async and no throws**.** track returns quickly, and a failing vendor reports the error to your error reporter instead of throwing. Does this feel right in Swift, or would you expect async throws? - Setup mistakes stop the app at start-up, for example two providers with the same name. Is that acceptable for a library, or too aggressive? - Swift 6 and Sendable**.** Vendor SDKs aren’t Sendable, so custom factories need u/preconcurrency import. Is there a cleaner way? - Does the API look like idiomatic Swift, or like “Kotlin written in Swift”? GitHub: MkhytarMkhoian/herald-ios Docs: mkhytarmkhoian.github.io Thanks in advance. Critical feedback is the most useful for me.
为了把鼠标侧键改成截图,装了两百多兆的厂商驱动,还要开机自启+登账号。 Solaar 开源罗技管理工具,几十兆,看电量/连接方式,改键位 DPI 滚轮,配置存进设备本身。 pwr-Solaar/Solaar
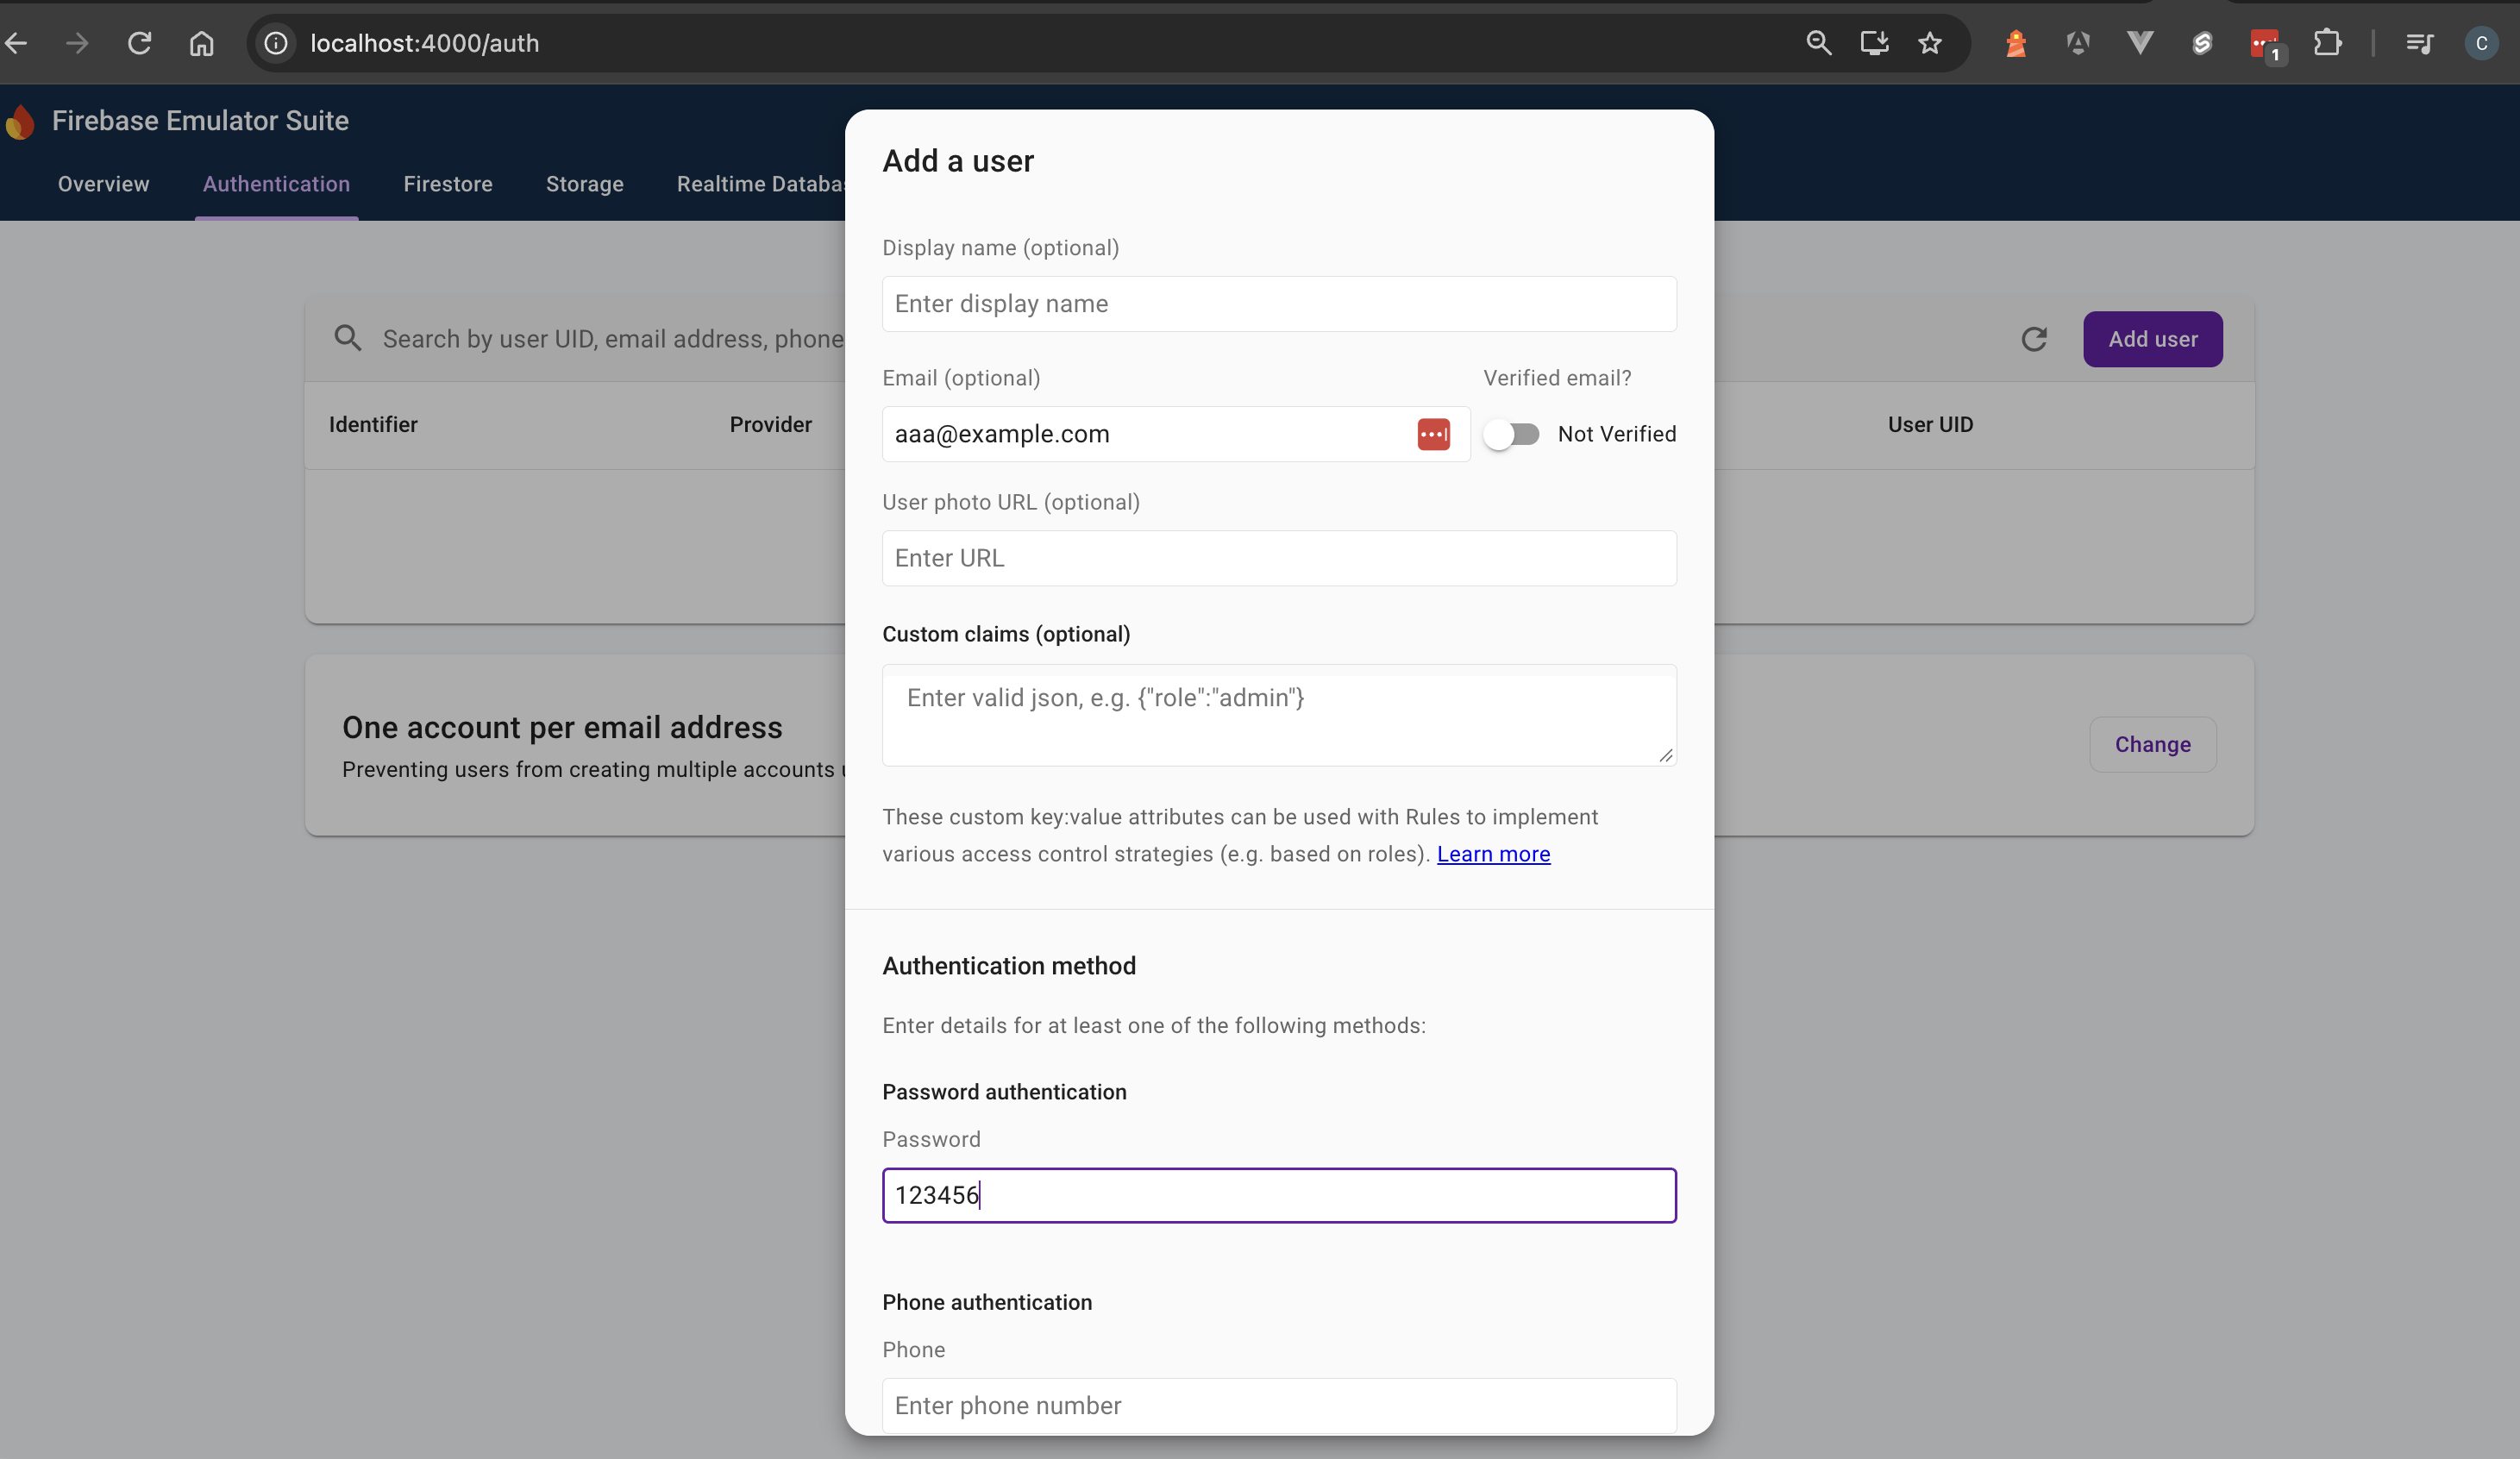
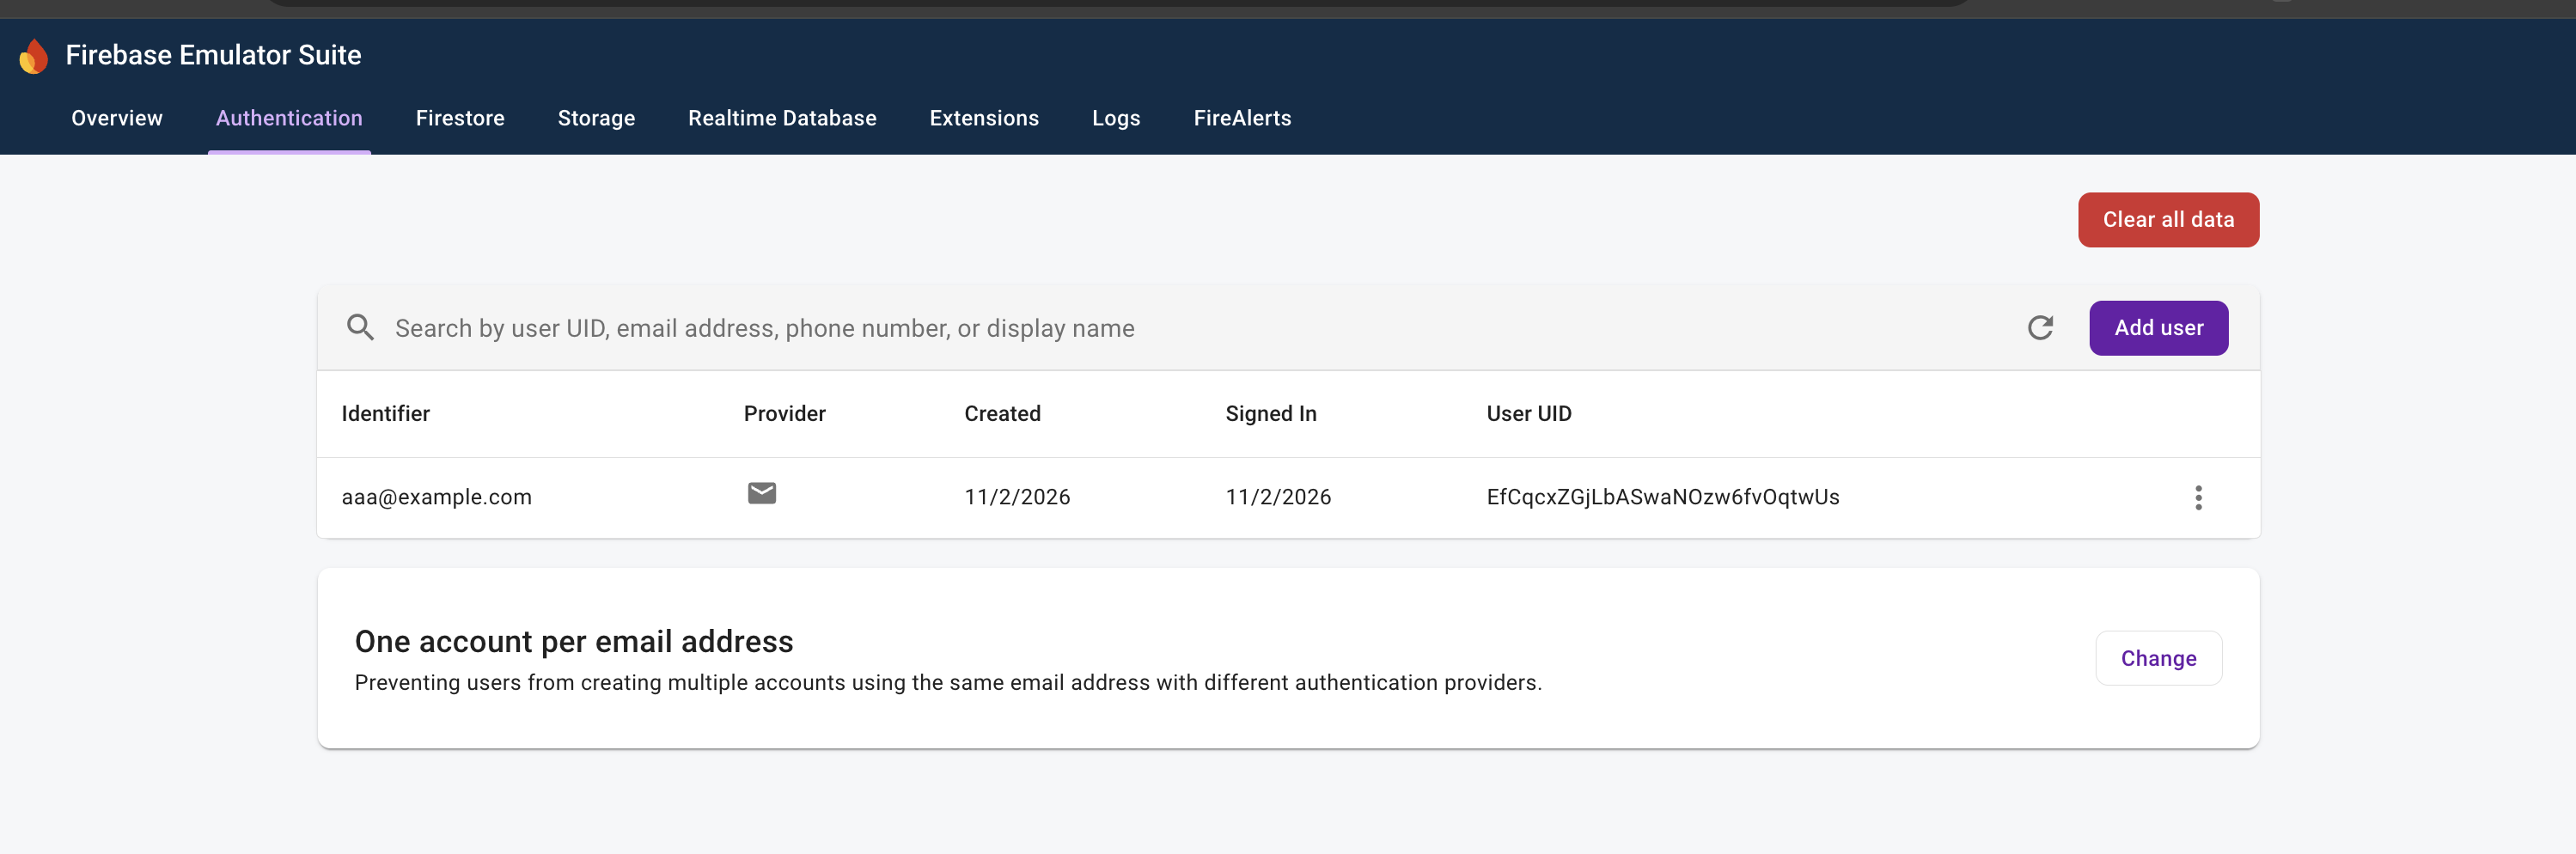
Securing an Angular Firebase AI App with Email/Password Authentication (Part 1: Emulator, AuthService, and Route Guard) [GDE] Anyone with the public URL can use my tokens to perform image analysis and text-to-speech, which can quickly drive up my billing costs. To prevent unauthorized usage, I want to convert /dashboard into a protected route by adding Email/Password authentication with Firebase Auth. Firebase Auth supports many authentication providers out of the box, and I chose Email/Password because it is the simplest method to configure. In Part 1, we will configure the Firebase Auth Local Emulator, build a lazy-loaded AuthService and a functional route guard, and protect the /dashboard route using CanActivateFn. --- Architecture & Mental Model Part 1 focuses on running the Firebase Auth Emulator alongside the Angular dev server and configuring authentication state management. The architecture uses Firebase's browser session persistence (browserSessionPersistence) to manage the user's authentication state, which provides two key benefits: - After a user authenticates successfully, Firebase persists the authentication state in sessionStorage. When the user refreshes the browser page, the browser retains their login state. - When the user closes the browser tab, the browser automatically clears the authentication state from sessionStorage. The next time the user visits the application, they must log in again. Without session persistence, the application would require extra custom logic to check token expiration, explicitly purge the user state from storage, and trigger route redirection. Similarly, because firebase/auth is a heavy third-party SDK, loading it eagerly would increase the initial bundle size. Instead, AuthService lazy-loads it via a dynamic import() to update the reactive isAuthenticated signal. flowchart LR subgraph Dev["Local Development (npm run launch)"] NG["Angular Dev Server (:4200)"] EMU["Firebase Auth Emulator (:9099 & UI :4000)"] end subgraph AuthCore["AuthService (src/app/core/auth)"] ENSURE["ensureAuth() (Single-Flight Promise)"] SDK["Dynamic import('firebase/auth')"] STATE["onAuthStateChanged -> #user Signal"] COMP["isAuthenticated Computed Signal"] ENSURE --> SDK --> STATE --> COMP end subgraph Routing["Angular Router (app.routes.ts)"] GUARD["canActivateDashboard (CanActivateFn)"] HOME["/home (Sign-In Screen)"] DASH["/dashboard (Image Analysis & TTS)"] end NG --> ENSURE SDK -. "isLocalhost()" .-> EMU GUARD --> ENSURE COMP -- "true" --> DASH COMP -- "false (Redirect)" --> HOME --- 1. Configuring the Firebase Auth Emulator & Unified Launch Script 1.1 Enabling the Auth Emulator in firebase.json The { "emulators": { "auth": ... } } block in firebase/firebase.json configures the Firebase Auth Emulator to run on host port 9099 (127.0.0.1:9099), while "ui": { "enabled": true } enables the Emulator UI on port 4000 (http://127.0.0.1:4000). // firebase/firebase.json { // ... rest of configuration omitted for brevity "emulators": { "auth": { "port": 9099 }, "ui": { "enabled": true } } } 1.2 Installing concurrently as a Dev Dependency This step is optional, but I prefer not to start the Firebase Auth Emulator and the Angular dev server in two separate steps—opening one terminal tab to run the emulator and a second terminal tab to run the Angular dev server. Installing concurrently allows us to run both processes with a single command so we can start development immediately. npm install --save-dev concurrently 1.3 Adding Emulator and Launch Scripts in package.json During local development, I connect the Angular application to the Firebase Authentication Emulator to seed a test user for login. AuthService connects to the emulator programmatically, and the new scripts in package.json launch it. // package.json (scripts excerpt) { "scripts": { "start": "ng serve", "firebase:emulate:auth": "firebase --config firebase/firebase.json emulators:start --only auth", "launch": "concurrently \"npm run firebase:emulate:auth\" \"npm run start\"" } } Here is what each script does: - start: Starts the local Angular development server (ng serve) on http://localhost:4200. - firebase:emulate:auth: Reads the firebase/firebase.json configuration to start the Authentication Emulator only. - launch: Launches both the Angular client and the Firebase emulator concurrently, allowing me to prompt the Antigravity CLI to execute it in the background. --- 2. Creating a Test Account in the Firebase Emulator UI Seeding a user is a manual process, so I open the Emulator UI at http://localhost:4000 to create a dummy user with the credentials aaa@example.com and 123456. Note that 123456 is a weak password created strictly to facilitate local authentication testing. !Create a new user form in Firebase Emulator Suite Caption: Creating a new test user with an email and password in the Firebase Emulator UI at http://localhost:4000. Saving the form creates the user account. Because the users table displays the email address without the password, I recommend using a password that is easy to remember or saving it in a password manager. !User account successfully created in Firebase Emulator Suite Caption: The newly created email/password user account displayed in the Firebase Authentication Emulator. --- 3. Building a Lazy-Loaded, Signal-Driven AuthService 3.1 Defining the AuthCredentials Interface The AuthCredentials interface defines the email and password properties for user login credentials. // src/app/core/auth/auth-credentials.interface.ts export interface AuthCredentials { email: string; password: string; } 3.2 Implementing AuthService with Dynamic SDK Loading and Signals First, AuthService injects WINDOW, ConfigService, and DestroyRef, and declares the #user signal, the isAuthenticated computed signal, and private fields to cache the Firebase Auth instance and SDK module: // src/app/core/auth/auth.service.ts import { WINDOW } from '@/core/constants/navigator.const'; import { ConfigService, isLocalhost } from '@/core/firebase'; import { computed, DestroyRef, inject, Service, signal } from '@angular/core'; import type { Auth, User } from 'firebase/auth'; import type { AuthCredentials } from './auth-credentials.interface'; const AUTH_EMULATOR_URL = 'http://127.0.0.1:9099'; @Service() export class AuthService { readonly #window = inject(WINDOW); readonly #configService = inject(ConfigService); readonly #destroyRef$ = inject(DestroyRef); readonly #user = signal<User | null>(null); user = this.#user.asReadonly(); isAuthenticated = computed(() => !!this.#user()); #auth: Auth | null = null; #authSdk: typeof import('firebase/auth') | null = null; #authReady: Promise<void> | null = null; Next, AuthService manages the Firebase Auth lifecycle through four core methods: 1. loadAuth() - Dynamically imports firebase/auth for the first time and retrieves the current Firebase application instance. - Connects the Angular application to the Firebase Auth Emulator when running on localhost. - Sets authentication state persistence to browser session persistence (browserSessionPersistence), registers onAuthStateChanged to monitor authentication state changes, and awaits auth.authStateReady() for the initial auth state to resolve. - Stores the auth instance in #auth and the Auth SDK module in #authSdk. private async loadAuth(): Promise<void> { const [firebaseApp, authSdk] = await Promise.all([this.#configService.getApp(), import('firebase/auth')]); const auth = authSdk.getAuth(firebaseApp); if (isLocalhost(this.#window)) { authSdk.connectAuthEmulator(auth, AUTH_EMULATOR_URL, { disableWarnings: true }); } await authSdk.setPersistence(auth, authSdk.browserSessionPersistence); const unsubscribe = authSdk.onAuthStateChanged(auth, (user) => this.#user.set(user)); this.#destroyRef$.onDestroy(unsubscribe); await auth.authStateReady(); this.#auth = auth; this.#authSdk = authSdk; } 2. ensureAuth() - Ensures loadAuth() resolves exactly once and returns both the auth instance and the #authSdk module. Keeping both in memory allows signIn() and signOut() to reuse them when logging a user in or out. async ensureAuth(): Promise<{ auth: Auth; sdk: typeof import('firebase/auth') }> { if (!this.#authReady) { this.#authReady = this.loadAuth(); } await this.#authReady; if (!this.#auth) { throw new Error('Auth is not initialized'); } if (!this.#authSdk) { throw new Error('Auth SDK does not exist'); } return { auth: this.#auth, sdk: this.#authSdk }; } 3. signIn() - Accepts the user's email and password, validates the arguments, and calls sdk.signInWithEmailAndPassword() to authenticate the user. When authentication succeeds, the authSdk.onAuthStateChanged(auth, (user) => this.#user.set(user)) listener observes the state change, updates the #user signal, and recalculates the isAuthenticated computed signal. async signIn({ email, password }: AuthCredentials): Promise<void> { if (!email || !password) { this.#user.set(null); return; } const { auth, sdk } = await this.ensureAuth(); await sdk.signInWithEmailAndPassword(auth, email, password); } 4. signOut() - Calls sdk.signOut(auth) to sign out the currently logged-in user. Similarly, the onAuthStateChanged listener resets the #user signal to null and recalculates the isAuthenticated computed signal. async signOut(): Promise<void> { const { auth, sdk } = await this.ensureAuth(); await sdk.signOut(auth); } } --- 4. Protecting the Dashboard Route with canActivateDashboard 4.1 Creating the CanActivateFn Route Guard canActivateDashboard is a functional route guard of type CanActivateFn. It injects AuthService and Router to verify the user's authentication status and handle route redirection. Calling await authService.ensureAuth() initializes Firebase Auth (connecting to the Auth Emulator when running on localhost) and updates the isAuthenticated computed signal with the current authentication state. When the user is authenticated, the guard returns true to allow navigation to the route; otherwise, it redirects the user back to /home via router.createUrlTree([APP_LINKS.HOME]). // src/app/core/auth/auth.guard.ts import { AuthService } from './auth.service'; import { APP_LINKS } from '@/core/constants/routes.const'; import { inject } from '@angular/core'; import type { CanActivateFn } from '@angular/router'; import { Router } from '@angular/router'; export const canActivateDashboard: CanActivateFn = async () => { const authService = inject(AuthService); const router = inject(Router); await authService.ensureAuth(); if (authService.isAuthenticated()) { return true; } return router.createUrlTree([APP_LINKS.HOME]); }; Finally, we re-export the AuthCredentials interface, the canActivateDashboard route guard, and AuthService from a single barrel file (src/app/core/auth/index.ts). This gives the /dashboard route configuration—and the Sign-In component we will build in Part 2—a clean, unified import path. // src/app/core/auth/index.ts export * from './auth-credentials.interface'; export * from './auth.guard'; export * from './auth.service'; 4.2 Wiring canActivateDashboard in app.routes.ts The canActivate property of the dashboard route accepts the canActivateDashboard function in an array. When a user types /dashboard in the address bar or navigates to the path programmatically, the router executes this route guard function. Authenticated users proceed to the dashboard, while the guard blocks unauthenticated visitors and redirects them back to /home. // src/app/core/constants/routes.const.ts export const ROUTE_PATHS = { HOME: 'home', DASHBOARD: 'dashboard', } as const; // src/app/app.routes.ts (dashboard route excerpt) { path: ROUTE_PATHS.DASHBOARD, title: 'Firebase TTS', providers: [provideEnvironmentInitializer(() => inject(ConfigService).initialize())], loadComponent: () => import('./features/dashboard/dashboard.component'), canActivate: [canActivateDashboard], }, --- Takeaways & What's Next In Part 1, we configured Firebase Auth to protect our image analysis and TTS endpoints: - Local Auth Emulator: Configured the Auth Emulator in firebase.json and used concurrently to start the emulator and Angular app together. - Lazy-Loaded AuthService: Dynamically imported firebase/auth once and used signals (#user and isAuthenticated) to track the login state. - Route Guard: Added canActivateDashboard to app.routes.ts to redirect unauthenticated users back to the home screen. In Part 2, we will build the interactive sign-in experience on the frontend. We will use Angular 22's Signal Forms to create the form where users input their email and password, use Angular CDK Dialog to open the sign-in modal when a user clicks the Sign In button on the home screen, and connect the Sign-In component with AuthService to call the signIn() method. Resources - GitHub Repository: ng-firebase-tts - Firebase Password Authentication - Firebase Auth State Persistence - Angular CanActivateFn