Mentions
Conversations linking to GitHub, newest first. Times are UTC.
Mentions by source
X
Bluesky
Hacker News
V2EX
Qiita
DEV
Mailwal
Mastodon
Latest posts
Les limites : → pas un clic : installation, ffmpeg, clé ElevenLabs → il attend votre accord avant de couper → projet de 6 mois, dernier commit il y a 3 semaines Dépôt : browser-use/video-use
POMWright v3.0.2 – New documentation site and a lot of improvements under the hood I've posted about POMWright here before when releasing v1 and v2, so here's a quick update now that v3.0.2 is out. For those unfamiliar, POMWright is a TypeScript companion library for Playwright/test. Its main feature is a typed LocatorRegistry that lets you define reusable locator segments and automatically chain them through paths. It also provides PageObject with its own base URL and navigation helpers, a more capable SessionStorage, report logging and an step decorator, all of which can be used independently. The main focus of v3 has been improving and hardening what's already there: - New documentation site with guides, examples, a complete API reference and a v2 → v3 migration guide. - Better validation and error messages, catching mistakes earlier and making failures easier to understand and troubleshoot. - Reworked SessionStorage, now built on Playwright's native page.sessionStorage API, adding typed values and reliable seeding before the application loads. - Improved PageObject lifecycle, navigation and step decorator, including better error locations in Playwright reports and traces. - Significantly expanded testing and CI, covering multiple browsers, Node.js versions, Playwright versions and module systems. The goal hasn't changed: complement Playwright, not replace it, and build on its existing APIs and behavior rather than change them. Use whichever parts are useful for your project, if any. I've also documented the design principles for anyone interested. Docs: dyhex.github.io GitHub: DyHex/POMWright Feedback, questions and criticism are always welcome!
Rigby2D 0.5 is coming on November 6. Rigby2D 0.5.0 releases on Friday, November 6. The update is already live in the browser editor, so you don't have to wait for the desktop release to try it. Here's what's coming: Generate meshes from images You can now generate a mesh directly from a sprite's alpha. Set the outline vertex count, adjust the alpha threshold and smoothing, and control interior vertex density. The mesh regenerates live as you change settings. It also preserves existing bone weights when regenerating a weighted mesh. The generated result remains a normal editable mesh, so you can continue refining it with the usual tools. Copy and paste animation keys The dopesheet now supports copying and pasting selected frame columns or multiple regions. It includes Merge, Overwrite and Overwrite All modes, with track matching by name so keys can be pasted between animations. This feature was contributed by github.com/maruccimauro. Thanks for the contribution! Phaser 4 support The Phaser runtime now supports Phaser 4 alongside Phaser 3.60+. Texture uploads and WebGL context handling have been updated, with matching output verified on Phaser 3.90 and 4.2. Other fixes - Fixed a crash when moving a mesh to another bone. - Improved AutoRig spine alignment. - Fixed DragonBones import selecting the wrong armature. - Improved add-on script menu organization. - Updated the Breathing Idle add-on. Try it now: rigby2d.com 0.5.0 desktop release: Friday, November 6 Windows, macOS and Linux installers, portable app, and all runtimes will be available. Full update notes: rigby2d.com Website: rigby2d.com Source code: jaisurya-dev-art/rigby2d If you try the browser build, I'd love to hear your feedback. You can share it here at r/rigby2d or report issues on GitHub.
AirDrop for every device, not just Apple. LocalSend is a free, open-source app that shares files between Android, iPhone, Windows, Mac and Linux, with no account or cloud upload. Note: both devices must be on the same Wi-Fi network. GitHub: localsend/localsend
offline voice-mimic party game in Flutter I made a game called Copy Cat 🐾 Here is how it works players pick a sound They can download it from the web right inside the app or record it or just grab any file from their phone The sound plays out loud Everyone else tries to imitate it Then an on device judge grades each attempt on melody rhythm timbre and energy No internet needed to play One phone hosts and up to 5 join over the same wifi Why I built it Family gatherings and bad internet Every party game out there wants a server and an account and a login. The three modes Random Party : sounds from all players get shuffled into surprise rounds Player's Choice : each player picks one sound and the others imitate it first while the picker goes last Host Challenge : the host lines up sounds from their library and everyone imitates them in order It ships in Arabic and English with dark and light themes plus a little shop with 3D avatars and power ups The stack Flutter with Riverpod 3 and go_router bonsoir for the mDNS discovery plus raw sockets with length prefixed framing flutter_scene for the 3D avatars All scoring runs on device with regression tests because I got tired of breaking it Try it Source code: wissam333/Copy_Cat APK for Android: github.com/wissam333/Copy_Cat/releases If you play a round tell me how the scoring feels That part was the hardest to tune and I want it to feel fair more than anything
用DeepSeek开源的dsh-superagent多智能体架构把我大量进行中的项目过了一遍,发现除了几个需要调整之外,其他基本都是按照这个路数开发的,而且是AI自己设计的deepseek-ai/dsh-superagent-prototype
@Bippykoy1599 solo abrelo con este emulador y ya Djihads80/Eglantine
Want to understand the ideas behind modern computing instead of just learning the latest framework? A curated collection of important computer science research papers. For developers who enjoy going down intellectual rabbit holes. papers-we-love/papers-we-love
@bunjavascript bun#45379 bun#47168 bun#47168 Possible to include these fixes? xD
把 Galaxy S8 的经典体验带回 iOS 我发布了一组相关项目,欢迎体验、围观,也欢迎大家提出建议 Floppikrob/ios-galaxy-s8
@QwenAIFans Thanks for sharing! 🙏 Scripts, logs and photos are all open: 6Robert123/cmp100-100-unlock
Note: this PEP has been submitted to the Steering Council for a decision: python/steering-council#374.
OpenBot: self-hosted alternative to Grok Bot that works with any agent and any harness (9.8k stars) Grok Bot and other hosted AI coworkers (OpenAI Dots, Meta Muse, Claude Duet) lock you into their model, their agent and their cloud. Your data and the agent’s computer all live on their side. OpenBot gives you AI coworkers you run yourself. Each Bot gets its own computer with a browser, files and a shell, and you decide what it’s allowed to touch. It’s built on AG-UI (Agent-User Interaction Protocol), so you can bring any AG-UI agent. LangGraph, CrewAI, Mastra, Claude Agent SDK, Google ADK, Pydantic AI, Agno, etc or something you built yourself, it just plugs in as a Bot. You can also pick a model for each Bot so you can use a cheap model for simple tasks and a heavier one for the hard stuff. Hosted tools by big companies don’t let you do that. What you get: - A computer per Bot you can watch live, and take over when it hits a login or 2FA screen - Policy rules plus an audit log of what was allowed or refused, and why - Connect third-party tools via MCP (Drive, Notion, GitHub, etc) with more through Composio - Talk to your Bots wherever you work: web chat, voice calls, Slack, Teams or plain text messages - Built-in routines that run on a schedule - Desktop app (sign in with Claude or Codex), mobile and a browser extension - 13 ready coworkers to start from (ticket triage, release notes, expense claims and more) Memory and threads run on CopilotKit Intelligence, which you can self-host entirely. It also has something called Automatic Learning - when you correct a Bot, it picks up the pattern and turns it into a skill.md you can review, edit and ship. The Bot uses it the next time without redeploying. Self-hosting is one Docker Compose, a single image or a Helm chart, with your data in your own Postgres. 9.8k stars, 1.2k forks, 50 contributors and 604 merged PRs in about 2.5 months. TypeScript, MIT licensed. CopilotKit/OpenBot
Designsystemet, Now in Elm · cekrem.github.io github.com/ensolabs/designsystemet-elm
Note: this PEP has been submitted to the Steering Council for a decision: python/steering-council#375.
SELAMAT TINGGAL IDM! PRISM Download Manager Gratis, Open Source & Fiturnya Lebih Gila! Selama ini Internet Download Manager (IDM) menjadi salah satu aplikasi download manager favorit pengguna Windows. Namun, sekarang ada alternatif menarik yang wajib dicoba, yaitu Prism Download Manager! Aplikasi open source dan gratis ini hadir untuk Windows, macOS, dan Linux dengan tampilan modern, bersih, serta berbagai fitur yang membuat pengalaman mengunduh file menjadi lebih praktis. Menariknya, Prism bukan sekadar aplikasi download biasa, tetapi menawarkan banyak kemampuan yang membuatnya layak menjadi alternatif serius untuk IDM. Setelah saya mencoba dan membandingkannya dengan IDM, Prism ternyata punya banyak fitur menarik. Mulai dari mengelola download, mengunduh video, menjadwalkan proses download, hingga mengonversi file MP4 menjadi MP3. Bahkan, tersedia fitur AI Models yang memungkinkan pengguna menambahkan model AI dari Hugging Face, sesuatu yang tidak ditemukan pada IDM. Dengan berbagai fitur tambahan tersebut, Prism menawarkan pengalaman yang lebih fleksibel sekaligus tampilan antarmuka yang terasa lebih segar dan modern. Buat kamu yang sedang mencari alternatif IDM gratis, open source, dan bisa digunakan di berbagai sistem operasi, Prism Download Manager patut masuk daftar aplikasi yang wajib dicoba. Apakah aplikasi ini benar-benar bisa menggantikan IDM untuk kebutuhan download sehari-hari? Bagaimana performa dan kelengkapan fiturnya setelah dibandingkan secara langsung? Jangan lupa tuliskan pendapatmu di kolom komentar! Jika informasi ini bermanfaat, bantu dukung channel ini dengan Like, Share, dan Subscribe agar tidak ketinggalan rekomendasi software gratis dan open source menarik lainnya. Download Prism Download Manager: FortoGraphy/prism-download-manager #PrismDownloadManager #IDM #OpenSource #DownloadManager #SoftwareGratis #Windows #Linux #macOS #TechIndonesia 📢 Copyright Disclaimer : 🔸 Under section 107 of the Copyright Act of 1976. 🔸 Every Video, Audio, Teks, Footage, Image etc in this content under terms of Fair Use, Permitted by Copyright Statute. 🔸 Every Content in this Channel for purpose such as Education, News Report, interpretation etc. Copyright © 2026 TeknoXpert — All Rights Reserved [en-US] GOODBYE IDM! PRISM Download Manager is Free, Open Source & Has Insane Features! Internet Download Manager (IDM) has long been one of the favorite download manager applications for Windows users. However, now there's an interesting alternative worth trying: Prism Download Manager! This free, open-source application is available for Windows, macOS, and Linux, boasting a modern, clean interface and a variety of features that make downloading files more convenient. Interestingly, Prism isn't just a regular download application; it offers numerous capabilities that make it a worthy alternative to IDM. After trying it and comparing it with IDM, I found Prism to have many interesting features. These include managing downloads, downloading videos, scheduling downloads, and converting MP4 files to MP3s. It even has an AI Models feature that allows users to add AI models from Hugging Face, something not found in IDM. With these additional features, Prism offers a more flexible experience while also offering a fresher and more modern interface. For those of you looking for a free, open-source alternative to IDM that can be used on various operating systems, Prism Download Manager is definitely worth a try. Can this application truly replace IDM for your daily downloading needs? How do you rate the performance and feature completeness after a direct comparison? Don't forget to share your thoughts in the comments! If this information is helpful, please support this channel by liking, sharing, and subscribing to stay updated on other interesting free and open source software recommendations. Download Prism Download Manager: FortoGraphy/prism-download-manager #PrismDownloadManager #IDM #OpenSource #DownloadManager #SoftwareGratis #Windows #Linux #macOS #TechIndonesia 📢 Copyright Disclaimer: 🔸 Under section 107 of the Copyright Act of 1976. 🔸 Every video, audio, text, footage, image, etc. in this content is permitted under the terms of Fair Use. 🔸 Every content in this channel is for purposes such as education, news reporting, interpretation, etc. Copyright © 2026 TeknoXpert — All Rights Reserved
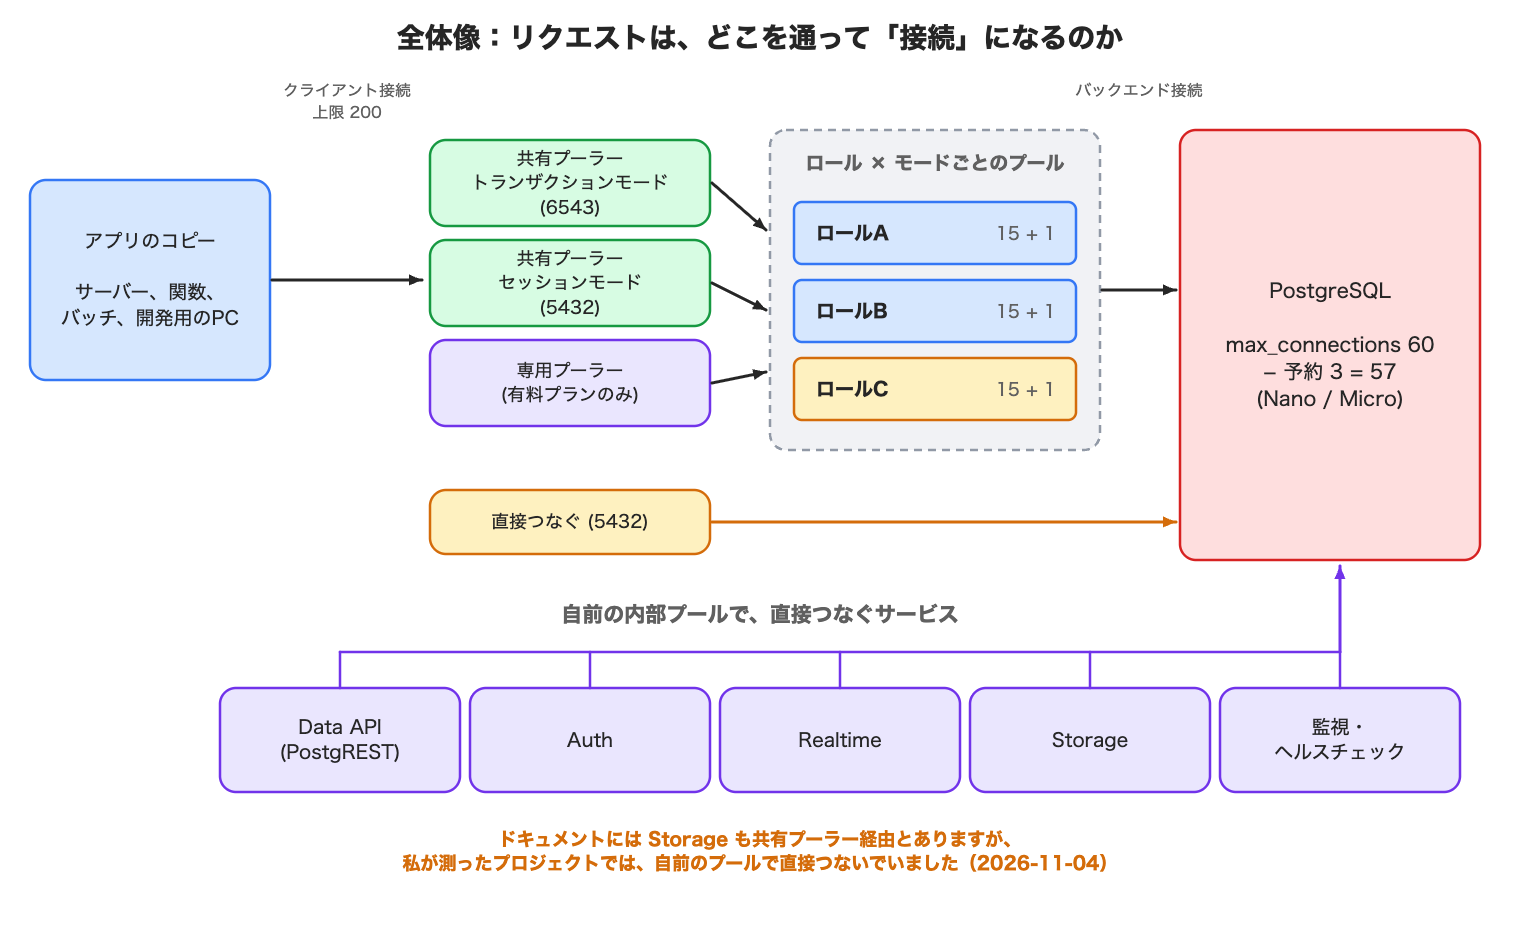
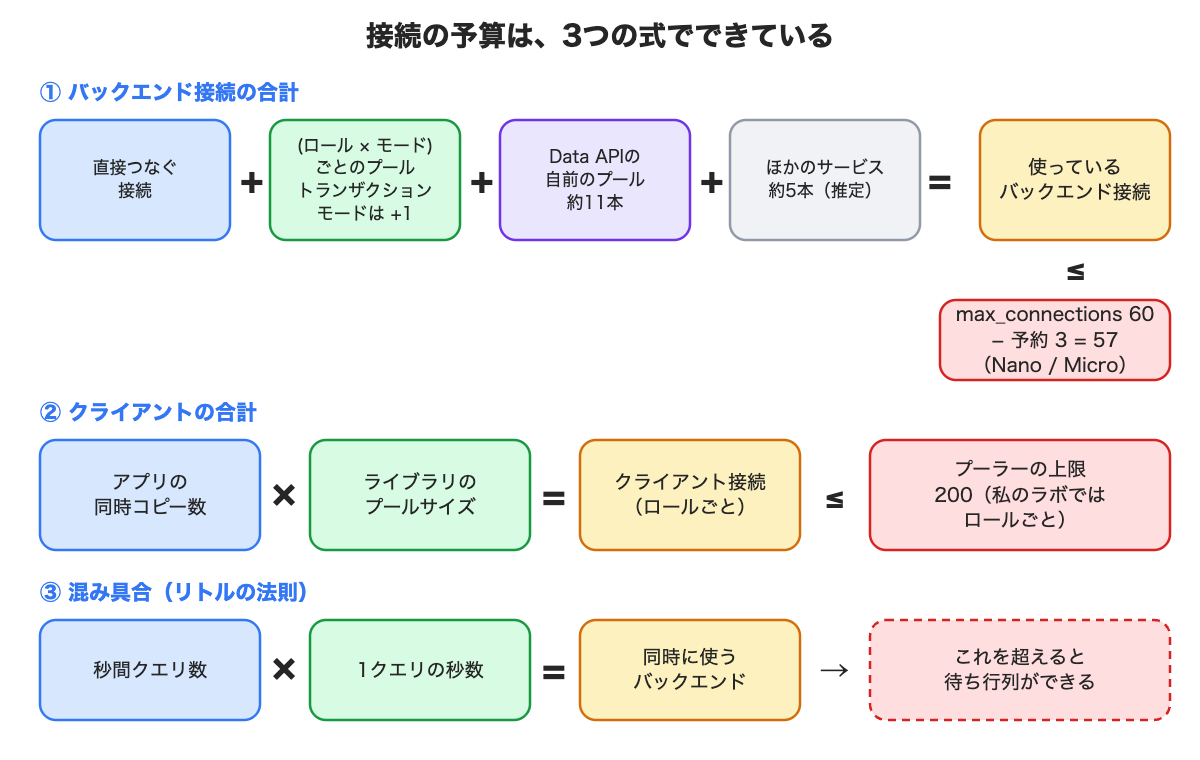
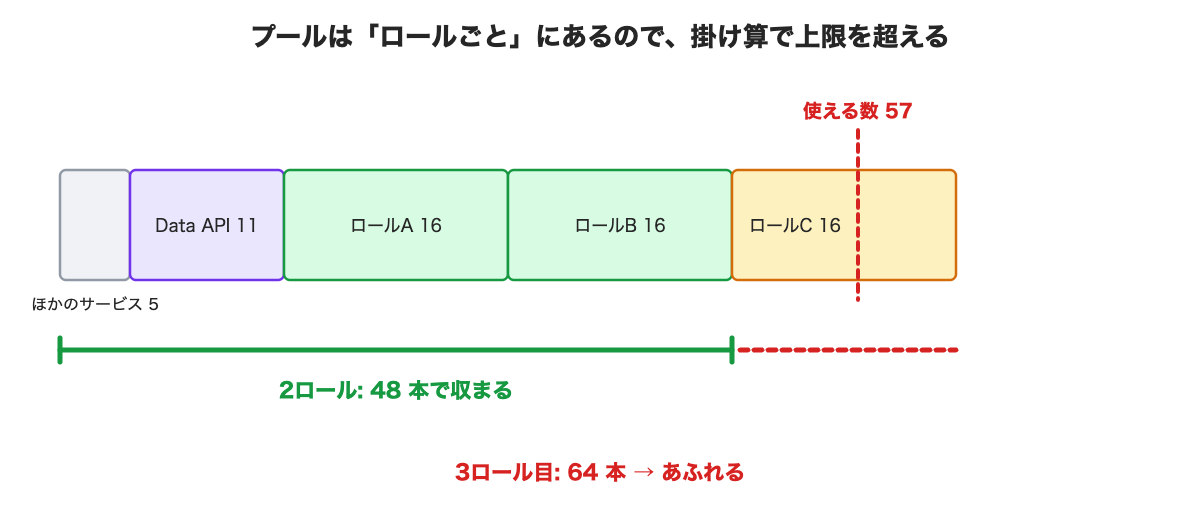
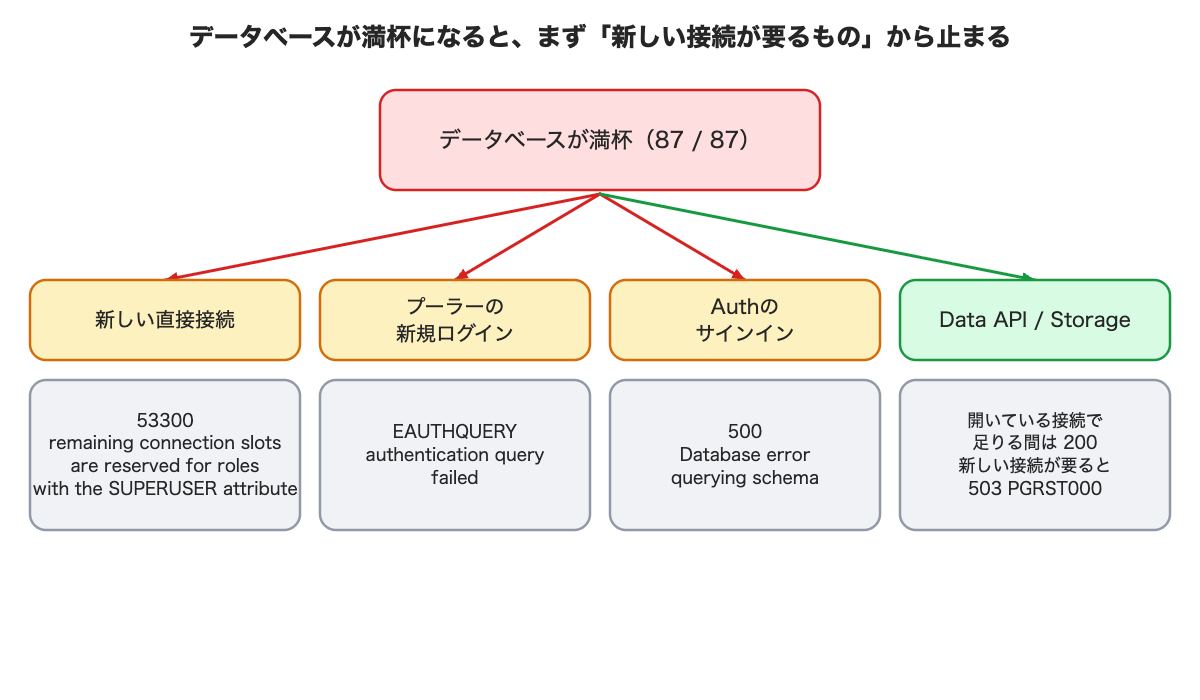
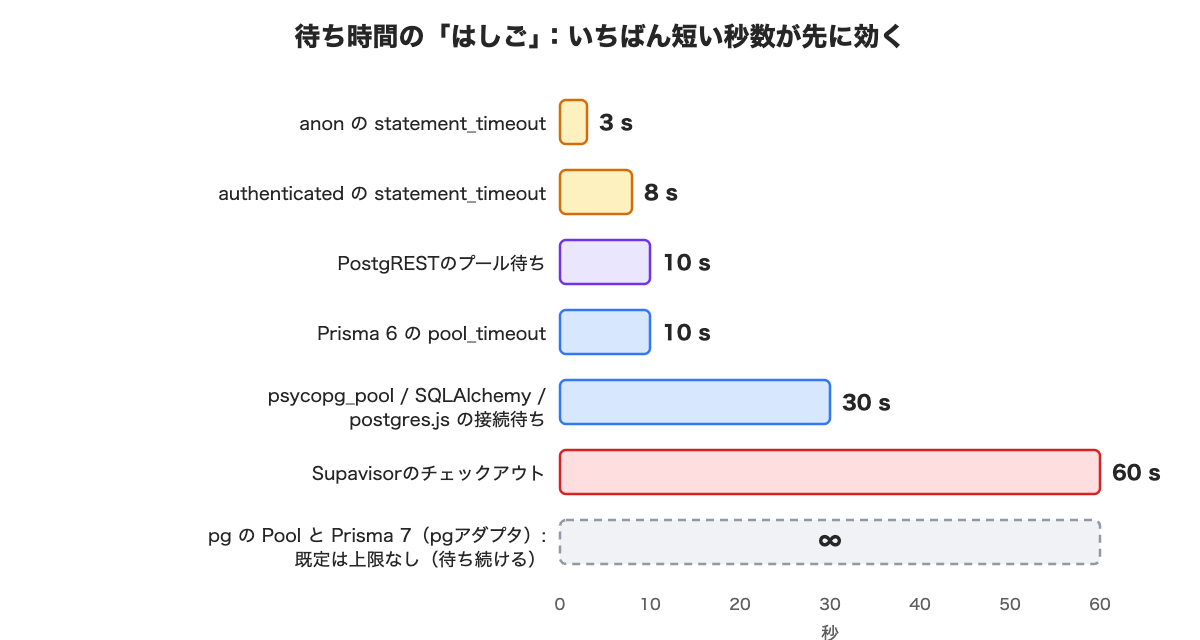
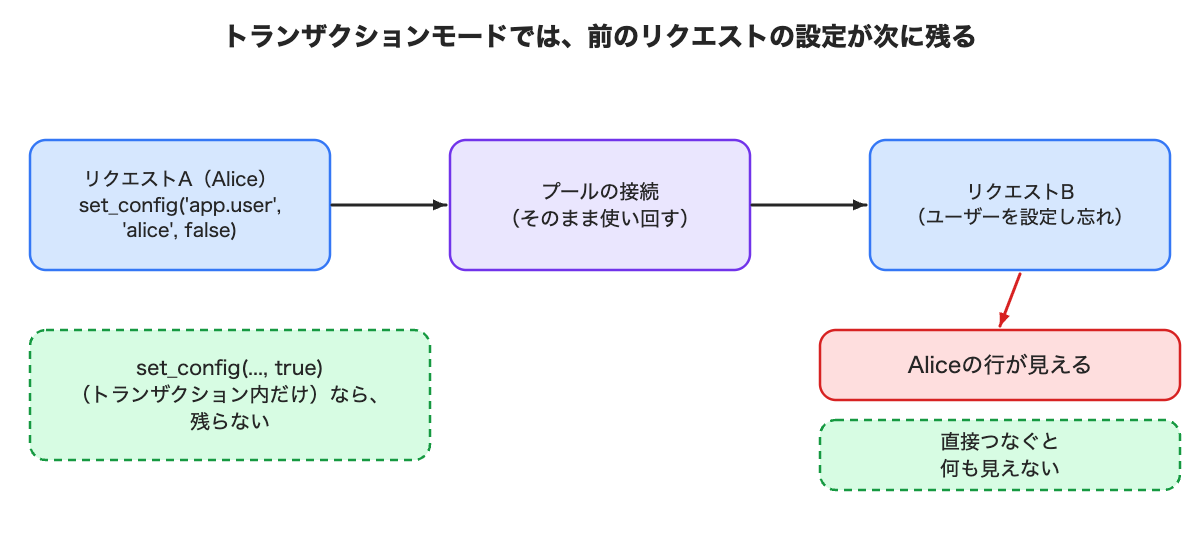
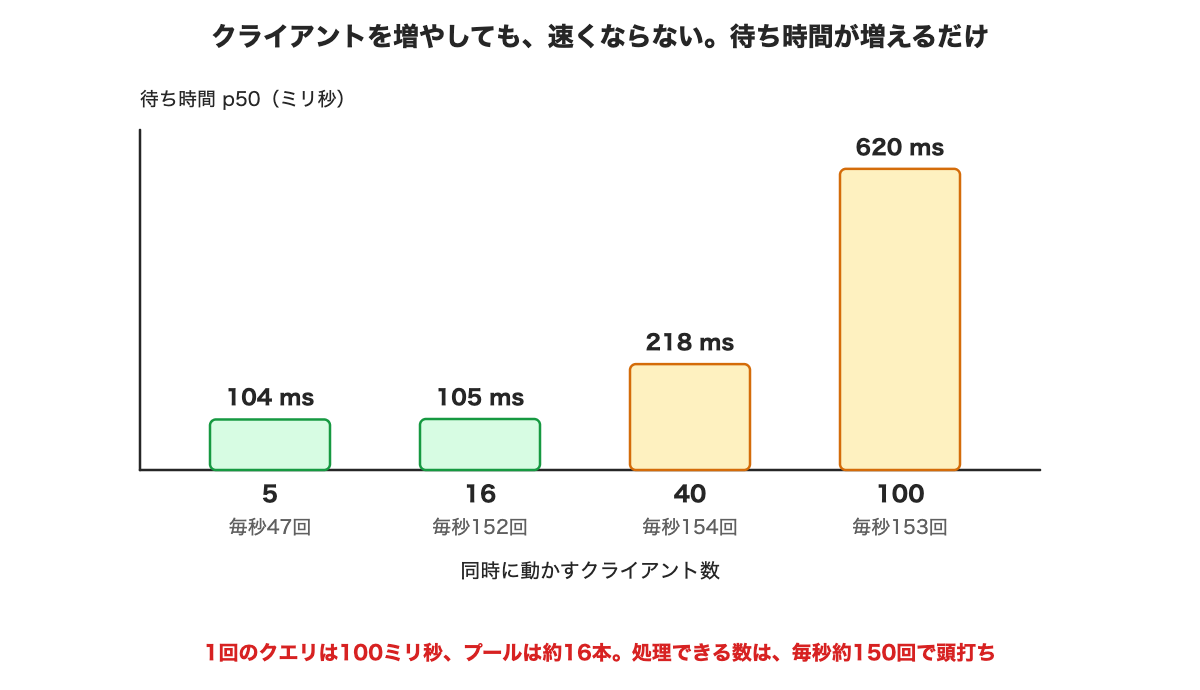
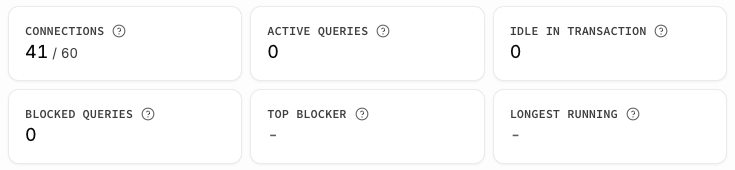
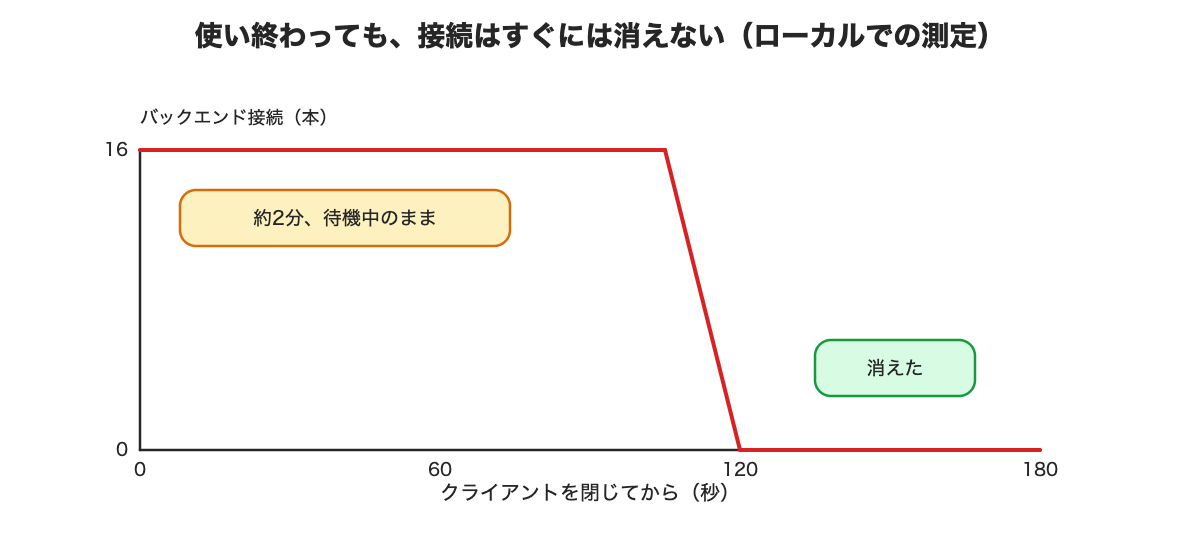
Supabaseの接続数は「掛け算」:満杯になると何から止まるか、上限の先まで試した > 対象: アクセスが増えたときの接続数が気になる方/too many clients や PGRST003 が不安な方/Prisma・SQLAlchemy・Djangoの既定値が気になる方 > 前提: Supabaseを少し触ったことがあればOK。プーラーや pg_stat_activity は、出てきたところで説明します > 所要時間: 25分 / 確認日: 2026-11-04(料金や仕様は変わります) > 続きの記事(接続が足りなくなったら、何をするか): qiita.com > サンプルコード一式(GitHub。ラボの設定、番号つきのテスト、結果の表): tomozilla/connection-budget-ja-demo > ビジネス編(やさしい解説・note): note.com 「プールサイズ」(プーラーがデータベースに開く接続の最大数)を15にしたのに、データベースには30本の接続が並んでいました。その「なぜ」が分からないままでは、自分のアプリが何本使うのかも予想できません。そこで、自分のPCにNano(無料プランのいちばん小さいコンピュートサイズ)相当の上限を再現したSupabase(以下「ラボ」)を立てて、上限の先まで押してみました。ホスト版でしか分からないことは、使い捨てのプロジェクトを作って測り、同じ日に消しています。 先に、いちばん大事な3つ 危ないものから並べます。 1. トランザクションモード(接続文字列のポートが 6543 のとき)では、前のリクエストの設定が次のリクエストに残ります。 1本の接続をリクエストごとに別の人が使い回すためです。その結果、RLSで守ったはずの他人の行と、管理者ロールの権限まで見えました。容量ではなく、情報漏れの話です(→ 6章)。 2. 接続は足し算ではなく掛け算で増えます。 プール(使い回される接続のひとかたまり)は「ロール × モード」ごとに作られ、しかもトランザクションモードは設定より1本多く使います。そしてプランを上げるだけでは接続は増えません。有料の最小構成Microの上限は、無料のNanoと同じ60でした。増えるのはコンピュートサイズを上げたときで、1つ上のSmallにすると90になります(どちらも[ホスト版]で実測。→ 1〜3章、13章)。 3. 満杯になると、「新しい接続が必要なもの」から止まります。 ラボではログインが最初に壊れましたが、ホスト版のAuthは一度使われると、使い終わっても閉じずに10本ほど持ち続けるので、同じ順番になるとは限りません(→ 4〜5章)。 今日やること(5つ) 1. 自分のアプリが使うライブラリとバージョンを書き出し、1コピーが何本開くか調べる(→ 7章の表)。 2. コピー数 × ライブラリのプール と、ロール数 × モード数 × (プールサイズ + 1) を、それぞれ計算する(→ 1章)。「コピー」の意味は下の用語表に書きました。 3. pg_stat_activity を usename ごとに数えて、Supabase自身のサービスが何本使っているかを引いておく(→ 5章)。 4. 接続文字列のポートが 6543(トランザクションモード)なら、コードで SET を使っていないか確認する。使っていたら set_config(..., true) に直す(→ 6章)。 5. タイムアウトの「はしご」を揃える。とくにPrisma 7のpgアダプタには、既定の待ち上限がありません(→ 8章)。 どの章から読むか | あなた | 読む章 | |---|---| | セキュリティが気になる | 6章(セッション状態の漏れ)だけでも | | Prismaを使っている | 8章(タイムアウト)と 7章(既定のプール)。Prisma 6→7のアップグレードは8章 | | サーバーレス(Vercel、Lambdaなど) | 3章(クライアント上限)と 7章(掛け算) | | Data APIだけ使っている | 9章(PostgREST=Data APIの中身)と 5章 | | postgres.jsを使っている | 10章(ハングの原因と対処) | | とにかく見積もりたい | 1章 → 2章 → 5章。リポジトリに、数字を入れると見積もれる計算ページも置いてあります | 読む前に:どこで測ったか 数字には、測った場所のタグを付けます。[ラボ] は自分のPC、[ホスト版] は実際のSupabaseプロジェクト、[ドキュメント] は公式ドキュメントです。 - [ラボ]: Nano相当の上限(max_connections 90、プールサイズ15、クライアント上限200)を再現した、ローカルのSupabase CLI環境です。上限を超える実験は、すべてここで行いました。 - [ホスト版]: 共有プーラーに迷惑をかけないよう、無料プロジェクトではプールサイズを3に下げ、数本のクライアントを数秒〜1分だけつないで、終了後に元へ戻しました。有料プランでしか見えない項目だけ、使い捨てのProプロジェクトを作って読み、同じ日に消しています。 - ラボのプーラー(Supavisor 2.9.12)はホスト版と同じオープンソースですが、設定まで同じとは限りません。 - 各実験は数回しか回していません。遅延の表は1マスにつき6秒を1回です。形は見えますが、細かい数字を信じすぎないでください。 用語(ここだけ先に読んでください) この記事に出てくる言葉を、先にまとめます。とくに最初の2つは、混同すると以降の話が全部ずれます。 | 言葉 | 意味 | |---|---| | クライアント接続 | アプリ(のライブラリ)が、プーラーに向かって開く接続 | | バックエンド接続 | プーラーやAPIが、PostgreSQL本体に対して開く接続。クライアント接続とは数も上限も別物です | | プーラー | アプリとPostgreSQLの間に立ち、少ない接続を使い回す中継役。Supabaseが使っているソフトの名前が Supavisor | | 共有プーラー / 専用プーラー | 共有プーラーは既定で全員が使う方。専用プーラー(PgBouncer)は有料の追加オプションで、既定では使いません | | プールサイズ | プーラーが1つのプールでPostgreSQLに開く接続の最大数。ダッシュボードの Project Settings → Database → Connection pooling で設定します(既定15) | | トランザクションモード / セッションモード | 接続文字列のポート番号で決まります。6543 がトランザクションモード、5432 がセッションモード。プーラーを通さない直接接続も5432ですが、ホスト名が db.<プロジェクトref>.supabase.co になります | | コピー | 同時に動いているアプリのプロセスのこと。Vercelの関数インスタンス、gunicornのワーカー、node cluster の各プロセス、開発中のホットリロードなど | | Nano / Micro / Small | コンピュートサイズ。Project Settings → Compute and disk で確認できます。Nanoは無料プラン | | p50 / p95 | 速い順に並べたときの真ん中が p50、遅いほうから5%の線が p95。平均より、詰まりに気づきやすい指標です | | prepared statement | ライブラリが「このクエリは解析済み」と名前を付けて、接続に覚えさせる仕組み。その接続が別のクライアントに渡ると、覚えが食い違って壊れます | 自分がどのモードか分からないときは、ダッシュボードの Connect ボタンから接続文字列を開き、ポート番号を見てください。 この記事のいちばん重い結果(6章)は、6543のときだけ起きます。 全体像:リクエストは、どこを通って「接続」になるのか !全体像:アプリのコピー → 共有プーラー(トランザクション/セッション)・専用プーラー・直接接続 → ロール×モードごとのプール → PostgreSQL。Data API、Auth、Realtime、Storage、監視は、自前のプールで直接つなぐ 図の下の帯が、見落としやすいところです。あなたのアプリが1本も接続していなくても、Data API、Auth、Realtime、Storage、監視は、それぞれ自分のぶんを使っています。 その実測は5章にあります。 --- 1. 接続は、結局何本まで使えるのか 答え: 3つの式で決まります。①バックエンドの合計 ≤ max_connections − 予約分、②クライアントの合計 ≤ プーラーの上限、③同時に使う数 = 秒間クエリ数 × 1クエリの秒数。このうち①が、いちばん先に効きます。 なぜ気にするか: この3つを混同すると、「クライアントは200まで大丈夫」と思っている間に、①の57本で先に詰まります。 !接続の予算は3つの式:バックエンドの合計、クライアントの合計、混み具合 ① バックエンド接続の合計 直接つなぐ接続 + 共有プーラーのプールが開いている本数の合計 プールは (ロール, データベース, モード) の組ごとに1つ 1つのプールが開くのは min(そのプールのクライアント数, プールサイズ) ただしトランザクションモードは プールサイズ + 1 + 専用プーラーのバックエンド接続(両方使うなら。プールサイズは、2つのプーラーに別々に効きます) + Data APIの自前のプール(10 + LISTEN用の1本 = 11) + Auth、Storage、Realtime、監視・ヘルスチェックの、それぞれの自前のプール ≤ max_connections − superuser_reserved_connections − reserved_connections Nano/Microなら 60 − 3 − 0 = 57 です。予約分の内訳は superuser_reserved_connections(3)と、PostgreSQL 17の reserved_connections(既定0)で、どちらも[ホスト版]で確認しました。 自分のプロジェクトの値は、ダッシュボードのSQLエディタで次を実行すると分かります。 show max_connections; show superuser_reserved_connections; 見落としやすいのは最後の行、つまりSupabase自身のサービスです。[ドキュメント](Pooling and limits)も合計に含めるものとして「Auth、Storage、PostgREST、ヘルスチェッカー」を挙げています。しかもこれらは本数が固定ではなく、使われると増えて、そのまま持ち続けるものもあります(→ 5章)。 ② クライアント接続の合計 アプリの同時コピー数 × ライブラリのプールサイズ が、プーラーの上限(Nano/Microは200)を超えられません。この200はロールごとでした(→ 3章)。ただし「ロールを増やせば余裕ができる」とは読まないでください。増えるのはクライアントの枠だけで、①のバックエンドの枠は1本も増えません。 ③ 混み具合(リトルの法則) 同時に使うバックエンド数は 秒間クエリ数 × 1クエリの秒数 です。たとえば毎秒100リクエスト・1クエリ0.2秒なら20本必要で、プールが16本(既定のプールサイズ15 + トランザクションモードの1本。→ 2章)しかなければ待ち行列ができます。 注意 [ドキュメント] Connection management の目安は「Data APIをよく使うならプールサイズは max_connections の約40%まで、使わないなら最大約80%」(Nanoなら24または48)。これが1つのプールではなく全部の合計に対する数字だというのは私の解釈ではなく、SupavisorのFAQに「プーラー全体の使用量を、使える接続の40%未満に保つように」と書かれています。 実際に当てはめると、既定のプールサイズ15でロールもモードも1つなら16本なので、24本の目安には収まります。超え始めるのは、ロールやモードが増えたときです(ロール2つ・モード2つなら、プールは4つ=64本)。 あなたがやること: ①の式に自分の数字を入れて、57(または自分のコンピュートサイズの値)と比べる。 2. プールは、何の単位で作られるのか 答え: 「ロール × データベース × モード」ごとに1つずつです。さらにトランザクションモードは、設定より1本多く使います。 なぜ気にするか: プールサイズ15でも、2ロール × 2モードならプールは4つ、4 × 16 = 64本になります。足し算で見積もっていると、ここで倍以上ずれます。 [ドキュメント](Connection management)には、こう書かれています。 > このプールサイズは、プロジェクト全体の1つの合計としてではなく、データベースのユーザー(ロール)ごとに適用されます。プーラー経由でつなぐロールのそれぞれが、この本数までの独自のプールを持つので、プーラーが開ける接続の合計は、使うロールの数に比例して増えます。 モードについても測りました。同じロールに、トランザクションモードとセッションモードのクライアントを20本ずつ同時に流します。 [ラボ] r1 backends: 31 (ポート6543 = 16本 + ポート5432 = 15本) [ホスト版] プールサイズ3で: 7 (ポート6543 = 4本 + ポート5432 = 3本) → モードごとに別のプールでした。 16 + 15 = 31なので、1つのプールサイズでは説明できません。 ロールを増やすと、こうなります[ラボ]。 ここからの「/ 87」は、ラボの上限です(ラボは max_connections を90にしてあり、予約3本を引いて87本使えます)。ホスト版のNano/Microなら、同じ表は「/ 57」になります。 | ロールの数 | ロールごとのバックエンド | 合計(ラボ、上限87) | |---|---|---| | 1 | r1: 16 | 53〜63(Supabase自身の分を含む) | | 2 | r1: 16、r2: 16 | 70〜80 / 87 で収まる | | 3 | r1: 15、r2: 16、r3: 7〜16 | 87 / 87、満杯 | → 3ロール目で上限に達しました。 1ロールずつ見れば「15本だけ」でも、掛けると超えます。 !プールはロールごとにあるので、掛け算で上限を超える 次に、表の「16」です。プールサイズ15のはずが、トランザクションモードでは16本でした。 | 入口 | プールサイズ15のときのバックエンド | |---|---| | Supavisor トランザクション [ラボ] | 16 | | Supavisor セッション [ラボ] | 15 | | PgBouncer 1.26.1(同じDBの前に置いた)[ラボ] | 15 | → トランザクションモードだけ、設定より1本多い。 [ホスト版]でもプールサイズ3でトランザクションが4本、セッションが3本でした。理由は分かりません。数本の差ですが、3ロールなら3本違い、「ぎりぎり収まる」と「あふれる」の境目になります。 注意 [ドキュメント] SupavisorのFAQに「クライアントがプーラーに接続している間は、少なくとも1本のホットな接続が維持されます」とあり、これが「+1」の正体かもしれません。確かめるため[ホスト版]でトランザクションモードのクライアントを1本だけつないで放置したところ、バックエンドは1本のまま137秒後も維持されていました(使われない接続は約2分で消えるので、これは「維持されている」ということです)。ただし「+1」と同じ仕組みかどうかは確かめられていません。 あなたがやること: ロール数 × モード数 × (プールサイズ + 1) で数える。粒度の書き方は[ドキュメント]内でも3通り(Connection managementは「ロールごと」、SupavisorのFAQは「ユーザー・DB・モードの組ごと」、ダッシュボードは「user+db」)あるので、いちばん多く数える「ロール × DB × モード」で見積もるのが安全です。 > 「ロール数」とは、自分の場合いくつか。 数えるのは、接続文字列に書いたユーザー名の種類です。ふつうのSupabaseプロジェクトなら、プーラー経由でつなぐときのユーザー名は既定で postgres の1つだけなので、ロール数は1です。バッチ用や分析用に自分で別のロールを作れば、そのぶん増えます。 > なお anon と authenticated は、ここでは数えません。supabase-js(Data API)を使うとき、PostgRESTが authenticator という1つのロールでつなぎ、リクエストごとに内部で anon / authenticated に切り替えているからです。Data APIのぶんは、式①の「Data API 11本」で別に数えています。 3. クライアント上限の200は、プロジェクト全体? ロールごと? 答え: ロールごとです。[ホスト版]でも確かめました。ただし、ロールを足してもバックエンドの枠は増えません。 なぜ気にするか: サーバーレスで1コピー10本(node-postgresの既定)なら、21コピー目で拒否されます。そのとき「ロールを分ける」が有効な応急処置になるか否かが変わります。 まず、上限そのものの挙動です[ラボ]。 connected 200 client 201: (EMAXCONN) max client connections reached, limit: 200 (0.5 s) → 201本目は0.5秒で拒否され、待たされません。 次に単位です。[ドキュメント](Pooling and limits)は、この上限を「同時にプーラーへ接続できるクライアント数=コンピュートサイズで決まる値」と説明し、ロールの話は出てきません。Proプロジェクトの設定画面にも「この値はコンピュートサイズMicroに基づいて200に固定されていて、変更できません」とあります。どちらもプロジェクト単位に読めます。読むだけでは決着しないので、[ホスト版]で測りました(クエリは1本も投げず、接続を開いて数秒持つだけ)。 | 試したこと [ホスト版] | 結果 | |---|---| | 1つのロールで215本つなぐ | ちょうど200本が成功、残りは (EMAXCONN) ... limit: 200 | | 2つのロールで150本ずつ(合計300本) | 300本すべて成功。拒否ゼロ | → 上限はロールごとでした。 設定画面の「200に固定」は、プロジェクト全体の合計ではありません。 厳密には、Supavisorのソースが数えている単位はプール、つまりロール × モードの組です。私が測ったのはロールを分けた場合で、同じロールでモードだけ分けた場合は測っていません。見積もるときは「ロールごとに200」で数えておけば、足りなくなることはありません。 ただし、ここで喜ぶのは早すぎました。同じとき、データベース側のバックエンドはこうでした。 クライアント 300本(2ロール) → バックエンド 2本 → クエリを投げていないので、バックエンドはロールごとに1本だけ。 つまりロールを足して増えるのはクライアントの枠だけで、①のバックエンドの枠(Nano/Microで57本)は1本も増えません。その300本がいっせいにクエリを投げ始めれば、今度は①で止まります。 あなたがやること: まずは1コピーあたりのライブラリのプールを減らす(これが根本です)。それでも足りず EMAXCONN が出るなら、ロールを分ける手もあります。その場合はSQLエディタでロールを作り、接続文字列のユーザー名を差し替えます。 create role batch_user login password '<自分で決めた強いパスワード>'; grant usage on schema public to batch_user; -- 必要なテーブルへの権限も grant します 接続文字列のユーザー名は batch_user.<プロジェクトref> の形になります(プーラー経由の場合)。ただしこれは混雑を①に移しただけだと理解しておいてください。 4. 満杯になると、何から止まるのか 答え: そのとき新しい接続が必要なものから止まります。「Authが先」のような固定の順番ではありません。 なぜ気にするか: 「画面は動いているのに新規ログインだけができない」という、原因の分かりにくい形で現れるからです。 3つのロールでプールを使い切り、データベースを満杯(87/87)にした状態で、ほかのサービスを呼びました[ラボ]。 !データベースが満杯になると、新しい直接接続、プーラーの新規ログイン、Authのサインインが止まる | 満杯のとき [ラボ] | 結果 | |---|---| | 新しい直接接続 | FATAL: remaining connection slots are reserved for roles with the SUPERUSER attribute(53300) | | プーラー経由の新しいログイン | (EAUTHQUERY) authentication query failed(プーラーもログイン確認に接続を1本使う) | | Authのサインイン/サインアップ | 500(Database error querying schema) | | Data API(rpc/ping) | 200(すでに開いている接続で足りた) | | Storage(アップロード、一覧) | 200(同上) | → すでに接続を持っていたサービスは動き続け、新しく要るものだけが落ちました。 この順番は環境によって変わります。別の回に2ロールだけで満杯にしたときは、PostgRESTが新しい接続を必要とした瞬間に、Data APIが 503 PGRST000 を返しました(9章に出てくる 504 PGRST003 とは別物です。PGRST003 はプールが埋まっていて待ちきれなかったとき、PGRST000 はそもそもデータベースにつなげなかったときに出ます)。つまり「満杯ならData APIは503」とも「満杯ならAuthが先」とも言えません。 注意 [ホスト版] ラボのAuthは接続を持っていなかったので先に倒れましたが、ホスト版のAuthは一度使われると10本ほど温めて持っています(→ 5章)。そのためホスト版で同じ順番になるとは限りません。ホスト版を満杯にする実験はしていないので、ここは「ラボの順番をそのまま当てはめてはいけない」という注意までです。 もう1つ。重いクライアントが止まったあとも、サインインは約1分のあいだ HTTP 500 を返し続けました(62秒の時点でプーラーが1本手放して、やっと 200 に戻りました)。接続はすぐには戻りません(→ 11章)。 あなたがやること: 監視は「エラーが出たか」ではなく「新規ログインが通るか」を見る。具体的には、テスト用アカウントで定期的にサインインを試す外形監視(UptimeRobotのような外部サービスや、小さな定期ジョブ)を1つ置くのが手軽です。1つのロールの使いすぎが、ほかのロールやAuthまで巻き込みます。 5. Supabase自身のサービスは、何本使うのか 答え: 何もしていないときは3〜4本ですが、使われると増えます。[ホスト版]でAuthは9〜10本、Storageは8本まで増え、Storageは返しませんでした。 なぜ気にするか: 57本のうち8本が恒久的に減るなら、見積もりが8本ずれます。 まず、何もしていないときです。 表に出てくるロール名は、authenticator がData API(PostgREST)のもの、supabase_admin がSupabaseの管理・監視用、pgbouncer はプーラーがログイン確認に使うものです(名前はPgBouncer由来ですが、共有プーラーのSupavisorもこのロールを使います)。 | 環境 | 何もしていないときの使用数 | |---|---| | [ホスト版] Free/Nano(2026-11-03) | 4本(authenticator 1、pgbouncer 1、supabase_admin 2)。空きは 57 − 4 = 53本 | | [ホスト版] Pro/Micro(作りたて、2026-11-04) | 3本(authenticator 1、pgbouncer 1、supabase_admin 1) | | [ラボ] 全サービス起動 | 36本(Supavisor自身29本 + 7本)。空きは 87 − 36 = 51本(ラボは max_connections 90、予約3本を引いて87) | ラボの「Supavisor自身29本」は、プーラーをデータベースと同じ場所で動かしているラボだけの分です。ホスト版にはこの29本はありません。 → 空きは53本と51本でほぼ同じなので、ラボはホスト版の代わりとして使えます。 ここで、Proプロジェクトを作って分かった大きなことが1つあります。Microの max_connections は、Nanoと同じ60でした。 つまり、プランを有料にするだけでは接続は増えません。 増えるのはコンピュートサイズを上げたときです。同じプロジェクトをMicroからSmallに上げて測り直すと、こうなりました[ホスト版]。 | | Micro | Small | |---|---|---| | max_connections | 60 | 90 | | プーラーのクライアント上限 | 200 | 400 | | プールサイズの既定 | 15 | 15のまま | → 接続もクライアント枠も増えますが、プールサイズは据え置きです。 大きいインスタンスにしても、プールは自分で広げる必要があります。 次に、使ったあとです。作りたてのプロジェクトはAuthもStorageも0本なので、そこへサインインを40本同時に、別の回に公開バケットへのリクエストを40本同時に投げ、usename ごとに数えました。 | サービス [ホスト版 Pro] | 何もしていないとき | 負荷のあと | そのあと | |---|---|---|---| | Auth(supabase_auth_admin) | 0本 | 9〜10本 | 約1分で0本に戻った(46秒では10本、61秒で0本) | | Storage(supabase_storage_admin) | 0本 | 8本 | 14分後も8本のまま | → Authは借りて返すが、Storageは持ち続ける。 ファイルを1度でも配信したら、57本のうち8本は戻らないものとして見積もってください。 注意 [ドキュメント] SupavisorのFAQには「Storageサーバーも独自の user+db+mode の組み合わせとしてSupavisorを使う」とありますが、私が測ったプロジェクトではStorageの接続の application_name は Supabase Storage API で、プーラー経由(Supavisor)ではありませんでした。1プロジェクト・1回の観察なので断定はしません。 あなたがやること: 自分のプロジェクトで下のSQLを流し、式①から「サービスの分」を先に引く。 select usename, state, count(*) from pg_stat_activity where backend_type = 'client backend' and pid <> pg_backend_pid() group by 1, 2; 6. セッションの状態は、次のクライアントに残るのか(安全の話) 答え: 残ります。 その結果、他人の行と管理者ロールの権限が見えました。これがこの記事でいちばん重い結果です。 なぜ気にするか: RLSで守っているつもりのテーブルが、設定を1つ書き忘れただけで他人に見えるからです。可用性ではなく、情報漏れです。 [ドキュメント](Connecting to Postgres)は、こう書いています。 > セッションレベルの状態は、トランザクションの間で失われます。これは set と reset、セッションレベルのアドバイザリロック、listen と notify、一時テーブルが対象です。 「失われる」と読むと、動かなくなるだけで危なくはなさそうに思えます。ところが私が測ったのは、消えるのではなく、次のクライアントに残るほうでした。トランザクションモードでは1本のバックエンドをクエリごとに別のクライアントが使い回すので、前の人の設定がそのまま引き継がれるのです。 | 操作 | プーラー(トランザクション)[ラボ] | 直接 | |---|---|---| | set_config('app.user','alice',false)(セッション全体) | 次のクライアントに8回中8回漏れた | 0回 | | set_config(..., true)(トランザクション内だけ) | 漏れない | 漏れない | | SET statement_timeout = 0 | 次のクライアントも0(ガードレールが静かに外れる) | 漏れない | | セッションのアドバイザリロック | クライアントが去っても保持 | 保持しない | | 名前つきprepared statement | prepared statement "q1" already exists | OK | | LISTEN/NOTIFY | 通知なし | 通知あり | → トランザクション内だけの設定(第3引数 true)以外は、すべて漏れました。 設定が漏れるだけなら地味に見えます。しかし、RLSのポリシーが owner = current_setting('app.user', true) を信じる作りだと、行が漏れます。 !トランザクションモードで、リクエストAの設定が、次のリクエストBに残る プーラー(トランザクション): A (alice, set_config(...,true)) : alice の行 B (トランザクション内だけの設定のあと) : 何も見えない ← 安全 A (alice, set_config(...,false)) : alice の行 B (ユーザーの設定を忘れたリクエスト) : alice の行が見える ← 漏れた A (管理作業: SET ROLE r_admin) : alice, bob B (ふつうのリクエスト) : r_admin として、alice と bob が見える 直接: B は、どちらも何も見えない → SET ROLE は権限ごと漏れます。 管理者ロールに切り替えたあとそのバックエンドを受け取ったリクエストが、RLSを無視する r_admin として動きました。 対照としてData APIも確かめました。PostgRESTはリクエストごとの設定を、そのリクエストのトランザクションの中だけに入れます。2人のユーザーで40本の混ぜたリクエストを同時に流したところ、他人のデータを受け取ったのは0件でした。つまり、この問題は「プーラーを使うと必ず起きる」のではなく、設定の入れ方で決まります。 あなたがやること: トランザクションモードでは SET を使わない。リクエストごとにトランザクションを開き、その中で set_config(..., true) を使う。既存コードの SET と SET ROLE を今日grepしてください。 7. ライブラリは、1コピーで何本開くのか 答え: 10本前後が多いものの、バージョンで変わります。実際に動かして数えるしかありません。 なぜ気にするか: ②の式の「ライブラリのプールサイズ」がここで決まり、プロセス数と掛け算になるからです。 | ライブラリ(バージョン) | 既定のプール | 20〜30並列での実測 [ラボ] | |---|---|---| | node-postgres 8.23.1 Pool | max 10 | 10 | | postgres.js 4.0.0 | max 10 | 10 | | Drizzle | 自前のプールなし。ドライバのもの | (pg: 10) | | Prisma 6.19.3 | 物理コア数 × 2 + 1 | 21(10コアのMac。サーバーレスでは割り当てられたCPU数で変わるので、実測してください) | | Prisma 7.10.1 + @prisma/adapter-pg | pgドライバ(max 10) | 10 | | SQLAlchemy 2.1.6 | pool_size 5 + max_overflow 10 | 15(使い終わったあとも5本残る) | | psycopg_pool 3.3.3 | min_size 4、max_size = min_size | 4 | | Django 5.2.18(既定) | プールなし。処理中のスレッド1つにつき1本 | 20(20スレッドで) | | Django 5.2.18 OPTIONS pool=True | psycopg_poolの既定 | 4 | → 同じPrismaでも、メジャーバージョンの間で21から10に変わりました。 ブログ記事で見た数字には、必ずバージョンが付いているか確認してください。 掛け算も測りました[ラボ]。node-postgresの Pool(max 10) を持つコピー(プロセス)を増やすと、直接接続のバックエンドは1つで10、3つで30、5つで50でした(この回だけ、50本を観察するために max_connections を150に上げています)。5コピーでNanoの上限に迫ります。 gunicornのワーカー、node cluster、開発中のホットリロードで、気づかないうちに増えます。一方、プーラー経由なら5プロセスの50クライアントは16本のバックエンドに収まりました。 あなたがやること: 自分のライブラリとバージョンで1コピーの本数を数え、コピー数 × を計算する。 8. 待たされる時間に、上限はあるのか 答え: あります。しかも何段も重なっていて、いちばん短いものが先に効きます。そしてPrisma 7のpgアダプタとnode-postgresには、既定の上限がありません(無限に待ちます)。 なぜ気にするか: 上限がばらばらだと、どこで失敗するかが予想できません。上限がないと、詰まったときに止まりません。 まず、プーラー側です[ラボ]。 - トランザクションモード(プール15): 18クライアントが30秒ずつ保持 → 16本が動き、2本は待って、全部終わるまで60秒。17クライアントが65秒ずつ保持 → 待っていた1つはちょうど60秒で (ECHECKOUTTIMEOUT) ... after 60000ms in Transaction mode。 - セッションモード(18クライアント、プール15): 3本が0秒で (EMAXCONNSESSION)。待たされません。 → トランザクションモードは60秒待ってから落ち、セッションモードは即断られます。 この60秒は、計算で予想できます。ここでの「閉じたループ」とは、1つ終わったら次を投げるクライアントのことです(逆に、前が終わるのを待たずに一定のペースで届くのが「オープンループ」で、実際のユーザーの流入はこちらです)。 閉じたループなら、1クライアントの待ちはおおよそ (クライアント数 − バックエンド数) ÷ バックエンド数 × クエリの秒数 になります。そこで199クライアントを同時に走らせ、バックエンド16本に対してクエリの長さだけを変えました。計算上は、クエリが5秒を超えたあたりで待ちが60秒に届くはずです。 | クエリの時間 [ラボ] | 予想の待ち(キュー時間) | 実測のp50(待ち + 実行、成功分のみ) | 結果 | |---|---|---|---| | 4.5秒 | 51.5秒 | 54.1秒 | 551件が成功、エラーなし | | 5.5秒 | 62.9秒 | 60.6秒 | 464件が成功、46件が ECHECKOUTTIMEOUT(510件中46件、約9%) | → 「5秒あたりが境目」という予想どおりでした。 式で予想できるということは、事前に避けられるということです。 次に、ライブラリ側です[ラボ、直接接続]。 | ライブラリ | 接続を待つときの既定 | 確かめたこと | |---|---|---| | node-postgres Pool | 無制限(connectionTimeoutMillis: 0) | プール1本・3秒のクエリで、2本目は6.0秒、3本目は9.0秒まで待った。connectionTimeoutMillis: 2000 を付けると2.0秒で timeout exceeded when trying to connect | | Prisma 6 | pool_timeout 10秒 | connection_limit=1 で3秒のクエリ5本: 4本目が10.0秒で P2024 | | Prisma 7 + @prisma/adapter-pg | なし | プール1本、3秒のクエリ5本: 5本目まで15.1秒待って全部成功。connectionTimeoutMillis: 2000 で2.0秒で失敗 | | psycopg_pool | 30秒 | timeout=4 で PoolTimeout | | SQLAlchemy | pool_timeout 30秒 | pool_timeout=2 で QueuePool limit ... timed out | | postgres.js | connect_timeout 30秒 | 接続待ちの上限は見つけていない | | Django 5.2 pool=True | psycopg_poolの既定(4本、30秒) | 終わりに connection.close() する形なら20スレッド×2秒が10.1秒で成功。閉じないスレッドが4本いると、他16本が OperationalError | → Prisma 6からアップグレードする方は、ここがいちばん大事です。 6にあった10秒の安全網(pool_timeout)が7(pgアダプタ)では既定でなくなり、待ちが無制限になります。PrismaPg に connectionTimeoutMillis を必ず渡してください。 import { PrismaPg } from '@prisma/adapter-pg' const adapter = new PrismaPg({ connectionString: process.env.DATABASE_URL, connectionTimeoutMillis: 5000, // これがないと、詰まったとき無限に待ちます }) !待ち時間のはしご:anonの3秒、authenticatedの8秒、PostgRESTの10秒、Prismaの10秒、30秒、Supavisorの60秒、pgは無制限 ロール側の既定も、同じはしごの一部です。[ドキュメント](Timeouts)によると anon は3秒、authenticated は8秒、service_role はなし(未設定なら authenticator の8秒)、postgres はロールごとの設定がなく既定のグローバルタイムアウトで2分に制限されます。[ホスト版]で pg_settings を読むと statement_timeout は確かに 120000、つまり2分でした。管理用のスクリプトやバッチを postgres でつないでいるなら、はしごのいちばん下は2分です。 注意 [ラボ] 到着が止まらない「オープンループ」では、話がさらに厳しくなります。1リクエストごとに新しい接続を開く形で毎秒200回(処理能力の約150回を超える)を流すと、4秒でクライアントが200に達し、以降は到着の約4分の1が (EMAXCONN) で拒否されました。閉じたループは待つのが上手なので、過負荷を隠します。つまり、自分で回す負荷テストが平気でも、実際のユーザー流入では拒否が出ることがあります。 あなたがやること: 自分のタイムアウトを1枚の表にして、いちばん短いものがどこか確かめる。Prisma 7なら connectionTimeoutMillis を今日足す。 9. Data APIは、何本使うのか 答え: 11本(プール10本 + LISTEN 用1本)です。そして埋まると、10秒で 504 PGRST003 を返します。 なぜ気にするか: supabase-jsやfetchしか使っていなくても、57本のうち11本はここで消えています。 slow(2.5)(2.5秒かかる関数)を、Data API経由で50本同時に呼びました[ラボ]。 200 x 40 待ち時間 2.5〜10.1 秒 504 PGRST003 x 10 10 秒ちょうど → 10本ぶんが順に処理され、あふれた10本は10秒で諦めました。 バックエンドの authenticator は11本で、内訳はプール10本と LISTEN "pgrst" の1本です(pg_stat_activity の query で確認)。 また、anon ロールには statement_timeout = 3s があるため、4秒の関数を呼ぶと HTTP 500 と、PostgreSQLのエラーコード 57014(クエリが時間切れで打ち切られた、という意味)が返ります。 注意 公開された遅い関数は、外部の人にData APIのプールを握らせます。今回の slow() は検証のため anon から呼べるようにしていますが、本物のプロジェクトでこういう関数を公開しないでください。 あなたがやること: 式①に「Data API 11本」を固定で入れる。公開している関数に重いものがないか確認する。 10. トランザクションモードで壊れるものは何か 答え: prepared statement(ライブラリが「このクエリは解析済み」と名前を付けて接続に覚えさせる仕組み。接続が別のクライアントに渡ると、その記憶が食い違って壊れます)と、パイプライン(1本の接続に複数のクエリを重ねて送ること)です。postgres.jsのハングは後者が原因で、prepare: false だけでは直りませんでした。 なぜ気にするか: 「動かない」ではなく「固まって返ってこない」ので、タイムアウトを設定していないと気づけません。 [ドキュメント](Connecting to Postgres)は、いまははっきり書いています。 > クエリのパイプラインはサポートされません。トランザクションモードは、1つの応答が終わったのを見た時点で接続をプールに返すので、クライアントがその接続にすでに次のクエリを積んでいても返してしまいます。 > > 注意: postgres.js は既定でクエリをパイプライン化するので、この組み合わせはクエリを固まらせたり、食い違った行を返したりすることがあります。 私が見たのは、この「固まる」ほうです。原因を1つずつ切り分けました。 | 設定 | [ラボ] トランザクション | [ホスト版] プール3 | 直接 | |---|---|---|---| | 既定 | ハング | ハング | OK | | prepare: false だけ | ハング | ハング | | | max_pipeline: 1 だけ | OK(1.0秒) | OK | | | 両方 | OK | OK | | → 効いたのは max_pipeline: 1 のほうで、prepare: false ではありません。 定番の対処として知られているのは prepare: false ですが、それだけでは直りませんでした。 「エラーが出ないのは、postgres.jsが黙ってやり直しているからでは」という疑いも確かめました(ここは細かい確認なので、飛ばして構いません)。クライアントがサーバーに送る「Parse」というメッセージの数を数えたところ、max_pipeline: 1 だけのときは接続の数(10)しか送られていませんでした。やり直しがあれば、もっと増えるはずです。データベースとSupavisorのログにも 26000 の行はありませんでした。→ やり直しで隠しているのではなく、そもそもエラーが起きていません(なぜ起きないのかは分かりません)。 ドキュメントが警告するもう1つ、食い違った行も探しました。1クエリごとに違う目印を送り、返りを全部照合します。 | 設定(プーラー、トランザクション)[ラボ] | 300クエリ / 10接続 | 食い違った行 | |---|---|---| | 既定 | ハング(この回は69件で停止。位置は毎回変わる) | — | | prepare: false だけ | ハング(この回は144件) | — | | max_pipeline: 1 だけ | OK(58ミリ秒) | 0件 | | prepare: false かつ max_pipeline: 1 | OK(38ミリ秒) | 0件 | | (対照)直接つなぐ、既定 | OK(15ミリ秒) | 0件 | → 上の表(300クエリ×10接続)に加えて、1000クエリ×20接続も3回流しましたが、食い違った行は1件も出ませんでした。 私の環境では、食い違う前に固まります。ただし「出なかった」は「起きない」ではないので、ドキュメントの警告のほうを信じてください。 max_pipeline: 1 をすすめる以上、トランザクションを壊さないかも確かめる必要がありました。[ドキュメント]の Postgres.js のページ には「max_pipeline: 0 は sql.begin() のトランザクションを壊す」とありますが、私がすすめているのは 1 です。 | 設定(プーラー、トランザクションモード)[ラボ] | 結果 | 値の食い違い | トランザクションの分断 | |---|---|---|---| | 既定 | OK(16ミリ秒) | 0 | 0 | | max_pipeline: 1 | OK(18ミリ秒) | 0 | 0 | | prepare: false かつ max_pipeline: 1 | OK(17ミリ秒) | 0 | 0 | | max_pipeline: 0 | エラー 42P05 prepared statement "..." already exists | — | — | | prepare: false かつ max_pipeline: 0 | OK、ただし2029ミリ秒 | 0 | 0 | → max_pipeline: 1 は sql.begin() を壊しませんでした(8〜30トランザクションで3回繰り返し)。一方 max_pipeline: 0 はパイプラインを完全に止めるため、クエリが1本ずつ順番待ちになり、100倍以上遅くなりました(max_pipeline: 1 の18ミリ秒に対して、2029ミリ秒)。 prepared statementが原因のものも、ちゃんとありました[ラボ]。 - Prisma 6: URLに ?pgbouncer=true がないと、30クエリのうち22本が prepared statement "sN" does not exist で失敗(付けると0本)。紛らわしい名前ですが、共有プーラー(Supavisor)のトランザクションモードでも、このオプションが必要です。 - psycopg 3: 同じクエリを5回以上流すと自動でprepareされて壊れます。prepare_threshold=None で0本。1回ずつの試しでは気づけません。 - Prisma 7 + pgアダプタ、node-postgres: 壊れませんでした。 注意 同じ検査をPgBouncer 1.26.1(同じDBの前に置いたもの)に流すと、postgres.jsの既定もpsycopgもPrisma 6も、すべてエラーなしでした。ただしこれはコンテナの既定値であり、ホスト版の専用プーラーと同じ設定とは限りません。 あなたがやること: postgres.jsなら、次のように書いたうえで、自分のトランザクションで検証してから使う(ドキュメントに載っている対処ではありません)。 const sql = postgres(process.env.DATABASE_URL, { max: 10, max_pipeline: 1, // トランザクションモード(ポート6543)で固まるのを防ぐ }) Prisma 6なら接続URLに ?pgbouncer=true、psycopg 3なら prepare_threshold=None を付けてください。 11. 接続は、いつ消えるのか 答え: 実測では約2分です。ただし[ドキュメント](Supavisor FAQ)は最大5分と書いているので、見積もりは5分でしてください。 なぜ気にするか: 「もう止めたのに枠が空かない」という状態が数分続き、復旧の判断を誤らせるからです。 [ドキュメント](SupavisorのFAQ)には3つの主張があります。3つとも測りました。 | [ドキュメント]の主張 | 私が測ったもの | |---|---| | トランザクションモードは、5分使われなければ閉じる | [ラボ] 約2分(105秒では残り、120秒で消えた。2回)。[ホスト版] 106秒では6本のまま、122秒で0本。どちらも約2分で、5分ではありません | | クライアントがいる間は、最低1本は維持される | [ホスト版] クライアント1本を放置 → バックエンドは1本のまま137秒後も維持。確かに維持されていました | | セッションモードは、すぐ閉じる | [ホスト版] 1本つないで切断 → バックエンドは3分以上残り、あとから来たクライアントに再利用されました。消えたのはアイドル4〜5分ごろ。「すぐ」ではありません | → 3つのうち2つは、実測と違いました。 それでも見積もりには大きいほう(5分)を使ってください。私が測ったのはプロジェクト1つ・数回ぶんだからです。 !ホスト版のダッシュボードに出る接続数。テスト直後で、実行中のクエリは0なのに41本が残っている(2026-11-02) 上の画面は、テストを止めた直後のものです。誰も使っていないのに41本が残っているのが、この「消えるまでの時間」です。 !クライアントを閉じてから約2分で、プーラーの接続が消える(ローカル) 関連して、「エラーが出ないまま遅くなる」ことも確かめました。1ロール・トランザクションモード・クエリ100ミリ秒で、クライアント数だけを変えます[ラボ]。 !クライアントを増やしても、待ち時間が増えるだけ(100ミリ秒のクエリ) | クライアント | 毎秒のクエリ | p50 | p95 | |---|---|---|---| | 5 | 47 | 104 ms | 112 ms | | 16 | 152 | 105 ms | 108 ms | | 40 | 154 | 218 ms | 312 ms | | 100 | 153 | 620 ms | 724 ms | → 16本を超えると毎秒約150回で頭打ちになり、増えるのは待ち時間だけ。エラーは1件も出ません。 だからp95を見ないと気づけません。 注意 [ラボ] データベース側がアイドルの接続を切った(pg_terminate_backend)とき、node-postgresの Pool は error ハンドラなしだとプロセスごと落ちました。pool.on('error', ...) を付けておけば、次のクエリから復帰します。SQLAlchemyは最初のクエリが失敗したので、create_engine(..., pool_pre_ping=True) を付けてください。 あなたがやること: 監視にp95を入れる。短いテストを連続で回すときは、前のテストの接続が残っている前提で数える。 12. 1つのロールに、みんなを巻き込ませないために 答え: ロールごとの connection limit が効きます。ただしプールサイズ + 1以上にしてください。statement_timeout だけでは守れません。 なぜ気にするか: 4章のとおり、1つのロールの使いすぎがAuthやほかのロールまで巻き込むからです。 > どのロールに付けるのか。 下の r1 はラボで作ったロールです。あなたのプロジェクトでは、自分で作ったロール(たとえば前章の batch_user のようなバッチ用)に付けてください。authenticator には付けないでください(Data APIが止まります)。postgres に付けるのも避けたほうが安全です(ダッシュボードや管理作業が入れなくなります)。 ロールごとの接続上限: alter role r1 connection limit 10 とすると、r1は10本で止まり、20クエリのうち10本が too many connections for role "r1" で即座に失敗しました。ほかのロール(r2)は影響なしです。ただし上限の値には注意が要ります[ラボ、プール15、40クライアント×5秒クエリ]。 | connection limit | r1のバックエンド | 失敗したクエリ | |---|---|---| | 15(プールサイズと同じ) | 15 | 25 / 40(すぐに失敗) | | 16(プールサイズ + 1) | 16 | 0(残りは待つ) | → ぴったりにすると16本目が拒否され、待てるはずのクライアントまでエラーになります。 2章の「+1」がここで効いてきます。 ロールごとのタイムアウト: alter role r1 set statement_timeout = '2s' で4秒のクエリは2.0秒で止まりました。ただし、どのロールも自分の statement_timeout を変えられます。 クライアントが SET statement_timeout = 0 を実行でき、しかもトランザクションモードでは次のクライアントにも0が残ります(6章)。つまり権限では防げません。 そのため、セッションの外に後ろ盾が要ります。pg_cron で5秒ごとに、長すぎるクエリを打ち切るジョブを動かしました。 -- 拡張機能 pg_cron を有効にしてから select cron.schedule('cancel-long-queries', '5 seconds', $$ select pg_cancel_backend(pid) from pg_stat_activity where usename = 'batch_user' -- 対象は自分で作ったロールだけに絞る and state = 'active' and now() - query_start > interval '6 seconds' $$); これを動かしたところ、SET statement_timeout = 0 をしたクライアントの30秒クエリが10〜11秒(6秒 + ジョブ間隔)で止まりました。 監視用のロール: 満杯のときに監視ロールがつながらないと、原因が見えません。PostgreSQL 17では reserved_connections を設定しロールに pg_use_reserved_connections を渡すと、満杯でもつながりました[ラボ]。reserved_connections を使うなら、式①の上限からその数を引いてください。 注意 reserved_connections を[ホスト版]で変更できるかは確かめていません(Nanoでは値は0でした)。変えられない可能性があるので、この手は当てにせず、満杯のときはダッシュボードから入る前提で考えておくほうが安全です。 あなたがやること: プーラーを使うロールの connection limit を「プールサイズ + 1」以上に設定する。長いクエリを止める定期ジョブを用意する。 13. 費用 - 今回の実験は約0.02ドルでした。ほとんどが自分のPCのDocker(0ドル)と無料プロジェクトでの短い確認で、使い捨てのProプロジェクト(Micro)を約1.5時間だけ動かし、終わったあと削除しました。 - [ドキュメント](Compute and disk、2026-11-04): Nanoは無料。有料プランのいちばん小さいコンピュートはMicroで月約10ドル、上限はNanoと同じ(直接60、クライアント200、プールサイズ15)。この「Nanoと同じ」はProプロジェクトで実際に読んで確かめました。 Smallは約15ドル(90/400)、Mediumは約60ドル(120/600)、XLは約210ドル(240/1000)。 - Largeはページによって数字が違い、Compute and diskでは約110ドル、Manage your usage / Computeでは約111ドルです。どちらも時間単価は0.1517ドルなので、月換算のしかたの違いです(0.1517 × 730 = 110.74)。 - Proプランは月25ドルで、コンピュートのクレジット10ドル分が含まれMicro 1プロジェクトぶんをまかないます。プランを上げるだけでは接続の余裕は増えません。 増えるのはコンピュートのサイズを上げたときです。 - コンピュートは時間単位で課金され、上限(Spend Cap)の対象外です[ドキュメント]。つまり、コンピュートサイズを上げたぶんの料金は、Spend Capでは止まりません。 - 専用プーラーにつなぐにはIPv6が必要で、IPv4だけの回線からはIPv4アドオン(月4ドル)が要ります。私は使わなかったので、専用プーラーの実測はありません。 14. 実際の運用にするなら(まだ試していません) - プールサイズは、(ロール数 × モード数 × (プール + 1)) + Data API + Auth + Storage + Realtime + 監視 が、max_connections から予約を引いた数に収まるかで決める。設定場所は Project Settings → Database → Connection pooling です。専用プーラーも同時に使うなら、そのぶんも足す。 実測値は、Data API 11本、Auth 10本(使われたあと。約1分で手放す)、Storage 8本(使われたあと、持ったまま)[ホスト版]。Realtimeは[ラボ]で5〜7本、監視は[ホスト版]で1〜2本でしたが、Realtimeの本数は同時接続数で変わるはずで、ホスト版では測っていません。ここは自分のプロジェクトで数えてください(→ 5章のSQL)。 - アプリのコピー数 × ライブラリのプール を、クライアント上限(ロールごとに200、コンピュートサイズで固定)と比べる。サーバーレスはとくに。ただしロールを足してもバックエンドの枠は増えません。 - 待ち時間の上限(Supavisor 60秒、PostgREST 10秒、anon 3秒、Prisma 6の10秒、ライブラリ30秒、postgres ロールは2分。Prisma 7のpgアダプタとnode-postgresは既定で無制限)を、ひとつの「はしご」として揃える。 - ロールごとの connection limit(プールサイズ + 1以上)、statement_timeout、idle_in_transaction_session_timeout。SET ではなく set_config(..., true)。クライアントに外されない後ろ盾として、長いクエリを止める定期ジョブ。 - postgres.jsを使うなら、max_pipeline: 1 を自分のトランザクションで確かめる。 - 監視ロールが満杯のときにもログインできるかを、使い捨ての環境で確かめる。 - [ホスト版]でのさらなる確認(クライアント接続数のグラフ、PostgRESTのプール設定、+1が全リージョンで同じか、専用プーラーのバックエンド本数、満杯のときのAuthの粘り)。 15. 検証メモ:つまずきと、考えを変えたところ 結果だけ読みたい方は、ここは飛ばしてください。再現する方のための記録です。 ラボ作りでのつまずき 1. max_connections は [db] ではなく [db.settings] に書きます。最初に [db] へ書いても効かず、alter system set で設定したところ、その値が postgresql.auto.conf に残って後から [db.settings] を効かなくしました。alter system reset max_connections と再起動で解決します(pg_settings の source で確認できます)。 2. ラボを90本にしたのは、「空き」をホスト版のNano(60本)に合わせるためです。ローカルのプーラーは管理用に29本(supavisor_meta 27本 + クラスタ用2本)をデータベース内に開きますが、ホスト版ではその分が外にあります。数字が合わないと思ったら、これでした(application_name を見るまで気づきませんでした)。 3. 満杯のとき、数える側の接続まで拒否されました。数える専用に、予約枠のある supabase_admin を使います。 4. シェルの引数の渡し方で、4種類のテストが全部同じ条件で走っていました(zshは引用符なしの変数を単語に分けません)。 5. バッチで続けて走らせると、前のテストの接続が残って数が膨らみます(Prisma 7が10本のはずが26本に見えた)。テストごとにプーラーを再起動して測り直しました。 考えを変えたところ 6. 最初に書いた式①は、実験データと合いませんでした。ラボの満杯は「57/60」で、残り3本は管理者用の予約です。式を max_connections ではなく「予約を引いた数」に直し、トランザクションモードの「+1」も足しました。 7. 「満杯ならData APIは503」と思い込んでいましたが、満杯でも200のことがあります。分かれ目は、持っている接続で足りるかどうかでした。 8. 「Authが先に止まる」も同じ種類の思い込みでした。Authが先だったのは、そのときAuthが接続を持っていなかったからです。 9. 「何もしていないときに0本だから、Authは接続を持たない」と書きかけました。Proプロジェクトで負荷をかけたら10本持っていました。「測っていない」と「0である」は別物です。 10. ドキュメントは2026年10月末に書き換わりました。以前は「プールサイズはポート5432と6543で共有される」という記述がありましたが、現在その文はなく、「ロールごと」に変わっています。古い記事を読むときは日付を見てください。 11. 状態漏れのテストで、set_config(..., true) の確認が前の実験で漏れた値に引きずられ、漏れたように見えました。キー名と順番を直しました。 12. 「食い違った行」を探す最初のテストで一時テーブルを使い、「食い違い」が3件出て一瞬再現したと思いました。違いました。一時テーブルは接続ごとに残るので、同じ接続を使い回した2つ目以降のトランザクションが前の行まで読んでいただけです。私のテストのバグでした。トランザクションモードを試すときは、テスト自身が状態を共有していないかを先に疑ってください。 13. Djangoのプールの実験で connection.close() を忘れ、全滅しました。これも私のバグですが、長く生きるスレッド(バックグラウンド処理など)では本番でも起こります。 まとめ - 危険度順の3つ: ①トランザクションモードでセッション状態が次のクライアントに残り、行と権限が漏れる。②接続は掛け算で増え、有料プランにしても増えない。③満杯になると「新しい接続が必要なもの」から止まる。 - 接続の予算は3つの式: ①バックエンドの合計 ≤ max_connections − 予約、②クライアントの合計 ≤ プーラーの上限、③同時に使う数 = 毎秒のクエリ × 1クエリの秒数。 - プールは「ロール × データベース × モード」ごと。トランザクションモードは「+1」。 - クライアント上限200もロールごと(ソース上の単位はプール=ロール × モード)。ただしロールを足してもバックエンドの枠は増えない(300クライアントが握っていたバックエンドは2本)。 - 式①にはAuth、Storage、Realtime、監視も入れる。Authは使われたあと10本(約1分で手放す)、Storageは8本(14分後も保持)。 - 待ち時間の上限は、プーラー60秒、PostgREST 10秒、postgres ロール2分。エラーが出ないまま遅くなるのでp95を見る。Prisma 7のpgアダプタには既定の上限がない。 - postgres.jsのハングの原因はパイプライン。max_pipeline: 1 で直り、sql.begin() も壊しませんでした。 - 接続が消えるまでは実測で約2分だが、見積もりは[ドキュメント](Supavisor FAQ)の5分で。 - connection limit は「プールサイズ + 1」以上に。statement_timeout はクライアントが外せるので、セッションの外に後ろ盾を。 - ライブラリの既定値はバージョンで変わる。実際に動かして数える。 参考にした公式ドキュメント(2026-11-04時点) 記事中で [ドキュメント] と書いたものの出どころです。内容は変わるので、読むときは日付を確かめてください。 - Connection management — プールサイズはロールごと、40%/80%の目安 - Connecting to Postgres — トランザクションモードの制限、パイプライン、セッション状態 - Pooling and limits — クライアント接続とバックエンド接続の上限、合計に含めるサービス - Supavisor FAQ — プールの単位、接続が消えるまでの時間、ホットな接続 - Postgres.js — max_pipeline と sql.begin() - Timeouts — ロールごとの statement_timeout の既定値 - Compute and disk / Manage your usage: Compute — コンピュートサイズごとの上限と料金 - Cost control(Spend Cap) — コンピュートがSpend Capの対象外であること サンプルコード(ラボのスクリプト、結果の表、この式をそのまま計算できるページ)は、冒頭のリポジトリにあります。 続きの記事では、実際に接続が足りなくなったときに何をするかを、症状の見分け方から順に試しました。
Boost can pause an app on its own once it has sat in the background for 5 to 60 minutes. You pick the delay. A paused app and its helpers use no CPU, and it resumes exactly where it was. Kernel-Hunter/boost
Beyond the Folder Structure: Building Maintainable React Applications with Feature-Based Architecture Beyond the Folder Structure: Building Maintainable React Applications with Feature-Based Architecture Introduction One thing I've come to understand from working on frontend applications is that writing code is only one part of building software. Another important part is how we organize that code, especially when we're building an application that will continue to grow. When a React project is new, it is easy to create folders for components, pages, hooks, services and utilities, and start building. You know where everything is because you've probably written most of it yourself. But what happens when the application grows to 10 or 20 features? What happens when another developer joins the team, or when you need to change a feature that was built a year ago? For me, a good architecture should do more than make the folder structure look organized. A developer should be able to find a feature, understand how it works and make changes to it without having to understand the entire application first. This is why I find feature-based architecture useful. It gives us a way to organize code around the actual work our application does, rather than only around the type of files we're writing. To explain the approach, let's imagine we're building a healthcare management application. It allows staff to register patients, manage appointments, view medical histories and maintain medication records. We'll use this same application throughout the article so the decisions are easier to follow. 1. The problem with organizing everything by file type A common React project starts like this: src/ ├── components/ │ ├── PatientCard.tsx │ ├── AppointmentCard.tsx │ └── MedicationTable.tsx ├── hooks/ │ ├── usePatients.ts │ └── useAppointments.ts ├── services/ │ ├── patientService.ts │ └── appointmentService.ts ├── pages/ │ ├── Patients.tsx │ └── Appointments.tsx └── types/ There is nothing fundamentally wrong with this structure. For a small application, it can be simple and effective. Now imagine I join the team and I'm asked to change the patient registration flow. I open the patients page, then trace its form components, validation, API calls and types across different folders. The files I need are all there, but the code for one feature is spread across the application. As more features are added, those folders become larger. It can become harder to answer a basic question: Which files belong to patient registration? This is not necessarily a code-quality problem. The individual files might be well written. The challenge is that the structure tells us what kind of file something is, but not always which business feature it belongs to. 2. Organizing the application around features Instead of grouping files only by what they are, we can group them by what they do. src/ ├── app/ ├── features/ │ ├── patients/ │ ├── appointments/ │ ├── medical-history/ │ └── medications/ ├── shared/ └── main.tsx If I want to work on appointment scheduling, I have a clear starting point. If I want to change patient registration, I go to the patients feature. Each feature can keep the files it needs close together: features/ └── patients/ ├── api/ │ ├── getPatients.ts │ ├── createPatient.ts │ └── patientKeys.ts ├── components/ │ ├── PatientList.tsx │ ├── PatientForm.tsx │ └── PatientProfile.tsx ├── hooks/ │ ├── usePatients.ts │ └── useCreatePatient.ts ├── types/ │ └── patient.types.ts └── index.ts We're still using familiar React concepts: components, hooks, types and API functions. We're simply keeping the code for one business feature together. However, feature-based architecture is not just about creating a features folder. We can move every file into that folder and still end up with a difficult application. The real value comes from deciding what each feature owns, what it shares and how it works with the rest of the system. 3. Each feature needs a clear responsibility Imagine our healthcare application has four features: patients, appointments, medical history and medications. Let's say we decide to remove appointment scheduling. We would expect to remove the appointment screens and update pages that show appointment information. We would not expect patient registration to stop working because an important patient utility was hidden inside the appointments feature. That is the kind of problem clear feature ownership helps us avoid. A feature should own the code needed for its responsibility and depend as little as possible on the internal files of other features. This doesn't mean features can never work together. A patient overview page will naturally need information from several features. The point is to make those relationships deliberate and easy to identify. A useful question when adding code is: _If this feature were removed tomorrow, what else would have to change?_ If the answer includes several unrelated features, we should look again at where that code belongs. There is also a practical limit here. A folder structure cannot make every feature independent. Features may share backend data, user permissions and workflows. We should aim for clear responsibilities, not pretend those relationships do not exist. I find it helpful to think of the main dependencies this way: the application brings features together, features own their business logic, and features can use general tools from shared. When one feature genuinely needs another, it should use a small public interface rather than reach into internal folders. This is a guideline for keeping changes predictable, not a rule that every feature must live in isolation. One boundary I would keep firm is that general code in shared should not import business features. Otherwise, the lowest layer starts depending on the very features it is supposed to support. 4. When should something become shared? Let's say we have a PatientCard inside the patients feature. Later, the medical history feature needs a card with a similar layout. One option is to import the whole PatientCard into medical history. That might work, but it also means medical history now relies on a component designed around the patients feature. I would first ask what we actually need to reuse. If it is just the layout, we can extract a general InfoCard: src/ ├── features/ │ ├── patients/components/PatientCard.tsx │ └── medical-history/components/HistoryCard.tsx └── shared/ui/InfoCard.tsx // shared/ui/InfoCard.tsx import type { ReactNode } from "react"; type InfoCardProps = { heading: ReactNode; children: ReactNode; }; export function InfoCard({ heading, children }: InfoCardProps) { return ( <section className="info-card"> {heading} {children} </section> ); } For example, the patients feature can use the shared layout while keeping its own content: // features/patients/components/PatientCard.tsx import { InfoCard } from "@/shared/ui/InfoCard"; import type { Patient } from "../types/patient.types"; export function PatientCard({ patient }: { patient: Patient }) { return ( <InfoCard heading={<h2>Patient details</h2>}> <p>{patient.name}</p> </InfoCard> ); } Now both features can reuse the layout without importing each other's internal components. Each caller supplies a heading such as <h2>Patient details</h2> or <h3>Medical history</h3>, choosing the right level for its page. The shared component provides the wrapper and a CSS styling hook; the feature still decides what information and actions belong inside it. Its actual spacing and appearance would be defined in the shared styles. But I wouldn't move an entire component into shared just because two screens look similar. A patient card may include actions, validation rules or permissions that only make sense within the patients feature. Share the general layout, not the patient-specific behavior. The same distinction helps keep shared from becoming a dumping ground. It is a good home for general UI controls, date formatting and HTTP configuration, but not patient forms, appointment workflows or medication rules. 5. Bringing features together on one screen A patient overview page might show a profile, medical history, medications and upcoming appointments. We do not need to move all that functionality into the patients feature simply because it appears on one screen. The application can bring the features together while each feature remains responsible for its own part. // app/routes/PatientOverview.tsx import { PatientProfile } from "@/features/patients"; import { MedicalHistoryList } from "@/features/medical-history"; import { MedicationList } from "@/features/medications"; import { UpcomingAppointments } from "@/features/appointments"; type Props = { patientId: string }; export function PatientOverview({ patientId }: Props) { return ( <main> <PatientProfile patientId={patientId} /> <MedicalHistoryList patientId={patientId} /> <MedicationList patientId={patientId} /> <UpcomingAppointments patientId={patientId} /> </main> ); } This example assumes each feature exports the component shown and that those components accept a patientId prop. In a real application, each one would also need appropriate loading, empty and error states. I like this approach because the route decides what appears on the page, while the features decide how their own functionality works. Passing a patientId is a small, explicit contract; the route does not need to know the internal state or data-fetching logic of each feature. If appointment scheduling is removed, we can update this page without rewriting the medical history or medication features. Not every feature interaction needs to happen in a route. Sometimes one feature genuinely needs an operation provided by another. When that happens, I would rather expose a small, clearly defined interface than import an arbitrary internal file. I would also watch for chains of features depending on one another, because those can make future changes harder. 6. Give each feature a clear entry point Consider these two imports: // Depends on the internal folder structure import { PatientProfile } from "@/features/patients/components/PatientProfile"; // Depends on a public entry point import { PatientProfile } from "@/features/patients"; The second approach allows the patients feature to decide what it makes available to the rest of the application. Inside features/patients/index.ts, we can write: export { PatientProfile } from "./components/PatientProfile"; If we later reorganize the patients feature, we can update this export without changing every consumer. The import path becomes a small agreement between the feature and the rest of the application. It is not a security boundary, and it does not prevent the features from sharing the same backend data. This is a lightweight convention rather than a full implementation of Feature-Sliced Design, which defines additional layers and import rules. There is one important detail: an index.ts file does not automatically make the other files private. TypeScript will still allow a direct import if the path is accessible. If the team wants to enforce this convention, we need import rules and code reviews to support it. I also wouldn't export every hook, type and component simply because we can. The entry point should expose what other parts of the application actually need. Keeping it small gives us more freedom to change the internal implementation later. 7. Organizing API calls and managing data Instead of putting patient, appointment and medication requests into one large services folder, I prefer keeping each feature's API operations with the code that uses them. The features can still use a shared HTTP client for common configuration: // shared/api/client.ts import axios from "axios"; export const apiClient = axios.create({ baseURL: import.meta.env.VITE_API_URL, }); This example assumes a Vite application, where import.meta.env.VITE_API_URL is available. Other build setups may read environment configuration differently. Variables exposed to the browser are public configuration, not a safe place for API secrets. The patient type can stay with the patients feature. For this small example, we'll use only an ID and a display name: // features/patients/types/patient.types.ts export type Patient = { id: string; name: string; }; export type NewPatient = { name: string }; Then the patients feature can define its own API operation: // features/patients/api/getPatients.ts import { apiClient } from "@/shared/api/client"; import type { Patient } from "../types/patient.types"; export async function getPatients(): Promise<Patient[]> { const { data } = await apiClient.get<Patient[]>("/patients"); return data; } The Patient[] type tells TypeScript what response we expect. It does not check that the server actually returned valid patient records. If the API contract is uncertain or the data is sensitive, runtime response validation may be needed as well. For these hooks to work, the application must provide a QueryClientProvider near its root. The app/providers folder is a natural place for that setup. Create the QueryClient once for the lifetime of the provider, rather than creating a new one on every render. If we use TanStack Query, we can keep the query hook with the feature as well. I also prefer one place for its query keys, so the list and registration flow cannot accidentally use different spellings: // features/patients/api/patientKeys.ts export const patientKeys = { lists: () => ["patients", "list"] as const, detail: (id: string) => ["patients", "detail", id] as const, }; // features/patients/hooks/usePatients.ts import { useQuery } from "@tanstack/react-query"; import { getPatients } from "../api/getPatients"; import { patientKeys } from "../api/patientKeys"; export function usePatients() { return useQuery({ queryKey: patientKeys.lists(), queryFn: getPatients, }); } Now a patient list component can focus on displaying the result: // features/patients/components/PatientList.tsx import { usePatients } from "../hooks/usePatients"; export function PatientList() { const { data: patients, isPending, isError } = usePatients(); if (isPending) return <p>Loading patients...</p>; if (isError) return <p>Unable to load patients.</p>; if (!patients?.length) return <p>No patients found.</p>; return ( <ul> {patients.map((patient) => ( <li key={patient.id}>{patient.name}</li> ))} </ul> ); } The shared client handles general request configuration. The feature API function knows which endpoint to call. The query hook handles fetching and caching. The component displays the result. Each part has a clear job. Query keys describe which data is cached. If the list later supports page numbers or filters, those values should be included in its key because they change the result. Keeping the shared patientKeys.lists() prefix lets us invalidate all patient-list variants together. I would keep personal details such as names and medical notes out of query keys. Patient registration shows why keeping related work together matters. When a new patient is created, the patients feature should own both the request and the decision to refresh its list. I would keep the HTTP operation in api/ and the TanStack Query behavior in hooks/, following the same pattern as the patient-list request: // features/patients/api/createPatient.ts import { apiClient } from "@/shared/api/client"; import type { NewPatient, Patient } from "../types/patient.types"; export async function createPatient(input: NewPatient): Promise<Patient> { const { data } = await apiClient.post<Patient>("/patients", input); return data; } // features/patients/hooks/useCreatePatient.ts import { useMutation, useQueryClient } from "@tanstack/react-query"; import { createPatient } from "../api/createPatient"; import { patientKeys } from "../api/patientKeys"; export function useCreatePatient() { const queryClient = useQueryClient(); return useMutation({ mutationFn: createPatient, onSuccess: () => queryClient.invalidateQueries({ queryKey: patientKeys.lists() }), }); } The form stays in the same feature and calls the mutation hook. Here is a deliberately small example: // features/patients/components/PatientForm.tsx import { useState, type FormEvent } from "react"; import { useCreatePatient } from "../hooks/useCreatePatient"; export function PatientForm() { const [name, setName] = useState(""); const registration = useCreatePatient(); async function handleSubmit(event: FormEvent<HTMLFormElement>) { event.preventDefault(); const trimmedName = name.trim(); if (!trimmedName || registration.isPending) return; try { await registration.mutateAsync({ name: trimmedName }); setName(""); } catch { // Keep the name in the form so staff can try again. } } return ( <form onSubmit={handleSubmit}> <label htmlFor="patient-name">Patient name</label> <input id="patient-name" value={name} onChange={(event) => setName(event.target.value)} required /> <button type="submit" disabled={registration.isPending}> {registration.isPending ? "Registering..." : "Register"} </button> {registration.isError && <p role="alert">Registration failed. Please try again.</p>} </form> ); } This is an architecture example, not a complete healthcare registration form. A real product needs stronger validation, access checks, consent and careful handling of personal data. Notice that the form doesn't need to know how the patient list is cached. The hook owns that decision. The form uses mutateAsync so it clears the input only after a successful registration; if the request fails, the name stays available for another attempt. Returning the invalidation promise from onSuccess also keeps the mutation pending while matching active queries are refetched. Inactive queries are marked stale but are not necessarily fetched immediately. This follows TanStack Query's documented behavior. The pending button helps avoid repeated clicks, but it does not guarantee that a request cannot be duplicated after a network timeout. In a real registration system, the server should handle retries safely, for example with an appropriate idempotency strategy. One more thing: not every React application needs an additional global state library. TanStack Query already helps with server data, and React's local state is enough for many UI interactions. If we later have client-side state that several unrelated parts of the application need, then a tool like Zustand may be worth considering. I would introduce it because the application needs it, not simply because it is available. 8. How do we keep the architecture from drifting? Defining feature boundaries is only the beginning. We also need ways to keep those boundaries intact as the team and codebase grow. The public entry points discussed earlier are one convention worth checking automatically. ESLint import restrictions or a module-boundary plugin can help enforce them. The details depend on the project's aliases and import patterns: a rule written only for @/ imports might miss relative paths, and static import restrictions do not cover every dynamic import. I would test both allowed and forbidden examples and run those checks in CI. Code reviews and tests are still necessary. A lint rule can catch a forbidden import, but it cannot reliably tell us whether a supposedly shared component contains business logic that should have stayed in one feature. I would keep tests close to the feature they cover and add an integration test for the registration flow: submit a valid name, mock a successful API response, and check that the patient list refreshes. I would also test the failure path: the form should show an error and keep the entered name so staff can retry. These checks test real user actions rather than only checking whether a folder exists. For a reliable test, I would render the form inside a fresh QueryClientProvider, mock the network request, and wait for the user-visible result. A new query client per test prevents cached patient data from one test affecting another. I would make the team's expectations short and practical: - Keep feature-specific components, API operations and rules inside their owning feature. - Use shared for functionality that does not need to know about a particular business feature. - Compose multiple features in a page or other clearly owned part of the application. - Import through public entry points when working across feature boundaries. - Add a new abstraction only when it solves a real problem. - These are rules a developer can understand and apply during everyday work. 9. Not every feature needs the same folders One mistake I'd avoid is treating feature-based architecture as a fixed template. A small notifications feature might only need three files: features/notifications/ ├── NotificationList.tsx ├── useNotifications.ts └── index.ts A more complex patients feature might need separate directories for forms, validation, API operations and components. Both structures can exist in the same application. We shouldn't create folders just because a template says they must exist. We should introduce structure when it makes the code easier to understand and work with. This also means feature boundaries may change. If patient registration grows into several distinct workflows, we might split it into smaller areas. If two tiny features are always changed together, we might discover that they belong to one larger responsibility. Architecture is something we maintain as the product changes, not a decision we make once and never revisit. 10. When does this approach make sense? I wouldn't recommend feature-based architecture for every React project. A small landing page with a contact form probably doesn't need public entry points, strict module boundaries and several feature folders. But consider a healthcare application that starts with patients and appointments, then adds medication management, billing, reporting, staff roles and more workflows. As different developers begin working on those areas, clearer ownership becomes more valuable. The trade-off is that we now need to think about boundaries, shared code and import rules. That takes some discipline. If the application is too small to benefit from those decisions, the extra structure may slow us down. I would judge the architecture by everyday development work, not just by how clean the folders look. Suppose a new requirement adds an emergency contact to patient registration. We should be able to find the patient form, its validation, the API contract and its tests within the patients feature. We might need a backend change or an update to a genuinely shared contract, but we should not have to edit unrelated appointment or medication components. I would look at which files changed and whether those changes stayed close to the feature's responsibility. In this example, I would expect changes in patients/components/PatientForm.tsx, the patients validation or types, the patient API contract, and their tests. The appointments feature should not need an edit just because patient registration gained one field. That is a more useful test of the architecture than counting folders. There is also a limit to what this approach solves. Organizing frontend files does not replace backend authorization, automated tests, accessibility or good API design. Patient records still need server-side access checks. A frontend route guard can guide the interface, but it cannot authorize an API request. I would also avoid putting medical details into query keys, logs or persistent browser storage. If the app caches patient records in memory, it needs a plan to clear or isolate user-specific cached data when staff sign out or switch accounts. For example, the sign-out flow can cancel relevant in-flight queries and clear the QueryClient cache, while also unmounting protected screens and ending the server session. Clearing a cache alone is not an authorization mechanism, and request cancellation must be supported by the HTTP layer to stop work in progress. The same browser should not show one staff member's cached records to another. Those are security and privacy decisions, not benefits that a folder structure provides automatically. For me, the question is not, _Is feature-based architecture always better?_ It is, _Has the application become complex enough that organizing code around its business features will make future changes easier?_ 11. Bringing everything together Here is how those decisions could fit together in our healthcare application: src/ ├── app/ │ ├── routes/ │ ├── layouts/ │ └── providers/ ├── features/ │ ├── patients/ │ │ ├── api/ │ │ ├── components/ │ │ ├── hooks/ │ │ ├── types/ │ │ └── index.ts │ ├── appointments/ │ ├── medical-history/ │ └── medications/ ├── shared/ │ ├── api/ │ ├── ui/ │ └── lib/ └── main.tsx This is a starting point, not a required structure. The more useful question is how to introduce it without disrupting an application that already works. If I were introducing this approach into an existing codebase, I wouldn't move every file at once. I would start with one feature, bring its related files together, define its entry point, run its tests, and check that its imports follow the agreed rules. Then I would migrate the next feature. That makes the change easier to review and avoids turning a folder reorganization into a risky rewrite. Explore the working example I have also built CarePoint, a small healthcare management application based on the example used throughout this article. It brings the ideas together in a working React project, including feature-owned components and API calls, shared UI components, and an application layer that composes features. - Try the application: feature-based-architecture-project.netlify.app - Explore the source code: Macksonpeters/technical-article-feature-based-architecture-demo The repository includes setup instructions, demo sign-in details, and a guide showing where the concepts discussed in this article appear in the code. It uses a mock backend, so you can explore the example without setting up a separate API. Conclusion I judge frontend architecture by what happens when someone needs to change a feature. Can they find the relevant code, update a workflow without surprising side effects, and reuse general components without spreading business rules across the application? Feature-based architecture gives us a practical way to approach those questions. It encourages us to organize code around the functionality we're building, define clear responsibilities and make dependencies easier to see. Those benefits don't come from creating a features folder alone. They come from clear ownership, deliberate dependencies and a team that maintains those decisions as the product changes. The proof is in everyday work: how quickly a developer can find the right code, how safely a feature can change and how easily its behavior can be tested. The goal isn't to have the most sophisticated folder structure. It's to have a codebase that developers can understand, maintain and confidently extend. Further reading These resources support the ideas discussed here. This article is a practical explanation of one approach, not a claim that React requires a particular folder structure. 1. React documentation, Thinking in React: react.dev 2. React documentation, Managing State:react.dev 3. TanStack Query documentation, Query Keys: tanstack.com 4. TanStack Query documentation, Invalidations from Mutations: tanstack.com 5. Feature-Sliced Design documentation, Layers and public APIs: feature-sliced.design and feature-sliced.design 6. ESLint documentation, no-restricted-imports: eslint.org 7. TanStack Query documentation, QueryClient (including cache clearing): tanstack.com 8. OWASP Cheat Sheet Series, HTML5 Security: cheatsheetseries.owasp.org
拍片哥女装 是一款开源的 AI 服装参考图库,收录 1407 张 AI 生成服装参考图,支持中英双语检索,还可自建后端实现“上传自拍+选服装”的 AI 虚拟换装试穿。 paipiange/nvzhuang t.co
Si una regla salta siempre con textos que están bien, la que sobra es la regla. Por eso he añadido a humanizar 0.4.0 un log de las reglas que saltan (idea de Edwin Jimenez). Tu texto no se guarda ni sale de tu equipo. En #ClaudeCode: /humanizar-log github.com/marcmayol/drac-plugins/tree/main/plugi…
@RIPDiplomacy @HindlesKitchen @huntster10 We are all less intelligent than AI now lol openai/math
Reitti v5.9.0 released: In-app alerts, ntfy.sh & Apprise push notifications Hey everyone, Daniel here. For those unfamiliar, Reitti is an open-source, privacy-first, self-hosted location tracker and Google Timeline alternative. It ingests points from apps like OwnTracks or GPSLogger, geotags your Immich photos, and keeps your travel history strictly on your own hardware. Today I am releasing Reitti v5.9.0, which brings a feature that has been on the wishlist for a while: a flexible notification framework. Here is what is new in this release. preview.redd.it Notifications: In-App, ntfy.sh, and Apprise You can now configure how and when Reitti reaches out to you. Whether you prefer keeping alerts strictly inside the web UI or want real-time push alerts on your phone or desktop, the notification system supports both. You can now configure how and when Reitti reaches out to you. Whether you prefer keeping alerts strictly inside the web UI or want real-time push alerts on your phone or desktop, the notification system supports both. Supported Channels - In-app notifications: View alerts directly within the Reitti web interface. - ntfy.sh: Connect to your own self-hosted ntfy instance or the public service for instant push notifications to your mobile devices or desktop. - Apprise: Route alerts through almost any messaging service, chat app, or webhook endpoint supported by Apprise. Granular Notification Types You have full control over what events generate an alert. Disabled notification types are ignored across all configured channels so your inbox stays clean. You can toggle: - Security: Notify me when someone fails to log in to my account too often. - Job completion: Notify me when a long-running job finishes (like large imports or timeline recalculations). - Job errors: Notify me when a background job fails. - Release updates: Notify me when a newer Reitti version is available. preview.redd.it Daily Update Checks As part of the new notification engine, Reitti now includes an automatic daily check for new releases. Once a day, your instance checks GitHub to see if a newer version is available and notifies you, so you do not have to keep checking release pages manually. Translations Thanks to our contributors on Hosted Weblate, translations across multiple languages have been updated and expanded. Thank you to everyone helping make Reitti accessible in their native language! Upgrading to v5.9.0 Upgrading via Docker is straightforward: pull the latest image tag (reitti:5.9.0) and recreate your container. There are no manual database migrations or config changes needed. docker compose pull docker compose up -d Links & Community Word of mouth is what keeps Reitti growing. If you know someone looking for an independent Google Timeline alternative or a way to geotag their Immich photo collection, mentioning Reitti helps a lot. I would much rather spend my time writing code than marketing on social media, so every mention counts. - GitHub Repository: dedicatedcode/reitti - Release Notes: v5.9.0 on GitHub - Documentation: dedicatedcode.com - IRC: Drop by #reitti on Libera Chat if you want to chat, report issues, or ask questions. - Support the Project: If you find Reitti useful and want to help support development financially, you can find me on Patreon and Ko-fi. Feedback and questions are always welcome! — Daniel
Si una regla salta siempre con textos que están bien, la que sobra es la regla. Por eso he añadido a humanizar 0.4.0 un log de las reglas que saltan (idea de Edwin Jimenez). Tu texto no se guarda ni sale de tu equipo. En #ClaudeCode: /humanizar-log github.com/marcmayol/drac-plugins/tree/main/plugi… t.co
OpenTodo 0.20.0: routines, multi-step automations that run on your own server, with AI steps that never write without your review I am the maintainer of OpenTodo, a self-hosted, local-first task manager (Go + SQLite, one container, AGPL). This release adds routines, and since this sub gave me the most useful feedback on earlier releases, here is what they are and what they are not. What a routine is. Several steps in a row, each using what the step before produced. "Every Sunday at 18:00: find overdue tasks, set them due tomorrow, count them, notify me with the count." Steps include find, create, change, comment, read and append to notes, split, join, format, if/otherwise, repeat for each, timers, notifications, a webhook, an email to your own verified address, and two AI steps. reddit.com How you build one. An editor of cards, phone first. Each card is a sentence whose bold words are buttons. Each card previews what it would do against your real tasks before anything is written. Eleven starters are included. Everything also exists in the REST API, the ot CLI (JSON or YAML) and over MCP. AI steps, with limits. Ask AI and Summarise call the provider you configured (Anthropic, OpenAI, Gemini, or a compatible endpoint on your own network). A run with an AI step writes nothing by itself: changes wait as a proposal you review item by item and apply with one Undo. "Apply without asking" is off by default, can only be switched on in the app (never by an agent or a token), is capped at 20 items a run, and switches itself off after a run that would exceed that or after two failures. Each routine has a daily token budget. No AI vendor is built in; the feature is off until the owner configures a provider. Encrypted accounts. With end-to-end encryption on, routines that read text run on one of your own devices, not on the server; the server only relays ids and applies encrypted changes. What it is not. Not a general workflow engine: 20 steps, 60 seconds, 500 items written per run. Not a scheduler for arbitrary scripts; the only outbound targets are your own webhooks and your own verified email address. Runs on. One container, about 34 MB binary with the web app inside, SQLite, no other services, a Raspberry Pi is fine. Upgrade is replace the image and restart; the release notes list the additive fields. Clip of the editor in the comments. Docs: open-todo.app . Source: OpenTodoApp/OpenTodo . Happy to answer anything, including why I made choices you disagree with.
把梵高的星空、蒙克的呐喊、莫奈的日本桥做成动画,一路走过去,人物也跟着换画风。这个动画项目开源了。 项目:huashu-art-motion GitHub:alchaincyf/huashu-art-motion 大家可以尝试下,挺好玩的。 t.co
Writing a TV player's core in Rust, shared with Kotlin and Swift via UniFFI Hey ! I've been building Hey Stream, a free and open-source (GPL) TV player for Android TV, tablets and phones. Most players in this space are either paid, full of ads, or crawl on cheap boxes, so I wanted something simple and fast. The part you might find interesting: the whole brain of the app is one Rust crate. API client, SQLite catalog cache, search, parental control, resume and "watched" tracking all live there. The Android UI (Compose) just displays stuff, and talks to the core through UniFFI. Swift bindings are generated too, for a future Apple TV app. A few things I learned along the way: - Cheap boxes are brutal. It has to stay smooth on a 2 GB box with a 32-bit userspace, so we ship armeabi-v7a next to arm64-v8a. Catalogs can hit 100k entries, so they live in SQLite (WAL, cached statements, paged queries) and never get loaded whole. - Provider APIs are a mess. Numbers as strings, maps instead of arrays, random missing fields. Each entry gets deserialized from its own RawValue slice, so one broken entry gets skipped instead of killing the whole list. - TLS without JNI. reqwest + rustls with bundled Mozilla roots, so the core needs zero Android-side setup. - Panics don't vanish. A panic hook forwards the message and file:line to the app through a UniFFI foreign trait, so they show up in (opt-out, anonymous) crash reports. - Tests never touch a real server: wiremock on the Rust side, MockWebServer on an emulator in CI. It's just a player: no content, not tied to any provider. Still early (test builds), so expect rough edges. If you want to jump in, there are open issues for instant search with SQLite FTS5, streaming JSON parsing so huge playlists don't eat all the RAM, and a benchmark on 100k items. And honestly, feedback on the core's design would be just as welcome. - Repo: Shweepsi/hey-stream-native - Releases (APK): github.com/Shweepsi/hey-stream-native/releases - Site: shweepsi.github.io
Built with Claude Code: a plugin that lets Claude Code sessions on different machines and accounts message each other, end-to-end encrypted (open source, pre-release) Since 2.1.224 in August, Claude Code sessions on one account can message each other across machines, with a claude.ai sign-in. We needed the rest: sessions under different accounts, agents from other vendors, and a relay that can't read the traffic. So we built worldinmotion (wim), a CLI plus a Claude Code plugin, mostly with Claude Code. It's open source (Apache-2.0), free to try, and a pre-release (0.1.8). We're Distronode, a Toronto telecom company about six months old: business phone numbers, calls and texts in Canada, the US and Europe, answered by District AI, our AI receptionist. Our own work runs as Claude Code sessions on three machines, pushing to a repo whose pipeline fans out into child pipelines. We kept needing two things: a way for those sessions to talk to each other, and a straight answer to whether a push deployed. This post covers both. What we built wim gives each session an address. A Claude Code tab gets its folder name plus the machine, like billing@laptop, shown on its status line. Sessions can see who's online, send, wait for a reply, and join rooms. Messages are end-to-end encrypted between devices and signed; the relay sees only metadata. There's no account and no telemetry, and a message to an offline session waits on the relay, sealed, for up to 24 hours. The plugin is where it gets useful. A message lands in the running turn, or starts a new turn in an idle tab. In a tab on one machine you can say Send demo@desk this message: "Please reply to notes@laptop with the word pong.", and the idle tab on the other machine wakes up, answers with SendMessage, and the reply arrives as a new turn. How Claude Code was used Claude Code wrote most of the code: 56 of the repo's 64 commits are co-authored by Claude. Every package is held to 100% coverage on all four metrics, per file; the plugin has its own tests (claude plugin test plugins/claude-code); and CI checks that the committed plugin bundle equals the build. Our own sessions use wim between our machines, so Claude Code is also its main tester. What we learned - Keep trust decisions out of the agent. wim held approve and wim devices trust run only in an interactive terminal with no agent variables set; inside Claude Code they refuse with CLAUDECODE is set: this shell belongs to Claude Code. That closes the obvious path, a peer asking your agent to approve its own messages. It isn't a sandbox: a program running as you can unset the variable. - Agents that wake each other need a breaker, and ours started too tight. Each device counts how often peers wake its agents. On Nov 1 a burst of short status requests between two of our machines tripped it (the defaults were 20 per sender and 60 in total an hour then), and every later message waited for a person to approve it. 0.1.8 raised the defaults for new meshes to 120 and 300, with a ping-pong pause after 32 short exchanges. - "Delivered" from an agent isn't proof. During that burst our sending agent told us four times that a message had gone through when it hadn't, because the held notice arrived as a separate turn after it replied. Making send say held straight away is part of issue #59. - Push beats polling. Gemini CLI and Antigravity work (tested Oct 24), but they only see messages when they check, so you have to tell them when to look. Try it Node.js 22.18 or newer, in a terminal you opened yourself: npm install --global worldinmotion wim init --name laptop --relay wss://worldinmotion.distronode.com Then in Claude Code (start a new session afterwards; open ones don't get the plugin): /plugin marketplace add distronode-corporation/worldinmotion /plugin install worldinmotion@worldinmotion A second machine joins with wim invite and wim join <code> --name desk. The hosted relay is free until 1.0, with no key and no sign-up (2,000 meshes in total, 25 MiB of files per mesh per day, idle meshes deleted after 30 days, no SLA, 60 days' notice before the offer ends). You can self-host the relay instead. Before 1.0 the wire format may change, and the formal two-account test still has to run. Repo and issues: distronode-corporation/worldinmotion The same lesson, for CI: bridgewatch "Pushed" from an agent isn't proof it shipped either. bridgewatch, also mostly written by Claude Code (49 of its 68 commits), is a tray app for GitHub Actions and GitLab CI. Most CI monitors show the newest pipeline on a branch, so an hourly schedule can bury your push. bridgewatch shows one row per push, every downstream pipeline under it, and whether the job you care about actually deployed, not just whether the pipeline went green. Its CLI (built from source with cargo) prints the same verdict as JSON, so a Claude Code session can check whether its own push deployed before it reports done. A Rust core and a Tauri 2 app; v1.2.0 runs on macOS and Linux. Apache-2.0: distronode-corporation/bridgewatch What would you hand off between Claude Code sessions if they could reach each other across machines and accounts?
AI coding agents are great at creating cloud resources. Less great at deleting them. agent-leftovers reads your Claude Code, Codex, Gemini CLI and Copilot CLI logs, lists what was left behind, and prints the teardown command for each. Free, read-only. ApahSaroj/agent-leftovers
@Web_3heir @ScamcoinSPL @PostyXBT @DeSchizo_ Always welcome. Blinkql has good first issues tagged, and non-code help counts too, like running the benchmarks on your machine or reviewing accessibility: github.com/Karthik-beta/Blinkql/issues
BD-JB Relapse 又有新进展:社区分支加入统一自动加载器了。 这是 ps3120 的分支,基于前面那套从蓝光入口运行的 Relapse。已经在关注 BD-JB 方案的,可以跟进这个版本。 ps3120/BD-JB-Relapse
DevSecOps Pipeline from Scratch: Gates That Block Bad Code "We want to shift security left. Walk me through how you would build a DevSecOps pipeline from scratch for a Kubernetes-based microservices stack." Naming tools does not answer it. The interviewer wants to know why each layer of the pipeline exists, what it catches, what it misses, and where it blocks a change instead of warning about it. This post builds that answer layer by layer, with configuration you can adapt. The video version covers the same pipeline if you prefer to watch it: {% embed youtube.com %} Why do security scans fail to block releases? A familiar failure goes like this. A team runs a dependency scanner in CI for months. It reports hundreds of findings, none of them fail a build, and the results go out as a weekly report that developers never open. Then a known critical CVE in a transitive dependency gets exploited, and the scanner had been flagging it for weeks. Scanning without enforcement is expensive logging. What an interviewer wants to hear is what actually stops a known-bad change from reaching production. Each layer below has a job, a set of blind spots and a specific enforcement point. What are the layers of a DevSecOps pipeline? | Layer | Where it runs | What it catches | Enforcement point | |---|---|---|---| | Secrets detection | Pre-commit hook, then CI | Keys, tokens and passwords in commits | Required CI check | | SAST | Every pull request | Injection flaws and insecure patterns in your own code | Required CI check | | SCA | Every pull request | Known CVEs in direct and transitive dependencies | Required CI check | | Image scanning and signing | After the build | CVEs in OS packages and app dependencies inside the image | Build fails; only passing images get signed | | Admission control | Kubernetes API server | Unsigned images, privileged or root pods | The API server rejects the pod | The layers overlap on purpose. SAST reads the code you wrote, including how it calls libraries, but it does not check those libraries for known CVEs. SCA knows the libraries but not your logic. Image scanning sees the OS packages in the base image, which neither of the first two looks at. Admission control is the only layer that still applies when someone skips CI and runs kubectl apply by hand. How do you add secrets scanning and SAST to pull requests? Secrets detection starts on the developer's laptop with a pre-commit hook; gitleaks ships one (id: gitleaks in .pre-commit-config.yaml). Treat the hook as a convenience. Anyone can skip it with git commit --no-verify, so the enforcing copy of the scan runs in CI. This workflow runs Semgrep and gitleaks as parallel jobs on every pull request: name: pr-security on: pull_request permissions: contents: read jobs: sast: runs-on: ubuntu-latest steps: - uses: actions/checkout@v7 with: fetch-depth: 0 - name: Semgrep (new findings only) env: BASE_SHA: ${{ github.event.pull_request.base.sha }} run: | pipx install semgrep==1.181.0 semgrep scan --config p/owasp-top-ten --error --baseline-commit "$BASE_SHA" secrets: runs-on: ubuntu-latest steps: - uses: actions/checkout@v7 with: fetch-depth: 0 - name: Gitleaks (commits in this PR) env: BASE_SHA: ${{ github.event.pull_request.base.sha }} HEAD_SHA: ${{ github.event.pull_request.head.sha }} run: | curl -sSfLO https://github.com/gitleaks/gitleaks/releases/download/v8.30.1/gitleaks_8.30.1_linux_x64.tar.gz echo "551f6fc83ea457d62a0d98237cbad105af8d557003051f41f3e7ca7b3f2470eb gitleaks_8.30.1_linux_x64.tar.gz" | sha256sum -c - tar -xzf gitleaks_8.30.1_linux_x64.tar.gz gitleaks ./gitleaks git --redact --log-opts="$BASE_SHA..$HEAD_SHA" . What to point out when you walk through it: - A red check only blocks if it is required. Mark both jobs as required status checks in branch protection or a ruleset. Otherwise the failure is a warning label and you are back to expensive logging. - --error is what makes Semgrep a gate. semgrep scan exits 0 on findings by default; --error makes it exit 1. The old returntocorp/semgrep-action wrapper is deprecated, so the job installs the CLI directly. - --baseline-commit reports only new findings. A team adopting Semgrep on an old codebase is not blocked by years of existing debt. That debt still needs tracking, just not in the merge gate. - fetch-depth: 0 is the simplest reliable choice. The checkout default of a single commit has neither the base commit Semgrep compares against nor the commit range gitleaks walks. - Gitleaks scans each commit, not only the final files. gitleaks git with --log-opts reads every commit in the range, so a key added in one commit and deleted in the next is still caught, and it exits 1 on a leak. The CLI needs no license key or repository secrets, so it also runs on pull requests from forks. If a secret does reach a shared branch, rotate it; rewriting history does not un-leak it. - Pin what the gate runs. The workflow pins the Semgrep version and checks the gitleaks download against a known SHA-256. In production, also pin actions to full commit SHAs, and keep in mind that a registry ruleset like p/owasp-top-ten can change between runs unless you vendor it. These two jobs cover mistakes developers introduce. Vulnerable libraries are the next layer. How do you scan dependencies and container images with Trivy? Trivy handles both SCA and image scanning. Pointed at the repository, trivy fs reads lockfiles, so transitive dependencies pinned there are covered. It needs no build, so it can run in parallel with SAST: trivy fs --scanners vuln --severity CRITICAL --exit-code 1 --ignore-unfixed . After the build, trivy image scans what actually ships: the OS packages from the base image plus the application dependencies inside it. The order of the next steps matters. Cosign signs an image that already exists in a registry, so the push comes before signing, and you sign the immutable digest rather than a tag that can be moved. set -euo pipefail makes the script stop at the first failing command, so a failed scan never reaches the push: set -euo pipefail IMAGE="registry.example.com/myapp:${GIT_SHA}" docker build -t "$IMAGE" . # Gate: fail on CRITICAL CVEs that have a fixed version trivy image --exit-code 1 --severity CRITICAL --ignore-unfixed "$IMAGE" # Push only after the scan passes, then sign the pushed digest docker push "$IMAGE" DIGEST=$(docker inspect --format '{{index .RepoDigests 0}}' "$IMAGE") cosign sign --yes --key env://COSIGN_PRIVATE_KEY "$DIGEST" cosign generate-key-pair encrypts the private key, so the job also needs COSIGN_PASSWORD in its environment; store both as protected CI secrets. --yes only skips the confirmation prompt. Each Trivy flag needs a reason you can defend: - --exit-code 1 is the gate. Without it, Trivy exits 0 even when it finds vulnerabilities, and without set -e the script carries on regardless. - --ignore-unfixed reports only vulnerabilities that have a fixed version, so the build only fails on problems an upgrade can solve. That keeps the gate actionable, but the unfixed findings still need an owner. Run a second, non-blocking scan that writes a full JSON report and track those findings outside the gate. Image scanning covers userspace packages. Containers share the host's kernel, so kernel vulnerabilities get fixed by patching nodes, not by rebuilding images. The base image decides how much there is to scan in the first place. Non-debug distroless images contain no shell and no package manager, which removes a lot of attack surface and makes scan reports much shorter. gcr.io/distroless/static-debian13 only suits statically linked binaries, such as a Go service built with CGO_ENABLED=0; interpreted languages need the matching distroless runtime image, pinned by digest. The multi-stage build and distroless guide covers those trade-offs. How do you block unsigned images at Kubernetes admission? Signing is only useful if something checks the signature. The admission layer rejects pods whose images from your registry lack a valid signature from the pipeline key, which also catches an image someone built on a laptop and pushed by hand. Be precise about what a passing check proves. A Cosign signature shows that the holder of the private key signed that exact digest. It only means "this image passed the scan" if the key is available exclusively to the protected CI job that runs the gate. If you need the scan result itself to be verifiable, publish it as a signed attestation and verify that too. As of Kyverno 1.19, ClusterPolicy is deprecated, and ImageValidatingPolicy replaces its verifyImages rules: apiVersion: policies.kyverno.io/v1 kind: ImageValidatingPolicy metadata: name: require-signed-images spec: validationActions: [Deny] failurePolicy: Fail matchConstraints: resourceRules: - apiGroups: [''] apiVersions: ['v1'] operations: ['CREATE', 'UPDATE'] resources: ['pods'] matchImageReferences: - glob: 'registry.example.com/*' attestors: - name: cosign cosign: key: data: | -----BEGIN PUBLIC KEY----- (contents of cosign.pub) -----END PUBLIC KEY----- validations: - expression: >- (images.containers + images.?initContainers.orValue([])) .map(image, verifyImageSignatures(image, [attestors.cosign])) .all(e, e > 0) message: image is not signed with the pipeline key The details that decide whether this is a real gate: - validationActions: [Deny] is the point. With [Audit] the pod is admitted and the violation only shows up in a report, which is the scanning-without-enforcement problem moved into the cluster. Starting in Audit to find what would break is a sensible rollout, as long as there is a date for switching to Deny. - Init containers are verified too. The expression runs the signature check on init container images as well as images.containers. - Tags get pinned to digests. By default (mutateDigest), Kyverno rewrites a matched image tag to the digest it resolved, so the node runs the digest that was checked even if someone moves the tag afterwards. - Other registries are not checked at all. matchImageReferences limits the policy to images under your registry, so an unsigned image from Docker Hub never reaches the signature check. Pair this with a policy that only allows images from your registry. - Some namespaces are exempt. The default Helm install excludes kube-system and Kyverno's own namespace from its webhooks, so pods created there are never checked. Keep pod creation in those namespaces limited to cluster admins. - Ephemeral containers take a separate path. Containers added with kubectl debug arrive through the pods/ephemeralcontainers subresource, which a pods match does not cover. Restrict who can use that subresource with RBAC. - Test it against your real registry. Kyverno reads signatures from the registry itself, so a private registry needs a credentials block: a supported cloud credential provider, or a registry secret in the Kyverno namespace. Cosign 3 also writes signatures in the newer Sigstore bundle format by default, so confirm your Kyverno version verifies what your Cosign version writes. Then prove the gate: deploy an unsigned image and watch it get rejected. Signature checks say nothing about how a pod runs. For non-root containers, no privileged mode, no privilege escalation and dropped capabilities, the built-in Pod Security Admission restricted profile is the simplest gate: kubectl label namespace production pod-security.kubernetes.io/enforce=restricted restricted does not require a read-only root filesystem. If you want that, add a Kyverno or OPA Gatekeeper rule for readOnlyRootFilesystem: true. Gatekeeper handles pod and registry rules like these well, but it does not verify Cosign signatures on its own; that needs an external data provider such as Ratify. Admission policy works alongside access control, which the Kubernetes RBAC least-privilege guide covers, and the shared-cluster multi-tenancy design shows how these policies fit a cluster with many teams. How do you keep security scans from slowing down CI? Every layer adds time to a pull request, and a slow pipeline gets bypassed. The main levers: - Run independent layers in parallel. SAST, secrets scanning and trivy fs need nothing but the source. Only the image scan waits for the build. - Cache the Trivy database. It is rebuilt every six hours, so downloading it on every run is wasted time. Persist a directory between runs and point Trivy at it with --cache-dir. - Keep SAST diff-aware. A gate that fails on findings the pull request did not introduce trains developers to ignore it. --baseline-commit keeps the report to new findings. - Agree the severity threshold as a team. Blocking only on CRITICAL lets serious HIGH findings through. Blocking on HIGH and above creates friction, because plenty of HIGH CVEs sit in transitive dependencies with no reachable exploit path. Decide it together, with an exceptions process, rather than leaving it to whoever writes the workflow. What does a DevSecOps pipeline miss after deployment? Images that were clean when they shipped. A scan is a point-in-time result. New CVEs are disclosed against packages your image already contains, and the image never picks up upstream base image patches until you rebuild it. If the base is pinned by digest, rebuilding alone changes nothing: bump the digest when upstream publishes a patched build (a dependency bot such as Renovate can open those pull requests), then rebuild. With a mutable tag, docker build --pull fetches the current base. Either way, keep scanning what is actually running. Trivy Operator runs in the cluster, scans the images your workloads use and stores the results as VulnerabilityReport resources. Reports expire after a TTL (24 hours by default) and are regenerated, which is how newly disclosed CVEs show up: kubectl get vulnerabilityreports -n production -o wide Secrets that never touch the repository. The secrets and SAST jobs above only see what is in the repository. A database password in a Helm values file kept outside the repo, or pasted into a ConfigMap, is invisible to them. That needs a different control: keep secrets in Vault or a cloud secrets manager, sync them into Kubernetes Secrets with the External Secrets Operator, and enable encryption at rest for Secrets in etcd. Gates nobody has tested. Make each gate fail at least once on purpose: open a pull request containing a dummy credential that matches a gitleaks rule, push an unsigned image and try to run it. A gate you have never seen block anything may still be in Audit mode. Why generate an SBOM for every image? A software bill of materials lists the packages in an image, as far as the generator can detect them; vendored or statically compiled code can slip past. Syft generates one in CycloneDX or SPDX format, and Cosign attaches it to the image as a signed attestation. The older cosign attach sbom route is deprecated. syft "$DIGEST" -o cyclonedx-json > sbom.cdx.json cosign attest --yes --key env://COSIGN_PRIVATE_KEY \ --type cyclonedx --predicate sbom.cdx.json "$DIGEST" The payoff comes when the next Log4Shell-class vulnerability is disclosed. Instead of searching every repository for log4j, you ask the stored SBOMs which images contain log4j-core, and at which versions: jq -r '.components[] | select(.name == "log4j-core") | .version' sbom.cdx.json # Match an SBOM against current vulnerability data without pulling the image grype sbom:./sbom.cdx.json One file at a time does not scale, so store SBOMs centrally. OWASP Dependency-Track is built for this, and it answers the question across every image at once. DevSecOps pipeline checklist - Gitleaks as a pre-commit hook for convenience and as a required CI check for enforcement. - Diff-aware Semgrep with --error on every pull request, as a required check. - trivy fs on dependencies, in parallel with SAST. - trivy image --exit-code 1 after the build, then push and sign the digest with Cosign. - An ImageValidatingPolicy in Deny mode, an allowed-registries policy, and Pod Security Admission restricted. - Base image updates that trigger rebuilds, plus in-cluster rescanning of running images. - An SBOM attestation for every image, stored where you can query it. Interview questions this covers - Walk me through a DevSecOps pipeline you would build from scratch for Kubernetes microservices. - What is the difference between SAST, SCA and image scanning, and what does each one miss? - How do you stop unsigned images from running in a cluster, and what does a valid signature actually prove? - An image passed its scan three weeks ago. Is it still safe to run? - A critical CVE is disclosed in a popular library. How do you find out which production images are affected? For more practice at this depth, try the Kubernetes interview questions for 2026 or browse all the DevOps interview ebooks. Pipeline security questions in real interviews go several follow-ups deeper: the supply chain threat model, gating releases on SBOM scans, and rolling DevSecOps out without making the security team the bottleneck. CI/CD & GitOps works through 50 questions with worked answers, including chapters on pipeline and supply-chain security (SBOM, Sigstore and SLSA) and on DevSecOps and compliance as code. It is one of the five books in the DevOps Interview Mastery bundle, and every purchase includes the free Interview-Day Playbook with a day-of checklist and behavioural answer frameworks. Prefer to watch or listen? Answers like these are walked through on YouTube and on the podcast, on Spotify and Amazon Music. --- Originally published at devopsinterview.cloud.
Revisited 7/39: Paired Market Maker (PMM). Quote YES and NO inside a wide spread so the pair sums to ~$1. To test it, count how often both legs fill vs only one. If single fills cluster before moves, it's a directional bet. Research, not advice. github.com/Polytutor-AI-Labs/polymarket-strategy-… t.co
@JaceThings Hey Jace, So i tried porting DiaTweaks to Windows but i only had a little success and most of the tweaks are not working with Windows version. So, here i am sharing the github repo with my findings and see if you can make it more compatible jinanshm/DiaTweaks-Win
Freenet Su telefono I finally managed to update it
100+ FREE Developer Tools You Need to Know! | GitHub Free-for-Dev #Shorts Stop paying for developer tools! 💸 Discover free domains, hosting, CI/CD, email services, AI APIs and more with this amazing GitHub repository. ⭐ GitHub Repo: ripienaar/free-for-dev%E2%81%A0 Part of 100 Days • 100 AI Repos – Day 03 Follow @ai.iyaz for more AI tools, GitHub projects and developer resources. #GitHub #FreeDeveloperTools #AITools #DeveloperTools #FreeResources #Shorts [bn] ১০০টিরও বেশি ফ্রি ডেভেলপার টুল যা আপনার জানা প্রয়োজন! | গিটহাব ফ্রি-ফর-ডেভ #Shorts ডেভেলপার টুলসের জন্য অর্থ প্রদান বন্ধ করুন! 💸 এই অসাধারণ গিটহাব রিপোজিটরিটির মাধ্যমে বিনামূল্যে ডোমেইন, হোস্টিং, CI/CD, ইমেল পরিষেবা, AI API এবং আরও অনেক কিছু আবিষ্কার করুন। ⭐ গিটহাব রিপো: ripienaar/free-for-dev%E2%81%A0 '১০০ দিন • ১০০টি AI রিপো – দিন ০৩'-এর অংশ আরও AI টুলস, গিটহাব প্রজেক্ট এবং ডেভেলপার রিসোর্সের জন্য @ai.iyaz-কে ফলো করুন। #GitHub #FreeDeveloperTools #AITools #DeveloperTools #FreeResources #Shorts [de-DE] 100+ KOSTENLOSE Entwickler-Tools, die du kennen musst! | GitHub Free-for-Dev #Shorts Schluss mit den Kosten für Entwicklertools! 💸 Entdecke kostenlose Domains, Hosting, CI/CD, E-Mail-Dienste, KI-APIs und vieles mehr in diesem fantastischen GitHub-Repository. ⭐ GitHub-Repository: ripienaar/free-for-dev%E2%81%A0 Teil von 100 Days • 100 AI Repos – Tag 3 Folge @ai.iyaz für weitere KI-Tools, GitHub-Projekte und Entwicklerressourcen. #GitHub #KostenloseEntwicklertools #KITools #Entwicklertools #KostenloseRessourcen #Shorts [es-US] Más de 100 herramientas GRATUITAS para desarrolladores que debes conocer | GitHub Free-for-Dev #S... ¡Deja de pagar por herramientas para desarrolladores! 💸 Descubre dominios, alojamiento, CI/CD, servicios de correo electrónico, APIs de IA y mucho más gratis con este increíble repositorio de GitHub. ⭐ Repositorio de GitHub: ripienaar/free-for-dev Parte de 100 Días • 100 Repositorios de IA – Día 3 Sigue a @ai.iyaz para más herramientas de IA, proyectos de GitHub y recursos para desarrolladores. #GitHub #HerramientasGratuitasParaDesarrolladores #HerramientasDeIA #HerramientasParaDesarrolladores #RecursosGratuitos #Resumen [fr-FR] Plus de 100 outils de développement GRATUITS à connaître ! | GitHub Free-for-Dev #Shorts Arrêtez de payer pour des outils de développement ! 💸 Découvrez des domaines, de l'hébergement, des services CI/CD, des services de messagerie, des API d'IA et bien plus encore, le tout gratuitement grâce à cet incroyable dépôt GitHub. ⭐ Dépôt GitHub : ripienaar/free-for-dev%E2%81%A0 Dans le cadre du défi « 100 jours • 100 dépôts d'IA » – Jour 3 Suivez @ai.iyaz pour découvrir d'autres outils d'IA, projets GitHub et ressources pour développeurs. #GitHub #OutilsDeDéveloppementGratuits #OutilsIA #RessourcesGratuites #Shorts [hi] 100 से अधिक मुफ्त डेवलपर टूल्स जो आपको पता होने चाहिए! | GitHub Free-for-Dev #Shorts डेवलपर टूल्स के लिए पैसे खर्च करना बंद करें! 💸 इस शानदार GitHub रिपॉजिटरी के साथ मुफ़्त डोमेन, होस्टिंग, CI/CD, ईमेल सेवाएं, AI API और बहुत कुछ पाएं। ⭐ GitHub रिपॉजिटरी: ripienaar/free-for-dev 100 दिन • 100 AI रिपॉजिटरी का हिस्सा – दिन 3 अधिक AI टूल्स, GitHub प्रोजेक्ट्स और डेवलपर संसाधनों के लिए @ai.iyaz को फॉलो करें। #GitHub #FreeDeveloperTools #AITools #DeveloperTools #FreeResources #Shorts [id] 100+ Alat Developer GRATIS yang Wajib Kamu Tahu! | GitHub Free-for-Dev #Shorts Berhenti membayar untuk alat pengembang! 💸 Temukan domain gratis, hosting, CI/CD, layanan email, API AI, dan banyak lagi dengan repositori GitHub yang luar biasa ini. ⭐ Repositori GitHub: ripienaar/free-for-dev%E2%81%A0 Bagian dari 100 Hari • 100 Repositori AI – Hari ke-3 Ikuti @ai.iyaz untuk lebih banyak alat AI, proyek GitHub, dan sumber daya pengembang. #GitHub #AlatPengembangGratis #AlatAI #AlatPengembang #SumberDayaGratis #VideoPendek [it] 100+ strumenti gratuiti per sviluppatori che devi conoscere! | GitHub Free-for-Dev #Shorts Smetti di pagare per gli strumenti di sviluppo! 💸 Scopri domini gratuiti, hosting, CI/CD, servizi email, API AI e molto altro con questo fantastico repository GitHub. ⭐ Repository GitHub: ripienaar/free-for-dev%E2%81%A0 Parte di 100 Days • 100 AI Repos – Giorno 3 Segui @ai.iyaz per altri strumenti AI, progetti GitHub e risorse per sviluppatori. #GitHub #FreeDeveloperTools #AITools #DeveloperTools #FreeResources #Shorts [iw] 100+ כלי פיתוח בחינם שאתם חייבים להכיר! | GitHub Free-for-Dev #Shorts הפסיקו לשלם עבור כלי פיתוח! 💸 גלו דומיינים בחינם, אחסון, CI/CD, שירותי דוא"ל, ממשקי API של בינה מלאכותית ועוד עם מאגר GitHub המדהים הזה. ⭐ מאגר GitHub: ripienaar/free-for-dev%E2%81%A0 חלק מ-100 ימים • 100 מאגרים של בינה מלאכותית – יום 03 עקבו אחרי @ai.iyaz לעוד כלי בינה מלאכותית, פרויקטים של GitHub ומשאבים למפתחים. #GitHub #כליפיתוחחינם #כליבינהאימטואלי #כליפיתוח #משאביםחינם #סרטונים קצרים [ja] 知っておくべき無料の開発者ツール100選以上! | GitHub Free-for-Dev #Shorts 開発ツールへの支払いはもうやめましょう!💸 この素晴らしいGitHubリポジトリで、無料のドメイン、ホスティング、CI/CD、メールサービス、AI APIなどを見つけましょう。 ⭐ GitHubリポジトリ:ripienaar/free-for-dev%E2%81%A0 100日間チャレンジ • 100のAIリポジトリ – 3日目 AIツール、GitHubプロジェクト、開発者向けリソースをもっと知りたい方は、@ai.iyazをフォローしてください。 #GitHub #FreeDeveloperTools #AITools #DeveloperTools #FreeResources #Shorts [ko] 꼭 알아야 할 100가지 이상의 무료 개발자 도구! | GitHub Free-for-Dev #Shorts 개발자 도구 비용 지불은 이제 그만! 💸 이 놀라운 GitHub 저장소에서 무료 도메인, 호스팅, CI/CD, 이메일 서비스, AI API 등을 찾아보세요. ⭐ GitHub 저장소: ripienaar/free-for-dev%E2%81%A0 100 Days • 100 AI 저장소 – 3일차 더 많은 AI 도구, GitHub 프로젝트 및 개발자 리소스를 보려면 @ai.iyaz를 팔로우하세요. #GitHub #무료개발자도구 #AI도구 #개발자도구 #무료리소스 #숏츠 [ml] നിങ്ങൾ അറിഞ്ഞിരിക്കേണ്ട 100-ലധികം സൗജന്യ ഡെവലപ്പർ ടൂളുകൾ! | GitHub Free-for-Dev #Shorts ഡെവലപ്പർ ഉപകരണങ്ങൾക്ക് പണം നൽകുന്നത് നിർത്തൂ! 💸 ഈ അത്ഭുതകരമായ GitHub ശേഖരം ഉപയോഗിച്ച് സൗജന്യ ഡൊമെയ്നുകൾ, ഹോസ്റ്റിംഗ്, CI/CD, ഇമെയിൽ സേവനങ്ങൾ, AI API-കൾ എന്നിവയും അതിലേറെയും കണ്ടെത്തുക. ⭐ GitHub Repo: ripienaar/free-for-dev 100 ദിവസത്തിന്റെ ഭാഗം • 100 AI Repos – ദിവസം 03 കൂടുതൽ AI ഉപകരണങ്ങൾ, GitHub പ്രോജക്റ്റുകൾ, ഡെവലപ്പർ ഉറവിടങ്ങൾ എന്നിവയ്ക്കായി @ai.iyaz-നെ പിന്തുടരുക. #GitHub #FreeDeveloperTools #AITools #DeveloperTools #FreeResources #Shorts [nl-NL] 100+ GRATIS tools voor ontwikkelaars die je moet kennen! | GitHub Free-for-Dev #Shorts Stop met betalen voor ontwikkelaarstools! 💸 Ontdek gratis domeinen, hosting, CI/CD, e-mailservices, AI-API's en meer met deze geweldige GitHub-repository. ⭐ GitHub-repository: ripienaar/free-for-dev%E2%81%A0 Onderdeel van 100 dagen • 100 AI-repositories – Dag 3 Volg @ai.iyaz voor meer AI-tools, GitHub-projecten en ontwikkelaarsbronnen. #GitHub #GratisOntwikkelaarstools #AITools #Ontwikkelaarstools #GratisBronnen #Kort [pa] 100+ ਮੁਫ਼ਤ ਡਿਵੈਲਪਰ ਟੂਲਜ਼ ਜੋ ਤੁਹਾਨੂੰ ਜ਼ਰੂਰ ਜਾਣਨੇ ਚਾਹੀਦੇ ਹਨ! | GitHub Free-for-Dev #Shorts ਡਿਵੈਲਪਰ ਟੂਲਸ ਲਈ ਭੁਗਤਾਨ ਕਰਨਾ ਬੰਦ ਕਰੋ! 💸 ਇਸ ਸ਼ਾਨਦਾਰ GitHub ਰਿਪੋਜ਼ਟਰੀ ਨਾਲ ਮੁਫ਼ਤ ਡੋਮੇਨ, ਹੋਸਟਿੰਗ, CI/CD, ਈਮੇਲ ਸੇਵਾਵਾਂ, AI API ਅਤੇ ਹੋਰ ਬਹੁਤ ਕੁਝ ਖੋਜੋ। ⭐ GitHub ਰੈਪੋ: ripienaar/free-for-dev%E2%81%A0 100 ਦਿਨਾਂ ਦਾ ਹਿੱਸਾ • 100 AI ਰਿਪੋਜ਼ - ਦਿਨ 03 ਹੋਰ AI ਟੂਲਸ, GitHub ਪ੍ਰੋਜੈਕਟਾਂ ਅਤੇ ਡਿਵੈਲਪਰ ਸਰੋਤਾਂ ਲਈ @ai.iyaz ਨੂੰ ਫਾਲੋ ਕਰੋ। #GitHub #FreeDeveloperTools #AITools #DeveloperTools #FreeResources #Shorts [pl] 100+ DARMOWYCH narzędzi dla programistów, które musisz znać! | GitHub Free-for-Dev #Shorts Przestań płacić za narzędzia dla programistów! 💸 Odkryj darmowe domeny, hosting, CI/CD, usługi poczty e-mail, API AI i wiele więcej dzięki temu niesamowitemu repozytorium GitHub. ⭐ Repozytorium GitHub: ripienaar/free-for-dev%E2%81%A0 Część 100 dni • 100 repozytoriów AI – Dzień 03 Obserwuj @ai.iyaz, aby uzyskać więcej narzędzi AI, projektów GitHub i zasobów dla programistów. #GitHub #FreeDeveloperTools #AITools #DeveloperTools #FreeResources #Shorts [pt-BR] 100+ Ferramentas GRATUITAS para Desenvolvedores que Você Precisa Conhecer! | GitHub Free-for-Dev ... Pare de pagar por ferramentas de desenvolvedor! 💸 Descubra domínios, hospedagem, CI/CD, serviços de e-mail, APIs de IA e muito mais gratuitos com este incrível repositório do GitHub. ⭐ Repositório do GitHub: ripienaar/free-for-dev%E2%81%A0 Parte de 100 Dias • 100 Repositórios de IA – Dia 03 Siga @ai.iyaz para mais ferramentas de IA, projetos do GitHub e recursos para desenvolvedores. #GitHub #FerramentasGratuitasParaDesenvolvedores #FerramentasDeIA #FerramentasParaDesenvolvedores #RecursosGratuitos #VídeosCurtos [ta] நீங்கள் தெரிந்துகொள்ள வேண்டிய 100+ இலவச டெவலப்பர் கருவிகள்! | GitHub Free-for-Dev #Shorts டெவலப்பர் கருவிகளுக்குப் பணம் செலுத்துவதை நிறுத்துங்கள்! 💸 இந்த அற்புதமான GitHub ரெப்போசிட்டரி மூலம் இலவச டொமைன்கள், ஹோஸ்டிங், CI/CD, மின்னஞ்சல் சேவைகள், AI API-கள் மற்றும் பலவற்றைக் கண்டறியுங்கள். ⭐ GitHub ரெப்போ: ripienaar/free-for-dev%E2%81%A0 100 நாட்கள் • 100 AI ரெப்போக்கள் – நாள் 03-இன் ஒரு பகுதி மேலும் AI கருவிகள், GitHub ப்ராஜெக்ட்கள் மற்றும் டெவலப்பர் வளங்களுக்கு @ai.iyaz-ஐப் பின்தொடரவும். #GitHub #FreeDeveloperTools #AITools #DeveloperTools #FreeResources #Shorts [te] డెవలపర్ల కోసం 100+ ఉచిత టూల్స్ మీరు తప్పక తెలుసుకోవాలి! | GitHub Free-for-Dev #Shorts డెవలపర్ టూల్స్ కోసం డబ్బు చెల్లించడం ఆపండి! 💸 ఈ అద్భుతమైన గిట్హబ్ రిపోజిటరీతో ఉచిత డొమైన్లు, హోస్టింగ్, CI/CD, ఇమెయిల్ సేవలు, AI APIలు మరియు మరెన్నో కనుగొనండి. ⭐ గిట్హబ్ రిపో: ripienaar/free-for-dev%E2%81%A0 100 డేస్ • 100 AI రిపోస్ – 03వ రోజులో భాగం మరిన్ని AI టూల్స్, గిట్హబ్ ప్రాజెక్ట్లు మరియు డెవలపర్ వనరుల కోసం @ai.iyazను అనుసరించండి. #GitHub #FreeDeveloperTools #AITools #DeveloperTools #FreeResources #Shorts [uk] 100+ безкоштовних інструментів для розробників, про які ви повинні знати! | GitHub Free-for-Dev #... Перестаньте платити за інструменти розробника! 💸 Відкрийте для себе безкоштовні домени, хостинг, CI/CD, поштові сервіси, API штучного інтелекту та багато іншого за допомогою цього дивовижного репозиторію GitHub. ⭐ Репозиторій GitHub: ripienaar/free-for-dev%E2%81%A0 Частина 100 днів • 100 репозиторіїв штучного інтелекту – День 03 Підпишіться на @ai.iyaz, щоб отримати більше інструментів штучного інтелекту, проектів GitHub та ресурсів для розробників. #GitHub #БезкоштовніІнструментиДляРозробника #AITools #ІнструментиДляРозробника #БезкоштовніРесурси #КороткіСторінки
折腾了好久,把「动效工坊 Pro」开源了。按 Claude Opus 5.5 那种审美搓的,多智能体跑分镜到 1080p。画面用代码渲的还行;配音是 Edge TTS,差点意思,正式用建议自己后期配。想试: [github.com/motion-craft-pro](songyuqiang55-create/motion-craft-pro)
@TokensAtHome I am releasing today stay tuned. I have c8 by ~150 tok/s 0xBakeer/TandemLLM
Mika (4.6k stars) is an Apache-2.0 Android agent that runs your apps and the web on a hidden background screen — no Mika server, data stays on the phone. #Android #AIAgents wangzan101/Mika
A letter to yourself, opened years later. Who you were, what you wanted, whether you got there. For over 10 years mine sat in someone else's database. So I built my own: timecapsule. Free, and encrypted on your own account. mdeligoz/timecapsule t.co
Humanizar funciona en 15 agentes, no solo en Claude Code. Lo he pasado a un binario en #Rust de menos de 2 MB con servidor #MCP. Motor nuevo contra el viejo en 7.650 textos: 0 diferencias. Lo he probado en Claude Code y OpenCode. Solo español. Gratis, MIT: github.com/marcmayol/drac-plugins/tree/main/plugi…
JCL でジョブを回し、エラーを直し、COBOL を動かす(IBM Z Xplore JCL1) > Series: IBM Z Xplore — Fundamentals + Concepts | Challenge: JCL1 | Beginner, Fundamentals | 60 minutes > Platform status: Completed (as of 2026-11-02) > Prerequisite: FILES1. Source: IBM Z Xplore official JCL1 challenge documentation, plus my own practice. JCL とは、一言でいうと JCL は厳密にはプログラミング言語ではありません。z/OS に対してタスクを記述する方法で、Job Entry Subsystem(JES)がリソースを集め、作業をスケジュールし、実行できるようにするものです。JCL をキッチンへの注文票、JES をその注文をどう処理するか決めるキッチンスタッフに例えると分かりやすいです。メインフレームでは、プログラムをただ「実行する」のではなく、ジョブをサブミットし、その出力を読んで何が起きたかを確認します。 パート 1 — セットアップとジョブの確認 1. ZXP.PUBLIC.JCL から JCLSETUP をサブミットしました。これにより、このチャレンジで必要なデータセット(自分の JCL データセットを含む)が割り当てられました。ここではシンボリック &SYSUID. が使われています。末尾のピリオドに注意してください。システムがこれを自分のユーザーIDに置き換えるため、誰でも同じジョブを使えます。2 回実行すると DUPLICATE データセットのエラーになることがあり、それ自体も良い学びです。 2. JOBS のフィルターを設定しました。所有者は自分のユーザーID、プレフィックスは *、ジョブIDは空白です。そこで JCLSETUP を見つけ、出力を開き、JESMSGLG で CC 0000 を確認しました。CC 0 はすべて想定通りに実行されたことを意味し、それ以外のコードは調査する価値があります。 3. 近道も学びました。サブミット後に VS Code の右下に表示されるポップアップメッセージから、JOBS ビューを探し回らずに直接ジョブ出力へ移動できます。ジョブは最初 ACTIVE で、ツイストを閉じて開き直すと状態が更新されます。 パート 2 — 初めてのコピージョブと、初めてのエラー 4. ZXP.PUBLIC.JCL から JCL1 メンバーを自分の JCL データセットにコピーしました。これから変更するためです。このジョブは IEBGENER ユーティリティを使い、JCL2 メンバーを自分のデータセットにコピーします。 5. サブミットすると CC 0012 になりました。ジョブログ(JES2:JESMSGLG)を見ると、SYSIN の DD 文が欠けていることが原因でした。IEBGENER には、SYSPRINT(メッセージ)、SYSUT1(コピー元)、SYSUT2(コピー先)、SYSIN(制御文、ない場合は DUMMY)が必要です。欠けていた DD を追加し、保存して再サブミットすると CC 0000 になり、新しい JCL2 メンバー(第 2 ステップによる JCL3 メンバーも)ができました。 ここでの基本用語は次の通りです。JOB はジョブを識別し、EXEC は実行するプログラムを指定し、DD(Data Definition) はプログラムと入出力データセットを結びつけます。JCL の DD 名は、プログラムが期待する名前と一致しなければなりません。 パート 3 — COBOL のコンパイルと実行、そして ABEND の修正 6. 自分の JCL2 を開きました。これは COBOL ソースをコンパイルし、結果のプログラムを自分の LOAD データセットに入れます。LOAD 内のプログラムはバイナリで、VS Code では表示できません。//COBRUN ステップがコンパイル、//RUN EXEC PGM=CBL0001 ステップがプログラムの実行です。 7. JCL2 をサブミットすると、チャレンジの予告通り ABEND(異常終了)になりました。今回は参照できるユーティリティのマニュアルはなく、COBOL コード自体がドキュメントです。//COBOL.SYSIN が指す COBOL ソースを開き、FILE-CONTROL セクションを見て、プログラムが使うファイル名と JCL の DD 名を比較しました。たとえば、プログラムの FIRST-NAME ファイルは、JCL の FNAMES DD 文に結びつけられています。 8. 原因は、1 文字足りないだけでした。プログラムが求めていたのは COMBINED なのに、自分の JCL2 の 27 行目には //COMBINE DD DISP=SHR,DSN=&SYSUID..OUTPUT(NAMES) としか書いてありませんでした。エディタで「FIX THIS ONE」と印がついていたのもこの行です。直し方は単純で、//COMBINED に書き換え、後ろにスペースを 1 つ足して桁を揃え、//COMBINED DD DISP=SHR,DSN=&SYSUID..OUTPUT(NAMES) にします。あとは Ctrl+S で保存し、JCL2 を右クリックして Submit Job を選ぶだけです。今度は CC 0000 になり、OUTPUT データセットの正しいメンバーに正しい出力が入りました。 !image-29.png ここから得た一般則は次の通りです。z/OS プログラムがデータセットと正しく動作するには、4 つが揃う必要があります。プログラム内部のファイル定義、DSN= で指定する実際のデータセット、正しい DISP=、そしてプログラムのファイル定義と名前が一致する DD 文です。 パート 4 — DISP、DUMMY、そして出力を完全に正しくする 9. JCL3 を開きました。これは複数のステップで IEBGENER を使い、順次データセットにレコードを書き込みます。コピー元データは、DD 文の直後にイン・ストリームで記述されており、DSN= ではなく DD * を使います。内容は時刻表で、ニューヨーク州ポキプシーからニューヨークのグランド・セントラル駅までの駅名と、ヘッダーおよび営業時間のテキストです。 10. DISP をきちんと学びました。第 1 フィールドは状態で、NEW(新規作成)、SHR(再利用、共有可)、OLD(再利用、排他的)、MOD(追加、なければ新規作成、順次データセットのみ)です。第 2 フィールドは正常終了時の処理(DELETE、CATLG、PASS)、第 3 フィールドは異常終了時の処理です。 11. DUMMY を学びました。これは「この DD は必須だが、今回は実際には使わないので、設定に時間をかけなくてよい」という意味です。IEBGENER は、出力が不要な場合でも SYSIN と SYSPRINT の DD を要求します。 12. JCL3 をサブミットすると CC 0000 になりました。しかし、CC 0000 は「壊れていない」ことを意味するだけで、出力が正しいことを意味しません。出力を見直すと、自分で入れてしまった重複が 2 か所ありました。まず Beacon - 59mi が 52 行目と 53 行目に続けて 2 回出ていました。直し方は、52 行目を残して 53 行目を丸ごと消すことです。48 行目の //BEACON EXEC PGM=IEBGENER は消してはいけません。あれはコードであって、重複したデータ行ではないからです。もう 1 か所は、//CORTLNDT のステップ自体が丸ごと重複していました。85 行目から始まるステップが、94 行目で一字一句同じ形で繰り返されていたのです。直し方は、最初の完全なステップ(85 行目から 92 行目)を残し、重複したブロック(94 行目から 101 行目)を全部消すことです。この 2 か所を直し、ヘッダーとフッターも正しくすれば、出力は 10 駅・重複なし、合計 23 行で JCL3OUT に入ります。なお、JCL3 を再サブミットする前には、毎回 JCL3OUT を削除しなければなりません。 !image-31.png !image-32.png 13. 最後に、ZXP.PUBLIC.JCL から CHKJCL1 をサブミットし、JCL2 と JCL3 の両方を検証しました。CC 0000 が完了、CC 0127 は戻って再確認する必要があるという意味です。 COBOL にとってなぜ重要か JCL がなければ、COBOL プログラムは本番環境では動きません。コンパイル、リンク、実行そのものが JCL で記述されたジョブであり、DD 文はプログラムの FILE-CONTROL と実際のデータセットをつなぐ橋です。JCL1 で学んだデバッグの流れは、今後のすべての COBOL プログラムで使うものです。サブミットし、ジョブログを読み、1 つ修正し、再サブミットし、完了コードだけでなく出力そのものを検証する、という流れです。 次回:USS1(完了するまでは概要のみ)。 --- --- 個人学習ブログ原文:CobolNote#5
Fun project by @maxencefaldor, who built a compiler, 'bricky', for LEGO® builds 🧱 It is really easy to use with agents 🤖 You can provide simple text instructions or images to build a model from. Code: maxencefaldor/bricky Docs: maxencefaldor.github.io Here is an example for Tokyo and its landmarks 🗼 This should be a lot of fun to play with in the context of ALife 🦎
Humanizar funciona en 15 agentes, no solo en Claude Code. Lo he pasado a un binario en #Rust de menos de 2 MB con servidor #MCP. Motor nuevo contra el viejo en 7.650 textos: 0 diferencias. Lo he probado en Claude Code y OpenCode. Solo español. Gratis, MIT: github.com/marcmayol/drac-plugins/tree/main/plugi… t.co
@badboy999654 it is a 2d canvas work: ChetasLua/moss-keeper
以前、C#版で画面上のローマ字を認識して高速自動入力するツールを公開しました。今回はGO版を公開します。 ⚠️ ご利用前に必ずREADMEをお読みください。公式サービスの利用規約を遵守し、許可された環境でのみご利用ください。 github.com/soso-kuri/susida-auto-GOedition/releas…
Mac 接普通鼠标,滚网页一格一格顿,长页面翻得眼累,为此花过 30 块。 Mos 开源,可调滚轮加速度曲线/每格像素/滚动方向,鼠标与触控板各存一套设置。 Caldis/Mos
Accelerating Computation and Resolving Extraneous Roots in the Kinetic Plasma Dispersion Relation Solver BO Xizhi Tian, Huasheng Xie, Long Wei arxiv.org [𝚙𝚑𝚢𝚜𝚒𝚌𝚜.𝚙𝚕𝚊𝚜𝚖-𝚙𝚑 𝚙𝚑𝚢𝚜𝚒𝚌𝚜.𝚜𝚙𝚊𝚌𝚎-𝚙𝚑] 💬Code: FusionAlpha/botian t.co
AI essays read like AI essays because the model skips the work: no question, no reading, one fluent draft. jp-essay forces the 9-step process, with a script stopping skipped steps. No model grades the prose, since models grading writing mostly reward overwriting. lucasbabur/jp-essay
Software developer in Ghana looking for an opportunity. The job search is honestly getting frustrating. I never imagined finding another software engineering job would be this difficult. I recently finished working with a software company in Ghana, and since then, I’ve been applying for jobs, reaching out to recruiters, messaging people on LinkedIn, and even completing technical assessments. Most times, it’s either rejection or complete silence. It’s honestly frustrating waking up every day, sitting at home, applying for jobs, and not knowing whether anyone will even respond. I have hands-on professional experience in software development, working with React, Next.js, Angular, React Native, TypeScript, Node.js, NestJS, Python, Go, Java/Spring Boot, PostgreSQL, AWS, Docker, Kubernetes, and other cloud and DevOps tools. I’m looking for a junior to mid-level software engineering role, whether frontend, backend, full-stack, cloud, or DevOps. I’m open to opportunities in Ghana and remote roles internationally. I’m not asking anyone to hand me a job. I just want an opportunity to prove what I can do. I’m willing to go through technical interviews, assessments, and a reasonable paid probation period. If your company is hiring, or you know someone I could reach out to, I’d genuinely appreciate a referral or connection. GitHub: github.com/Prosper41 At this point, even a conversation with the right person could make a difference. Thanks for reading.